Plant preparation
If the trip did not come as a surprise, it is better to prepare the plants in advance for the upcoming changes.
- Place in the shade to reduce evaporation. It also depends on the time of year, the presence of working heating devices and ventilation in the room.
- Remove affected leaves and inflorescences. Professionals advise partially thinning out healthy leaves, and be sure to remove not only blooming flowers, but also buds. This measure may seem cruel, but it will allow the plant to use water more economically.
- Wipe the leaves and spray them with a spray bottle.
- Place all flower pots in one place and cover the top with film, making several holes in it for air flow. An alternative to film can be a covering material - it is more porous, promotes air exchange and prevents the formation of mold.
- If you are placing flowers in groups, isolate diseased plants. In the immediate vicinity, even a banal fungus will quickly infect healthy neighbors.
- Immediately before leaving, all flowers need to be watered well. In rare cases, the plant is taken out along with the earth (a lump) and lowered into water, but not for long - so that the earth does not crumble.
Additional materials.
This homemade product was assembled from all sorts of rubbish that I managed to find in my shed. So, for example, carbolite legs were used from the Idas tape recorder, the isolation transformer of the protection device was used from the VEF 202 radio receiver, the power filter was used from the 3USTST TV, etc.
Therefore, even if someone decides to build something similar, he is unlikely to need my drawings. However, I publish them because I myself am always interested in other people’s crafts and technical solutions.
July 16, 2011 (12:21) in Do it yourself
Do-it-yourself capillary irrigation, watering on fabric
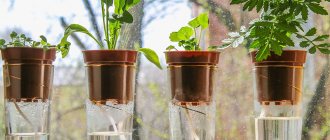
- An automatic watering system can be organized using a glass jar and terry cloth. Place a damp, wrung-out towel at the bottom of the tray. Place pots of flowers on it.
- Pour water into a glass jar, close it with a lid with a small hole made (10 - 15 mm). A 3-liter bottle with a nylon sealed lid is suitable. In my photo - a half-liter with a regular screw cap. Cover the hole with your finger, turn the jar over and place it upside down there, on this terry towel. You will see air bubbles rushing upward. Water will seep out little by little from the hole in the lid.
- Turn the jar of water over and place it on a towel next to the flowers.
- Once the towel is sufficiently damp, air will stop flowing into the jar and water will stop flowing out.
- Check: Wring out the towel and place the jar of water back on it. Air bubbles will appear and the process will repeat - this means the automatic watering system is working. (Without a towel, water will not flow out of the jar.)
- How much water will flow to the plants depends on the type of pots and drainage (see above - watering with a bottle), as well as the thickness of the towel. It’s worth checking 10 days before your vacation to see how this automatic watering system will work.
Enema balls
Externally, “enemas” look like spherical flasks with watering pipettes, which are filled with water and inserted into the pot. When the soil begins to dry out, oxygen enters the stem of the flask and pushes out the amount of water the plant needs. In general, “enemas” are a good option for automatic watering, but they do not dose water well and sometimes flood the plant.
IN THE PHOTO: Enema balls provide watering to the plant and look original in the container.
Capillary mat
The towel with the jar can be replaced with a purchased capillary mat for watering seedlings. The mat is pre-impregnated with water and pots of flowers are placed on top of it; a jar is not needed here. One square meter of capillary mat absorbs about three liters of water. The mat is covered with a film with many holes to reduce water evaporation and to prevent roots from growing from the pots into the mat.
Getting ready to leave for a few days, I made a capillary mat for seedlings with my own hands. Place a piece of terry towel on the bottom of the tray. I covered it on top with a thin film with holes. (Without film, the roots grow into the fabric.) I installed watered pots with seedlings.
- I folded thin cling film in several layers and made many holes, at least one for every square centimeter.
- Carefully unfolded and laid on top of the towel
- Now more details. The pallets were installed strictly horizontally, without tilting, so that the water did not flow to one side. Before laying, I moistened the towel from a measuring cup. (In order to know how much water it absorbs without forming a “swamp” in the pan.) I took pots with drainage holes at two levels: on the ledges and in the depressions of the bottom: the roots need not only water, but also air. A thick towel should not be folded in several layers, so as not to block air access to all holes.
- I placed a damp towel at the bottom of the tray, covered it with a film with small holes and placed pots with watered seedlings.
- I watched the plants for several days. I decided to add a layer of fabric, since the towel was thin and there was not enough water for 5 days. Before leaving, I watered the seedlings from above into the pots, poured measured amounts of water into the tray, distributing them in different places. The method works if all conditions are met.
What not to do
The only and main mistake a gardener makes when going on vacation is to flood the plants to capacity, hoping that this volume of water will be enough for them the entire time. As a result, root rot often develops. Or the soil simply dries out to the state of stone. It is very difficult, sometimes impossible, to revive such plants.
If you ask relatives and friends for a favor, be sure to leave them detailed instructions - what, when and how much to water. Those who have no experience in floriculture may decide with the best of intentions: the more water, the better for the plants.
Types of automatic watering
Creating automated irrigation does not require expensive equipment. Let's consider the main ways of organizing such systems.
Here we consider systems designed exclusively for watering indoor plants; also on our website you can study the issue of organizing automatic watering systems for your dacha.
Drip
This is the simplest “automatic waterer” that can be made from an ordinary plastic bottle. The algorithm is as follows:
- you need to take a two-liter PET bottle with a stopper, cleanly washed from the inside;
- cut the bottom with a knife to make a funnel. It will be needed for the convenience of pouring water;
- Make a small hole in the removed plug. It can be made with an awl or drill of the appropriate size (3–4 mm);
- A single layer of mesh or gauze should be placed over the neck to prevent clogging. The fabric itself is also wrapped around the thread;
- Next, the plug needs to be screwed onto the thread of the neck so that the fabric/gauze is fixed.
Automatic drip watering for indoor plants, prepared for use, is turned upside down with the plug. Then you can go in two ways:
- dig the bottle into the ground;
- hang it so that it barely touches the surface;
- All that remains is to fill the system with water, and the simplest automatic watering is ready.
Important: it is advisable to choose a bottle of such a capacity that it matches that of the flower tub or pot.
Method using a wick
A rope woven from fibers is capable of carrying water along its length. This curious physical property is also useful in irrigation.
How to make automatic watering for indoor plants using a wick:
- take a piece of rope that will become a wick;
- one end is lowered into the filled container;
- the second is brought to the plant;
- the wick will absorb water and transport it to the flower.
The wick rope can be fixed directly to the ground or inserted into the drainage of the tub. The first option is well suited for plants living on a light nutrient substrate, like violets.
It is advisable to select laces made of synthetic materials - they absorb and conduct water well. It is not recommended to use ropes made from natural fabrics: in the ground they quickly begin to rot, tear and cease to perform their function.
An important advantage of the wick system is ease of adjustment. If you raise the water container higher, the watering speed will also increase; if you lower it, it will decrease. Through experimentation, you can choose the optimal speed for an individual flower.
Important: if you transfer indoor vegetation to constant wick watering with a cord inserted into the drainage of the pot, you can do without laying a drainage layer.
Hydrogel or clay granules
This can be attributed to modern and high-tech methods. Containers or protruding bottles placed around flowers look ugly and unaesthetic, but hydrogel allows you to do without them. It consists of balls of a special material or granulated clay - they can be purchased at home and garden stores.
These substances quickly absorb water and gradually release it to the soil as it dries.
When laying hydrogel/clay for automatic watering, it is important to consider that after absorbing water they greatly increase their volume.
You need to choose a spacious and wide flower pot. A layer of the selected material is poured onto its bottom, and a plant with a lump of earth is placed on top. The free spaces between the walls of the tub and the lump are also filled with an absorbent substance. After watering, it will be enough to periodically add water, the hydrogel or granules will do the rest.
Important: after watering, the pot should be covered with film. This is done to avoid rapid evaporation of moisture.
The materials in question are reusable: they can withstand many watering-drying cycles, and such automatic watering of flowers can last for many years.
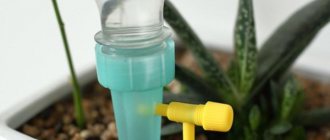
Automatic watering system from a medical dropper
Gardeners often use drippers to create “automatic waterers” in greenhouse beds. With the same success, these medical products can be used for indoor flowers.
This homemade automatic watering for indoor plants is somewhat similar to wick watering:
- the system tube is taken. A weight is attached to one end of it - it is needed to prevent floating;
- the second is fixed at the roots of the flower above the ground;
- a vessel filled with water is placed above the pot;
- then the end of the dropper tube with a fixed weight is lowered into it;
- the system opens, and the rate of water flow is adjusted by the regulator.
Watering with flasks
In stores you can buy colored plastic cones of various shapes with a long spout. They can not only become an effective DIY flower watering system, but also an original decoration.
The principle of use is simple: you need to take such a flask, fill it with water and insert the spout into the soil of the pot.
If the soil is damp, water will not flow out of the vessel. But when the soil dries out, it will allow oxygen to pass through, which will enter the flask and displace water. This is a very simple method of supplying liquid to plants using the laws of physics.
Capillary mats
This is a popular solution among gardeners. The capillary mat is a product of modern technologies for watering home gardens - a mat made of highly hygroscopic material. They absorb water well and effectively release it to the soil with planted vegetation.
To install automatic watering on mats, you need a couple of pallets of different sizes. Water is poured into the larger one. After this, a small tray is immersed in it, the bottom of which should contain perforations. A capillary mat is placed on the perforated bottom, and vegetation in need of watering is placed on it.
Another installation option, also somewhat similar to the wick one:
- the mat is laid on a flat surface (for example, a table);
- flower pots with drainage at the bottom are placed on it;
- the edge of the mat is lowered into a vessel filled with water;
- the material will absorb liquid and transport it to the greenery.
Pots with automatic watering
Enthusiasts often use automatic watering for indoor flowers based on advanced flower pots that provide the vegetation with water for about a month. Structurally, this is a container with a double bottom; You can simply use two pots of different capacities inserted into each other. Whatever the design, the principle is the same - double bottom.
Water is poured into the outer vessel. The inner one contains a drainage hole through which liquid enters the substrate. And from there the water is absorbed by the roots of the flowers.
Important: such a pot is not suitable for young house plants. Their developing root system is too short and is not able to “extend” to a depth sufficient to feed from the drainage layer.
How to use this device correctly:
- the bottom of the internal vessel is lined with a draining substrate;
- a young flower or other plant is planted on it in the prepared soil;
- The outer vessel is not filled with water at the first stage. The planted flower should be watered in the usual way, from above, until the root system gets stronger and reaches the drainage. As a rule, this process takes about two to three months - depending on the type of plant;
- After this, you can begin organizing automatic watering. The lower vessel of the flowerpot is filled with water: for this purpose, the product is usually equipped with a special tube and an indicator float. Water is poured until the MAX mark is reached;
- In addition to the last mark, there is also a MIN mark. When the float reaches it, it is necessary to repeat adding water. But you can postpone the procedure for another three to four days; the soil will still remain quite moist.
There are other ways to determine the dryness of the soil in a pot:
- on the float. It must be removed from the float chamber and wiped by hand. If drops of moisture are felt, add too early. If it’s dry, then most likely it’s time;
- using a wooden stick. Being stuck into the ground, it can either remain dry and clean, or stick to wet soil. In the first case, the plant needs watering.
How to organize the system yourself
You can do automatic watering for indoor plants yourself. There are several ways to create such structures.
What is needed for this
To build a self-watering system with your own hands you will need:
- mini-pump, preferably of higher power;
- hose to prevent sunlight;
- special inserts for connecting to the hose through which water will drip;
- timer - installed in a socket;
- faucets - they are used to create an extensive system.
It is recommended to purchase a hose first, and then a pump. Since the outlet of the latter is important, if it is wider than the hose, the water supply will be significantly lower.
It is necessary to make several cuts in the hose, the number of which depends on the number of flower pots. Droppers are attached to the holes. The watering time is set on the timer, and the pump is immersed in a reservoir of water.
Pros and cons of this installation
Advantages of automatic watering:
- correctly adjusted water supply of the required volume;
- reduction of labor intensity;
- reduction in consumption - the system supplies a given amount of water, maintaining an optimal balance of soil moisture;
- the ability to carry out irrigation in the long-term absence of the owner.
Flaws:
- purchased systems with software are more expensive;
- the electronic system depends on the household electrical network;
- cheap analogues are not durable.
The most important advantage of simple automatic irrigation is the ability to create such irrigation with your own hands, without the use of complex electronics.
Scheme
You can build automatic watering with your own hands in the following ways:
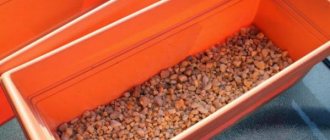
1. Double bottom of pots. To do this, place a 1-3 liter water container at the bottom of each pot. These can be bowls, cut plastic canisters, etc. In order to subsequently easily fill with water, a tube is installed in them in advance. The top is filled with gravel or pebbles and covered with cloth. Soil is poured on top of it, plants are planted, and then they are watered. If there is too much liquid, the excess comes out through the drainage hole at the bottom of the pot.
2. Wick system. To do this, you will need to make a wick from a synthetic material that will not rot with constant exposure to moisture. Immerse one end of it in water and the other in a container of water.
Pots with double bottom
A cheaper variety is plastic pots with a double bottom. Water is poured into a reservoir under the upper bottom and flows to the roots from below. I have these pots for large plants on the balcony. A convenient thing, especially in summer.
Do-it-yourself pots with a “double bottom”
Using the double bottom principle, I converted several ordinary 15-30 liter pots from scrap materials for balcony and garden plants.
At the bottom of the pot I installed a water container and a tube. Covered it with stones and gravel.
Place a 1-3 liter water container at the bottom of each pot. I used bowls, cut plastic canisters and other utensils. I installed a tube to fill the container with water.
I filled everything with gravel, broken bricks, pebbles - whatever I found. I covered the gravel with a circle of cloth to prevent it from silting up with soil. It’s better to take geofabric or a piece of nylon: it won’t rot and allows water to pass through better.
I poured soil on top of the fabric and planted plants. I watered it well on top, as usual.
Place a piece of cloth on top of the gravel
The water supply in the container at the bottom of the pot was poured into a piece of hose. When overwatering, excess water comes out freely through the drainage hole in the bottom of the pot.
I came up with everything myself, but I probably “reinvented the wheel”, it’s so simple. This self-watering functioned well. It was only inconvenient to pour water into the small hole of the tube.
You can water less often if
firstly, take high-quality, and not too light, soil from dried pulverized peat. You can “weight” the mixture with ordinary garden soil. Or make the mixture yourself, finding out the composition for a specific plant.
Secondly, when replanting potted plants, add perlite, vermiculite and/or silicate-based cat litter crystals (up to 4% of the soil volume) to the soil mixture. Place crushed volcanic lava and pieces of charcoal at the bottom of the pot. All this increases the moisture capacity of the soil without displacing air. I don't use hydrogels. There are reports of toxic breakdown products of hydrogels.
Place crushed volcanic lava and charcoal on the bottom of the pot.
Automatic watering for indoor flowers for the very busy or a little lazy
There is no desire to delve into all these subtleties of watering and caring for plants, but it still wouldn’t hurt to have a couple of indoor flowers to liven up the interior?
Then the most unpretentious plants will suit you. Some succulents or ferns, for example. Echeveria, lithops - “living stones”, nolina - “horse tail”, sansevieria, spathiphyllum, kalanchoe, zamioculcas can survive for a long time without water...
But even “living stones” need at least a little attention and water once or twice a month. For those who are especially forgetful, I would advise reading the instructions and adding reminders to your calendar or phone about moderate watering at the recommended intervals. Moreover, separately for winter and summer.
A modern option for automatic watering for indoor flowers
for the lazy, but not the poor - “Smart pot for plants Parrot Pot”. He does everything himself: measures humidity, temperature, light, nutrient content and, most importantly, waters when necessary from the built-in reservoir.
Moreover, when you go far and long, you can always use your smartphone to ask the smart pot how your ficus is doing. And the pot will send a detailed report... fantastisch!
Important Operating Instructions
For proper operation of the system, it is necessary to take into account:
- Micro-drip irrigation is best connected to the water supply, especially with a large number of plants. Otherwise, you will need to take a large tank.
- To irrigate several pots, it is recommended to use structures from a 2 liter bottle.
- If the automatic watering system does not have a soil moisture sensor, it is recommended to purchase it separately. This prevents the soil from becoming waterlogged.
What ready-made options are there on the market?
Gardening stores have a wide range of systems for automatically watering indoor plants. The following is a description of the most popular devices.
GARDENA 1265/1266
Fully automated system from German manufacturers. Equipped with a timer, pump, filter and hose system with a total length of 30 meters. Allows an even supply of water to up to 36 individual pots.
Characteristics:
- Capacity with a capacity of 9 liters.
- 12 outputs from 3 distributors.
- Pegs with water supply regulator.
- Supply hose length 9 m.
- The length of distribution lines is 30 m.
- Minimum irrigation time 1 min.
- Flow from 15 to 60 l/min.
- Possibility of regulating flow for each type of plant.
The system is suitable for owners of a large number of plants. The approximate cost of the model starts from 3,400 rubles. Read about Garden drip irrigation in this article.
DEWDROP
Model from Russian manufacturers . It does not have an electronic component, therefore it is completely independent of the electrical voltage in the network. Consists of main lines and emitters with a water supply regulator.
The system can be connected to a water line or tank. One set is suitable for irrigating a greenhouse or indoor plants in quantities of up to 50 pcs. The cost of the set is from 350 to 500 rubles. Read more about drip irrigation Rosinka here.
Characteristics:
- hose length 20 m;
- number of droppers 50 pcs.;
- water consumption up to 2 l/h;
- working pressure up to 1 bar.
“Rosinka” is completely independent of the container when operating. The main thing is to regulate the water flow and monitor its volume.
Argus
This model is a ceramic cone. Irrigation is carried out through the controlled flow of water from a container (plastic bottle) or using a hose from a container located at a distance.
Characteristics:
- Number of cones 2 pcs.
- Hose length 1 m.
- Water consumption up to 0.5 l/h.
- The ability to connect the cone to the neck of a plastic bottle with a standard diameter.
Ceramic cones are great for irrigation throughout the day. The approximate cost of the model starts from 350 rubles.
How to water flowers during vacation or business trip
In this case, a micro-drip automatic watering system, a flowerpot or a ceramic cone will be suitable. It is necessary to prepare for their arrangement in advance and check the system for correct operation. It is important that moisture is supplied as needed to prevent overdrying or waterlogging, which is detrimental to plants.
Top 5 ready-made systems (manufacturers)
Among the most well-known systems for automatic watering of plants are:
- Bug – .
- Water strider - from .
- A drop – .
- The harvest is from Tuboflex.
- The source is production.
Each of the systems operates on the basis of a drip tape (Bug, Drop, Harvest and Source) or a tube (Water Strider). For irrigation, a container of water or a pipeline (well) is used.
Automatic watering from plastic bottles
Many gardeners know how to set up a drip irrigation system from plastic bottles. The operating principle of this device is very simple:
- Take a container of mineral or carbonated water and, using a hot knitting needle or nail, make two holes: in the lid and in the bottom.
- The bottle is filled with water, turned upside down and secured above the pot or buried in the ground up to the neck.
The most difficult part of this job is adjusting the frequency of drops and calculating the volume of liquid needed for watering over several days. To do this, you need to measure in advance how much water will flow out of the bottle per day and check how well the soil mixture is wet. Depending on these observations, the diameter of the hole in the cap and the volume of the bottle are adjusted.
How can I check that the selected option works?
It’s good if you have the opportunity to test the effectiveness of the device you created and see the plant’s reaction.
Automatic watering, although done by hand, must correspond to the type of plant. For those who love moisture, your supply may not be enough, but for cacti there will be plenty.
If the water supply comes from below, you need to make sure that the soil is moistened to the level of the roots. Plants with short roots may never receive it. Soil moisture can be checked with the same wooden toothpick or skewer.
Monitor how quickly the water is used. A larger container may be needed. Or not one system, but two.
It’s good if after a few days someone can still check the condition of the plants. Water supply systems can become pinched or otherwise malfunction. Coming and looking at the flowers is not as troublesome as watering them thoroughly. As a last resort, during their absence they can be monitored through cameras connected to the Internet.
Switching power supply.
| R1 = 5E R2 = 560k R3, R6 = 43E R4, R7 = 22E R5, R8 = 1E R10 = 470E VD13-16 = KD510A VT1 = 13007 VT2 = 13007 IC1 = KR142EN8B | C0, C3 = 0.47 C1, C2, C7 = 2.2n C4 = 22.0 C5 = 22n C6, C8 = 47n C9, C11 = 0.1 C10 = 10.0 C12 = 47.0 VD1-5, 7, 8 = 1007 VD6 = DB3BL VD17 = AL307V VD9-12 = KD226 |
Transformer TV2 is wound on a ring ferrite core of grade 2000NM, standard size K28x16x9.
Winding I contains 2 layers of wire Ø0.35mm, wound turn to turn.
Winding II contains 17 turns of wire Ø1.0mm.
Winding III contains 23 turns of wire Ø.23mm.
Although a printed circuit board was laid out for the power supply, the main part of the parts and electrical circuit were borrowed from the electronic ballast of a burnt-out fluorescent light bulb (CFL). How to modify the CFL electronic ballast circuit is described in detail here.
The only significant difference in the presented circuit is the presence of a real input filter on elements C0-C3, DR1, which you are unlikely to find in an economical light bulb. The filter parts were used from an old 3USTST TV. The filter can be simplified by leaving only capacitors C1 and C2, but you need to keep in mind that they must be 5 kV. These capacitors, through the electrical network, ground the housing and circuit of the device at high frequency, which ensures the operation of the humidity sensor in conditions of interference created by a switching power supply.
Return to top to menu.
Operating rules
Using pots with an automatic watering system will not cause difficulties even for inexperienced gardeners, but to obtain a large amount of green mass throughout the entire period of flower growth, you need to know and apply the advice of experienced gardeners:
- mandatory use of drainage materials at the bottom of the pot and special soil that matches the type of flower;
- using the usual method of watering during the formation of the root system, which should reach the bottom of the pot;
- the watering tank should be filled only with settled water at room temperature;
- the amount of water should reach the maximum mark on the indicator.
The frequency of filling the container with water depends on the following factors:
- volume of container with water;
- type of plant;
- level of development of the root system;
- season;
- ambient temperature;
- level of light and humidity in the room.
Well-known manufacturers provide detailed information on operating the device and caring for plants in the instructions for their products.
Beginning gardeners should pay attention to those pots that are sold together with special drainage material, which makes it possible to ensure optimal water supply and quantity. A special drainage composition can be replaced with ordinary vermiculite, gravel and expanded clay
To carry out root feeding of a plant, it is enough to simply dissolve the necessary organic or mineral fertilizer in water, which is poured into a special tank.
Between each filling of the container, a certain amount of time must be allowed to dry the nutrient soil. This procedure will prevent rotting of the root system, and replacing the top fertile layer will avoid the development of fungal diseases.
The most popular pots are the well-known brands Xiaomi and Parrot Pot, whose products are of high quality and have a long service life.
Xiaomi flower containers and Parrot Pot have special sensors and electronic applications that monitor the condition of the flower and inform its owner about the need to water or feed the plant.
Innovative technologies and modern equipment allow manufacturers to produce products that greatly simplify human life. One of the latest innovations on the modern market is the “smart” flower pot, which is popular with both interior designers and ordinary indoor plant lovers.
The use of this device will fill any interior with bright, lush and beautiful greenery of indoor plants and will make it possible to create unique compositions that can consist of several different types of flowers.
Ceramic cones for automatic watering of indoor flowers
An effective, but not the most budget-friendly method of autonomous watering.
How the method works:
- Purchase ceramic cones at a flower shop or online. They are equipped with a sealed lid with an attached drainage tube.
- Before use, the device must be soaked in water for about half an hour so that the cone is saturated with moisture. The lid should be closed without removing the cone from the water, so that air does not get inside.
- The prepared cone is stuck into the flower pot along the “shoulders”, and the tube is lowered into a container of water.
- Moisture flows to the roots of plants as the soil dries. The cone is filled with water from an external container due to the vacuum formed inside.
- The lower the container is located in relation to the pot, the more moisture will flow into the ground.
This method of autonomous watering is good if the roots of the plant are not too tightly woven into the earthen ball in the pot. Otherwise, attempts to squeeze the cone will damage the root system and the plant will die.
Another drawback is the rather high price of the cones.
How to make automatic watering yourself
Ceramic cones can be replaced with thick wool threads or cords. One end of an improvised irrigation cord is placed in a flower pot, and the other in a container with water.
Popular articles Magic pills for sad thoughts
To prevent water from evaporating from the surface of the cord, it can be threaded through cocktail tubes.
Attention! The ends of the cord must remain free, otherwise the liquid will not flow into the pot.
If the automatic watering system is clogged
A large amount of minerals are dissolved in water (especially hard water). They gradually settle on the walls of automatic watering systems, which sooner or later leads to clogging.
Blockages in autonomous irrigation systems can also be caused by microalgae, which thrive in warm water.
To clean cones, they usually use soaking in a solution of acetic acid and mechanical removal of remaining deposits - a long and unpleasant process. To avoid it, you can use a 3% hydrogen peroxide solution.
This is a preventive measure. Peroxide prevents minerals from settling on the walls of the cones and does not harm plants. It is recommended to take at least 40 ml of peroxide per bucket of water.
Attention! Water filtration will help combat the development of microalgae.