How to make a flower stand with your own hands - overview of types, master classes on creation, photo ideas
Indoor plants not only serve as a beautiful addition to the decor of the room, but also saturate the air with oxygen. Lovers of indoor flowers sooner or later face a lack of space for new specimens. And then stands for flower pots come to the rescue.
You can purchase a ready-made design in the store. But a stand made by yourself will turn out to be more functional and fit much better into the interior. In addition, it will be a unique product.
Conclusions about the above information
Thus, to grow large, climbing plants with thin stems, it is necessary to use special supports and bush holders. Such designs are presented in stores in a wide range. Some people make their own support products. To buy in bulk or make a reliable and durable support with your own hands, it is important to know what requirements apply to supports. We also recommend viewing the article: Aesthetic design of garden beds and design of garden plots.
Types of stands for indoor flowers
Options for placing indoor plants suggest a wide variety of shapes and types of stands for them.
Depending on the size of the rack there may be:
- single,
- double,
- designed for a large number of pots.
Depending on the installation location, stands are divided into:
- floor,
- wall,
- balcony,
- for window sills.
Before starting work on making a flower stand, you need to calculate its size depending on the planned placement of plants. Then decide on the installation location. Then you can think over the design of the structure and choose the material for its manufacture.
Basic requirements for stand design:
- strength,
- sustainability,
- durability of the material.
When choosing a place to install a future stand indoors, it is important to remember that plants need enough light. In this case, the design should not clutter the room or greatly obscure the window.
It is the homemade stand that will be most convenient for lovers of indoor plants, because when making it you can thoroughly take into account all the small nuances.
To make a flower stand, you can use the following material:
Sometimes there are interesting combined options for racks. For example, wooden shelves on metal stands. The choice of solution depends on the imagination of the home craftsman and the needs of the housewife.
Wooden stands and racks are convenient, durable and environmentally friendly, but the material requires preliminary treatment to remove moisture.
Metal structures can withstand heavy weight and look original. In addition to pre-treatment, they require regular maintenance to avoid corrosion.
Glass products can be handled by a specialist and require careful handling. No more than two flowerpots with plants are placed on them.
Plastic coasters are easy to clean, but they are usually purchased ready-made.
DIY shelves and flower stands are the most convenient and cheapest. They are manufactured according to the needs to be placed in a specific location. Design ideas can be found on the Internet.
Manufacturing methods
You can make a functional and attractive stand for your favorite flowers with your own hands. Using the design you can decorate a window or wall. If your homemade stand will stand on a windowsill, be sure to take preliminary measurements. Manufacturing options depend on the selected material. Some stands will require scrap materials and a little time. To manufacture complex structures you will need special skills in working with tools.
Made of metal
A simple and convenient option looks like several parallelepipeds with 2 common faces. The work is labor-intensive and requires special skills. It is better if a man does the manufacturing. Pre-draw a drawing and mark all dimensions. For vertical supports you need to make 4 equal segments, and for horizontal edges - 8. From short parts you need to make squares or rhombuses using welding. It is important that they are the same, otherwise the stand will warp. Long posts must be used to connect geometric shapes. Then proceed like this.
- Weld a metal crossbar between the vertical posts. It should be at the same height as the next shelf.
- Make a rectangle out of metal. Dimensions are easy to calculate. The width should correspond to the distance between the vertical parts of the high stand, and the length is calculated according to the previous measurement.
- Cut 8 more small and 4 large pieces. Repeat the procedure. Connect the 2 tiers together by welding.
- Depending on your needs, you can make as many blanks as you want.
We recommend reading: DIY flowers from scrap materials: cotton pads and buds, egg trays, disposable spoons, burlap, thread and wire
From plastic pipes
The flower stand is quite attractive and easy to make. You can craft with your children. The product is suitable not only in the apartment, but also in the garden. You need to take plastic pipes, trim pieces, 2 pieces of regular hose, self-tapping screws (6 pcs.) and a screwdriver. Act like this.
- You need to make rings. Twist the pipe in a spiral so that 2 hoops are formed. To make the task easier, you can use an empty barrel.
- Remove the spiral from the mold and cut. You should get 2 rings.
- Connect the edges using a hose.
- On one ring, make 3 marks at an angle of 120°. Insert self-tapping screws into the holes.
- Make similar marks on the other ring.
- The legs are made of pipes. Cut it into 3 pieces of 40 cm in length.
- Make 3 plugs from the scraps and insert them into the legs.
- At the final stage you need to collect all the parts. Fold the first ring under the legs and screw it to each of them with a screwdriver. Place a second ring on the back of the pipes and screw it to the legs with self-tapping screws.
From plywood
The classic stand is well suited for apartments and houses. You need to take a shelf made of chipboard or PVC, plywood, thick rope, screws, plugs, paints and varnish for decoration, a screwdriver, drill, saw, hammer and screwdriver. For comfortable work you will need a level, tape measure, ruler and pencil. Make the product like this.
- Prepare the material. Calculate the size based on the free space. The width should match the size of the pot. Additional bars in the middle will help make the distance between the shelves the same.
- Drill 2 holes in each shelf with a drill. They need to be placed in parallel. The size of the hole should be such that a thick rope can pass freely.
- Pass the rope through all the holes. Form a loop at the top for hanging, and make a secure knot at the bottom.
- Install the stand. Drill a hole in the wall in the desired location and install the mount. Fix the stand firmly. The wall design is ideal for indoor plants.
From wire
Even a woman can make a structure, the main thing is to have experience in handling cold welding. For work, use welding wire with a diameter of 1 cm. Stock up on cold forging tools and a hammer (800 g). Make a stand like this.
- Draw a sketch, divide it into simple parts. Calculate all sizes. Be sure to consider the diameter of the round blanks for the pots.
- First of all, make a stand and stands. Duplicate the drawn parts with wire and secure with cold welding.
- Make decorative items. These can be various curls, spirals, leaves and flowers. If desired, you can use ready-made metal molds to create these parts. Simply drive the wire into the template with a hammer and remove the desired element.
- Attach all the decorative parts to the main homemade structure using cold welding.
From driftwood
Lovers of natural materials can make a stand from wood. You can use a cut trunk or branch, depending on the desired size. Act like this.
- Cut off any excess knots from the driftwood to create a cylinder. It is convenient to perform the procedure with a grinder.
- Set aside about ¼ of the total diameter of the deck from the ends. Make deep cuts to the depth of the flower pot.
- Cut or hollow out part of the wood between the cuts. Place the pot. This floor stand looks great in the interior.
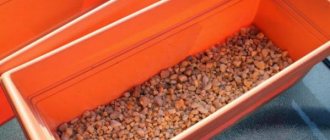
From plaster
It’s easy to make a product from such material and it won’t take much time. Gypsum is durable and versatile. The main thing is to purchase or make a mold for the stand. It is better to place the product indoors and handle it with care. You can use a suitable flower pot as a mold. You need to pour the gypsum mixture into the container and place another pot on top. There will be a hole inside into which you can insert a flower. Work with the solution like this.
- Pour water into the container and add gypsum in a ratio of 10: 6, respectively.
- Add 1 part slaked lime to all ingredients. The mixture will be more elastic in a liquid state and more durable after drying. The component can be found at any hardware store.
- Pour the solution into the mold and wait until it dries. The exact time is indicated in the instructions; on average, this will take 24-48 hours.
- Decorate the stand. If desired, you can make the plaster already colored. To do this, add gouache to the water while mixing.
From bottles
This stand can even be placed in the garden; it is not afraid of bad weather. A product from scrap materials can be made together with children. Take tape, PVA glue, a roll of toilet paper and a pack of paper napkins, 14 plastic milk bottles, and a roll of medium-thick twisted lace. You will also need some thick cardboard, gold-plated spray paint, and beads or seed beads. Make a stand like this.
- Use tape to wrap 12 bottles into 6 pairs.
- Use 3 pairs to make the bottom. Fold the bottles into a flower shape and secure with tape. Place 1 bottle in the middle so that the neck is 5 cm higher than all the bottles.
- Make another flower from 3 pairs of bottles, but without filling the middle.
- Place the second flower on the bottom of the neck of the bottle so that the middle wide part acts as a rod.
- Wrap the structure with toilet paper, pre-coating it with PVA.
- Lay several layers of napkins in the same way. After each layer you need to wait for the glue to dry.
- Leave the structure for 24 hours.
- Make a pattern on the surface in the form of flowers or something similar.
- Make leaves from a sheet of cardboard and glue them to the product.
- Decorate the flower stand to suit your taste. Finally, coat everything with a coat of gold paint.
DIY flower stands
The most affordable material for making a flower stand at home is wood. For work, you can use old shelves and unnecessary parts of home furniture.
Classic wall flower stand
In order to make such a design, you will need very little available material, tools and a little patience.
You need to prepare in advance:
- shelf or board made of wood or chipboard,
- a decorative element for connecting the structure (in this case, a strong tree branch of a suitable configuration),
- drill,
- saw or jigsaw,
- screws,
- paint,
- varnish,
- pencil,
- brush,
- roulette
Pergolas
Initially, the pergola had a very practical purpose and served as a support for grapevines with heavy, pouring bunches. Over time, this design, which came from the Mediterranean, has become popular all over the world and is increasingly of a decorative nature. Although at first pergolas were built as large canopies, now on our sites their sizes can change at the request of the owner.
Essentially, this is an open veranda, attached to the house or separate, in which some of the openings are filled with a thin lattice, beams, curtains, and the role of the roof is played by weaving plants. Building a pergola is quite simple - you need to make a wooden frame from a powerful beam, optionally covering some walls with screens or partitions. Then plant grapes, virgin grapes, clematis, climbing roses and other plants that winter in your area without shelter at the pergola supports. In a few years (provided there are mild winters), a real Mediterranean pergola will decorate your site.
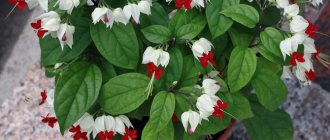
Why do you need a support for flowers and for what crops is it needed?
Support is required for many plants. For indoor types, it is a decorative and practical detail. Support is required for species with leaves that are not elastic enough to support weight, as well as with fragile and climbing shoots.
Support is required for:
- plants that form aerial roots (philodendron, monstera);
- plants with long shoots (stephanotis, dipladenia, jasmine);
- for tall plants (Araliaceae);
- for those plants in which all their beauty is shown only when they are tied up (ivy, cissus).
Only with support will these plants grow correctly.
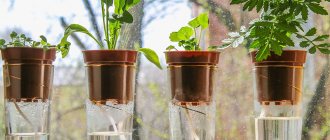
Stele supports
Steles made of metal rods, wire or plastic arches are most often used for planting hanging plants, such as petunias or nasturtiums with long stems. Moreover, flowers can be planted either at the foot of the stele, gradually entwining it, or in special flowerpots attached to the top or walls of the structure.
The easiest way is to make a pyramid-shaped stele from reinforcement with a diameter of 6 mm and thick wire, but having free time allows gardeners to make supports in the form of towers, Ferris wheels or spirals.
Requirements for support devices
The choice of a specific type of support must be decided before the plant is planted. The choice is influenced by the height and power of the shoots, the method and degree of attachment to the support.
Primary requirements:
- Reliability and durability. The support should hold the pot well and support the weight of the plant.
- There should be a uniform arrangement of the plant along the support.
- Practicality: the support should not be bulky, the plant should look beautiful and collected in it.
- Safety: the support must be made of natural, environmentally friendly materials.
- The support should have an attractive appearance.
If all requirements are met, the support will perform its functions to the maximum.
Column supports
They look beautiful and unusual, but the style is not suitable for every area. They can be hewn from stone, cast from concrete, carved from wood, but in any case they will look harmonious only in a classic English garden in front of a large stone house. If you have a standard 6 acres and a panel house, you shouldn’t experiment with columns.
Moreover, they are quite impractical; virgin grapes, bindweed, morning glory, and hops can curl on their surface, but roses or grapes simply cannot stay on a smooth vertical.
How to do it yourself?
Many types of supports can be made independently. This is more economical and allows you to make an option to your taste.
Made of metal
To make a metal support you need:
- Take any long cylindrical object and wrap it in a metal mesh.
- The edges of the mesh are tied together to form a pipe.
- The inner part is taken out.
- The pipe is filled to the top with moss.
- The support is placed in a pot and a plant is planted next to it.
Made of plastic
Plastic supports are suitable for large and heavy plants. For manufacturing you will need a polypropylene pipe. Support manufacturing process:
- The required amount is cut from the pipe.
- A thick layer of moss is wrapped around the pipe, moistened and tied with wire or fishing line.
- The support is then inserted next to the plant.
Plastic supports last a long time.
Made of wood
The main advantage of wooden supports is environmental friendliness . To create such a support, you need to take wooden sticks and stick them next to the plant. Some use special wooden gratings. They are called “trellis” and are bars crossed with each other. They look very stylish and beautiful. They are hung on the wall.
Such trellises do not allow the plant to grow in width. The plant stretches upward.
Bamboo for climbing crops
It is easy to make a support in the form of arcs from bamboo. The stick is inserted into the ground and secured with clamps. Such supports are suitable for large, short and long climbing plants. Bamboo rods are ideal for spreading plants.
The support is made as follows:
- Three or four bamboo sticks are tied in the middle.
- The rods are inserted during transplantation. If you insert them after transplantation, you can damage the roots.
- The stem or shoots are tied to a support. Do not tighten it too tightly so that the plant has the opportunity to grow further. The thread is first attached to a support, and then a figure of eight goes around the stem. This method allows the stem to develop in diameter.
From coconut
Coconut poles are the most environmentally friendly . They are invisible. To make a coconut support, you need:
- Take a plastic pipe and wrap it with coconut fiber.
- The coconut support is stuck into the ground near the plant.
Being near coconut fiber will be beneficial for the plant. The product looks aesthetically pleasing. If everything is done correctly, it will withstand heavy loads.
Thus, supports for some plants play an important role in their normal growth. You can make the support yourself. It's much more profitable than buying it in a store. For production you will need available materials and a minimum set of tools. Before starting work, you need to decide on the material.
Source
Rules for pruning house plants
When pruning indoor flowers, the following rules should be observed:
- The best time to prune is at the end of the dormant period. After pruning, plants can produce powerful shoots.
- After pruning, plants need good care. In many cases, increased air humidity is beneficial.
- Be patient. Most pruned plants look bad for a few weeks.
But after 2-3 months it’s nice to look at them again, although they have become smaller.
Radical pruning weakens a living organism. Therefore, you should not shorten the plant when replanting. Both at the same time can be beyond his strength.
Regular collection of wilted leaves and flowers should become a habit, as well as watering and fertilizing. This is necessary not only to make the plant look well-groomed, but primarily because wilted parts of plants can cause disease. First of all, they contribute to the appearance of mold.
Withered flowers on long stalks should be cut as low as possible, at the very base.
In some plants, such as Alpine violet (Cyclamen persicum) or Usambara violet (Saintpaulia ionantha), they simply come off with a sharp movement.
Withered flowers on short stalks growing on shoots can most often be torn off with your fingers.
Withered leaves are usually removed, as are flowers. It is somewhat more difficult to remove individual leaves that span the stem, as with Dieffenbachia .
In such cases, take a sharp knife, preferably a stationery knife (with a razor-like blade) and cut the sheet as low as possible. Let the remainder sit until it is so dry that it can be easily plucked off. There is a botanical term for the process of removing wilted leaves and flowers: “cleaning.”
Some plants tend to trail up. But they would look much better if they grew bushier and had more side shoots.
Trimming the tops can help here. This means that the tops of all shoots and only the top two or three leaves are cut off. You don't necessarily need scissors for this; you can pinch off the tops with your fingernails. You will have the greatest success with young plants that are still actively developing. Young plants obtained from seeds or cuttings should be topped several times during the first months. The optimal time to trim the tips of shoots on tall plants is the beginning of the growing season.
Flowering plants that are recommended to be pruned:
Bougainvillea.
Prune before dormancy in September or February/March - without sun the covering leaves will not color.
Allamada (Allamada cathartica) . In early spring, shorten long shoots by about one third - use the cut tops of the shoots as cuttings.
Hypocyrta glabra . In the fall, after flowering, shorten it, which promotes the formation of new shoots and tillering; in the winter, place it in a cool place to form color.
Passion flower (Passifiora caerulea) . Before transplanting in the spring, cut out 2-3 shoots - it grows best on trellises.
Grids
A chain-link mesh or plastic construction mesh is similar in principle to a rope support - it also needs a frame or an attachment point. Most often, a metal mesh serves both as part of a fence and as a supporting element for a hedge. Clematis, bindweed, peas, cucumbers and other soft-stemmed plants can easily climb thin twigs. But for grapes or climbing roses, the mesh will not be strong enough.
It is advisable to grow annual plants along the grid, which can simply be cut off in the fall, since it will be very difficult to untangle the stems from the cells, and it is almost impossible to lay the entire structure for the winter.
The supports of the mesh, dug into the ground to a depth of 70 cm, must be at least 1.5-2 m apart from each other, otherwise it will bend under the weight of the plants.
Hanging planters
You can make a beautiful hanging planter from scrap materials: scraps of eco-leather, thick threads for weaving macrame, copper pipes and even pieces of wood. The simplest option is a flower pot made from plastic straws. This is an affordable material that can be purchased at any grocery store. Select the tubes of the color you like and start creating the design.
Take a long cord and cut it into 100 cm pieces. Tie one large knot at the end of the threads to form a tassel. The next step is very simple - start stringing a short piece of plastic tube onto each thread - no more than 2 cm. After each tube, tie a knot and string a new layer. You will get a beautiful and unusual hanging structure.
PHOTO: greenmarket.com.ua To make the flowerpot fit well into an eco-friendly interior, use floral filler for pots, just don’t put it inside, but cover the outside of the flowerpot
For greater reliability of the structure, additionally attach several ribbons tied together to the flowerpot.
What NOT to plant in containers
Yes, in general, you can plant anything, BUT if you use decorative crops for 2-6 weeks, then you will have a container with flowers NAKED for most of the season.
For example, LILY. They look very beautiful during flowering, especially low-growing varieties, BUT this is only 2-3 weeks. What's next?
Or, for example, HOSTS. They look great as part of a shade garden in a floor pot. BUT you are unlikely to display such a container in the spring and at the end of August on the terrace or veranda. However, hostas really grow well in container planting.
But what about violets, or pansies? They look good immediately after planting, but quickly lose their appearance. It is possible to plant in VERY large containers, simulating the conditions of a regular open flower bed. They don't do well in small pots.
Another option for a VERY beautiful container with flowers...for 2 whole weeks! Such containers with tender anemones are used in urban landscaping in Europe. They are beautiful, no doubt about it. Afterwards, they are removed from the streets until next year and replaced with containers with summer leaves.
Berso
An option for the largest garden, literally a park on private territory, is berso. This ancient small architectural form came to us from France in the 17th century, where, with the help of frames and tree trimmings, they created long corridors in which both the wall and the roof were made of branches. The openwork elements of the frame itself made the berso decorative even in the cold season.
Of course, in a summer cottage such an element will look massive and take up all the free space, so it is better to replace it with a pergola or arch. But in a huge garden, you can plant several willows in 2 rows and install high metal arches around which to form a berso. True, you will need at least 7 years and experience in artistic tree trimming, but you can safely say that only you and the Upper Gardens of Peterhof have such beauty.
Diseases
Like other plants, hatiora is also susceptible to diseases. Let's find out why the plant withers, spots and plaque appear:
| Disease or pest | Symptoms | Treatment |
| Fusarium | The appearance of rot in certain areas, spreading to the entire plant. | Complete removal of affected areas. |
| Late blight |
| “Oxychom”: spraying with a solution – dilute 5 g of the drug in 2.5 liters of water, apply three times a day for 2 weeks. |
| Shchitovka |
| “Fitoverm”: spraying with a solution – 5 ml per 1 liter of water, three times every 7 days. |
| Spider mite |
| “Fitoverm”: spraying with a solution – 5 ml per 1 liter of water, three times every 7 days. |
| Mealybug |
| Single spraying with Aktara at a concentration of 4 g per 5 liters of water. |
| Few buds, no flowering |
|
|
| Wrinkling of segments | Dry air with sufficient watering. | Regular spraying. |
| Drying of segments, falling buds |
|
|
| The plant is withering |
|
|
| The plant hardly branches | Lack of nutrients. | Organize feeding. |
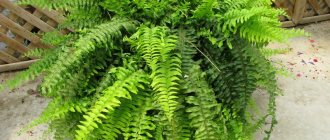
The stems of this flower can break off under their own weight, so they need support. They can be tied up, or you can create conditions for the flower to exist epiphytically.
Hatiora is a real decoration of the home, and caring for it is considered to be of average difficulty. This amazing plant will always delight its owners with its unusual appearance and beautiful flowering if you take care of it and create suitable conditions for it.
Macrame
What you will need:
- yarn, rope, or even an old T-shirt cut into strips (unless, of course, you decide to weave a rug out of it);
- scissors.
How to do:
The macrame technique is great for creating elegant hangings for plants in pots. The step-by-step master classes in the pictures below will help you master this simple technology.