Often during the holidays, flower lovers leave their plants for a long time without attention or care. It’s good when there are good neighbors or relatives who will periodically visit the apartment and water the flowers.
And if there are none, what should we do? There are ways to provide flowers with life-giving moisture and organize automatic watering for indoor plants . Let's look at the simplest and most popular ones.
Do-it-yourself capillary irrigation, watering on fabric
An automatic watering system can be organized using a glass jar and terry cloth.
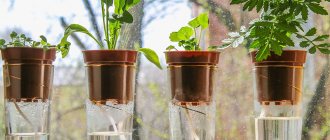
Place a damp, wrung-out towel at the bottom of the tray. Place pots of flowers on it. Pour water into a glass jar, close it with a lid with a small hole made (10 - 15 mm). A 3-liter bottle with a nylon sealed lid is suitable. In my photo - a half-liter with a regular screw cap. Cover the hole with your finger, turn the jar over and place it upside down there, on this terry towel. You will see air bubbles rushing upward. Water will seep out little by little from the hole in the lid.
Turn the jar of water over and place it on a towel next to the flowers.
Once the towel is sufficiently damp, air will stop flowing into the jar and water will stop flowing out.
Check: Wring out the towel and place the jar of water back on it. Air bubbles will appear and the process will repeat - this means the automatic watering system is working. (Without a towel, water will not flow out of the jar.)
How much water will flow to the plants depends on the type of pots and drainage (see above - watering with a bottle), as well as the thickness of the towel. It’s worth checking 10 days before your vacation to see how this automatic watering system will work.
Capillary mat
The towel with the jar can be replaced with a purchased capillary mat for watering seedlings. The mat is pre-impregnated with water and pots of flowers are placed on top of it; a jar is not needed here. One square meter of capillary mat absorbs about three liters of water. The mat is covered with a film with many holes to reduce water evaporation and to prevent roots from growing from the pots into the mat.
Getting ready to leave for a few days, I made a capillary mat for seedlings with my own hands. Place a piece of terry towel on the bottom of the tray. I covered it on top with a thin film with holes. (Without film, the roots grow into the fabric.) I installed watered pots with seedlings.
I folded thin cling film in several layers and made many holes, at least one for every square centimeter.
Carefully unfolded and laid on top of the towel
Now more details. The pallets were installed strictly horizontally, without tilting, so that the water did not flow to one side. Before laying, I moistened the towel from a measuring cup. (In order to know how much water it absorbs without forming a “swamp” in the pan.) I took pots with drainage holes at two levels: on the ledges and in the depressions of the bottom: the roots need not only water, but also air. A thick towel should not be folded in several layers, so as not to block air access to all holes.
I placed a damp towel at the bottom of the tray, covered it with a film with small holes and placed pots with watered seedlings.
I watched the plants for several days. I decided to add a layer of fabric, since the towel was thin and there was not enough water for 5 days. Before leaving, I watered the seedlings from above into the pots, poured measured amounts of water into the tray, distributing them in different places. The method works if all conditions are met.
Lechuza product quality
Self-watering pots “Lechuza” are containers from a popular German manufacturer. They are distinguished not only by their aesthetic design and functionality, but also by their high-tech production. To create its flowerpots and flowerpots with automatic watering, Lechuza uses only the best plastic. It is environmentally friendly, and therefore has a slightly porous structure and its physical properties resemble ceramic material. Nevertheless, it is the plastic base that makes the Lechuza self-watering pots truly durable, strong, practical, durable and wear-resistant.
The peculiarity of the flower pots of the German brand Lechuza is as follows:
- Mobility. The containers are easy to move because they have rollers or additional planting pots. Lightweight plastic material also does not create problems in moving a flowerpot or flowerpot.
- Lechuza self-watering pots are manufactured in accordance with all German standards. This approach ensures their long and high-quality operation.
- Thanks to a modern system, an innovative pot with automatic watering is able to supply water to home, garden and office plants for a long period of time - from 2 weeks to 3 months. The duration of automatic watering depends on the volume and size of the container used.
- The device of a flowerpot with automatic watering consists of several components that ensure its uninterrupted operation: an internal pot for the plant; drainage insert to obtain a water reservoir; mineral substrate for the development and nutrition of plants; water supply channel for filling water and fertilizing; water level indicator in the form of a float to monitor the residual volume; drain plug for using pots outdoors.
Do-it-yourself automatic watering of flowers
You can organize automatic watering for plants on the balcony yourself. There are many options for creating systems from scrap materials.
Drip irrigation
To create drip irrigation, you will need a small plastic bottle with a lid. Punch several holes in the lid in advance using a thick needle or awl. Fill the bottle with water and cover the neck with several layers of gauze or mesh. Screw the lid on tightly. Turn the container upside down and place it directly into the pot on the soil.
The number and thickness of holes is determined individually. It is better to try the method in advance in order to know for sure which holes will be optimal for watering a particular plant variety.
Wick watering
Also called the passive irrigation method. To set up the system, you will need a container for water and improvised wicks, which can be laces, ropes or threads of various diameters.
Place one end of the wick in a container of water and secure the other end in the pot with a peg. Water will be absorbed by the material and enter the soil thanks to the physical laws of pressure difference
Please note that the higher the water container is located, the faster the water will seep into the soil, so before leaving, conduct several experiments and select the optimal watering
Automatic watering from a medical dropper
The method is quite simple and common. To organize watering, you will need medical dropper systems with needles and jars of medicines, such as saline. As an alternative, you can use a regular plastic bottle. You will also need a tripod or thick wire to make it.
Action plan:
- Prepare containers and fill them with water.
- Build a tripod with a hook.
- Place a needle on one end of the system tube and pierce the lid of the container.
- Insert the other end of the dropper without a needle into the soil.
- Adjust the watering intensity using the slider on the tube.
- Hang the bottle on a tripod and leave it in that position until you return.
In this way, you can provide watering for the plant for up to two weeks.
Granulated clay or hydrogel
Special substances such as hydrogel or granular clay are good for uniformly moistening the soil in the pot. They are characterized by rapid absorption of water and its gradual, uniform release. Instructions for use:
- Prepare the substrate by filling the hydrogel granules with water in a separate container.
- Once they have swollen to the desired size, about 8 to 12 hours, pour a small layer into the empty pot.
- Place the flower along with the earthen ball on top of the layer.
- Sprinkle the soil with another layer of granules.
- Add water little by little as the balls dry.
When using this method, do not overfill the hydrogel granules, but only moisten them a little.
Capillary mats
Similar devices are sold in stores for gardeners and flower growers. The mat is made of a material that absorbs moisture well, and is covered with a protective film on top to prevent evaporation. To moisten the soil in pots during your absence, buy a capillary mat in advance and prepare 2 trays: one for water, the second with holes for installing pots. Similar containers can also be purchased in the store along with a capillary mat.
Procedure:
- Fill the prepared pan with water.
- Place the tray with the holes on the first one and cover the surface with a drip mat.
- Place the pots where the holes are located.
The material will take moisture from the pan and moisten the soil in the pots. In this case, the flowers will take as much water from the mat as they need for normal life. The device is inexpensive and does not require special skills to organize watering. The material can also be cut into strips and used as wick cords.
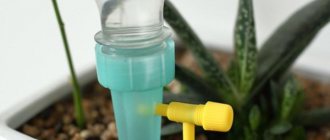
Cones and jars
For short-term watering, you can use special pedunculated pears, which are sold in gardening stores. There are a lot of design and color options, so you can choose a container that suits your interior. The device works quite simply. Pour water into the pear and place it in the pot. When the soil dries, dry air will flow through the stem and push out the liquid. Before using the method, it is worth testing it in practice, as some gardeners complain about excessive soil moisture.
Electrical circuit of an improved automatic plant watering machine.
| R1*, R3, R4 = 22.0 R2, R7 = 100k R5 = 5.1 R6, R8 = 12k R9, R10, R15, R21, R22 = 1k R11 = 470k(B,V) R12 = 30k R13 = 47k R14 = 24k R16 = 1.0M R17* = 6.2M R18-20 = 15k SA1 = MT-3 | VD1 = FD263 VD2, VD3, VD4 = KD510A VD5 = AL307B VT1, VT2, VT3 = KT3102 VT4 = KT973B C1 = 0.22 C2, C4, C7 = 10.0 C3, C5, C6, C8 = 0.1 DD1.2 = K561LE5 (CD4001A) FU1 = 3A M1 = 12V 2.5-3A |
So that any lady could use the machine after reading a few lines of instructions, the circuit had to be significantly improved.
Now, to adjust the machine, it is enough to insert the electrodes of the soil moisture sensor into the pot, the soil of which already requires watering, and set the resistor R11 to a position at which the VD5 LED will just start blinking. At this point, the setup of the electronic part of the machine can be completed. The regulator scale allows you to record the relative soil moisture values on paper.
How it works?
When switch SA1 is switched to the “Tuning” position, the photosensor and the pump starting circuit are blocked, and an additional pulse generator is turned on.
The pulses of the measuring generator are sent through the VD4 diode into the same measuring circuit, which controls the machine in operating mode. The setting is made using the VD5 LED indicator.
To simplify the transition to the setup mode, the “protective” timer circuit was also changed by adding element DD1.3 and timing circuit R5, C3.
Return to top to menu.
Operating rules
Using pots with an automatic watering system will not cause difficulties even for inexperienced gardeners, but to obtain a large amount of green mass throughout the entire period of flower growth, you need to know and apply the advice of experienced gardeners:
- mandatory use of drainage materials at the bottom of the pot and special soil that matches the type of flower;
- using the usual method of watering during the formation of the root system, which should reach the bottom of the pot;
- the watering tank should be filled only with settled water at room temperature;
- the amount of water should reach the maximum mark on the indicator.
Popular articles Congratulations on May 9
The frequency of filling the container with water depends on the following factors:
- volume of container with water;
- type of plant;
- level of development of the root system;
- season;
- ambient temperature;
- level of light and humidity in the room.
Well-known manufacturers provide detailed information on operating the device and caring for plants in the instructions for their products.
Beginning gardeners should pay attention to those pots that are sold together with special drainage material, which makes it possible to ensure optimal water supply and quantity. A special drainage composition can be replaced with ordinary vermiculite, gravel and expanded clay
To carry out root feeding of a plant, it is enough to simply dissolve the necessary organic or mineral fertilizer in water, which is poured into a special tank.
Between each filling of the container, a certain amount of time must be allowed to dry the nutrient soil. This procedure will prevent rotting of the root system, and replacing the top fertile layer will avoid the development of fungal diseases.
The most popular pots are the well-known brands Xiaomi and Parrot Pot, whose products are of high quality and have a long service life.
Xiaomi flower containers and Parrot Pot have special sensors and electronic applications that monitor the condition of the flower and inform its owner about the need to water or feed the plant.
Innovative technologies and modern equipment allow manufacturers to produce products that greatly simplify human life. One of the latest innovations on the modern market is the “smart” flower pot, which is popular with both interior designers and ordinary indoor plant lovers. The use of this device will fill any interior with bright, lush and beautiful greenery of indoor plants and will make it possible to create unique compositions that can consist of several different types of flowers.
Watch the following video about smart pots.
Principles of operation of flowerpots with automatic watering
If previously automatic watering was perceived as a luxurious “toy”, today pots equipped with automatic systems for regulating substrate humidity are slowly turning into one of the basic options for the full care of green pets. And whatever you call such containers - just pots with automatic watering, automatic flowerpots, smart pots - this does not change their simplicity from a technical point of view. An improved version of conventional containers solves the biggest problem and the most important task of proper houseplant care, and does it in the easiest way.
Automatic watering from a technical and technological point of view is a very simple device. In fact, this is a system of subsoil, capillary irrigation. Such pots work on the principle of communicating vessels, one of which contains water reserves, and the second is intended for planting the plants themselves. In fact, it is a double plant pot equipped with a special reservoir or a pot in which a separating barrier is installed.
Smart flowerpots can vary in design. Some pots have a cone-shaped water container, installed in the pot and connected to a tube with an indicator protruding above the surface of the pot. Others are made in the form of two vessels located one inside the other with or without a side reservoir-channel for replenishing water. Still others are collapsible structures: a special barrier-separator, an indicator tube and a reservoir for filling the lower part of the pot with water are inserted into the pot (they are supplied separately in disassembled form and are installed independently before planting the plant). At the same time, pots with automatic watering can provide for both bottom watering and water infiltration not only from below, but also from the sides of the earthen clod. The indicator is a “float” tube with marks of the maximum and minimum water levels, which are easy to navigate.
Image of a plant pot with an automatic watering system. lechuza
Some manufacturers, along with containers and collapsible systems for automatic watering, consisting of a special barrier for the pot, a filling reservoir and an indicator tube, also provide a special drainage mixture that ensures optimal water supply and dosing. But most automatic watering systems in pots work with the most common drainage, which is usually used for indoor plants - gravel, vermiculite, expanded clay, etc.
Saturation of the substrate with moisture occurs at the capillary level; water rises into the soil from the reservoir slowly and gradually, and most importantly, evenly. From the inner container, water penetrates into the substrate as it dries, depending on the rate at which the plant consumes moisture.
A double pot with a water reservoir, from which the plant itself actually consumes as much moisture as it needs, ensures very effective, balanced hydration of the substrate. Since the moistening process is regulated by the degree of moisture consumption and the plant’s needs for it, the risk of complete drying out of the substrate or, conversely, excessive moisture and stagnation of water, acidification of the soil is completely eliminated. And you can simply not be afraid of any mistakes, miscalculations, negligence, or the influence of temporary factors. The plants will not be harmed even in your absence, if the air temperature changes sharply, etc.
Pots with automatic watering system. lechuza
The only nuance in the operation of pots with automatic watering, which can be considered a disadvantage, is that the system begins to work only when the earthen ball is sufficiently filled with the root system, the roots of the plant reach the drainage layer and, accordingly, can “pull” water from the reservoir. If you plant indoor plants with a small root system in such a container, filling most of it with “empty” soil, you will have to wait until the root system develops and begins to “pull” moisture at the capillary level.
In the case of young plants planted in large pots, you will have to wait about 2-3 months after transplantation. All this time, pots with automatic watering are used as usual and watering is carried out using the classical method. Therefore, it is advisable to use smart pots for adult plants and not to increase the diameter of the container too much compared to the previous one. But there are also models with smart watering systems that work from the moment of planting (always check this parameter when purchasing).
Pots with double bottom
A cheaper variety is plastic pots with a double bottom. Water is poured into a reservoir under the upper bottom and flows to the roots from below. I have these pots for large plants on the balcony. A convenient thing, especially in summer.
Do-it-yourself pots with a “double bottom”
Using the double bottom principle, I converted several ordinary 15-30 liter pots from scrap materials for balcony and garden plants.
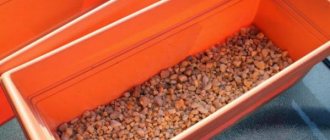
At the bottom of the pot I installed a water container and a tube. Covered it with stones and gravel.
Place a 1-3 liter water container at the bottom of each pot. I used bowls, cut plastic canisters and other utensils. I installed a tube to fill the container with water.
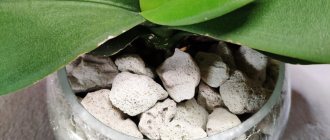
I filled everything with gravel, broken bricks, pebbles - whatever I found. I covered the gravel with a circle of cloth to prevent it from silting up with soil. It’s better to take geofabric or a piece of nylon: it won’t rot and allows water to pass through better.
I poured soil on top of the fabric and planted plants. I watered it well on top, as usual.
Place a piece of cloth on top of the gravel
The water supply in the container at the bottom of the pot was poured into a piece of hose. When overwatering, excess water comes out freely through the drainage hole in the bottom of the pot.
I came up with everything myself, but I probably “reinvented the wheel”, it’s so simple. This self-watering functioned well. It was only inconvenient to pour water into the small hole of the tube.
You can water less often if
firstly, take high-quality, and not too light, soil from dried pulverized peat. You can “weight” the mixture with ordinary garden soil. Or make the mixture yourself, finding out the composition for a specific plant.
Secondly, when replanting potted plants, add perlite, vermiculite and/or silicate-based cat litter crystals (up to 4% of the soil volume) to the soil mixture. Place crushed volcanic lava and pieces of charcoal at the bottom of the pot. All this increases the moisture capacity of the soil without displacing air. I don't use hydrogels. There are reports of toxic breakdown products of hydrogels.
Place crushed volcanic lava and charcoal on the bottom of the pot.
Automatic watering for indoor flowers for the very busy or a little lazy
There is no desire to delve into all these subtleties of watering and caring for plants, but it still wouldn’t hurt to have a couple of indoor flowers to liven up the interior?
Then the most unpretentious plants will suit you. Some succulents or ferns, for example. Echeveria, lithops - “living stones”, nolina - “horse tail”, sansevieria, spathiphyllum, kalanchoe, zamioculcas can survive for a long time without water...
But even “living stones” need at least a little attention and water once or twice a month. For those who are especially forgetful, I would advise reading the instructions and adding reminders to your calendar or phone about moderate watering at the recommended intervals. Moreover, separately for winter and summer.
A modern option for automatic watering for indoor flowers
for the lazy, but not the poor - “Smart pot for plants Parrot Pot”. He does everything himself: measures humidity, temperature, light, nutrient content and, most importantly, waters when necessary from the built-in reservoir.
Moreover, when you go far and long, you can always use your smartphone to ask the smart pot how your ficus is doing. And the pot will send a detailed report... fantastisch!
Scheme
You can build automatic watering with your own hands in the following ways:
1. Double bottom of pots. To do this, place a 1-3 liter water container at the bottom of each pot. These can be bowls, cut plastic canisters, etc. In order to subsequently easily fill with water, a tube is installed in them in advance. The top is filled with gravel or pebbles and covered with cloth. Soil is poured on top of it, plants are planted, and then they are watered. If there is too much liquid, the excess comes out through the drainage hole at the bottom of the pot.
2. Wick system. To do this, you will need to make a wick from a synthetic material that will not rot with constant exposure to moisture. Immerse one end of it in water and the other in a container of water.
Automatic watering with your own hands
No matter how many options for such systems exist, people often prefer to organize automatic watering of indoor plants with their own hands. The most common (old and proven) method is watering with a wick. A twisted strip of gauze or bandage, nylon fabric or woolen thread is lowered at one end into a container with water prepared for irrigation, and the other is placed in the soil of the pot and fixed there. The deeper the wick is dug into the ground, the better the moisture will flow. If you think about this when planting the plant, you can insert the wick from the bottom through the drainage hole.
A do-it-yourself automatic watering system for indoor plants is usually made from improvised materials. You can make it perfectly from plastic bottles. To do this, just make small holes in the lid, fill the bottle with water and place it vertically, with the neck slightly buried in the ground
It’s just important that it doesn’t turn over; it’s better to strengthen it in a vertical position. The size of the bottle depends on the volume of the flower pot and the duration of your absence
Usually a small bottle is inserted into a small pot, but a tub will require several large bottles.
Conventional medical droppers are very convenient to use for dosed delivery of water to flowers. If several pots are located nearby, you can arrange one reservoir for them by filling it with water and lowering the edges of the tubes fastened together there. It is convenient to use metal wire for weighting - it will help hold the tubes at the bottom of the dish. The water container can be some beautiful vase or just a large plastic bottle placed above the pots. The second edge of each tube is freed from the nozzle with a needle and lowered into the soil to the roots of the plants. Using the control wheel, you can perfectly adjust the desired rate of water flow to the roots.
Flower shops today offer granular clay or hydrogel, which are saturated with water and then gradually release it to the plants. Using them is simple - you need to place the plant when replanting so that there is a sufficient layer of these granules around the lump of earth everywhere (at the bottom, along the walls and on top). After watering from above, the soil is covered with film to prevent evaporation. This way the plant will receive as much moisture as it needs to live while the owners are away.
You can also use capillary mats. This is the name given to rugs made from a material that easily absorbs and retains moisture. Pots with plants are placed on them, and one edge of the mat is lowered into the water. Sometimes they are sold together with special trays: a large tray is filled with water, a smaller one is placed, a rug is placed on it and plants are placed. So, along the mat, as if through a kind of wick, moisture rises to the holes in the pots.
There is another way - a greenhouse. All pots with plants are placed on a tray or in basins with water, covered with film, thus constructing something similar to a greenhouse, inside which high humidity will be established. This way the flowers will definitely not dry out. This method has its drawbacks - it is not suitable for all plants, and “fluffy” leaves covered with villi can rot. A long time spent under the film will wean the plants from fresh air, then they will have to be gradually accustomed to it.
Regardless of which method you choose to water your plants, it is important to prepare them for host absence and reduce their water needs as much as possible. To do this, you need to cut off all the flowers and buds, drying leaves so that they do not weaken the plants
Popular articles Felt horse
Advantages and disadvantages
The problem with flowers left during the holidays cannot be solved necessarily with the help of automatic watering - there will almost always be people (good friends or neighbors) who will agree to briefly take on the responsibility of caring for the abandoned plants. Accordingly, it is worth assessing all the advantages and disadvantages of such a mechanism in order to understand whether it is better than people, and if so, in what ways. Let's start with the good.
Automatic watering is a mechanism that has no other worries; it should not refuse its owner. Previously, going on vacation, a business trip, or just to visit could become a certain problem, because not every person has friends who live nearby and like to tinker with plants. Thanks to simple technology, you don’t even have to look for them - automatic watering will replace all those who do not want or cannot help you.
If you are already fascinated by the idea of buying an automatic watering system, we hasten to inform you that everything looks interesting, but not as rosy as it might seem. Potential risks may seem exaggerated, but they are always present, so it is possible that in some situations a person is still better than even the most “smart” mechanism.
- Alas, automatic watering is just a mechanism, and any mechanism tends to break sooner or later. Any type of unit leaves a chance that it will not work - those in which water evaporates may end up in too cool conditions, and electric ones may end up without mains power or even burn out. A person, of course, can also be temporarily incapacitated, but this usually happens less frequently.
- With all the “smart” technologies, automatic watering still depends to a certain extent on human intervention. Firstly, it does not work endlessly - sooner or later it will run out of water, and then it will be of no use. Secondly, at best, it can be set up for regular irrigation, but the device itself, unlike a person, cannot respond to changing circumstances. So, with a sharp increase in air temperature, a person would think to intensify watering, and vice versa, but home automatic watering systems are not yet capable of this.
- A primitive self-watering system, assembled with your own hands, is often not a worthy solution for at least a few days of absence, and the purchase of an expensive industrial model, especially if there are quite a lot of flowers, can cost a pretty penny. If you don’t go out very often, then often it will be easier to thank your grandmother-neighbor than to introduce technology in your own home.
Do-it-yourself automatic watering of indoor plants
The most reliable way to preserve houseplants while the owners are away is to have a responsible person water them.
But there are other methods to get out of this situation: retain the moisture obtained with the last watering (this method can work for a maximum of 2 weeks and requires virtually no financial costs) or equip an automatic watering system.
There are many ways to create automatic watering systems, which are indispensable in the event of a long absence of owners. They can be both budget and quite expensive.
We retain moisture at the lowest cost
First, let's look at a way out of the situation at the lowest cost. This method is very simple, but it is advisable to use it only in extreme cases - it has too many disadvantages.
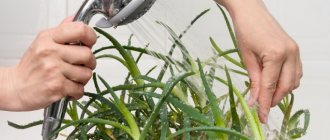
So, in order to organize the simplest moisture conservation system, you need to water the plants well, best by immersing the root along with the lump in water.
Remove pots from window sills: the weaker the lighting, the less moisture evaporates, and the less it is consumed by the plant. Of course, without light, growth will slow down and delicate plants may be depressed.
to reduce water consumption
Place all the pots closer to each other, preferably in one container - for example, in a bathtub or large basin. Place a five-centimeter layer of expanded clay on the bottom and fill it with water. We place the pots, placing pieces of wet sphagnum in between them.
Cover the structure with film. The most delicate specimens can be placed in individual greenhouses.
Keep in mind that when “under a hood”, plants with pubescent leaves (Saintpaulias, pelargoniums) can become moldy and rot.
For tips on creating automatic watering for indoor plants using pallets, see the video below:
The simplest drip irrigation
The system described above will be viable longer if it is provided with a source of moisture. You can make small holes in the caps of plastic bottles, turn them over and place them between the pots, ensuring that moisture seeps out drop by drop.
Bottles can be stuck directly into the ground. The capacity of each bottle is selected individually - 0.5 liters is enough for one plant, and for large plants in tubs, you may need several 2 liter bottles.
For rules for caring for stephanotis at home, read our material.
Why do calathea leaves dry out? You will find the answer to this question in our article.
Despite the simplicity and artisanal nature of this method, there are production devices that work on this principle.
Austrian Blumat irrigation systems, which can be purchased in our stores, operate on this principle.
System "Wick"
This is a well-known method - connecting to an irrigation system using improvised wicks made from any laces, ropes, etc. One end of the wick is lowered into a basin of water, the second is fixed in a pot (you can use an ordinary women's hairpin or a wooden peg).
The most reliable way is to pass the wick through the hole in the bottom of the pot before planting the plant. You can equip all plants with this system in advance if you are often away from home.
The material for the wick is needed in this case, synthetic is selected. Thus, water will flow into the ground due to the difference in capillary pressure.
Watch the video for a master class on making a self-watering system “Wick” at home:
Hydrogel and granular clay
Granular clay or hydrogel well saturated with moisture (buy at garden centers) is also used for automatic watering equipment. These materials have the ability to absorb large amounts of water and then release it little by little to plant roots as needed.
Lumps of clay in granules are placed in a separate pot (select a larger size), and then a plant with an undisturbed lump is transplanted into it and covered with a thick layer of clay (hydrogel) on all sides. Then the soil is covered with polyethylene.
Read about the features of caring for cyclomen at home in our material.
Find out how to plant and care for lavender in our article.
Plant preparation
Before organizing automatic watering, properly prepare the plants. To ensure that indoor flowers have enough automatic watering:
- Try to reduce the amount of evaporation from the soil. To do this, place the pots in a less lit place. The less light falls on the leaves and stems, the slower the plant will develop and, consequently, consume moisture.
- Check in advance to see if the plants have any pests or diseases, and, if necessary, treat the flower.
- Do not fertilize the soil at least 2 weeks before departure.
- Remove dried flowers, leaves and buds. This way the plant will spend less energy and nutrients.
- To maintain maximum humidity around the flowers, place the pots as close to each other as possible or place them in a large container with moistened expanded clay.
- Water the soil thoroughly before leaving. You can also use the method of immersing an earthen clod in water, depending on the variety.
- For compact species, you can organize a greenhouse by covering the pot with a plastic bag or bottle.
Irrigation system at the dacha depending on water supply
Water can be supplied to the irrigation system in one of the following ways:
- automatic;
- semi-automatic;
- mechanical.
Each method of supplying water to the root system of a plant has both its advantages and disadvantages.
The first option is carried out depending on the wishes of the owner and is set by a special program. In this case, the start time for watering is set or humidification sensors are installed, relative to which water will be supplied. You can buy such a system ready-made or organize automatic irrigation yourself.
When installing an automatic system, a self-priming pump must be used for watering a vegetable garden, house garden, or cottage, which pumps water from a container
When choosing a unit, you should pay attention to the frequency of engine adjustment and the possibility of a soft start. It is connected to an on timer that controls the operation of the pumping unit
When organizing automatic watering at your dacha with your own hands, you can purchase a socket with a timer, which involves daily or weekly irrigation. This system is most often used for sprinkling. However, it can be organized for other options. Wells, reservoirs located near the land plot, or a centralized water supply system can be used as water storage facilities.
The automatic watering system is convenient because it irrigates at a specified time and does not require much human effort.
Semi-automatic irrigation involves manually supplying water to the common pipe. Then the system independently distributes the liquid through the pipes, regulating its flow and pressure.
On a note! At any time, by changing the settings, you can switch from semi-automatic to automatic mode without turning off the water supply tap.
With mechanical watering, the moistening of the beds is controlled by a person who manually opens the watering tap at the dacha, selecting the required pressure.
Features of using drip tubes with external droppers
The drip tube is made of HDPE and is rigid and durable. It is produced without holes and is intended for self-installation of external drippers. The wall thickness of the product is 0.9-1.2 mm. The material is resistant to UV rays. The drip tube can withstand pressure up to 6 bar.
Drip tubes are rigid and durable and can withstand pressures up to 6 bar.
External drippers are used when organizing drip irrigation at a dacha individually for each plant. To ensure normal operation of the system, it is necessary to have high pressure in the network. These devices can be connected through thin hoses or connected directly to the drip pipe.
There are several types of external IVs. Compensated ones are used for uniform irrigation with a very long drip tape, as well as in areas with a slope. They operate exclusively from a pressure system. Less prone to contamination by small debris. Uncompensated devices are used with a short length of drip pipe and on flat areas. This option is used for gravity flow systems from a tank. They can operate at low network pressure. There are also dropper pegs that are used for spot watering. The product is installed in the root zone of the planting.
On a note! For drip irrigation of tomatoes, cucumbers, eggplants and peppers, it is advisable to use drip tubes with external droppers.
The advantage of such pipes is that you can independently choose the installation step and regulate the volume of water released. The disadvantages include the high cost of the product (compared to drip tapes), the labor-intensive and time-consuming process of cleaning the droppers.
Drip tubes are commonly used for watering tomatoes, cucumbers, peppers and other vegetables.
Types and their structure
Home automatic watering systems are divided into numerous types, which are united only by their purpose and common name. To understand what they all represent, let's look at the most common systems.
Microdroplet devices
This is the same irrigation system that is usually used in an outdoor garden, but in a slightly smaller form. It is used if there are a lot of plants in the house, and at the same time they are located compactly - in one room. Water is supplied either directly from the water supply system, or from a special plastic tank using a pump. The design usually involves the presence of an on and off timer.
Ceramic cones
This design option is the simplest, and it is this that folk craftsmen usually use in their creations. The idea is that water is supplied to the pot from an elevated reservoir, simulating a water tower - just enough moisture should be supplied from it so that the soil never dries out. Such a mechanism gets clogged quite easily, and it is difficult to calculate the exact position of the reservoir to supply water in the required quantity, but even very cheap ceramic nozzles are available for simple two-liter bottles, which provide watering for a month in advance at a minimum cost.
Double pot
In this case, the inner vessel plays the role of a classic pot, that is, it contains the soil and the plant itself, while the outer product is a water tank. The walls of the inner pot have small holes with a membrane that can let water through in limited quantities and only as the soil inside the vessel dries out
Pump.
As a pump, I decided to choose a centrifugal type pump. This is one of the simplest and most reliable pumps, which, nevertheless, can provide water lifting to great heights. I think it is clear that with such a scheme, the pump must create sufficient air vacuum in the pipe to lift water from the bottom of the tank.
Here it would be possible to use a submersible centrifugal pump like the one used in the Moskvich or Zhiguli car window washer, but such pumps have a relatively shallow immersion depth, which will not allow, for example, to lower it into an ordinary bucket of water. In addition, in our car market such a pump is very expensive - about $10.
But, on the other hand, you can buy a centrifugal pump from some foreign car for almost half the price. I found new pumps there for only $5 - $6. True, I was confused that they were all non-separable and somehow very Chinese. In addition, to secure such a pump it would be necessary to make a clamp.
But, I was lucky and I bought a used pump from some unknown car for only $3.3. It, located one meter above the surface of the water, lifts a liter of water to a height of two meters in less than one minute, even if there is initially no water in the hose. Simply put, the depth of the tank used and the position of the flowerpots are not limited in any way, unless, of course, you live in a castle.
To fasten the pump, I used one of my old ideas, namely the largest office clip.
Return to top to menu.
Ceramic cones for automatic watering of indoor flowers
An effective, but not the most budget-friendly method of autonomous watering.
How the method works:
- Purchase ceramic cones at a flower shop or online. They are equipped with a sealed lid with an attached drainage tube.
- Before use, the device must be soaked in water for about half an hour so that the cone is saturated with moisture. The lid should be closed without removing the cone from the water, so that air does not get inside.
- The prepared cone is stuck into the flower pot along the “shoulders”, and the tube is lowered into a container of water.
- Moisture flows to the roots of plants as the soil dries. The cone is filled with water from an external container due to the vacuum formed inside.
- The lower the container is located in relation to the pot, the more moisture will flow into the ground.
This method of autonomous watering is good if the roots of the plant are not too tightly woven into the earthen ball in the pot. Otherwise, attempts to squeeze the cone will damage the root system and the plant will die.
Another drawback is the rather high price of the cones.
How to make automatic watering yourself
Ceramic cones can be replaced with thick wool threads or cords. One end of an improvised irrigation cord is placed in a flower pot, and the other in a container with water.
Popular articles Magic pills for sad thoughts
To prevent water from evaporating from the surface of the cord, it can be threaded through cocktail tubes.
Attention! The ends of the cord must remain free, otherwise the liquid will not flow into the pot.
If the automatic watering system is clogged
A large amount of minerals are dissolved in water (especially hard water). They gradually settle on the walls of automatic watering systems, which sooner or later leads to clogging.
Blockages in autonomous irrigation systems can also be caused by microalgae, which thrive in warm water.
To clean cones, they usually use soaking in a solution of acetic acid and mechanical removal of remaining deposits - a long and unpleasant process. To avoid it, you can use a 3% hydrogen peroxide solution.
This is a preventive measure. Peroxide prevents minerals from settling on the walls of the cones and does not harm plants. It is recommended to take at least 40 ml of peroxide per bucket of water.
Attention! Water filtration will help combat the development of microalgae.
How to use self-watering pots
Flowerpots with automatic watering are becoming increasingly popular among the so-called “smart flowerpots”, which simplify plant care. Modern manufacturers strive to create qualitatively new products for the easiest and most convenient care of all types of plants.
With Santino pots, the root system of the plant is always protected from rotting, the drainage system collects excess water when watering and then feeds the root system of your any plant in a dosed manner, as needed, optimal growth occurs due to the fact that the roots are provided with air circulation. As a rule, the drainage system is drainage granules (gravel, expanded clay) - this is an inorganic substrate that can retain up to 40% of the volume of water and provide aeration of the roots.
Many people ask: How to use a self-watering pot? The answer is very simple! Just like with any other pot or flowerpot. Draining excess water from Santino self-watering pots is not difficult, since all Santino pots have a double body; you just need to remove the inside of the body along with the plant and soil. If your model of self-watering pot requires a special drainage cartridge, then before use you must remove the protective film.
Automatic watering system for Arte pot:
- Evenly distribute drainage granules (gravel, expanded clay) over the entire surface of the bottom of the functional insert of the Arte pot.
- Apply a sufficient layer of growing medium (soil) on top of the drainage layer. Place the plant in the pot and carefully add the required amount of plant substrate, gradually compacting it.
Automatic watering system for Asti pot:
- Evenly distribute drainage granules (gravel, expanded clay) over the entire surface of the bottom of the functional insert of the Asti pot.
- Apply a sufficient layer of growing medium (soil) on top of the drainage layer. Place the plant in the pot and carefully add the required amount of plant substrate, gradually compacting it.
- The water level indicator built into the body of the flowerpot will allow you to control the volume of water without unnecessary manipulation.
Automatic watering system for Latina pot, Latina Box:
- All pots in the Latina series already have a built-in drainage cartridge containing the innovative Ceramopon drainage granules; you just need to remove the protective film from the drainage cartridge.
- Apply a sufficient layer of growing medium (soil) on top of the drainage cartridge. Place the plant in the pot and carefully add the required amount of plant substrate, gradually compacting it.
- The built-in water level indicator will allow you to control the volume of water by watering through a special filler element in the body.
Automatic watering system for Deco pot:
- Evenly distribute drainage granules (gravel, expanded clay) over the entire surface of the bottom of the functional insert of the Arte pot.
- Apply a sufficient layer of growing medium (soil) on top of the drainage layer. Place the plant in the pot and carefully add the required amount of plant substrate, gradually compacting it.
Calipso pot self-watering wick system:
- If you have a lot of moisture-loving plants, the wick method of watering will be the best solution. Add a layer of plant substrate so that the wick is not pressed to the bottom of the pot (as shown in the video).
- The method is based on the capillary properties of a wick (a thin cord made of nylon, nylon or other well-wettable material). The higher the surface tension forces that arise at the boundary separating the liquid and solid phases, the better the capillary suction of the wick. As a result, it conducts water well. One end of the wick is lowered into the water, the other is brought out into a pot with a planted plant.
Self-watering from a bottle
This type of automatic waterer is the simplest; to make it you will need one plastic bottle. The volume is selected depending on the volume of the pot. For small flowers, a 0.5 liter container is suitable. It is done as follows:
Small holes are made in the lid; the intensity of watering will depend on their number and diameter.
Next, water is filled into the bottle.
Then you need to place the top of the bottle in the ground.
Another option for automatic watering
This kind of watering is quite simple to do, but has many disadvantages:
- Constant watering;
- Intensity cannot be adjusted.
Model rating
It is problematic to make an adequate rating of automatic watering models for indoor plants. Here, existing models often do not shine with fame, even if they are found in every home, and new designs appear every year, and each consumer needs something special, and not some average option that suits most other buyers. For this reason, we will not give away places, and we will not even claim that our automatic waterers from the list are definitely the best. These are just good samples of products that can be useful to every amateur gardener.
Idea M 2150 is a pear-shaped polypropylene analogue of a ceramic cone. For a large-scale home plantation, this solution is far from ideal, but for a single plant, and even if the owner is away for a short time, it is definitely the most profitable given its cost.
Automatic watering from plastic bottles
Many gardeners know how to set up a drip irrigation system from plastic bottles. The operating principle of this device is very simple:
- Take a container of mineral or carbonated water and, using a hot knitting needle or nail, make two holes: in the lid and in the bottom.
- The bottle is filled with water, turned upside down and secured above the pot or buried in the ground up to the neck.
The most difficult part of this job is adjusting the frequency of drops and calculating the volume of liquid needed for watering over several days. To do this, you need to measure in advance how much water will flow out of the bottle per day and check how well the soil mixture is wet. Depending on these observations, the diameter of the hole in the cap and the volume of the bottle are adjusted.
Review of ready-made drip irrigation systems, their characteristics
The Zhuk drip irrigation system from a domestic manufacturer is one of the most popular among gardeners. It can be connected to a centralized water supply or to a storage tank. If you use the latter option, the kit includes a level tube, through which you can control the amount of water remaining in the barrel. Manufacturers produce “Zhuk” drip irrigation systems for 60 plants and 30 plantings. Usually the device is equipped with a timer and a filter. You can additionally buy “Zhuk” drip irrigation, designed for 20 plants.
The ready-made drip irrigation system “Zhuk” is the most popular on the domestic market
“Kaplya” irrigation kits are equipped with emitter tapes with dropper pitches of 0.3 m. Thanks to the complex labyrinth of channels inside the dropper, the possibility of clogging is eliminated. The system is designed for an area of 25 m2. Can be connected to both a water supply and a storage tank. The controller is not included in the set.
A more reliable analogue of the Zhuk irrigation system is the Water Strider model, which is designed for drip irrigation of small greenhouses. The set consists of a 12 m long hose, a controller, 40 drippers and connecting elements. The system is organized for watering exclusively from the container, since the operating pressure in the network should not exceed 1 bar. The barrel is most often located at a height of 50 m.
The Belarusian drip irrigation system “Akvadusya” has several varieties suitable for watering areas of different sizes. It can be equipped with or without a controller, connected to a water supply or storage tank.
Drip irrigation "Urozhay"-1 is also produced with long-length emitter tapes. The system can be additionally equipped with a filter and automation. Another budget option is the Pomodor drip irrigation system with drip tubes, external drippers and a timer. The kit also includes special splitters to facilitate installation of the system. The most expensive model contains a controller and a submersible pump.
Scheme of operation of the drip irrigation system "Aquadusya"
The Istok irrigation system includes a 25 m drip tube with a pitch between droppers of 30 cm. The device is equipped with a filter and fittings necessary for connection to a storage tank. Some models are equipped with a controller and pump.
Today you can buy a drip irrigation system, which includes all possible elements. But such a solution requires significant financial costs. A more economical option is to create such a mechanism from ready-made components. In addition, you can make your own irrigation system for your dacha using scrap materials, such as plastic bottles and medical droppers. The choice depends on the nature of the territory, its area, the number and type of green spaces, personal preferences and financial capabilities of the owner.
Automatic watering for indoor plants from plastic bottles
How to make self-watering for indoor plants from plastic bottles while on vacation? Attention! Read to the end, you didn’t know about this method yet. I once saw this trick on the channel “Crazy Hands”
The author of the idea is E.Yu. Khramov.
Place flower pots in a tray, tray or bowl with a thin layer of water at the bottom. Place a plastic bottle of water there.
Place a flower pot and a prepared bottle of water in a tray or bath.
You must first make two small holes in the bottle with an awl or a thin nail. One - as low as possible, at the junction of the bottom with the side surface, the other - 1 - 3 cm higher. The plug is screwed tightly.
Make two holes in the bottle with an awl
Water from a bottle placed in the tray will pour out until the water level in the tray is at the mark midway between these two holes.
As soon as the plants absorb some of the water from the pan and the level drops, some water will flow out of the bottle again - the level in the pan will be restored.
Make sure the system is working by removing some of the water from the pan using a sponge or towel. Air bubbles will immediately begin to rise in the bottle, and some of the water will pour out of the holes.
Now the water is leaking out of the bottle and air bubbles are visible.
How to set up automatic watering for indoor flowers from a bottle
This automatic watering system is made very quickly. But it would be good to adjust it in advance.
What water level do you need? Let’s say 1 cm. In this case, we pierce the 2nd hole at a height of approximately 2 cm. The water level for most plants should be low, i.e. The water should just touch the soil at the bottom of the pot.
If the water level is too high for one of the plants, you can put something under the bottom of the pot. Or insert the plant into another similar pot with holes in the bottom, like the one in my top photo.
What kind of pots do you have, large or small? Are the plants fast growing or not so fast? How many days will the water last? You can, if necessary, put several bottles or a hard plastic canister.
When the water in the bottle runs out, the soil in the pots will remain wet for several more days. How many days for specific plants can be established in advance experimentally.
Is the bottom of the flower pot flat or ridged? Is there a drainage layer at the bottom or not? If there is a high side on the outside of the bottom of the pot and/or there is drainage from large pebbles inside the pot, then the water may not reach the roots of the plants when standing low. Then the water level must be changed: a second hole must be pierced higher.
Water will flow most abundantly into unglazed ceramic flower pots with a flat bottom without drainage or with drainage in the form of sand in the pot. But if both the bottom of the pot and the tray are very smooth and water does not penetrate between them, then you should put something under the pot: a couple of toothpicks or matches, for example.
Which plants are suitable for this method of watering on vacation?
Not all plants are suitable for heavy moisture, especially in winter: the roots can rot. My tradescantia and asparagus tolerated a long stay in a basin of water very well. This method of automatic watering is also suitable for begonia, calla lilies, anthurium, monstera, cyperus, indoor bamboo, calamus, hanging reeds, in short, for marsh and semi-swamp plants.
For plants with very moderate watering, it makes sense to cover the drainage hole in a clay pot at this time, for example, with plasticine. Water will very slowly be absorbed through the pores of unglazed ceramic as the soil dries.
Or organize a capillary method of automatic watering.
Basic types of irrigation
- DIY automatic watering for indoor plants
- Combined irrigation systems
- Smart automatic plant watering systems
DIY automatic watering systems for indoor plants are very easy to build, and the simplest ones use everyday items you probably have lying around the house, such as bottles, tubs, string and plastic bags.
At the same time, smart automatic watering systems solve your problem much easier and faster. Let's look at the difference between these approaches.
Types of systems
There are several types of automatic watering systems for indoor plants. They all do their job well, you just need to choose the right one.
Microdroplet systems
If there are a large number of indoor flowers collected in one room, it is advisable to use micro-drip automatic watering systems, similar to garden ones. The water supply comes from the central water supply, and the on and off time is controlled by a timer connected to the electrical network. The system operates completely autonomously, which is very convenient when the owners are absent for a long time. For an average collection of up to 30 plants, drip systems with a reservoir are suitable. A tube extends from the container to each flower, supplying water. it is connected to a dropper with a plastic or ceramic tip, which is buried in the ground.
The water supply in a conventional dropper is manually regulated. Rotate the wheel to adjust the watering intensity, for example, 10 drops per hour or 10 ml. Devices with a ceramic tip have the ability to control soil moisture and supply water when there is a lack of moisture.
Microdroplet system
Ceramic cones
Automatic watering for indoor plants is provided by ceramic cones, which are popular among gardeners. Outwardly, they look like ceramic “carrots” with plastic or rubber tubes. The “carrot” itself is placed in a pot, and the end of the tube is placed in a container of water. There is no control over the water supply here. It is supplied under pressure as soon as the soil dries.
As an alternative for a vessel with water, use a bottle with a ceramic nozzle. Simply attach the nozzle to a plastic bottle and place it in the pot. The device supplies the right amount of water and does not require attention. it’s convenient and economical, because a 2-liter bottle will last for a whole month. The use of porous, ceramic material ensures drip irrigation through the pores.
Ceramic cone
Enema balls
Externally, enema balls resemble spherical flasks with pipettes for watering. Water is poured into them and placed in a pot. When the soil dries, oxygen enters the stem of the flask and squeezes out the amount of water necessary for the flower. Enemas have worked well, but they also have a drawback - a poor dosage that “floods” the flower.
Enema ball
Self-irrigating pots
The design consists of 2 containers. One is internal for planting an indoor flower, and the other is deep for water. The soil will absorb water through capillary mats or special wicks located under the flowerpot. The mat or wick is saturated with moisture and transfers it to the flower pot. The pot has a water indicator, which allows you to accurately determine when to top up. The design allows you to avoid rotting of the roots from excess moisture.
Self-irrigating pot
Colorful cones
Original sprinklers were invented by domestic manufacturers - multi-colored cones that are filled with water, inserted into a thin stem and stuck into the ground.
As the soil in the pot dries, oxygen penetrates the stem, pushing out of the flask exactly as much water as the flower needs .
Ideal for watering house plants, as well as greenhouses, gardens, etc. This method has its advantages:
- practicality and originality of the solution;
- additional interior decoration;
- no threads, droppers, complex designs - everything is beautiful and simple.
Automatic irrigation system using capillary mats
Capillary irrigation using a towel is considered an effective option by gardeners, but there are special materials that absorb water well. To create an irrigation system, you will need two pallets. One of them is larger than the other. The smaller tray should have holes for drainage. Install the smaller tray into the larger one.
Pour water into a larger pan. A smaller tray is placed on top and its bottom is covered with an hygroscopic mat. Flower pots with plants are placed on top of the capillary material.