Houseplant lovers tirelessly test different irrigation methods to make caring for flowers easier.
The most effective options are especially appreciated, because at least once a year you plan to go on vacation. In the absence of moisture, only a cactus can survive.
The remaining crops die from the heat and increased dryness. The ideal option is to arrange wick watering of plants; how to do it is described in detail in the article.
Features of wick irrigation
Many gardeners love small plants that grow in small pots with loose substrate. Chirites, Saintpaulias, Achimenes, Episcias, Gloxinias and other flowers must be watered every other day. If you only have a few of these plants, then you can still cope with watering them. But if the collection is large or you have to go on vacation for a week, the problem of watering becomes quite acute. In this case, experts recommend paying attention to wick watering. This method provides water and all nutrients to the plant on time. The liquid rises along a synthetic cord to the roots of the plants. So, how to make wick watering?
Instructions
Algorithm of actions:
- We cut off the neck of the bottle, cut out a small square from the mosquito net and make a neat cut in the middle.
- We tie the thread to the mosquito net.
- We pass the thread through the cut neck of the glass bottle.
- We place the plant along with the soil in a bottle.
- Fill a 13-ounce glass with water and place a bottle with a plant in it.
This device will help solve the problem of timely watering of indoor plants once and for all. It is strictly not recommended to use thread that is 100% synthetic or polymer. But natural laces are also not suitable, as they quickly rot. The best option is a wick thread, which contains both natural and synthetic elements.
Advantages and disadvantages
Wick watering is used by many gardeners. This method of care has its advantages and disadvantages.
Pros:
- Watering plants is kept to a minimum: 1-2 times a month.
- Plants grow actively and bloom faster.
- The roots do not dry out, because they receive the required amount of water.
- You can leave home for a long period without worrying about your green home garden.
- Such plants bloom profusely, lushly and brightly, compared to other plants. Buds and flowers are larger.
Minuses:
- The vital activity of these plants proceeds faster, so their aging occurs faster.
- In a room with high humidity and air temperature below +18°C, there is a risk of developing fungal diseases and rotting of the root system.
What plants is it suitable for?
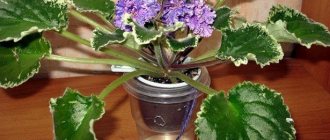
Most often, the irrigation method using a wick is practiced by lovers of indoor plants, for example, Saintpaulia. This crop does not require intermediate drying of the soil between irrigation activities, so capillary delivery of moisture on a regular basis is ideal.
Gloxinia, Achimenes, Chyritis, Episcia and Streptocarpus can be switched to round-the-clock humidification using a wick. These plants do not have a pronounced dormant period. In this case, it is important to observe an important condition: the air temperature in the room where the flowers are installed should not fall below 20°. Otherwise, the risk of root rot increases.
Important! If wick irrigation is organized in the cold season, when daylight hours are short, there is a need for additional lighting. It can be easily done using fluorescent lamps or special phytolamps.
Large varieties of Centopoly require a pot with a capacity of more than 8 cm. For such containers, wick irrigation is not suitable, as is the case for some varieties of violets (for example, Uzambara).
Growing plants on a wick in a soil mixture
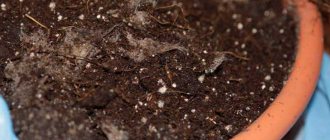
First of all, you need to choose soil that is suitable for a particular plant. To make wick watering for plants, it is necessary that 35-40% of its volume be occupied by perlite, which ensures looseness of the soil. You can apply fertilizers on the wick in the usual way, adding the solution in small doses, watering the soil from above. But make sure that fertilizers do not get into the water with the wick watering container. You can also use foliar feeding.
You definitely need to keep an eye on the plant. If the leaves begin to discolor or turn yellow, it is better to replant the plant in new soil.
How to water indoor violets - water preparation
The best option for watering garden and indoor plants has always been rainwater. In the absence of rainwater, it was recommended to use melt water. But when it comes to growing indoor plants in a metropolis, it becomes clear that rain and melt water will have to be abandoned immediately.
What remains is tap water, which is hard and unsuitable for watering plants due to the presence of chlorine. But since we have no other options, water for irrigation must be prepared in advance - boiled or settled.
If you don’t have many indoor plants, then you can boil the water, which removes most of the harmful impurities. After boiling, the water must be further acidified with citric or acetic acid.
If you use citric acid, then 5-6 crystals for each liter of liquid will be enough; in the case of acetic acid, add a tablespoon for the same volume of water. But don’t get carried away with “sour” watering; it is enough to carry them out once every 4-5 weeks, not more often.
If you know for sure that the tap water is quite soft, then it will be enough to pour it into a container and leave it for two to three days without covering it with a lid. During this time, chlorine is almost completely eroded, and the lime contained in the water settles to the bottom, so such water will not harm the plants with regular watering.
If you have various filters installed, then this is great, but even filtered tap water still needs to be defended
In addition, it is important to remember that regardless of the method of watering, the water must be at room temperature; it is strictly forbidden to water the plants with cold water
Growing in soilless mixture
Many gardeners also use the method of growing plants on wicks in a soilless mixture. In this case, the soil will consist of perlite and peat, taken in equal proportions. This mixture contains virtually no nutrients, so when wicking violets, all plants are grown in special containers with a nutrient solution. In this case, the following fertilizers are often used: Kemira Lux, Etisso, Pokon.
To create a nutrient solution, you must study the manufacturer's recommendations. For example, to make a nutrient solution from Etisso Hydro fertilizer, you need to use 3 ml of the product per 1 liter of water.
Fertilizers used
Use special fertilizers for violets:
- Agrecol NPK 9:4:5 - during the growth period and during budding and flowering (0.5 ml per liter of water);
- Fertika - 100 grams per 2.5 liters of water. Add to the solution during wick watering at a ratio of one teaspoon per liter of solution;
- Kemira Combi - 2% concentrated solution: 20 grams per liter of water. To obtain a 0.05% solution, dissolve 25 ml in a liter of water.
If the violet is constantly in the solution, it should have a concentration 3-4 times less than that specified in the instructions.
Wick cord
Having decided to make wick irrigation yourself, you need to pay special attention to the choice of cord. It must be made of synthetic material. This eliminates the possibility of rotting of the material.
The cord should conduct water well. To do this, just take a small piece of material and immerse its tip in water. It should get wet quickly.
For a flower pot with a diameter of 9 cm, you must use a cord with a diameter of 1.5-2 mm. The cord should be long enough to reach the bottom of the container.
After installing the wick cord, it is necessary to check how wet the earthen lump is during the first 2 weeks. Pay attention to whether the turgor of the plants changes or whether the water in the container decreases.
If the soil in the pot is dry, you need to install an additional cord. If the soil, on the contrary, is waterlogged, you need to observe the plant for several days. Perhaps you chose a cord that is too thick or the plant's root system is not very developed.
LiveInternetLiveInternet
What is “wick watering”? Wick irrigation is an irrigation method that uses the capillary properties of a cord, due to which water from a container under the pot rises along the wick and releases moisture to the substrate. As soon as the substrate dries out, the water “pulls up” again. As a result, the plant receives only the amount of water that it needs at a given time under given conditions. If conditions change (it becomes hot or cold, air humidity increases or decreases, the plant grows, etc.), then the amount of incoming liquid will also change to what your violet needs.
Of course, there are some disadvantages : 1. If the system is not designed correctly and the substrate is waterlogged, the roots may rot. However, even with normal watering, this phenomenon is by no means uncommon! 2. When over-watered, small flies may appear - sciarids (fungus gnats). However, since their larvae feed on decaying organic matter (leaf soil, etc.), the chances of getting them with regular soil mixture (and, accordingly, regular watering) are much greater. 3. Some people complain that when transferred to a wick, the violets become much larger in size. This is true if you leave them in ordinary 10-12 cm pots. However, wick watering requires a smaller container, and in a 5.5-8 cm pot, violets feel comfortable, bloom profusely, but the size of the rosette remains normal! 4. Many people worry that when a container with violets is on the windowsill, the water in the trays cools down and the plants drink cold water. Yes, this is a minus. But when you water each violet separately with warm water, then on the same windowsill the moistened earthen lump instantly cools down and the roots are in the cold substrate. That is, there is no difference in this case. The only way out, regardless of the method of watering, is to either insulate the windowsill or move the violets to a warmer place during the cold period.
What are the advantages of wick watering when used correctly: 1. Violets grow in the most comfortable conditions, without experiencing stress from overwatering or drying out; 2. Having found the optimal concentration of the fertilizer solution, you will not overfeed or underfeed the violets; 3. Growing violets becomes very easy: you don’t need to check every day to see if the earth ball is dry and run around with a watering can/pear/dropper to measure out the amount of water the plant needs; 4. In winter, due to the high dryness of the air, the top layer of soil dries out, but moisture remains inside. And you can easily flood the plant. Whereas with wick watering, the substrate is wetted evenly: the top layer dries out and moisture is immediately drawn from below; 5. You can leave violets for a long time (several weeks), for example, during vacation, and not ask your neighbor/friend/mother to water your pets; 6. It is very easy to root and grow a large number of violets, since you do not have to water each pot separately; 7. If it comes to rooting leaf cuttings, then you will not miss the moment of evaporation of water from the glass (also very important with a large number of violets); 8. Thanks to comfortable conditions, violets not only bloom more luxuriantly, but also bloom much earlier;
9. Violets love high air humidity, but it is quite difficult to provide it without special humidifiers. But with wick watering, water will constantly evaporate little by little from the reservoirs with the solution, which will create additional humidity in the air near the plant; 10. Mini-violets, which are grown in very small pots, can dry out literally within a day with normal watering, so wick watering is very convenient when growing them; 11. Since the food will come from the solution, and not from the soil, the pot needs to be small (even less than 1/3 of the diameter of the outlet), and this means a certain saving both on the amount of substrate and on the pots themselves (the larger the diameter, the higher the price); 12. With a small diameter of the pot, the rosette is small, but evenly developed. Energy is spent on flowering, and not on gaining green mass; 13. As a result, you will get healthy, well-developed, abundantly blooming violets, since with wick watering the plants receive all the necessary microelements from the solution, and the violet regulates the level of soil moisture itself.
We have been using wick watering since 2005 and have noticed that violets have begun to grow much better than when watered in a tray. Their leaves are clean (without traces of drops, which are almost inevitable with normal watering), and the head of flowers is much larger and denser.
How to organize such a wonderful system? Let's consider two examples - rooting leaf cuttings in sphagnum moss using wick irrigation and growing children and adult plants using wick irrigation. For both of them there are 3 common points : the wick, the solution and the container for wick watering.
The wick must be synthetic (cotton will rot very quickly) and be well wetted, that is, have capillary properties. This is a very important point, since not all synthetic cords are hygroscopic, so it is advisable to check this in advance (you can ask them to wet a small area right in the store). We cut the wick into pieces about 20 cm long. The thickness of the wick is usually small. For pots with a diameter of 4-8 cm, we use a cord about 0.5 cm thick. The most common misconception is that many people believe that the larger the diameter of the cord, the more the substrate is wetted. This is wrong! The fact is that the wick is just a “conductor”, and the “pump” is the surface of the substrate in the pot. Even simpler: water does not “enter”, but is “pulled up” according to the law of capillaries when the top layer of the loose substrate dries out. That is, the substrate will take exactly as much water as it needs. Do not forget that this only works with the correct substrate for wick irrigation (very moisture- and breathable). If you use a dense substrate, it will retain excess water.
The color of the wick does not matter, the main thing is that it does not color the water (otherwise it may affect the color of the leaves and flowers). Some people make wicks from used nylon tights. On the one hand, this is convenient, since they are almost always at hand, but, according to reviews, such wicks conduct water too well and the substrate becomes soaked. The main thing is that the end of the wick constantly touches the solution, and the bottom of the pot remains dry. The distance between the bottom and the water level is usually about 1-5 cm and depends on the length of the wick and the amount of water in the tray. What is important is not the length of the wick itself, but the distance from the water to the pot (there may be another half meter of wick lying in the solution - no big deal). This “air” section of the wick is a kind of “engine” of the entire system: when it dries out (and therefore the soil in the pot dries out), water, according to the law of capillaries, is pulled up into the pot. If you make this distance too large, then the wick will dry out due to its large length, and not because the soil has already dried... We use trays 7 cm high, which are about 6 cm filled with solution, with a plastic plate on top with holes on which cups or pots stand. The end of the wick touches the bottom of the tray, that is, the solution can be added quite rarely (depending on the number of pots, air humidity and other conditions).
To prepare the solution, you can use any water-soluble mineral complex microfertilizer. For many years we have been using Kemira Combi . In this case, we prepare a 0.05% solution . It is very convenient to dilute, for example, the entire pack (20 grams) in 1 liter of water and keep it closed away from children (so as not to confuse it with soda). And dilute as needed in the proportion you need! By the way, don’t forget to write on the bottle what’s in it and how to dilute it. For example, when diluting 1 package (20 grams) in 1 liter of water, a 2% solution is obtained. Take 25 ml (5 teaspoons) and dilute it in 1 liter of water - you get a 0.05% solution. Or 50 ml in 2 liters - the effect is the same. It’s more convenient for everyone - how many plants they have. Kemira solution can be stored for a very long time. If it precipitates, shake it and use it for its intended purpose.
The container for the solution - a container for wick watering - can be individual for each plant, or common for several. The first option has an undoubted advantage in that if there is some kind of nasty stuff in the water, then other violets will not be harmed.
However, we have been growing violets on trays for many years, from which 6-8 children, or 2-3 rosettes, drink. And we never had any problems. And it is much easier to add solution to several large containers than to many small ones.
Sometimes a green coating appears on the walls of the container with the solution - this is algae. There is nothing wrong with them - they do not affect the vital activity of violets. Perhaps the only negative is an aesthetic defect. But sometimes you can wash your containers/trays/reservoirs to remove the greens.
Another point is the greenhouse . Everything is simple here: if there is an opportunity, then it’s worth doing it - both the cuttings and the children will grow in much more comfortable conditions. If this is not possible, then its absence will at least to some extent be compensated by the evaporation of water from the trays and the correct humidity of the substrate in the pot.
Now let's take a closer look at the technology.
When rooting leaf cuttings in sphagnum moss using wick irrigation, you will need: Basics: 1. Live sphagnum moss; 2. Plastic cups (180-200 ml); 3. Correct wick; 4. Fertilizer type Kemira Combi; Additionally: 1. Marker or stickers (adhesive price tags); 2. Burning machine or wire/awl; 3. Scissors; 4. Blade or stationery knife; 5. Sticks for spreading leaves.
So, you need to make small holes in the cups so that you can thread the wick through it. We usually use a burning machine for this, but heated wire or a thick awl will also work. You can cut holes with a knife with a sharp tip.
The names of the varieties can be written with a marker on the cup or with a pen on adhesive price tags. You can also use a marker to label the coffee stirring sticks and place them in cups. It’s more convenient for anyone.
We cut living sphagnum moss into pieces of 2-5 cm (as it turns out) - this way it will be easier to separate the roots of the children from the moss itself.
By the way, don’t be surprised when, after some time, the chopped moss begins to grow - new green stems will appear. This is a very good sign, since living moss has bactericidal properties and thereby prevents the cuttings from rotting. Sometimes moss growth is so intense that you have to remove the excess to make it easier to plant the babies later! We are preparing a 0.05% solution of Kemira Combi, which our cuttings and subsequently children will drink. You can also root in clean water (before the babies form), but in our experience, when using a fertilizer solution, the babies appear faster. We pass the wick through the hole so that at the bottom of the cup we get a half-ring of cord, the rest remains outside. We place cut sphagnum moss on the ring so that it is about 3-4 cm in height, it can be slightly compacted.
For leaf cuttings of violets, we make a cut at an angle, leaving a petiole length of about 2-3 cm. Some prefer not to cut, but to break off the cutting - this is also the right option. If you are a beginner violet grower and are afraid that the cuttings will rot, then you can leave the petiole longer (so that you can trim it if necessary), but it is more convenient to root petioles that are not long. We insert a leaf cutting into the sphagnum so that the cut is covered with moss, but does not reach the plastic bottom. Many people recommend first dipping cuttings into Kornevin. We don’t do this (everything takes root well here anyway ), but, according to reviews, it really speeds up the process of root formation.
To prevent the leaf from falling (if it is large or, conversely, too small), it is advisable to prop it up with a special stick. The same coffee stirring sticks, broken or cut in half, are suitable for this. You can come up with something else, the main thing is that you should not use wooden sticks - they quickly begin to rot the leaf plates. It is best for each leaf to have its own glass (if one of the pair rots, the second one will not “get infected”, and the children will then feel more at ease). But in order to save space, you can place 2 leaves of the same variety in one glass. In this case, spacer sticks are simply necessary.
If the leaf plate is very large and does not fit into the cup, then you can safely cut the edges at a slight angle (as if parallel to the walls of the cup). For reliability, the sections can be sprinkled with crushed charcoal (if you don’t have charcoal, you can crush activated carbon tablets).
When all the leaves have found their homes, the cups need to be placed in a tray with the solution so that the wicks get wet and the moss is completely saturated with water. This is very important, because otherwise the system will not work. If you don’t have a tray, you can pour some moss on top. After this, the cups can be placed on the container for wick watering.
After about 10-14 days, you will see that the leaves seem to stand up in the cups and become more elastic. And if you pull them slightly, you will feel resistance. This means that everything is going well and the first roots have appeared. At this stage, you can do without backlighting. But babies will appear much faster if you organize additional lighting. The rate of formation of children varies greatly among different varieties and depending on different conditions, on average from 1 to 3 months and even longer. If the leaves sit for a long time without children, they need to be “stimulated” - cut off the top 1/3 of the leaf, and sometimes ½ if the leaf is very large. Do not forget that violets must be protected from drafts, and the optimal temperature for them is above 22 degrees.
Some leave the cuttings in the moss only until well-developed roots form, and then replant. We prefer the option when the leaves take root in the moss, produce babies, and the babies grow in the moss with wick watering to the age when they can be planted separately.
This is usually determined by the size of the baby (about 1/3-1/4 in height from the mother leaf) and the amount of green pigment for variegated varieties. By the way, after the separation of the firstborns, the leaf can be left in the sphagnum and it will give you another generation of children.
Now let's talk about growing children and adult plants using wick irrigation.
The only difference between leaves and babies is that for rosettes a wick mixture is used, in which there is no place for sphagnum. Also, according to our observations, you should not add soil to the mixture, as this will lead to rotting of the roots of children and adult violets (sphagnum and soil strongly draw water onto themselves). So, we use only soilless mixture . Usually we take 50% high-moor (red) peat and 50% perlite, vermiculite or a mixture of them.
You can also use a mixture of coco peat/substrate and perlite, since coconut fiber remains porous even after being saturated with water, which promotes active root formation and better plant growth. But don’t forget to rinse the “coconut” before using it – it contains quite a lot of salts. The soilless mixture for wick irrigation turns out to be very loose, moisture- and breathable, and thanks to this the root system becomes well and evenly developed. Place a turn/half turn of the wick on the bottom of the pot. We usually make the ring slightly smaller than the circumference of the pot.
Some people thread the wick through the entire thickness of the mixture, but this is not necessary: due to the looseness and moisture permeability of the substrate, the solution will evenly wet the entire mixture in the pot. Sometimes it is recommended to put some kind of synthetic material on the bottom so that the substrate does not spill out, but with a small diameter of the holes in the pot, the wet mixture will not go anywhere. Thus, we fill the wick on top with the substrate and plant the baby. No drainage is required for wick irrigation.
If, after separating from the leaf, you are left with very small children, there is no need to give up on them: be sure to plant them in a pot with the same mixture, and they will probably take root. In such a substrate, roots develop very quickly!
We place the pot on a tray with water so that the entire system is saturated with the solution. You can also thoroughly flush the system from above, but this is less convenient. You may have to sprinkle the substrate a little on top, as the water will cause it to settle a little. The main thing is not to deepen or fill up the growth point, otherwise the baby will die. After this, you can place the pot on a container for wick watering and add solution as needed.
Soilless substrate does not contain nutrients, so it is necessary to constantly use fertilizer, which will always be supplied to the plant through a wick. We use a 0.05% Kemira solution.
When wick watering with Kemira Combi solution, nutrients are supplied evenly, the plant does not experience stress from overfeeding/underfeeding. But don’t forget to monitor the condition of the plant. If it grows well, we don’t change anything. If the lower leaves turn pale and the plant becomes “skinny,” the concentration of the solution can be slightly increased. And if a reddish-whitish coating appears in the middle of the rosette, then the concentration must be reduced. No additional feeding is required.
Some violet growers sometimes “dry out” their plants (they do not immediately add the solution when it runs out). We never do this, and our violets feel great. By the way, as I noticed, lovers of soil mixtures rather than soilless substrates advise “drying”. And for them this is justified - because of the soil, the substrate gets too wet, and so that the violets do not rot, they have to be “dried”. With the right substrate this is simply not necessary.
Over time, when the baby grows up, roots may grow through the hole in the bottom of the pot along the wick.
There is nothing wrong with this; on the contrary, it means that the plant feels great. We usually leave everything as is. But you can carefully replant the violet. The main thing is not to try to free the old wick from the roots - you can damage them. Just cut off what can clearly be cut off, especially since this will stimulate the formation of important and necessary lateral roots, and plant the renewed root system in the pot again.
It is advisable to replant the violets once a year (not necessarily into a larger pot): this is done to renew the substrate so that salts and other nasty things do not accumulate in the soil. If a larger pot is not needed, then simply shake off the old substrate from the roots and add a new one to the pot!
Some people worry about the size of the outlet. To prevent violets from turning into “elephants,” the diameter of the pot should be minimal (we have both children and adult primroses, and sometimes re-flowering rosettes, live in 5.5 cm pots ). If you plant violets in large pots, the result may be “burdocks”! If for some reason the system stops working (for example, you forgot to pour the solution into the tray in time and the mixture with the cord dried out), you need to thoroughly pour the substrate or place it in a container with water/solution to soak, and everything will fall into place again!
If you want to transfer violets that grew in the ground to wick watering, then you need to remove them from the pot and, if possible, carefully remove the soil from the roots, but do not wash the roots. And only after that, transplant into the mixture for wick watering. After several days of adaptation, the violets will perk up and will only delight you! Some recommend that after transferring to the wick, water the plants only with clean water for a week or two. Of course, whether to put it on the solution right away or wait is everyone’s personal choice. But don't forget that we are planting in a completely soilless mixture, and it does not contain any nutrients. And in my opinion, it will be difficult for violets to come to their senses “on a starvation diet.” Therefore, when using a soilless substrate, we recommend immediately placing violets on Kemira’s solution.
Wick watering is very convenient and actually simple. If you are worried about the result, just start small: transfer a few not very valuable violets to the wick and watch them for a month. You may need to reduce/increase the concentration of the solution, remove the wick from the pot a little, or, conversely, add it. And when you find your optimal version of the system, you can safely transfer the remaining violets. They will thank you for this with their good health and lush flowering!
Author of the article and photographs: Marina Krutova, https://www.fialki-senpolii.ru/
Watering container
Containers for plants and for collecting water should be made of plastic. They are easy to clean and disinfect if necessary.
As a container, you can use a plastic disposable cup or a container with a lid with a hole. It is better to use transparent containers. So keep an eye on the water level.
A plastic tray with a grid can be used as a general container.
Some gardeners notice that green algae appears on the walls of the water container. They are not dangerous to the plant. Simply wash the container thoroughly.
How to properly place a cord in a pot
There are several ways to lay cord in a flower pot.
Some sources recommend laying the cord on the bottom, twisting it in a circle.
But experienced flower growers recommend stretching the wick diagonally.
You need to make a hole in the middle of the bottom of the flower pot for threading the cord. Pay attention to this, because most pot manufacturers make holes in the bottom on the sides. In this case, the soil wetting will be uneven, which means the root system will develop incorrectly.
If the wick is unevenly positioned, only one side of the plant will be able to receive moisture. For example, the roots of streptocarpus, if planted and positioned incorrectly, can dry out on one side, which will also affect its above-ground part. So the plant may die completely.
What does an organization need?
Wick irrigation technology uses the ability of the cord to absorb liquid from the container and saturate the soil in the flower pot with it. Plants receive the amount of moisture they need without the threat of soil waterlogging.
Wick requirements
The material used to make your own wick is a synthetic fiber cord. Natural fibers and fabrics are not used, as they rot quite quickly.
To ensure that the chosen material is suitable for making a wick, it should be moistened with water, allowed to dry and placed back into the liquid. If the cord immediately gets wet, you can safely use it to make a wick. If it does not get wet and floats on the surface of the water, then the material is not suitable.
Before laying in the pot, the cord is pre-moistened with water.
What should the soil be like?
To set up an irrigation system through a synthetic wick, a properly selected soil mixture is of great importance. It should be breathable, light, loose. To do this, equal parts of vermiculite, peat soil and coarse perlite are added to the soil for wick irrigation.
Before mixing, perlite and vermiculite are moistened with water until slightly damp, but not wet. The resulting soil is not nutritious enough, so for lush, long-lasting flowering of the rosettes you will need high-quality fertilizing.
Selection of capacity
A flower pot is selected with a small diameter: from 7 to 11 cm. If the holes at the bottom of the container are too large and the substrate spills out through them, they are covered with a piece of synthetic fabric. No need to use clay pots. It is recommended to choose light containers, since the design is quite heavy.
If a food-grade plastic container is used instead of a liquid reservoir, pour water into it, close it with a lid, and cut a hole in it for the cord. The pot of Saintpaulia is placed on top, the string is threaded through the hole in the lid, and then lowered into the water.
When using disposable plastic cups, lids are not needed. They are tightly covered with pots, and the solution does not evaporate. The distance between the bottom of the pot and the liquid in the glass should exceed 0.5 cm.
Wick or cord
A synthetic cord is used as a wick, since natural material undergoes rapid rotting.
The cord must have good water absorption.
The thickness of the cord is selected experimentally. Typically, for a pot with a diameter of 5 to 8 cm, a cord thickness of 0.5 cm is used.
When using wicks from nylon stockings or tights, the soil becomes soaked due to too much water absorption.
Features of wick irrigation
When planting a plant in a pot, never compact the soil. After all, air is as important for a plant as water. It is better not to use a large amount of high-moor peat as a planting mixture. After all, it will be quite difficult to wet it. How to wick water violets correctly?
It is better to use synthetic padding as a drainage layer. It is chemically neutral and conducts both water and air well. You can also use coarse perlite. The mesh at the bottom of the pot will prevent it from spilling out.
The plant will be able to absorb enough water if its root system is well developed. After transplantation, it is advisable to place the plant in a greenhouse for 2 weeks. After 1-2 weeks under normal conditions, it is better to keep the flower on regular watering. It is advisable that the liquid be in a pan so that the earthen ball does not become compacted.
For good development of the root system, you can use a solution of zircon or ecogel. Only a grown plant can be transferred to wick watering.
Different watering methods in winter and summer
Direct watering and watering through a tray
The most common way to water violets is the direct method using a watering can. There are some nuances to consider. Using a watering can, water is poured over the edges of the pot in a thin stream so that it does not fall on the rosette, leaves and flowers.
A watering can with a thin elongated spout or a syringe is suitable for this purpose. Water is poured until it begins to flow out of the drainage holes.
Another type of watering violets is watering through a pan. Water is poured into the lower pan, from where it is taken up by the roots. If too much water has been poured and it remains in the pan twenty minutes after watering, it is poured out.
This must be done to avoid rotting of the roots.
Immersion method
Today, the immersion irrigation method is not very common. The success of such watering depends on the attentiveness of the grower and the availability of the required amount of time. Some collectors use this method, especially when it is sultry outside.
Immersion watering is very easy. To do this, prepare a container of water where the flower pot is placed. The roots and soil take up water within ten to fifteen minutes. The leaves of the rosette should not touch the water.
It is worth monitoring the time carefully; you cannot keep the plant in this state for a long time, otherwise the soil will become saturated with an excessive amount of moisture. This method has a drawback: during irrigation using the immersion method, dangerous mineral salts accumulate in the substrate and are not removed along with the water.
To avoid problems with the flower when watering by immersion, the soil is occasionally washed with water.
They remain on the top layer of soil and turn into a crust. Petioles and lower leaves are injured during contact with salty deposits on the soil. To prevent such a situation, once a month the soil is spilled with warm water to remove excess salts.
Wick and drip irrigation at home
The wick method of watering is used by amateurs who do not have the opportunity or time to constantly water violets. When using this method, moisture is supplied to the roots using a so-called wick - a wet rope or tourniquet.
At the preparatory stage, you will have to spend a little effort, but then watering will occur practically without the participation of the grower.
To make a wick, choose a lace or rope made of synthetics. Bundles made from natural materials will rot in conditions of constant humidity.
The most suitable wick would be a synthetic rope or a piece of unwanted tights twisted into a rope. It should be borne in mind that the wick should be thin - approximately 0.15 - 0.2 centimeters.
At the next stage of preparation, containers for planting violets are selected. Any plastic pots will do. A pot with a diameter of nine centimeters is popular. This size is suitable for an adult specimen and will accept the wick perfectly.
Wick installation process:
| Step 1 | The rope is threaded through the drainage hole |
| Step 2 | A small loop is made at the bottom of the pot, touching the sides, which is sprinkled with drainage |
| Step 3 | The other end of the tourniquet is removed from the pot and left free |
| Step 4 | Prepared soil is poured into the pot |
| Step 5 | Place the violet and fill the voids with substrate |
Next, prepare a container for water. Any utensil will do. It is advisable that the water does not evaporate from it.
In between wick waterings, let the soil dry out a little.You can take a half-liter plastic cup. At the final stage, place the pot above the container with water and lower the wick into the glass.
Using this method, the violet can be provided with moisture for two weeks. Some gardeners do not immediately add water to the glass after it has run out. For two days they allow the soil to dry out a little, after which they resume watering.
Wick irrigation has its downsides: during the winter months, water on a cold windowsill can freeze or get cold. Cold water has a detrimental effect on violets.
Drip and wick irrigation operate according to the same scheme: water in small quantities is constantly supplied to the root system of the plant. Drip irrigation systems are sold in specialized stores.
When choosing a ready-made automatic watering system, the difference will only affect your budget
They are completely automated. With their help, water is delivered drop by drop to the plant through tubes with tips.
Reviews and recommendations from gardeners
Wick watering speeds up all life processes of plants. They grow faster, bloom actively and profusely, and age quickly. The soil must be changed frequently due to salt deposits that can be found on the edges of the flower pot.
Wick watering of orchids is also a successful practice. This method allows you to get abundant flowering of the plant in a short period of time.
There are flower growers who bring plants on a wick to the point of flowering, and then transfer them to normal mode. This way they can quickly verify that the varietal color is correct. If you decide to do the same, do not forget to replant the plant in nutritious new soil.
Feedback from gardeners allows you to avoid mistakes in growing plants. For example, it is recommended to leave the planting date at the bottom of the pot. This way you can determine when the plant needs replanting.
Wick watering of violets
Violet is a favorite of many gardeners. This plant is quite picky in terms of watering. Therefore, for many, wick watering of the soil is an ideal option. Fewer care problems, abundant flowering of your favorite plants.
So, let's look at the step-by-step stages of creating wick watering for violets:
- We select the correct cord.
- Prepare a container with a plastic lid, wider than the diameter of the pot.
- We pass the wick through the hole in the pot, after placing a piece of mosquito net on the bottom.
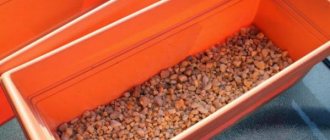
- Pour a layer of drainage (foam plastic, expanded clay, vermiculite).
- We lay out the cord in a circle along the diameter of the pot.
- We fill up the soil.
- We replant the plant.
- We close the container with a plastic lid, making a hole in its center for the wick.
- We lower the lower edge of the cord into a container with settled water. In this case, 1/3 of the wick is in the water, 1/3 is between the soil and water, 1/3 is inside the pot.
Equipping wick watering for violets is quite simple. And after a while you will be able to enjoy the result of your labors.
Drip irrigation systems for indoor plants
We present to your attention options for drip irrigation systems for home flowers.
1. CAPILLARY MAT FOR TRAY IRRIGATION
This special covering made of hygroscopic material is placed in any convenient flat place, and a garden film is laid under it. The edge of the capillary mat or its cut strip is moistened with water and lowered into a container with liquid.
- For home use, do not buy capillary geotextiles; they are made from recycled materials.
CAPILLARY MAT PRICE : about 3 euros per linear meter of a roll 100 cm wide. For example, Vivapol (Germany) with Aquafol protective coating and a moisture capacity of three liters per m2. The width of the rolls is different: 100, 125, 150 or 200 cm, color black or white.
2. IRRIGATION TRAY FROM CAPILLARY MATS
This automatic watering device consists of three parts: a capillary carpet, an external and an internal tray.
The inner tray is covered with a capillary carpet, on top of which a pot with a plant is placed. The inner pan is placed in the outer pan, into which water is poured. The carpet absorbs water and transfers it to the plant.
- Similar designs are produced by many companies (Garland (England) and others), which assure that the plant will live autonomously for up to two weeks.
PRICE : price on Amazon is 7-8 euros per pallet with dimensions (55 cm length, 31 cm width, 3 cm height) and a capacity of 1.8 liters of water made from environmentally friendly materials.
3. AQUA GLOBES TYPE DEVICES
Devices like aqua globes (watering tubes, glass watering sphere, etc.) are becoming widespread: a glass flask with a ceramic cone. The structure is placed in the soil mixture, where it evenly moistens the substrate due to its capillary-porous structure.
Aqua globes are one option.
AQUA GLOBES PRICE : on Amazon 10-12 dollars for 2 pieces, in the CIS in stores you can find it for about three dollars per piece.
- TIP: if there is no need for a beautiful appearance, then watering a device made from a plastic bottle will not be much worse, but it will be free.
4. CERAMIC CONES FOR WATERING PLANTS
Ceramic cones can be sold separately without a water container (for example, Blumat Tube Automatic Plant Waterer), and they receive moisture through a thin hose from a water container.
The lower part of the cone is made of special clay, which analyzes soil moisture and releases moisture after sufficient drying.
By changing the height of the plant pot in relation to the water container, you can regulate the amount of moisture received.
Irrigation system "Blumat"
BLUMAT SET PRICE: on Amazon 12-15 euros. Separately, a cone from an unknown manufacturer can be purchased in the CIS for approximately $1.50 apiece.
5. SMART FLOWER POT WITH AUTO-WATERING
Smart pot systems for flowers with automatic watering are becoming increasingly popular, for example, from the website smartpots.com_ or.
This device is easy to plant and maintain: you only need to add water once every 20-25 days.
- In Europe and the USA, many people use smart pots everywhere in the garden, growing garden crops (tomatoes, cucumbers), strawberries.
SMART POT PRICE: Average on Amazon from $13 to $35 per pot depending on its size and capacity. Aliexpress has a large number of different options and at different prices.
6. HYDROGEL FOR HOUSE PLANTS
Hydrogel is a special polymer that absorbs a large amount of moisture (two grams can absorb up to 200-500 ml, according to various sources) and slowly releases it to the plants. Hydrogel for indoor plants is mainly found in the form of granules or balls, colorless or colored.
- Ideally, the plant should already be planted in a soil mixture with hydrogel (they recommend two grams for about 800-1000 grams of substrate) and before leaving you just water it generously and that’s it.
Now hydrogel granules with complex fertilizer have appeared, which, in addition to moisture, supply the plant with nutrients.
According to manufacturers, on average, such hydrogel granules last for 3-4 years.
OTHERWISE: before releasing, soak the hydrogel in water for 7-8 hours, and then sprinkle the granules on top of the soil mixture and cover with moss. If the root system is not of a superficial type, then the hydrogel can be buried 2-3 cm deep.
HYDROGEL PRICE: on aliexpress: 7 colored pieces - from one dollar, 125 smaller colored pieces - about 3 dollars, 100 medium transparent pieces - about 7-8 dollars, 500 small multi-colored pieces - 10 dollars. Also available by weight: 500 grams – $20.
- There are many options and they can change so you need to keep track.