On the shelves and window sills of many houses you can see pretty trees, the crown of which consists of a variety of objects. Topiary, or tree of happiness, can be made from flowers, pine cones, coffee beans, paper and many other things. The result is a tree for different occasions, moods and interiors.
It’s not at all difficult to create something like this, but once you try it, it’s hard to stop. As a result, the apartments of the craftswomen turn into a wonderful magical garden.
What will you need to create a topiary?
Everything that can be used to make a tree of happiness can be found in handicraft stores, at the housewife’s fingertips, and within easy reach. Topiary consists of three main parts:
- crown (usually spherical),
- trunk,
- a pot that serves both as a stand and an integral part of the composition.
- a tube made of thick cardboard;
- metal rod (will have to be primed and painted);
- thick wire twisted several times and wrapped in twine or paper.
Any flower pot suitable in style can be used as a pot. It should be a simple classical shape without unnecessary decoration, if the topiary has a voluminous crown with complex elements. And vice versa - the flowerpot should be decorated more if the tree of happiness itself is made in a minimalist style.
To ensure that the tree stands firmly, does not fall on its side and holds the center, the pot is filled with a solution of gypsum, alabaster, and cement. If the topiary is not heavy, then polyurethane foam will also be suitable as a filling.
Features of flowering
The period when aichrizon begins to flower is in the middle - end of spring, and only at the age of three is the tree able to bloom. Many gardeners choose either a densely leafed green tree or a flowering aichrizon, since, in most cases, one excludes the other. When the plant blooms profusely, the plant spends a lot of energy; to maintain its lush color, the bush sheds its leaves, and some branches may dry out.
Aichrizon can bloom for almost six months, as a result of which many gardeners do not allow the development of flower stalks in order to preserve the appearance of the plant.
How to make the best crown?
Original ideas for trees for happiness are to create an unusual and bright crown. In action are:
- candy wrappers;
- artificial buds;
- sequins and beads;
- figures of butterflies, ladybugs, birds;
- coffee;
- dried flowers;
- artificial fruits and berries;
- decorative packaging mesh or paper;
- shells;
- pebbles;
- ribbons;
- tinsel.
This list can be continued, it is limited only by the imagination of the master. It's time to shake out your supplies and get creative.
Description of the species
Catalpa is a plant up to 30 m high. In Russian latitudes, medium-sized species of catalpa grow, which grow to a maximum height of 6 m. The bark of the tree is finely scaly and has a light gray or brown tint.
The branched root system is capable of growing horizontally, going up to 2 meters deep into the ground. The tree trunk grows 20 cm wide.
The tree has a spreading crown. The leaves are ovate, sometimes heart-shaped, up to 30 cm long. The flowering period depends on weather conditions. It usually falls in May or June. At the beginning of summer, white flowers appear on the branches of the catalpa, emitting a sickly sweet smell. Externally, the flowers look like slightly swollen small bells collected in panicles. The corollas are milky in color, and the throat has a few dark spots. After flowering, the plant bears fruit - elongated pods with seeds appear on the branches. When ripe, the seeds turn gray-brown.
The catalpa tree has another interesting name - pasta tree. The fact is that the pods have a bizarre pasta shape. Although the fruits ripen in the fall, they hang from the branches all winter.
Types of catalpa
The most popular varieties of kapalta are:
- The beautiful catalpa (speciosa) is the most frost-resistant plant species, capable of growing up to 30 m in length. In Russian latitudes, the trunk height does not exceed 15 m. The thin-plated crown has a pyramidal shape. The green foliage forms a heart shape. The first flowering occurs when the tree reaches 10 years.
- Catalpa bignonioides - grows up to 20 m. The leaves on the branches are arranged oppositely and fall off very early. Flowering occurs in June - erect inflorescences with funnel-shaped flowers appear on the branches. The flowers are slightly fragrant, about 5 cm long. There are red spots inside the flower, the edges of the petals are slightly corrugated. In another way, bignonia-shaped catalpa is called lilac-leaved.
- Catalpa bunge is an ornamental species that grows mainly in China. During the flowering period (July to August), the plant is covered with white flowers with purple spots. The inflorescences are much smaller in shape than those of their “brothers”. The crown is pyramidal in shape and the leaves are ovoid. This variety is very thermophilic and moisture-loving. It is not recommended to grow the crop in the northern regions of the country.
- Catalpa ovate is a tree that can grow up to 10 m in height, but when planted in the garden its growth is no more than 3.5 m. This variety has a short growing season and is found in the form of a shrub. Withstands temperatures down to -29 °C. Flowering occurs late. For this reason, the fruits do not have time to ripen.
- Catalpa Fargezi is a tree with a spreading crown, up to 25 m high. The main feature of this variety is the large inflorescences of a bright pink hue. The plant has high frost resistance and can withstand temperatures down to -30 °C.
Each of the above varieties has its own varieties. There is also a hybrid catalpa, which was obtained by crossing two varieties. This tree grows up to 16 m in height. It is this species that is most often used by landscape designers in the process of decorating the garden.
The following varieties are very popular among gardeners:
- Catalpa blushing (Purpurea) is a tree that, in ideal conditions, reaches a height of up to 25 m. The crop loves well-drained soil, but is able to adapt to dry soil. Flowering begins at the end of spring - bell-like corollas appear on the tree, inside of which there are bright spots.
- Aurea is a medium-sized tree with golden leaves that forms a wide-angled crown. Externally, the leaves resemble lilac flowers. Flowering duration is 2.5-3 weeks. Ideal for both single and group plantings.
- Quene is a tree with large, heart-shaped leaves. The foliage has a yellowish tint with a green center.
- Nana is a tree reaching a height of 4-6 m. This variety prefers to grow in brightly lit and windless places. It does not set flowers, which means it is ideal for landscaping public places. It grows very slowly, but can develop in loamy soils.
Sometimes another plant, Paulownia, is mistaken for Catalpa. They are very similar to each other in appearance, but differ in fruits and seeds.
Flowering tree as a gift
Topiaries, strewn with rosebuds and other inflorescences, are often given as gifts for weddings, anniversaries and other celebrations. Such compositions look elegant and festive, preserving memories of the past happy day for a long time.
Here are step-by-step instructions on how to make a tree of happiness from artificial flowers in a monochrome style:
- Let's say the idea chosen is pink. You will need a pot, a satin ribbon, lush but low inflorescences of roses, peonies or chrysanthemums, beads and other decor in a delicate powdery shade.
- We wrap the stick - the base tightly - with a satin ribbon and connect it to the ball - the blank for the crown.
- Flat buds of the same shade are placed tightly on the base so as to cover it without gaps.
- Prepare the solution and pour it into the flowerpot. Place the composition in the pot and let it dry.
The final touches remain:
- We randomly glue large beads of a slightly brighter shade than the flowers into the center of the buds.
- On the trunk closer to the crown we tie a simple bow made of satin ribbon, matching the color of the beads.
- Along the perimeter of the pot we glue one row of large half-beads or shells, close in color to the main range of the composition.
- We cover the “ground” around the trunk with artificial tow to match the crown and flower pots. You can add a figurine of a bird of paradise.
The delicate composition is ready. Such a tree of happiness, charged with positive emotions and a piece of the soul, will surely bring its owner good luck and luck not only in matters of the heart!
Planting and propagation
The indoor plant aichrizon is propagated by seed and vegetative methods. Even a novice gardener can cope with any of the aichrizon propagation options; they are not particularly difficult.
Landing
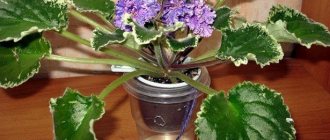
For a young aichrison, choose a small and shallow flower pot. It must have several holes at the bottom to remove excess moisture. Place the plant in the center of the container for uniform growth of the root system.
Aichrizon is a non-conflict plant and gets along well with other members of its family, which is why many gardeners create “mini flower beds” with an amazing combination of succulent compositions, planting different types of aichrizon next to each other.
Transfer
It is necessary to replant aichrizon when the roots of the plant become crowded in a flower pot. The new pot is chosen to be wider, but not lower than the old one, with a sufficient number of holes at the bottom of the container. Before transplanting, a thick drainage layer of expanded clay or pebbles is poured onto the bottom of the pot. The plant should be replanted only by transshipment, preserving the original clod of earth. After manipulation, the plant is left alone for at least a week, completely stopping watering during this time.
Reproduction of aichrizon at home
For the seed propagation method at home, prepare a shallow container with loose soil, sow the seeds and lightly sprinkle with soil. Using a sprinkler, moisten the soil and cover the container with glass or other transparent material, creating a greenhouse effect. It is advisable to leave a small hole or remove the lid every day for a couple of hours for ventilation, but the soil should not dry out. The optimal temperature for maintaining a greenhouse is + 15… + 20°C. After 14 days, the first shoots will appear. Transplantation into another, more fertilized soil is carried out after the appearance of the third leaf.
Young shoots are transplanted to a new place of “residence” at a distance of at least 5 cm from each other. When the seedlings become stronger, they are transplanted one by one into separate small flower pots and cared for as an adult plant. Throughout the entire time, from sowing to transplanting into pots, the plant needs good lighting, and therefore it is preferable to plant seeds in the spring.
The vegetative method involves propagation by cuttings. To do this, cut the branches to about 7-10 cm and leave them for a day in a shaded, dry room until the cuttings are dry. Cuttings are stuck into specialized loose fertilized soil or a specialized earthen mixture for succulents. Many gardeners leave cuttings in a glass of water or wet sand, but this increases the chance of rot. After 2-4 weeks, roots appear on the shoot, after which it is transplanted “to a permanent place of residence.”
One of the characteristic features of a plant is its ability to reproduce using any part of it. Even a leaf stuck into the ground can produce roots in a short period of time, as a result of which fallen leaves should be removed as often as possible, otherwise the young shoots will quickly fill the flower pot.
Photo of a tree of happiness with your own hands
Industrial vacuum pumpDIY stencils of beautiful snowflakes from A4 paper
- DIY paper crown: ideas, templates and tips on how to make a real crown (video + 130 photos)
How to make a three-dimensional paper house: step-by-step master class and instructions for making a doll and toy house (155 photos + video)Making peony flowers from corrugated paper - a guide for beginners and a step-by-step master class on how to make a flower with your own hands
- How to make a beautiful lampshade with your own hands: simple ideas for table and floor lamps (125 photos + video)
Catalpa care
It is important to take good care of it in the first five years after planting the seedling. First of all, pay attention to the soil: it must be constantly loosened, especially the top layer. This promotes root aeration and good access of irrigation water to the root system.
Watering is done once a week. One tree uses 20 liters of water.
Do not forget to lay mulch around the trunk, which retains moisture in the soil for a long time.
Young trees are covered with spruce branches in the winter to prevent freezing of the roots. The covering is provided until the catalpa is 5 years old. Mature trees will not need covering, as they will develop good winter hardiness with proper care of young plants.
Feeding catalpa
The best fertilizer for this plant is organic matter. You can use either manure, mullein or bird droppings. Water with a liquid solution of organic fertilizer 4 times during the summer. 5 liters of fertilizer is enough for one tree.
Important! In the first two years, seedlings are not fertilized. The amount of fertilizer that was applied during planting will be sufficient.
Two years later, the first fertilizing with organic matter and mineral compounds is carried out. In the spring, they are fed with a solution of nitroammophosphate, and in the summer-autumn period, potassium-phosphate mixtures are used for feeding.
When caring for catalpa, prevent the formation of a dry crust on the soil surface.
To avoid the appearance of a crust, the soil is periodically loosened to a depth of 30 cm.
If you care for the tree correctly, starting from planting itself, then it will develop normally, and after 3-4 years it will delight you with the first inflorescences.
Trimming
Catalpa is pruned both in spring and autumn. In spring, pruning should be completed before buds form. Only injured, broken and frozen branches must be removed. They must be removed. Otherwise, such leaves can be a place where viral pathogens and bacteria settle.
Autumn pruning involves the formation of the crown. In the fall, branches are left that are ready for wintering.
Diseases and pests
Catalpa “fights” with herbivorous pests almost without the participation of the gardener. The only serious enemy of this culture still lives in the United States and has not reached Russia.
Of the domestic harmful insects, the threat is posed by ash weed and spider mites.
Acaricides or insecticides are used to kill these pests. A single treatment per season is sufficient.
If trees grow in the countryside, then whitewashing the lower part of the tree with lime or chalk will help save the tree from being gnawing by small rodents in winter. Traps are also often set.
Coffee beans
Such fragrant elements are perfect for forming a coffee tree of happiness, which will later decorate your work or kitchen table.
To attach them to a ball of paper or foam plastic, you need to use a glue gun, and it is especially important to think through the composition you are creating in advance, because it will be a real work of art.
The main difficulties of growing
Amateur flower growers may encounter the following difficulties when cultivating the “Tree of Love”:
- too much exposure of the shoots indicates a very high temperature in winter;
- wrinkling of leaf plates is the result of insufficient soil moisture in a flower pot;
- stretching of the stem part of indoor crops, and loss of decorativeness, can be caused by a decrease in illumination;
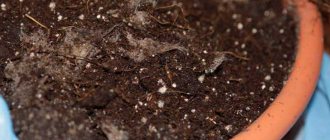
- yellowing of foliage and rotting of the root system are signs of excessive soil moisture.
As a rule, after the irrigation and fertilizing regime is adjusted, and the temperature in the room is stabilized, the condition of the plant returns to normal.