Orchids are beautiful flowers that get along well at home next to a person. Since the century before last, there have been many changes in the methods of care and reproduction of these wonderful tropical beauties. Now there is no need for laboratory conditions for the orchid family to reproduce.
Among several methods of home propagation, one is distinguished. To implement it, you need patience and the ability to properly care for an orchid, and gardeners who choose orchids should have plenty of these qualities.
In this article we will talk about transplanting baby orchids at home.
When and how do babies appear?
With good care, phalaenopsis very often produces babies or so-called keiki. Babies are small, well-developed young plants. They can be used for reproduction. In order for a baby to appear on an orchid, it needs to create the following conditions:
- Provide the plant with sufficient sunlight during the period after flowering.
- Maintain the temperature not lower than + 25°C both during the day and at night.
- Trim the peduncle to the level of the first dormant bud.
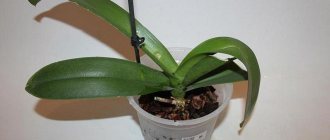
After the phalaenopsis has given birth to a baby, its development on the mother plant continues for six months. During this time, it grows 5-6 leaves and its own root system. After the size of the roots reaches 5 cm, the baby orchid is planted in a separate pot.
Rules of care
During the flowering period, the rules of care are somewhat different from usual, and when it ends, changes are needed again. In order for an orchid to give birth to a baby, follow the following care rules:
Watering
After coloring and shedding of flowers and buds, standard watering of the flower is resumed, which involves moistening the substrate once every 7-10 days. The need for manipulation can be determined visually. If condensation has collected on the walls of the pot, then it’s too early. If it’s completely dry, then it’s time. You can determine this by touch. When the soil is almost dry, it's time to water. The water chosen is warm and not hard.
To awaken the babies on the peduncle, the method of “bathing” under a warm shower is well suited. Increased water temperature improves metabolic processes in the flower, which promotes the growth of the baby. After such watering, it is necessary to carefully wipe the axils of the leaves to avoid rotting.
Temperature and lighting
It is very important to ensure a daily temperature difference. At night not lower than +18 °C, during the day not higher than +28 °C. Constantly high or constantly low temperatures cause stress, disease in the plant and attract various parasites.
Lighting . Your pet should have at least 12 hours of daylight, preferably 14.
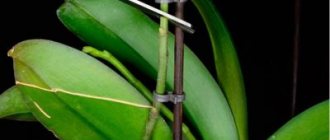
After the flowering period, the top of the peduncle is cut off. The location of the cut is very easy to determine; it is located a few centimeters above the bud that has not yet awakened. The cut must be rubbed with coal. The instrument must be sterilized. In order for the buds to awaken and the children to develop well and quickly enough, the orchid is fertilized.
In order for the baby to appear, you can use cytokinin paste. This is a phytohormonal agent that is applied to a kidney cleaned of scales in a small amount. It stimulates metabolic processes inside the kidney and accelerates its growth. If the plant is large and healthy, then you can apply the paste to several buds at once to get several babies.
They also use a triad, that is, nitrogen-phosphorus-potassium fertilizers, which are combined with mineral fertilizers. They begin to apply such fertilizing immediately after flowering has completed. This gives the orchid strength to develop new babies.
Important! The baby is very sensitive, so extremes in care and fertilization should be avoided.
Types of children
Depending on the location, the following types of children are distinguished:
- basal;
- located on the peduncle;
- developed in the leaf axil or stem.
Most often, the development of shoots in phalaenopsis is observed on the peduncle. This may be due both to the creation of favorable conditions and to the approaching death of the mother plant. In most cases, they manage to develop into an independent plant without outside help.
The mechanism of development of root and stem children is somewhat different. It is not the dormant bud that participates in their formation, but the meristem tissue of the plant. Experienced gardeners associate the appearance of such shoots with the approaching death of the plant. Their appearance is also possible due to injuries to the trunk, death of a growing point, during a prolonged drought, or when a peduncle forms from the center of the rosette. Children that develop on the trunk or in the leaf axil may not produce roots for a long time, so their rooting is somewhat difficult.
Stem baby phalaenopsis orchid
Process technology
Capacity
It should be noted right away that orchids are absolutely indifferent to the material and shape of the pot. You can use any utensils, from ordinary plastic to expensive ceramic pots.
However, you need to remember that most types of orchids are epiphytes and they use their roots for respiration and photosynthesis, so it is preferable to use transparent plastic containers.
Advice! Some "ground" orchids can be planted in regular pots.
The size of the container should be 1-2 sizes larger than the previous one, this is enough to fit almost all the roots. If an orchid is being resuscitated and some of the roots have rotted, then, accordingly, a smaller pot of appropriate size is needed.
The pot must have drainage holes, and for epiphytes it is important that the pot also has holes on the walls. If it is plastic, then making them is quite simple.
The size of the holes should be about 1 cm in diameter, larger is possible, but make sure that the substrate does not fall out through them.
For the most part, orchids prefer cramped pots rather than spacious ones.
Some gardeners mount their orchids on blocks or shards. This design looks very impressive, but requires special care and daily spraying.
Substrate
It should be said right away that most orchids are epiphytes; in nature they grow on supports (trees, branches, etc.). This means that indoor orchids only need a substrate to:
- To gain a foothold and stay in space;
- And also to maintain the level of humidity near the roots.
The exception, perhaps, is the same “earth” species.
The main criterion by which a substrate is selected is its density. So, a store-bought substrate with all sorts of additives in the form of moss or peat is perfect for earthen orchids. This substrate is denser and heavier and in most cases is not suitable for epiphytic species, such as Phalaenopsis.
In this case, the purchased substrate is sifted, selecting pieces of bark of the largest fraction, into which the plant is planted.
The best solution is to harvest pine bark yourself. It is collected from a pine tree that has fallen in the forest. Make sure that there is as little resin on the bark as possible. Then the bark:
- Disinfect;
- Divide into cubes or pieces of 2-3 cm;
- And they dry it.
Large pieces of bark will allow air to flow more freely and ventilate the pot.
Advice! Add a handful of old substrate to the fresh substrate to “populate” beneficial microflora.
Preliminary abundant watering
Most orchids have thick, succulent and fragile roots.
They can be easily damaged during transplantation. Therefore, before removing a plant from an old pot, it needs to be watered generously so that the roots become more flexible. Place the pot in a basin or other container and fill with water for 10 minutes.
This procedure does not guarantee 100% flexibility; be careful and gentle with the plant.
Removing from the pot and cleaning the roots from old soil
After the orchid has absorbed water, the pot must be slightly kneaded with your fingers to stir the substrate and the plant is removed from the pot. This must be done carefully for the reasons described above.
It often happens that the roots of an old orchid have become intertwined and grown into the holes in the pot. In this case, the pot will have to be cut with scissors or a knife - another plus of plastic dishes
Ceramic pots are carefully broken with hammer blows
When the plant is removed from the pot, it is inspected. The old substrate is crushed. If pieces of bark stick to the roots, do not try to peel them off. Dip the plant in water for another 10-15 minutes, the bark will get wet and fall off on its own.
Removing old rotten roots, processing cuts
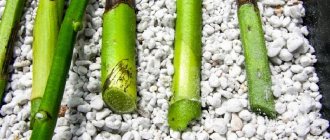
After the roots are completely cleaned, cut off the rotten areas. They are easy to distinguish - they are hollow and brown in color.
Rotten orchid roots must be removed.
For pruning, use a sharp tool whose blades should be disinfected. Sprinkle the slices with crushed coal or cinnamon. Then the orchid is left to dry for six hours.
Moving to new ground
The pot is filled 1/3 full with substrate and the plant is placed in it. Be careful with the roots - carefully straighten them and place them in the pot. The voids are filled with substrate. Do not push roots that do not fit into the pot - they can be easily broken; it is better to remain outside the pot. The substrate is compacted with water from the shower.
Important! If the orchid is large, place several pebbles on the bottom of the pot as weight - they will not allow the plant to tip over and fall.
How to properly separate a baby from an orchid
The separation of the baby from the mother plant must be carried out correctly, only in this case the small plant will successfully take root in its new place. Planting of the sprout begins after roots have formed on it. To do this, it is cut off with a small part of the peduncle using sharp pruners or scissors.
All cut areas must be dried for half an hour, and then treated with crushed cinnamon powder or charcoal. The treatment procedure should in no case be neglected; the cut site is like an open wound, which without appropriate disinfection can become a source of putrefactive infection.
Possible complications
Infection . This is fraught not only with diseases, but also with the death of plants. Moreover, both the baby and the mother plant can suffer. That is why it is recommended to sterilize the pruners and treat the cut site, as well as treat the soil.- Rotting of the cut site . To prevent this, treat (sprinkle) the cut area with activated carbon or crushed cinnamon.
- The baby takes root poorly and dies. This often happens if: the shoot is cut off too early, the transplantation rules were violated, or the rules for maintaining the orchid were not followed.
- Sometimes the mother plant dies or gets sick . This happens if several children were cut off at once. In this case, the mother plant receives significant damage. And if there is still an infection, then there is a risk of losing the orchid.
Read more about what problems may arise after transplantation and how to deal with them here.
How to plant an orchid shoot
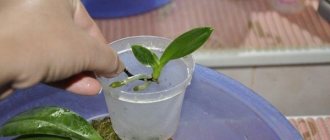
The work of separating the baby from the mother plant is behind us. Now all that remains is to figure out the landing rules. Planting a baby phalaenopsis orchid is done in a small transparent plastic pot. It can be purchased at a specialized gardening store.
If for some reason you cannot find a pot of suitable volume, you can use any plastic container with transparent walls. For example, it could be a glass of cotton swabs. The main thing is to make a sufficient number of drainage holes in the sides and walls of the container.
Planting baby orchids
A small orchid should be planted in a special substrate consisting of pieces of bark, moss and light turf soil. When planting, the baby orchid should be located strictly in the center of the pot, and its root collar should be at soil level; it should not be buried. In order for the root system of the phalaenopsis to be evenly distributed throughout the entire pot when planting, you need to hold the plant with one hand and gradually add soil to the roots with the other.
Immediately after planting is completed, the pot is lightly tapped on the sides, this helps the soil to settle. The substrate cannot be compacted by force. Phalaenopsis roots are quite fragile and break easily even with slight pressure on them. You cannot water the orchid sprout immediately after planting. The cuts on the peduncle should have time to heal. Usually this takes no more than 2-3 days.
Basic recommendations
- There is no need to rush to separate the baby from the mother.
- The pot where the young orchid is placed should not be too large. You can use a regular plastic cup.
- The pot must have holes not only at the bottom, but also on the sides so that the roots can breathe.
- The young plant should not be placed in a glass of water. This can lead to rotting.
- Feeding should be done no earlier than four weeks after transplantation.
- It is advisable to place a young orchid in a mini-greenhouse to maintain the desired microclimate.
How to grow orchid babies without a root system
In some cases, for example, when the mother plant dies or for other reasons, a baby orchid is found without roots. How to plant an orchid shoot in this case so that it successfully takes root in a new place and begins to develop a root system?
Under normal conditions, transplanting a baby orchid without roots is not possible. It is left on the mother plant until the root system develops. But if time passes and the roots still do not appear, you can try to stimulate their appearance.
You can use sphagnum moss for this. It is applied to the root zone of the process and secured with a bandage or any other available material. After this, the moss is moistened daily; it should not be allowed to dry out completely. Usually, in this way, the root child is forced to grow roots.
Growing roots of a baby orchid on a peduncle
But what is the right thing to do if it is not possible to wait for the natural formation of roots. In this case, you need to act as follows:
- Cut off a small piece of the peduncle along with the baby.
- Disinfect cut areas with 70% alcohol.
- Dry and powder the sections with crushed sulfur or charcoal powder.
- Rinse living sphagnum moss with boiled water.
- Place a layer of moss in a glass jar of a suitable size.
- Place the baby in the center of the moss layer.
- Cover the jar with a lid.
- Place the jar in a warm, well-lit place.
During rooting, the jar must be ventilated. If after 1.5-2 months from planting the root buds have not appeared, then you can try growth stimulants. For example, powder the junction of the baby with a piece of peduncle with Kornevin powder, and spray the leaves with Epin solution.
After roots of at least 3-5 cm in length have developed on the young plant, begin replanting it. In a plant such as an orchid, the roots develop slowly, so the babies are first planted in a small plastic cup.
After planting, the glass with the sprout is again placed in a glass jar. In conditions of high humidity, the root formation process occurs much faster. Properly planting a baby orchid is only half the problem, but how to grow it into an adult flowering plant?
Stimulation of root emergence
Some baby orchids do not produce roots ; in such situations, plant lovers are interested in the question of how to deal with this problem.
First of all, you need to take sphagnum moss, strong thread and cling film .
In order for the moss to swell, it must be soaked in water for 30 minutes.
From the resulting moss we make a nest , which is attached to the peduncle with the baby using a thread. You need to secure it so that it does not fall apart.
To ensure that the orchid does not tip over and the baby does not break off the peduncle, the “nest” of moss can be additionally attached with a stick with clamps .
To create a greenhouse effect in a dry room, the moss “nest” is additionally wrapped with cling film.
Important! When wrapping with cling film, remember that the plant must be ventilated every day.
The moss “nest” is sprayed with water every day. Kornevin is added to the spraying water .