There is an opinion that growing an orchid on your own is quite difficult. In fact, you just need to know the features. Compliance with them will allow you to propagate this tropical beauty at home.
The most popular method is propagation using a flower stem: several young shoots can be obtained from one.
Propagation of orchids using a peduncle
This method is called vegetative and involves dividing and rooting the stem as a whole and its parts. The method is most often used for propagating phalaenopsis, but the method is also suitable for other varieties.
How to choose the right time
To grow an orchid from a peduncle, you will need to wait until the tropical beauty fades. This period is optimal for starting the procedure. Coincidence with the arrival of spring on the calendar doubles the chances of success.
Preparation
The stem is cut and divided into parts.
Each fragment of the peduncle must contain a living bud.
The necessary conditions
There are often cases when an orchid does not produce new shoots for a long time, and the peduncle does not produce children. The explanation is simple: favorable conditions are not created for the plant. In order for an orchid to have lateral shoots, it is necessary, first of all, for it to be healthy. Before breeding, visually inspect the tropical beauty: there should be no yellow or black spots on it.
Among the mandatory conditions for breeding are also:
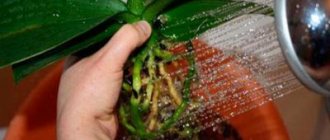
- the humidity level is within 50-80%, for which the container with the peduncle is placed in a tray with expanded clay and water. Another way is to spray with warm water.
- temperature regime (+28..+30), which can be exceeded, but not reduced;
- diffuse lighting should be less intense;
- feeding the plant with nitrogen fertilizer.
Suitable conditions
In order for a home orchid to produce offspring, you need to create special conditions for it. Plants living in absolute comfort are not inclined to reproduce, so you need to put the flower into a state of stress. New shoots are most likely to appear in the following conditions:
- the presence of diffuse sunlight for 10-12 hours a day;
- the difference between night and day temperatures is about 10°C;
- humidity level in the atmosphere is 40-50%;
- rare watering;
- increasing the nitrogen content in fertilizing.
Important! You need to make sure that the conditions for keeping the flower do not become too harsh (use just one thing), otherwise the flower will begin to wither instead of reproducing.
Cuttings and shoots sent for rooting also require special conditions. The temperature in the greenhouse should be maintained at 26-28°C and humidity at 70-80%. The mini-greenhouse needs regular ventilation to prevent the shoots from rotting. When rooting in soil, watering is done once every two weeks; when rooting in liquid, the solution is changed every 3-4 days.
Awakening a sleeping bud
The process occurs in the active phase of flower growth. There are several ways to push a sleeping kidney to awaken.
Since the main factor is a high level of humidity, so that babies sprout from the buds faster, the flower stalk is placed in a mini-greenhouse. It is made from an ordinary plastic bottle. About half of it is cut horizontally, leaving about 2 cm to hold the parts together. Water is poured into the lower half and a peduncle is placed. Then it is closed with the top of the bottle and secured with tape. To allow air to enter the “greenhouse”, the lid is not screwed on.
To grow an orchid from a peduncle, you can plant it in a plastic container to awaken the buds. Sphagnum moss is placed at the bottom of it, on which parts of the stem with one living bud are placed. The container needs a lid: it will create the desired level of humidity.
In a bottle
Another option for propagating an orchid using a plastic container. Only the neck of the bottle is cut off. Then water is poured into it to a level of 6 cm and the peduncle is lowered. The kidney should be on the surface.
The greenhouse is placed in a place well illuminated by diffused sunlight, but so that the future plant is not touched by the direct rays of the heavenly body. Protect against rotting of the bottom of the peduncle by adding activated carbon to the water. Periodically you need to feed with fertilizer containing nitrogen.
Transplantation to a permanent place
The reason for transplantation is the appearance of roots on the peduncle. The future orchid is ready for transplantation when they reach a length of 50 mm. The pot in which the plant will grow further must be filled with a suitable substrate. The ratio of its composition:
- 1 part – charcoal;
- 1 part – sphagnum moss;
- 5 parts – evaporated pine bark, the diameter of the fractions is 1 cm.
And expanded clay is placed at the very bottom of the pot.
If you have doubts about the ability to prepare the substrate in the correct ratio, it is better to buy a ready-made mixture in the store. This will increase the likelihood of successfully growing an orchid from a peduncle stem at home.
Step-by-step instructions for reproduction
Compliance with the main steps of the instructions is the key to obtaining a guaranteed result in a simple way.
Choosing the right option
The most suitable option is the peduncle of a young strong plant. The bush has more than five healthy leaves, and the arrow has dormant buds.
Trimming
Determine the location of the cut. It must be one and a half centimeters below the kidney. Disinfect the device with alcohol and make a cut. Remember to use charcoal to prevent infection.
Planting cuttings in a container of water
Prepare a container for planting and water in advance. Dilute the liquid with charcoal (one tablet per 250 ml). You can use a weak solution of potassium permanganate (achieve a light pink color). Growth activators such as Kornevin and succinic acid are often used. In this case, strictly follow the manufacturer's instructions.
Place the cutting 3-5 cm into the liquid, the cut should be from the bottom. Be sure to close the container with a lid or film, but make sure that the peduncle does not touch it. If you are using a bag, tie it with string to seal it. Provide access to light and warmth.
When should you drop off your baby?
If the conditions are met, after some time, the buds will sprout and babies will form. Then a root system (from 5 shoots) and leaves will form. At this stage, the baby is separated for transplantation. If climatic factors are disturbed, then only the stalk will appear from the bud.
How to transplant into a pot?
- The formed baby must be cut off from the cutting with a knife.
This is done in the morning, observing all air temperature requirements. The peduncle is cut off 1 cm above or below the sprouted bud. - The sections are disinfected.
- Plant the dried plant in a pot, a small glass with holes for drainage. The substrate for planting must be prepared in advance.
- Watering the planted shoots is carried out after a couple of days.
- The young orchid is sprayed several times a day and initially stored in a greenhouse.
The complexity of propagating orchids, both through peduncles and in other ways, depends on the structural features. On the mother bush, dormant buds rarely awaken. The patience and care of the gardener will be fully rewarded - flowers that are compared to butterflies, stars or called “lunar” bring true pleasure to aesthetes and connoisseurs of beauty.
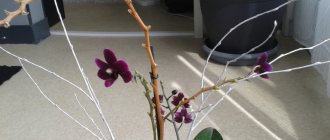
Caring for a plant to produce babies
When the orchid fades and falls off, shoots may appear on the flower stalk. Babies, as flower growers affectionately call them, are easily separated and rooted from the mother orchid, as they are a miniature but fully formed plant. The shoot has a stem, leaves and roots.
Proper care will help stimulate the appearance of babies on the stem of the peduncle to make it easier to grow an orchid at home. The following recommendations will help you not to ruin a young plant:
- water after replanting as the moss dries;
- ventilate the greenhouse every day;
- replant only after an adaptation period, which should take place gradually;
- Use only soil for orchids.
Reproduction of "phalinopsis"
You may be interested in: What colors are combined with roses in a bouquet: the right combination, advice from florists, photos
The following methods of propagation of the phalaenopsis orchid are known:
- By division - the upper part of the plant is cut off and takes root, while the lower part continues to grow.
- Cuttings - to cut cuttings, use the arrows of the peduncle containing dormant buds. New orchids grow from rooted cuttings.
- Children - one of the popular ways. Small orchids grow on the flower stalks of the plant, which are separated and rooted.
- By seeds - they are rarely used because of the difficulty of growing, but they get an orchid that is completely different from the one from which the seeds were taken.
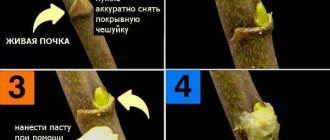
Stimulation: use of cytokinin paste
The maximum benefit for using the drug, created on the basis of the phytohormone of the same name, is achieved with proper application. To do this, a dense scale is cut on the uppermost or lower dormant bud. You can use a knife, needle, scalpel (pre-disinfect). Remove the cut off scale and apply a ball of paste with a diameter of 2 mm to the opened green dot (this is the bud). Spread over the surface of the kidney.
With the correct process, the result will be noticeable after 7-10 days.
Further care
To obtain good results when growing orchids, the following conditions must be created:
The optimal temperature and humidity conditions in the room should be at +18-22°C during the day, +13-20°C at night, humidity 50-60%. The daily difference should not exceed 5°C.- It is important to provide the flower with 12 hours of daylight. It is better to shade bright, scorching sunlight. The best option is diffuse lighting. During the cold season, an additional light source will be required.
- When moistening, you need to be careful so that the liquid does not stagnate in the pot.
In summer, water 2-3 times a week; in winter, once is enough. Advice! It is advisable to take water for irrigation that is filtered, without salts and impurities, and slightly warmer than room temperature. - The ideal option is no fertilizing. The plant has enough nutrients obtained from the soil. In this case, the soil is renewed every 2 years.
- As necessary, you should pick off dried flowers, loosen the soil, spray, remove dust from the foliage, and inspect the plant for pests.
Important information that can be read on the site is the propagation of orchids by cuttings at home, as well as about the propagation of the Dendrobium nobile orchid.
Propagating an orchid for the first time is quite exciting. It is important not to forget all the subtleties of the process . Once you've walked this path, it will be easier the second time. And then everything will work out like clockwork. So don't be afraid, experiment.
Baby separation technology
In order not to sigh sadly about why you can’t grow an orchid from a peduncle at home, you should follow simple rules:
- the flowering stem is cut off at the base;
- Each part when divided must have a bud;
- the length of one cutting is 4-5 cm;
- the bud should be located in the center of the piece.
How to propagate orchids at home: methods
The method of propagation of an orchid depends on its type. There are several methods:
- peduncle (cuttings);
- children;
- dividing the bush;
- seeds.
Peduncle (cuttings)
Phalaenopsis orchids are propagated using this simple method:
- After flowering green, the peduncle is cut into pieces of 3-4 cm, so that each has one dormant bud.
- The sections are treated with crushed charcoal.
- The cuttings are placed in damp sphagnum moss, covered with film and left in a warm place with a temperature of 25-28 degrees.
- Moss is regularly moistened.
- After a while, roots will appear.
- After the leaves appear, new plants are planted in separate pots.
After flowering, you can place the peduncle in water with fertilizer and leave it in a warm, bright place. Treat periodically with Doctor Foley fertilizer. This way the buds will awaken and babies will appear on the peduncle. They are cut and replanted when they are sufficiently formed.
Children
Babies on the peduncle can form spontaneously during flowering. Their appearance is promoted by very high air temperatures (over 28°C) and high humidity.
In Dendrobium, Calanthe, Tunia, Catazetum, the children are lateral shoots. To stimulate them, complex mineral fertilizers with potassium, phosphorus and nitrogen, as well as minerals and amino acids are used.
This method is used when one or more children appear instead of a flower. They can form in the center or at the end of the peduncle.
Interesting! Many gardeners recommend separating the “baby” from the mother plant after at least one root appears.
There is an opinion that this action depletes the mother plant, so the children are cut off after the appearance of 2 leaves.
However, from experience, it is better to wait for the formation of 3-4 leaves 5 cm long, and also help the plant grow roots by creating the appropriate conditions.
Most often, babies are formed at the roots of the orchid. Then it will be more difficult to separate it so as not to damage the roots of an adult plant. However, with the right technology, the young plant quickly takes root and grows rapidly.
You don’t have to wait for the roots to appear in the children that appeared on the arrow of the original rosette, but cut them off when 4 leaves are formed. It is believed that the children of hybrid Phalaenopsis do not grow roots on the mother plant, but feed on it.
Process of separation of children:
- The shoot is carefully separated from the adult stem with a sharp knife. It is recommended to transplant the baby into a pot when it has a root system.
- First, the cut area is dried for several hours and then treated with crushed charcoal for disinfection.
- Take a transparent plastic pot and make drainage and side holes in it. It should be a little small for an orchid.
- Planting is carried out in such a way that the root collar is at the level of the soil surface. The main thing is not to damage the roots.
- Fill the pot with nutritious substrate. The plant is placed in it so that the roots are completely covered.
- The flower is left by the window.
Important! The first 2 days do not water so that the cut becomes dry and the orchid does not get sick.
- Watering is carried out on the 3rd day, then as it dries.
- During watering, use a solution of a root formation stimulator - Kornevin, Heteroauxin, Zircon, Epin (3-5 ml per 1 liter of water).
- The plantings are ventilated every day for 5–7 minutes.
- If the lower pair of leaves turn yellow, there is no need to cut them off, since the developing roots receive nutrients from them. They will dry out and fall off on their own in due time.
- When the roots grow to 4–5 cm in length, the plant is transplanted into soil for adult orchids.
This procedure takes about a year.
Watch the video! Separation of babies from the mother Phalaenopsis plant
How to propagate using cytokinin paste
One of the simplest and most rewarding ways to propagate Phalaenopsis orchids is to use cytokinin paste. The procedure is carried out at the end of winter or spring, when the plant is full of vitality and energy.
Attention! Cytokinin paste is stored only in the refrigerator! Cytokinin paste can stimulate the birth of children. This is a hormonal remedy that awakens dormant buds and new plants appear.
Step-by-step instructions for awakening a dormant bud on the stem of a peduncle using Cytokinin paste:
- To awaken the kidney, the scales protecting it are cut off.
- Using a sterile sharp instrument, scratch the surface of the peduncle and apply 1.5-2 ml of paste to the bud site using a toothpick.
- After 10-20 days, a bud will begin to emerge.
Important! If there is a lack of cytokinin paste, not a bud, but a new peduncle will appear.
- The baby is planted when 2-3 leaves and roots 3-5 cm long are formed.
Important! The plant should not be exposed to direct sunlight.
Dividing the bush
By dividing the bush, Dendrobium, Cymbidium, Miltonia, Cattleya, Odontoglossum, Oncidium are propagated. Only adult plants are divided so that each division leaves 4 or more pseudobulbs. It is better to divide the bush during its transplantation. Procedure:
- The substrate is moistened for easy removal from the pot.
- Then they pull the base of the stem and remove the orchid.
- The roots are cleared of soil.
- Using a sharp knife, divide the onion into 2-3 parts so that at least 4 pseudobulbs remain on each.
- The sections are powdered with cinnamon or crushed charcoal and air dried.
- The delenki are planted in separate pots with moss and nutrient substrate.
The orchid, thanks to the pseudobulbs, feeds and recovers after division. If the seedling is weak, it is rooted in a plastic bag with wet moss. With increased humidity, the plant grows roots faster. The bag is left in a warm place for the cuttings to root.
If there is no desire to divide an adult bulb, so as not to spoil the appearance of the mother plant, division is carried out after the young shoots have formed their bulb and entered the dormant phase. This moment will be the most favorable for division. They are planted in pots and cared for in the same way as orchids during the dormant period. Once out of this phase, plants begin to grow, develop roots, and continue to mature.
Adult Phalaenopsis can also be propagated by dividing the bush. It should have a lot of aerial roots and leaves. The rosette is divided into 2 parts so that leaves and roots remain on both. Next, the sections are treated with charcoal and dried. The lower part is left in the old pot. The top one is transplanted into a new pot, deepening the aerial roots into the soil. The stump will dry out over time and form a root child.
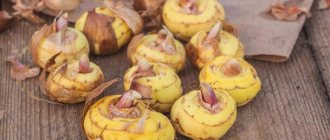
Seeds
Propagating an orchid by seeds is very difficult, and it is also a long process with certain difficulties. Orchid seeds resemble dust, they do not contain nutrients, so they germinate only under conditions of absolute sterility and good nutrition based on agar-agar, which are sold in a garden store. It will take about a year for the sprout to appear, so this propagation method is used extremely rarely.
- Sterilized seeds are poured into test tubes with a nutrient solution.
- After a week, the seeds will form small green balls.
- Suction hairs will form on them, and then leaves.
- Flowers are replanted into the ground after a year.
Pros and cons of this propagation method
Growing an orchid from a peduncle at home is the most reliable and safe method of propagation. Among the advantages, flower growers note:
- safety of the mother orchid;
- a fairly large percentage of plants take root;
- the ability to stimulate the awakening of the kidneys;
- Even an inexperienced lover of tropical plants can master it.
But difficulties may also arise. Due to inexperience, a weak plant will be used for propagation: a young plant instead of an adult one, without a healthy root system, or an unsuitable peduncle. In addition, the breeding period was chosen incorrectly. All these nuances must be taken into account.
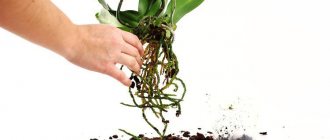
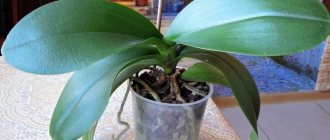
What does a plant's reproductive organ look like?
It is quite difficult for a novice gardener to distinguish a peduncle from a root. At first glance, they are similar. As soon as something starts to peck under the leaf, it’s impossible to immediately give a definite answer. The peduncle grows at the junction of the leaf and the stem . At the beginning of its growth, it can wriggle, and then it grows vertically upward or to the side, directed towards sunlight.
Reference! The appearance of the peduncle resembles an arrow, light green in color with a pointed tip. Buds appear on it, from which amazing inflorescences bloom.
It happens that instead of the expected flowers, babies appear. This phenomenon is possible due to unsuitable temperature conditions in winter or due to problems with the root system.
Main problems
When propagating and growing orchids, gardeners are faced with situations related to growth and reproduction. Let's look at the most common problems.
Does not produce a peduncle
The reason is regular watering. To eliminate, it is necessary to create arid conditions:
- increase the break between watering;
- leave for another 4-7 days without water;
- ensure the air temperature does not exceed +30 degrees;
- do not spray;
- do not feed.
Children are not educated
A shoot appears when the plant is exposed to unfavorable conditions. What to do? Water less when temperatures and humidity are high. Or use a stimulating agent - cytokinin paste.
The emerging shoot has dried up
Delete. There are other dormant buds that create the necessary conditions for development. You can stimulate as described above.
The roots of a young plant died
Don't rush to throw it away. The following procedure will contribute to the appearance of new roots:
- Place sphagnum moss in water and let it swell;
- form it into a ball and fasten it with thread;
- attach the resulting lump to the base of the process;
- Spray the moss daily with water with the addition of Kornevin.
Tips and tricks
Experienced gardeners who have been growing orchids for a long time give the following recommendations:
- For good survival of cuttings, moist soil is necessary until 2-3 leaf nodes appear.
- After roots grow 5 cm long, the sprouts are planted in new pots.
- When propagating, apical cuttings are often used.
- For the formation and appearance of flower buds, the plant needs to be stressed in the form of artificial drought or a sharp change in temperature.
- Tilling orchids of the sympodial type are easiest to propagate by separating a rosette with roots.
- When propagating, it is very important to maintain the sterility of the necessary equipment and planting material.
What pests should an orchid be protected from?
The most dangerous for the flower:
- Shieldman. As you can see in the photo, this is a small insect that feeds on juices and produces destructive mucus. Signs of infection are dark spots on the leaves. You can get rid of it: change the soil, remove pests, spray with a special product and periodically rinse the sheets with water.
- Mealybug. A small, furry insect attacks the plant and causes its leaves to fall off. Remove the insect and disinfect it.
- Whitefly. The larvae suck the juice. Wash the plant with a solution of laundry soap (1:6) and disinfect the pot.
- Excessive humidity can cause anthracnose - brown spots that grow over time. Cut out the damaged sheets and treat the cut areas with wood ash. It is worth purchasing medicine at the store and treating the sheets with it.
- Powdery mildew is a whitish coating that leads to drying out of the affected area. The cause is increased temperature or humidity. Treatment - spray the entire area with a solution of colloidal sulfur, after thoroughly watering the soil.
It takes a little effort, and a luxurious flower will delight you for many years.
Growing per plant
Flower growers often grow babies directly on the mother’s body. To do this, after the end of the flowering period, you should shorten the peduncle. It is necessary to cut off the flowering shoot above the “dormant” bud. You need to step back 1.5–2 cm from it. It is necessary to remove the integumentary scales from such a bud. This procedure injures the stem, leaving a small “wound” on it. It must be treated with cytokinin paste. This paste contains the plant hormone cytokine. As a result of processing, it gets inside the flower and stimulates the growth and development of the bud. When growing a lateral shoot on a peduncle, it is enough to prepare 1–2 “dormant” buds.
After the work has been done, the orchid should be placed in a warm room. Lighting must be organized in such a way that directed sunlight falls on the treated buds in the evening and in the morning. If there is insufficient humidity in the room, then the buds should additionally be wrapped in a plastic bag and left until they hatch.
When and how to separate the baby
After the baby has formed on the plant, you need to properly separate the shoot so as not to injure either it or the mother’s body. For the success of this operation, the timing must be correct. A baby that can take root must meet the following requirements:
- have developed roots. They should reach several centimeters in length;
- have a pair of formed true leaves;
- Externally the process should be healthy.
The ready-for-use plant should be carefully cut from the peduncle to minimize injury to both organisms. You need to cut off the shoot with a gap of 1.5 cm. After disconnecting the baby, you need to give it 30 minutes to dry thoroughly. Then we treat the sections with activated carbon. If it is not available, cinnamon can be used.
Classification by growth type
All types of orchids, according to their characteristic growth characteristics, are divided into two large groups:
- Sympodial - plants consist of numerous shoots that are connected to each other by a rhizome. This is a modified stem creeping along the surface of the substrate, from the nodes of which leaves and pseudobulbs with bunches of young roots are formed. They have several growth points, and each new shoot turns into a pseudobulb (a thickened orchid stem with a supply of nutrients). This type includes “lelia”, “cattleya”, “dendrobium”.
- Monopodial - they do not have rhizomes or pseudobulbs, but contain one vertical stem and only one apical growing point. Growth is accomplished by lengthening the stem and laying leaves at the top. Buds are formed in the axils, between the leaves. From them lateral peduncles or axillary aerial roots are formed. Over time, the leaves below grow old and die, and young ones develop higher up the shoot. Representatives of this type are “phalaenopsis” and “vanda”.
Its method of reproduction depends to some extent on the type of orchid it belongs to.
How to speed up the appearance of children
Many gardeners note that they have been growing orchids at home for several years, but have not noticed the formation of children. The fact is that for lateral shoots to appear, the orchid must grow under certain conditions. Only if all requirements are correctly fulfilled can a new plant appear.
The main thing is to choose the right time for reproduction. Any types of orchids that can be grown in apartment conditions should be propagated during the period when they finish flowering. At this time, the resources of the flower can be directed to the formation of a new lateral process.
When the timing of reproduction is determined in the room where the tropical beauty grows, it is necessary to establish the optimal humidity level for the plant. Since most species grow in the tropics, humidity should be in the range of 50–80%. Growing these flowers in an apartment can be done at a humidity of 25–85%. However, the appearance of children will occur only with optimal indicators of this parameter.
Don't forget about temperature. To propagate orchids, this parameter should be +28…+30 °C. Temperature increases above the specified limit are allowed. However, its reduction is undesirable.
Also, do not forget that the plant that needs to be propagated must be healthy. The orchid should not show signs of disease or traces of parasites. The leaves and stem of the plant must have a normal color (yellow and black spots are symptoms of infection of the flower).