I want to see the orchid bloom longer after purchase. And if she is the only one of the orchids, you will strive to increase their number. Notice also envious glances acquaintances and friends. They wouldn't mind having such beauty.
Is there a branch of it? So you begin to master the basics of reproduction . Simply distributing seeds or bulbs will not work. Most species are more difficult to propagate. But it is possible.
In nature, for many centuries they reproduced on their own.
And they continued their lineage. Some even have their own enticements :
- Aroma;
- Nectar;
- Color and structure. In some orchids, the color and shape copy the female insects.
But not everyone could survive. And civilization helped some to cease to exist. Previously, they were evidence of wealth and luxury . Now there is enough information about them. Yes, and more accessible. Many new species have been developed. There is a whole industry of their cultivation and sale.
Many amateur gardeners propagate orchids at home.
A huge number of hybrids have been specially bred for home use. They are propagated at home. Not only in greenhouses. Successfully. True, not all.
It is not difficult to choose the appropriate breeding (planting) time for the species. The end of flowering of most orchids also marks their preparation for a new flowering. Orchid flower as a fruit for fruit plants. This is also their main method of reproduction . A necessary and next stage towards new growth. Maybe with a little rest (rest period). At the end of spring.
Important! With sick plants, it is necessary to delay propagation until recovery.
Take all this into account. And select techniques, methods and time for a specific species (plant). Let's learn more about how to propagate an orchid at home.
General rules of care
- Young plants need to be planted in suitable containers and with proper care: First, lay expanded clay drainage;
- Select the composition of the substrate as in your parents. You can add a small part from the mother plant.
- Especially temperature (not lower than 25 degrees) and high humidity (70-80%);
Let's find out below: if the orchid has faded, what to do with the arrow?
- If the peduncle is green and the orchid does not dry it out, then we leave such a peduncle without trimming, because flowering may still continue from its dormant buds.
- If the orchid begins to dry out the peduncle, then the dried parts are cut off as they dry and the sections are disinfected and covered with wax to avoid water getting inside and rotting.
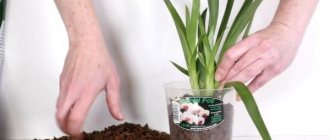
How to plant an orchid at home step by step with photos
Even if the owner of the flower does not plan to propagate the orchid, periodic planting of the flower will still have to be done. First of all, the procedure is carried out when the substrate is destroyed. Over time, it loses nutrients and does not bring any benefit to the flower.
Note: For orchids that grow in a substrate with moss, seeding is carried out every 2 years, and for those that grow in bark, every 3 years.
The second most common reason is the size of the pot. As the orchid grows, the original container becomes too crowded. In this case, the flower is either moved to a larger pot, or divided and planted in several containers. Let's consider several options for propagating orchids during planting.
If the shoot went on a branch
One of the simplest methods of planting is using shoots. They can form on a plant at any time of the year, and the fact of growth itself depends not on the season, but on the conditions of the flower. Such processes form only on adult and healthy orchids (Figure 1).
Note: Initially, the shoot looks like a small bump on the stem. Later, leaves form on it, and even later, roots.
The emerging shoot must be carefully observed. It makes no sense to separate it small, since it simply will not take root. But it is also impossible to keep it on the mother plant for too long, since the shoot will parasitize and weaken the mother plant.
The shoot can be separated when 2-4 leaves have formed on it and there are 1-2 pairs of well-developed roots.
Figure 1. Planting with shoots is one of the simplest and most popular methods
Planting an orchid using a shoot is carried out as follows:
- The shoot is separated from the mother plant with a sharp, disinfected instrument. It must be separated so that a small part of the mother plant remains on the shoot.
- All sections on the mother orchid are treated with activated carbon.
- The separated shoot is laid out on a clean cloth and dried for 6-12 hours.
After drying, all sections of the seedling are also processed and planted in a pot with a substrate suitable for the orchid.
Children's seating arrangement
Unlike shoots, which can form on stems, roots and even in the axils of leaves, babies are formed only on stems. Moreover, this propagation method is not suitable for all varieties. Some of the orchids, in principle, are not capable of forming children (Figure 2).
Figure 2. Seating by children is carried out in the same way as propagation by aerial shoots
Externally, the formed baby looks like a full-fledged orchid, but much smaller in size. The seating instructions are the same as for the lateral processes. With proper care, one plant can produce several plants at once, which can be planted in separate pots.
Basic mistakes
How to properly grow an orchid at home without making mistakes? When starting the breeding process, we hope for a positive result. But there are also failures :
- Only healthy plants without diseases can produce a good new bush . And we often try to save the sick;
- All cuts must be made with a clean tool. And sterilize;
- An optimal regime must be created for transplanted plants.
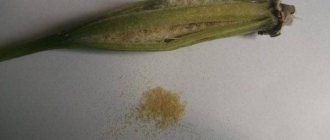
How to plant orchid bulbs
When many bulbs form on an orchid, they become cramped in the pot. Each bulb grows with its own roots, which also take up space in the pot (Figure 4).
Figure 4. Bulbs form on the roots of the orchid, which are also used for planting
In this case, the plant is replanted: it is removed from the pot and the required number of bulbs is separated. Each of them must have a sufficient number of roots for the new plant to take root in the new container.
The bulbs contain a lot of moisture and nutrients, so they need to be planted in a dry substrate. In addition, the plants do not need to be watered in the first two weeks after planting.
The correct technology for dividing phalaenopsis
This type of orchid is one of the well-known varieties, it is not picky in care, and can be grown in almost any conditions. When the container for the plant becomes small, it is planted and the children are separated. The children should have 4 roots and at least two leaves. Orchids should not be replanted in autumn, winter or when they are in bloom. The most favorable time for plant propagation is spring or the period after flowering. All flower stalks are removed from faded plants. With proper transplantation and care, plants quickly take root.
Babies can appear on their own or their appearance is stimulated with the help of a special paste based on cytokinin, this product allows the kidney to grow. To root a young plant, it is covered with a plastic or glass cup, thus creating a greenhouse. Once every three days it is necessary to moisten the soil and constantly monitor the plant; sometimes it is necessary to lift the container for ventilation. If the plant is green, does not dry out, and continues to grow, then the greenhouse can be removed and then further care can be carried out.
Leaf propagation
Why is this not possible?
Is it possible to propagate an orchid from leaves? In violets, the growing point is in the rosette from which the leaves grow. It is the connection of the violet leaves with the growing point that allows it to be propagated and grown in this way.
In orchids, the growing point is not on the stem from which the leaves are formed.
With a piece of trunk
How can you propagate an orchid from a leaf? The structure of the orchid leaf, and especially the place of its attachment to the trunk (without a petiole) and the absence of a growing point does not allow the propagation of orchids by leaves.
How to restore an orchid from one leaf? But if for some reason the leaf is left with a piece of the trunk or, as experienced orchidists say, “with a heel,” then there is a good chance that such a leaf will take root.
Propagation of an orchid with a “naked” leaf is impossible.
It is the presence of a neck (piece of trunk) on a leaf that is a sign of its possible rooting .
The complexity of the rooting process lies in creating the necessary conditions . Many nuances must coincide for the result to be positive:
- Temperature;
- Humidity;
- Lighting;
- Quality of water and moss.
It will be necessary to create a mini greenhouse and use root formation stimulants.
Optimal transplant timing
For most plants, the best time for replanting is the beginning of spring, when active sap flow processes are activated. Phalaenopsis (the most popular variety of orchids) also adequately tolerates intervention at this time, and active growth and development helps to recover faster and easier after transplanting. Young spring sap not only promotes restoration, but also the rooting of a new cutting.
It is better to replant the orchid in early spring
Under favorable conditions (good condition), the orchid can be transplanted after flowering. But it is recommended to plant a flower only when necessary - when the old container becomes small and the roots begin to crawl out in different directions. You also need to pay attention to the condition of the exotic plant, whether it is ready for transplantation. Plants that are sick or weakened after an attack by parasites should not be touched - all efforts should be devoted to restoring the flower.
Transplantation must be carried out for other reasons: a fungal infection that provoked rotting of the roots, attack by parasites, depletion and decomposition of the soil.
Using Knudson's nutrient medium to awaken the growth point
When breeding orchids, Lewis Knudson's nutrient medium is used. Among inexperienced gardeners, there is a widespread belief that it can be used to root plants and awaken their growth points.
The purpose of any nutrient solution is to grow certain microorganisms. Knudson's medium is intended only for germinating seeds of representatives of the Orchid family. In rare cases, it is used for cell cloning.
This substrate is prepared on the basis of agar-agar, which is obtained from red and brown seaweed. Dissolving in water, it acquires a jelly-like consistency.
Advice! In order to awaken the growth point, you can use cytokinin paste. It is applied to the dormant bud with a clean needle or toothpick.
Features of seating for different varieties
Certain differences in seating arrangements exist for individual varieties of orchids, so let’s look at the most popular ones.
Cymbidium
Orchids of this variety are planted every 3-4 years, and the procedure is carried out only after flowering.
In this case, it is important that at least 6 pseudobulbs have formed on the mother plant by the time of planting. An adult plant is divided into several sectors, each with 3-4 pseudobulbs and developed roots. The landing pattern remains the same as described above.
Cumbria
This orchid is considered one of the most capricious and whimsical, and its propagation by shoots is practically not practiced.
The most effective seating method is bulbs. You need to wait until the flower fills the entire space of the pot. The culture is removed from the container, carefully divided into several parts, slightly dried and planted in prepared containers.
Cattleya
The most suitable way to plant a Cattleya orchid is by dividing the bush. The procedure is carried out only after the roots have completely filled the interior of the pot.