Photo: pinterest.ru Flower growers recommend disturbing delicate orchids less often, but they still need to be replanted periodically. Flowers are not sold in the most suitable soil and flowerpots. And in the future they will grow and require expansion, because if the roots are constantly cramped, you can forget about flowering. We tell you how to properly transplant an orchid at home and not injure it in the process!
Replanting after purchase
In stores, orchids are most often sold in a special transport soil, but it is not suitable for permanent use. Therefore, the flower will definitely need to be replanted, and the sooner the better. But first, keep it in quarantine for at least 5-7 days without watering or fertilizing in order to identify possible diseases and pests.
Photo: vseolady.ru
Propagation of aerial roots
Aerial roots are not formed in all types of flowers, only in Epidendrum and Dendrobium. And phalaenopsis reproduces only by cuttings. This growing method is one of the most difficult, because it requires sphagnum moss and a mini-greenhouse. Rules for planting orchids:
- the emerging plant is cut off from the flower (it must have aerial roots of at least 3-5 cm)
- the roots are laid out in a mini-greenhouse on moss;
- Maintain a high level of moisture and temperature, while ventilating.
After the sprout has grown strong, it is planted in the ground. In addition to caring for new plants, increased attention to the mother flower is required.
Planned orchid transplant
In normal conditions, indoor orchids are replanted when they grow out of the flowerpot. On average, this is once every 1-2 years, when the root system clearly no longer fits. A planned transplant is carried out in early spring or a couple of weeks after the orchid has completely bloomed.
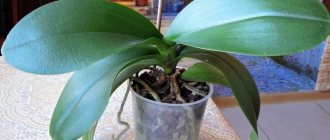
It is imperative to replant the plant at the first sign of rotting of the root or neck. If there is moss or other moisture-intensive components in the flowerpot, you need to look after it especially carefully. It is recommended to grow such orchids only in transparent pots so that you can see how the soil dries out.
Photo: dayflowers.ru
Secrets and general rules for growing orchids at home
The entire system of growing orchids at home is based on a few simple general rules.
The first rule is that crops need to be provided with sufficient lighting. The selection of temperature conditions, frequency of watering, and intensity of fertilizing depend on the level of illumination and quality of light.
Epiphytic orchids are not exactly potted plants.
They exist at the boundary between the pot substrate and the room air. Therefore, they need to be planted so that they seem to “crawl” along the substrate, do not sink into it, but at the same time are well strengthened in the pot.
Second rule : Most orchids need a porous, quickly drying substrate. Any stagnation of moisture in the substrate coma can cause the death of the roots, and, as a consequence, the death of the entire plant. In addition to a lack of light, many reasons can lead to excessive moisture - lack of a drainage layer inside the pot, too moisture-intensive substrate that does not dry out for a long time, frequent and abundant watering.
Therefore, the third rule of growing orchids that a novice gardener needs to know is to water the plant only when the substrate dries out.
The fourth rule concerns the diagnosis of substrate moisture. When estimating when to water, feel free to fall back on the old gardener's methods of covering the surface of the substrate with a layer of sphagnum moss (wet moss is darker than dry moss), or weighing the pot in your hand (a light pot is dry), or plunging your finger into the middle of the substrate ball (if your finger feels cold - the substrate is wet, if not, urgent watering is required).
Indoor orchids, although they have undergone a long “domestication” for window sills, are still tropical plants. At home, they usually do not have enough humid air.
Hence the fifth rule of growing orchids at home - less water in the pot, more on the leaves. Orchids respond gratefully to frequent spraying, even to wiping the leaves with a wet napkin. You can increase the humidity in the room using a household humidifier or arrange a small indoor greenhouse for your pets on the windowsill.
Attention! This rule of care when growing orchids does not work for lady's slippers and “precious” orchids, which it is advisable not to spray on the leaves.
The sixth rule concerns transplants. The secret is that orchids need to be replanted as rarely as possible and only during active root growth or just before their appearance.
But if the roots of an orchid have rotted, the plant must be replanted immediately, no matter what phase of growth it is in. The need for replanting may be caused by a decomposed substrate that has lost its porosity, or by the plant growing outside the pot.
In the first case, replanting will help avoid waterlogging and rotting, and in the second, regular drying out of the root system.
The seventh rule regarding how to properly grow orchids concerns fertilizing. You can feed epiphytic and lithophytic crops with any liquid mineral fertilizer for flowers, but the concentration of the fertilizer should be reduced by 10 times compared to the concentration indicated on the label (except for special fertilizer for orchids, where it is already diluted).
The frequency of feeding when caring for orchids while growing at home is no more than 1-2 times a week during active growth. It is recommended to temporarily stop feeding only in the darkest time of the year - from November to January, but only for those plants that are kept in rooms without artificial lighting.
And one more rule on how to grow orchids at home: it is better not to move flowering plants from place to place, otherwise the buds may fall off, and you, having almost achieved success, will lose the long-awaited flowering.
Soil requirements
Garden soil is not suitable for an orchid - it is too heavy and the roots will quickly rot. You need a special substrate made from pieces of oak, aspen or pine bark. You can use fern roots, charcoal, moss, cork or foam chips, pieces of chalk, granulated clay or perlite. If you prepare the mixture yourself, be sure to first boil the bark twice to kill bacteria, fungus and pests.
Photo: biruzinka.blogspot.com
How to grow an avocado from a seed at home
Choosing a pot
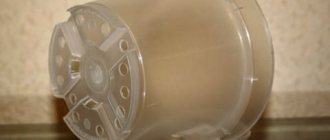
Orchids need constant air circulation, and some varieties can even be grown without pots in special blocks. Baskets, wicker flowerpots, and wooden boxes with slots are perfect. A convenient option is a transparent plastic pot with holes on all sides to monitor the condition of the roots and soil.
To make drainage holes in a plastic flowerpot, use a soldering iron or a hot nail. When replanting, fill any new pot one-third full with foam or fine gravel. In the future, when watering, always wait until the orchid has completely drained.
Photo: tchudesa.ru
What should you avoid?
- To avoid excessive waterlogging of the flower, you can build drainage from foam or expanded clay with a layer of four centimeters.
Spraying must be carried out at a distance of twenty centimeters so that the liquid evaporates faster from the surface.- When watering orchids of the Phalaenopsis and Vanda varieties, it is necessary to avoid getting water on the core, which will begin to rot from excessive moisture. This cannot be prevented during irrigation with a shower, so after the procedure the core is thoroughly wiped with a dry cloth.
- If a grower waters an orchid using the immersion method, he should add new water after each pot. This precaution is necessary to prevent the transmission of diseases from one plant to another.
Taking the orchid out of the pot
Your main task is not to damage the delicate root system, closely intertwined in the lump. If you cannot remove it carefully, it is better to break or break the entire flowerpot. Under no circumstances try to get the orchid by force, otherwise it will be injured and later die.
To make the roots slip out of the pot more easily, briefly soak the orchid in warm water. They will be saturated with moisture and become more elastic and elastic, so there is less risk of tearing or damaging something. Carefully shake out all the contents along with the soil onto a clean surface.
Photo: fb.ru
Geranium: home care, propagation and transplantation
How to determine when it’s time to replant an orchid
Contrary to the popular belief that orchids are delicate creatures and require complex, labor-intensive care, these plants are quite unpretentious. It is enough for them to create the right conditions for existence and provide minimal care. Flowers do not need frequent transplants.
Important! There is no need to rush to replant an orchid immediately after purchase. This crop, unlike ordinary flowers, is not kept in transport soil. The store-bought substrate is complete for orchids.
Orchids are regularly replanted once every few years. External signs that the plant needs to change the soil and pot ahead of schedule:
- the bark in the substrate has turned into dust, the soil has become compacted (rotted organic matter becomes moisture-intensive and does not allow oxygen to pass through);
- the measles system of the orchid is affected by rot (healthy roots are whitish-green, elastic);
- there are pests in the substrate;
- The roots do not have enough space in the container, they stick out.
The depressed state of the plant itself, yellowing of the foliage and falling of the buds signal improper care or disease, the appearance of harmful insects. Sometimes, to find out the cause of the poor condition of a flower, a detailed examination of the root system (transplantation) is required.
Preparing the root system
Before replanting the orchid, be sure to rinse the entire root system in warm water to get rid of adhering soil residues. Using a sharp knife or garden shears, cut off all rotten, dry and damaged fragments. Sprinkle the cuts with crushed charcoal or treat them with special floral antiseptics. Dry the plant for 10-20 minutes on a paper towel.
Photo: greensotka.ru
Preparatory stage
The orchid will tolerate the transplantation procedure well if you follow some rules. Prepare the substrate, container, necessary tools and preparations in advance.
The orchid family includes many different species, including:
- epiphytes - develop on other plants used as support;
- lithophytes - grow on rocks and rocky slopes in faults and cracks filled with a thin layer of humus;
- geophytes are terrestrial perennial herbs with powerful rhizomes or tubers.
A significant part of orchids, common in the tropics, are epiphytes that require partner plants, but do not parasitize on them
Suitable substrate
The substrate must be selected based on the natural characteristics of the species and its specific representative that you plan to place in your home. Most often, epiphytic varieties are grown indoors. The most common of them are: phalaenopsis, vanda, dendrobium, cattleya, etc. In nature, these orchids prefer to grow, located on tree trunks with rough, thick bark, receiving nutrients from humus accumulating in the cracks of wood, and moisture from the surrounding air.
To create the necessary conditions close to the natural environment for epiphytes, and to help the exotic flower adapt faster, it is good to use a solid piece of cork tree bark, which has a spongy structure, as a substrate. If one could not be found, then the planting container is filled with specially prepared pine bark. It’s easy to “get” it yourself or buy it at specialized retail outlets. Large pieces of bark do not need to be crushed into chips; their size can be 2-3 cm or a little more. Charcoal and expanded clay are usually used as additional fillers and drainage.
Experienced gardeners successfully grow plants of the Vanda genus without a substrate, placing them with bare roots suspended in a window.
Various sources contain advice on using boiled nut shells: walnuts, Manchurian, pine, almonds, pistachios and hazelnuts. It is worth keeping in mind that nut shells contain tannins and toxic phenolic substances, which have a depressing effect on the orchid. Also, do not place foam rubber, foam crumbs, or colored hydrogel into the container. Some people do this out of ignorance or in an attempt to decorate the root system, which is visible through the transparent walls and seems unsightly to them. Such elements are not only superfluous. They create certain inconveniences in caring for the plant, and most importantly, they can harm it. By accumulating excess moisture, such materials increase the risk of various pathogens, and when they swell, they can even force the orchid out of the pot. Many gardeners, trying to provide the proper degree of moisture to the roots, immerse pots filled with such a substrate in water. Once in the liquid, all artificial fillers will certainly float to the surface, pulling the plant with them.
The photo shows the herbaceous perennial Paphiopedilum, well known as Lady's slipper.
The soil for terrestrial species (paphiopedilum, cypripedium, etc.) should be more dense and heavy. It usually contains peat-based soil mixtures, moss, coconut “chips” and other natural additives.
Optimal capacity
The process of choosing a container for an orchid is also important. Its size is selected in accordance with the degree of development of the root system. The roots of the epiphyte should occupy approximately one third of the total volume of the pot in order to have some freedom of growth, that is, a container whose diameter is approximately 1-2 centimeters larger than the circumference of the root system is suitable for planting. In a pot that is too spacious, the plant will not bloom until it has absorbed the entire volume of the substrate. The length of the leaves and the height of the aerial parts are practically unimportant.
Of all the planting containers available in the range, an orchid will feel most comfortable in a transparent plastic pot with a wide bottom, a convenient tray for watering and aeration holes on the sides for better ventilation. The holes need to be small, otherwise pieces of bark will fall out through them. At home, it is more convenient to plant an orchid in a pot if there are perforated cones protruding inward at the bottom.
Epiphytes, for example, phalaenopsis (pictured) look very original in hanging flower pots, which are easy to make yourself
More interesting options are to plant orchids in wicker baskets or small bamboo flowerpots. Bamboo has a smooth, non-porous surface, which prevents root growth (as with plastic). To avoid spilling and washing out the soil, it is recommended to cover the bottom and walls with sphagnum or “breathable” material, for example, natural burlap, and cover it with a fine-mesh metal mesh, which can be easily removed if necessary.
The color of the pot plays a purely aesthetic role; it can be selected based on personal preferences.
Transplanting an orchid into a new pot
Place the roots vertically in the new pot and carefully fill in the soil, filling all the cavities. If the old substrate is definitely healthy, in good condition, without signs of rotting, fungus or plaque, you can use it. But it’s better to replace it with a new one just in case, carefully tapping the pot to seal it.
Photo: domashniecvety.ru
Questions and answers
Beginning orchid lovers have a lot of questions about caring for this tropical beauty. Answers to the most common questions are given below.
How often should an orchid be replanted?
If the plant is healthy, fully develops and blooms, it is replanted no more than once every 2-3 years. During this time, the substrate, consisting of organic matter, will rot and lose its functions. If the orchid is kept in inorganic soil (expanded clay, synthetic fiber, pebbles), then it can be replanted even less frequently.
How to transplant a shoot correctly
The general principles of transplanting a shoot or baby orchid are similar to transplanting an adult specimen. It is important to correctly separate the baby from the mother plant.
- The shoot is separated from the adult orchid only when the baby grows its own roots, 3-4 cm long.
- The baby is cut out from the peduncle, along with a piece of the stem of the mother orchid.
- The shoot is soaked in a warm solution of Epin or Energen for 15 minutes.
- The cuts on the baby and on the stem of the orchid are sprinkled with charcoal powder.
Plant the shoot one at a time in a pot with a sterile substrate.
If it is necessary to separate a baby orchid without waiting for its roots to form, the shoot is first rooted in water and only then planted. To do this, the shoot, cut off with the grip of the mother stem, is placed on sphagnum moss, which is placed in a bowl filled with expanded clay. Water is poured into the bowl. A greenhouse is installed above the plant to maintain high humidity.
The young orchid is provided with comfortable conditions for development:
- diffused bright light for 13 hours;
- humidity 87-93%;
- temperature of 28 degrees Celsius.
It will take several months for the baby to grow roots.
When can you replant an orchid after purchase?
It is not necessary to replant the orchid after purchase if the flower looks healthy and the substrate is not compacted. If the condition of the plant requires resuscitation, and the substrate must be replaced, the orchid is replanted 8-12 days after purchase. During this time, the flower adapts to new conditions and can withstand stress more easily.
Is it possible to replant an orchid during flowering?
Transplanting a plant at the time of flowering creates additional stress on the roots. An orchid can drop all its flowers and even die. Unless absolutely necessary, plants are not disturbed during the flowering period.
A flowering specimen can be replanted only in case of illness or pest attack. The buds, in this case, are removed from the peduncle.
Garter
For the first time, before rooting and adaptation, it is better to tie up the orchid. It is important that it stands tightly in the pot and does not wobble from side to side. When installing the support, try not to damage the roots, because all cracks and injuries are potential sources of rot.
Photo: agrosetka74.ru
How to care for an orchid at home
Propagation by cuttings
Orchid can be propagated by cuttings
Another planting method is propagation by cuttings. The top of the purchased plant should be cut off (with living aerial roots). Be sure to treat the branch with cuts and the top with charcoal powder, fungicide or garden varnish.
Next, you need to take the cutting and plant it in a suitable substrate (focus on the size of the outlet).
Caring for an orchid after transplantation
Water the orchid with warm water immediately after transplanting, move it to a bright, warm place and do not touch it again for another 2 weeks. You cannot place such a flowerpot on a cold surface, near an open window or in direct sunlight. Try not to turn, rearrange or disturb the flower at all. After 2 weeks, you can add a little fertilizer, water the plant and go back to your usual care regimen.
Photo: dachnyedela.ru
Further care
The transplanted orchid is placed in a shaded place for 10-14 days , protecting it from excessive light and overheating.
You will receive all the necessary information about caring for a transplanted orchid here.
In the absence of flowering
Lack of flowering is normal , since replanting is very stressful for the plant. Be prepared for the fact that the plant will “come to its senses” and recover for some time.
The period when orchids bloom after transplantation very much depends on proper care and the creation of optimal conditions for them.
Read more about why an orchid does not bloom after transplantation in this article.
What to do if the orchid withers after transplantation?
This can be observed if more than half of the roots have rotted or if the plant is standing in bright sun . Since the root system has suffered slight damage, it does not fully perform its functions, which is why in the heat and sun more moisture evaporates from the leaves than enters through the roots.
There is no need to panic, move the plant to partial shade, spray it, increase the humidity around it . You can cover it with a plastic bag or place it in a greenhouse. Otherwise, a slight loss of leaf turgor or pseudobulbs is not critical for the plant.
Most often, orchids wither due to problems with the roots or excess lighting.
This article will tell you more about the causes of wilting.
Watering
After compacting the substrate with water from the shower, the orchid is not watered for some time (a week or a week and a half) . It is better to replace watering by spraying the plant with settled water in the morning.
More information about watering after purchase can be found here.