Gloxinia is a perennial shrub that was brought from the tropical American climate. People call it sinningia. The leaves and flowers have a velvety texture, which provides excellent decorative qualities. Growing from seeds is quite difficult. However, if you try, everything will work out. It is important to know how to grow gloxinia so that it decorates your garden for a long time.
When to plant gloxinia seeds
The best time to sow indoor flowers is winter. Seedlings will begin to develop in spring, when the length of the day increases. Gloxinia seedlings will receive natural light, and the grower will have fewer problems organizing artificial lighting.
Winter is considered the optimal time for sowing
If desired, sowing can be done in the fall. However, the gardener will have more worries. First, you need to organize the lighting. Winter days are short. The seedlings will be dark. Secondly, there is a problem with air temperature. Its norm will have to be constantly artificially maintained indoors. Failure to comply with the conditions will result in gloxinia seedlings stretching out.
By dividing the tuber
Before planting a tuber in the soil, it must be thoroughly cleaned, washed and inspected. All dead roots should be removed, and rotten areas should be cut out.
To prevent the wound from starting to rot, treat it with brilliant green or sprinkle it with an activated carbon tablet crushed into powder.
After drying the tuber, you can immediately plant it in the soil, but in this case it will take a long time to germinate. In addition, there is a risk of flooding it, since gloxinia does not tolerate waterlogging at the beginning of growth. To avoid this, it is better to first “wake up” the tuber and plant it in the ground after small sprouts appear.
To “wake up” the tuber, after cleaning and washing, place it in a plastic bag with a small amount of light (peaty) and slightly moistened soil.
Tie the bag and place it in a warm (with an air temperature of about 25°C) and well-lit place. Can be placed under a lamp.
There is no need to ventilate the bag or moisten the soil. Your task is to simply wait for small green sprouts to appear from the tuber. After this you can plant it in a pot.
The most suitable soil for gloxinia is a mixture of peat and humus in a 1:1 ratio. In addition, it is necessary to add perlite to the container, and make drainage from expanded clay at the bottom.
If you don’t have perlite on hand, you can use regular river sand (about 1/3 of the total mass of the substrate), it also improves soil permeability well.
Do not plant gloxinia in heavy soil, as the tuber may rot in it.
Select the container for the flower taking into account the size of the tuber. There should be a distance of 3-5 cm between it and the pot so that the plant can easily grow in mass. At the same time, it is better not to take too large a container “for growth”: in it the soil will remain moist longer, so the roots will develop slowly, flowering will be delayed, and the tuber may even rot. So, for large adult tubers, a pot with a diameter of 12-14 cm is best suited.
Place a 1-2 cm layer of drainage on the bottom of the pot, and a little substrate on top. Then carefully place the tuber and cover it with soil so that the top part where the sprouts are located remains open. Gently water the soil around the tuber with warm water, avoiding dripping onto the sprouts.
Place the pot in a warm place under a phytolamp. Provide additional light to the plant 12-14 hours a day.
When the gloxinia sprouts grow to about 2 cm, completely cover the tuber with soil and water.
After a couple of leaves appear on the plant, move it to a light windowsill located on the southeast side. Please note that at this time, for the formation of a strong gloxinia bush, moderate temperatures, regular but meager watering and a lot of natural light are necessary.
Approximately 3 months after germination of the tuber, gloxinia blooms. At the same time, simple flowers bloom earlier, and double flowers usually have to wait a little longer.
If several shoots have formed on the tuber, it is cut into pieces so that each fragment has its own shoot. The sections are treated with crushed charcoal, dried for 3-4 days and planted in separate containers.
Read about gloxinia during the dormant period and about preserving the cucumber here.
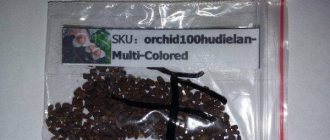
What do gloxinia seeds look like?
Externally, the flower seeds look like very small grains of irregular shape. Color ranges from light to dark brown. They can only be seen well under a magnifying glass.
Gloxinia seeds are very small
The grains are not only small, but also light. If you take a careless breath, they can fly apart through the air. For this reason, gardeners like to grow gloxinia from purchased seeds, since most of them are pelleted and easier to sow.
What kind of plant is this?
A plant of the Gerseniaceae family native to America. Gloxinia was named in honor of the botanist and doctor B.P. Gloxina. However, it has another name - Sinningia, in honor of the breeder who was breeding it, V. Sinning. It is grown only as a houseplant or greenhouse plant.
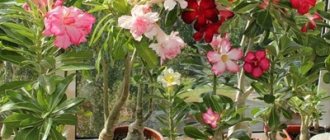
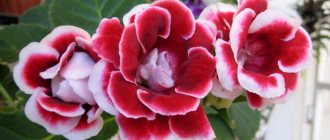
A small compact bush with large bell-shaped flowers. The leaves are quite large, oval in shape, with a velvety surface, in various shades of green. The flowers are simply amazing with their colors. There are not only colors: white, yellow, pink, red, purple, brown, as well as various combinations of them. But there is also a pattern on the petals: specks, an ornament reminiscent of lace, a wide edging of the petal of a different color. The root system is in the form of a tuber.
How to collect gloxinia seeds at home
Collecting seeds yourself is not an easy task. In general terms, the process resembles a whole ritual with preparatory actions.
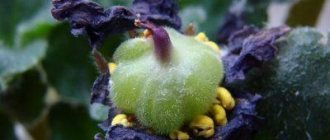
Gloxinia seeds ripen in capsules
In order for gloxinia to produce full-fledged seeds, you need to perform a number of actions. The flower does not pollinate on its own. You need to take a cotton swab, a soft brush or just a piece of cotton wool and move it over the pistil of each flower during flowering.
Advice! If several gloxinias grow and bloom at the same time in the house, then for better pollination you need to go over all the pistils of the flowers with a cotton swab.
Having completed the gloxinia pollination procedure, the gardener can only wait for the result. After flowering, a box with seeds forms in place of each flower. You need to wait about another week until they ripen. The completion of the process is determined by the bursting of the boxes. They are carefully cut with scissors. Holding the tail with your fingers, place the box into a glass and gently tap it. All mature seeds will fall off easily.
Advice! Self-collected seeds can be planted without prior preparation.
How can reproduction occur?
You can get gloxinia offspring in 5 ways:
- Leaf cuttings. To do this, the petiole with the leaf is rooted in the ground. This method gives quick results with the characteristics of the donor plant.
- Part of a leaf plate. The method is similar to the previous one. Read about rooting gloxinia leaves here.
- Rooting the peduncle. Again a similar method, where a peduncle is used as a cutting.
- By dividing the tuber. The tuber root can be divided into parts. The main requirement is the presence of a growth point on each part. For division, take healthy tubers that have grown sufficiently and have several growth points. This is not only propagation, but also a necessary operation for caring for the plant.
- Seeds. Gloxinia produces seeds that can be planted to produce offspring. This method is quite difficult and time-consuming, but sometimes the only possible one.
Preparing for sowing gloxinia seeds
Gloxinia seeds germinate poorly. When collecting on your own, it’s not a fact that you didn’t come across a lot of pacifiers. For this reason, gloxinia seeds should be planted densely. If you are lucky and they sprout en masse, it is better to thin out the crops by removing weak shoots. When you decide to use purchased seed material, you need to choose it correctly in the store.
Seed selection and preparation
All gloxinia seeds sold come prepared for sowing. Additionally, you don't need to do anything with them. It is important to choose the right company. The best seed material is considered to be from Holland and Germany. Seeds from the UK are famous for their germination. The quality of domestic seeds is slightly lower, but you can also find good options.
Read more Gloxinia: types and varieties, photos of flowers with names. The best seeds are considered to be imported.
When giving preference to hybrids, it is important to know that seeds come in first and second reproduction. On the packaging they are designated F1 and F2, respectively. The healthiest gloxinia seedlings are obtained from such material. However, it is important to know that in the future you should not try to collect seeds from them yourself. They may not sprout, or a flower may grow with completely different characteristics from its parents.
Coated seeds are considered convenient for sowing
Gloxinia seed material is sold in the form of pickled grains or small pellets. The second option is a special treatment. Each seed is covered with a complex of nutrients, which is dried into a dense shell. To get seedlings, pelleted seeds need to be watered regularly. Water causes the shell to become limp, and Gloxinia grains fed with nutrients produce a strong sprout.
Important! Gloxinia seed material can be stored for up to 5 years.
Soil requirements
To grow gloxinia, it is easier to purchase ready-made soil in a specialized store. When preparing yourself, it is optimal to take equal amounts of soil under the birch and pine trees. The soil is mixed and the same portion of sand is added. The finished soil mixture is calcined in the oven for 40 minutes.
It is more convenient to obtain gloxinia from seeds in peat tablets, which at the same time act as a good fertilizer. First, they are soaked in water and the protective film is removed. From 2 to 3 seeds are sown in each tablet.
Choosing a pot
You can sow in any container, but you need to think about convenience. To obtain seedlings immediately after sowing the grains, the container must be covered. In other words, create a greenhouse. For this reason, it is more convenient to use transparent plastic packaging with lids.
Confectionery packaging is suitable for seedlings
A container for planting can be purchased at any supermarket with a confectionery product. The packaging chosen is one with a lid that closes tightly and is secured with locks.
Family planting conditions
If you need to grow several varieties, then each variety must be sown separately.
- Seeds must be poured into a pre-prepared lid or matchbox to make them convenient to take.
- A toothpick or thin stick needs to be moistened with water. Thus, it is very easy to pick up each gloxinia granule.
- Next, you need to lower the seed onto the surface of the soil without embedding. The same should be done with the remaining seeds. So plant all the granules in a row.
- After sowing the seeds, the patches must be covered with either film or a lid.
- It is necessary to water the ground before planting so that the seeds do not fall into the ground. After all, deepening even by at least 0.5 cm can sharply reduce the possibility of seedlings appearing. If tablets were used, it is no longer worth watering; the moisture that the peat humus tablets absorbed should be enough for cultivation.
- Place the patch on the window to create greenhouse conditions for the plant. Additionally, you can use table lamps.
- The seedlings should germinate in 2-3 weeks. You should not open the lid before the first shoots appear, so as not to disrupt the normal conditions for growing seeds.
It is necessary to control:
- Humidity of soil and air in the container. If necessary, lightly spray with clean boiled water. The water temperature should be slightly above room temperature.
- Lighting. The level of illumination cannot be changed. If necessary, to reduce the temperature from the lamps, you can raise the lamps higher. This way the brightness of the lighting will not decrease.
As soon as the second leaf appears, it is necessary to gradually accustom the seedlings to room conditions: humidity, temperature. Namely, start ventilating the greenhouse, thereby hardening the gloxinia.
Growing gloxinia from seeds at home step by step
The process of obtaining seedlings is simple when all the necessary materials are prepared. To grow gloxinia from seeds, follow a number of simple steps:
- First of all, prepare the seeds, containers, soil, and material for drainage. You will need a spray bottle with warm water for irrigation.
- The container inside is disinfected with manganese. A drainage layer 1 cm thick is poured onto the bottom. Fine gravel is suitable for this purpose, or you can simply collect pebbles.
- Soil is poured over the drainage in a 3 cm layer. It is lightly compacted with the palm of your hand. If you made the soil mixture yourself, it wouldn’t hurt to add a little peat to it for better root development.
- The filled soil is sprayed with a spray bottle. It should be slightly moistened without any dirt forming.
- Granulated seeds are spread by hand on the surface of the soil. Regular seed material is very small. For sowing, it is optimal to make a device from a sheet of paper folded in half. Grains from the pack are poured onto the fold. By hitting your finger with a paper device, the seeds gradually fall onto the ground. You just need to have time to drive across the entire landing area.
- The crops are lightly crushed with soil. Moisten the soil again with a spray bottle.
- The container with the crops is covered with a transparent lid. The box is kept warm. It is impossible to ventilate gloxinia crops before germination. Irrigate the soil with a spray bottle every 3 days. Around the beginning of the germination period, lighting is organized. It is optimal to use a phytolamp for it.
- With the appearance of the first shoots, the seedlings are given proper care. This requires timely ventilation, watering and other procedures.
The process of growing gloxinia is shown in more detail in the video:
Read more Tuberous gloxinia: planting, how to grow gloxinia from a tuber
Step-by-step instruction
For planting you need to prepare:
- a shallow and wide container for seedlings with drainage holes;
- translucent sealed cover or film;
- soil from one part of coniferous soil and deciduous soil containing peat, which will provide the root system with the necessary elements;
- regular or granular seeds;
- expanded clay gravel for drainage;
- spray;
- paper;
- a needle.
Algorithm of actions:
Fill the bottom of the container with drainage so that a layer 1 cm high is formed. Level it.
Spread the soil on top of the expanded clay gravel in a 3 cm layer and compact it lightly. It can first be disinfected in the oven at a temperature of 150 degrees and allowed to cool.
Spray the soil generously with water from a spray bottle.
Fold a sheet of paper in the middle and sprinkle seeds on the fold.
Distribute them over the top layer of soil, dropping one seed at a time with a needle.
Slightly deepen the seeds by spraying them with a spray bottle at a distance of at least 40 cm.
Cover the container with a lid or transparent film with small ventilation holes.
Caring for gloxinia seedlings from seeds
With the appearance of the first shoots, the gardener needs to provide them with proper care. What is important here is an optimal microclimate, proper watering, lighting, fertilizing and maintaining temperature conditions. If you are not lazy, gloxinia seedlings from seeds will grow strong.
Lighting
During the day, the seedlings have enough natural light. The container is placed on the windowsill, but make sure that there is no direct sunlight. In winter, the day length is short. The lack of lighting is compensated by artificial lighting. Gloxinia needs light for 12-14 hours per day. The lamp is placed at a distance of 40 cm from the tops of the plants. However, the distance may vary depending on the power of the lighting fixture.
Temperature
You can sow gloxinia seeds at any temperature, but you need to keep the crops warm until germination. The optimal indicator is from 22 to 26 °C. With seed germination, the temperature is reduced to 20 °C. The extreme minimum threshold is 18 °C.
Air humidity
Inside the room with seedlings, normal air humidity is maintained. Ventilation is carried out periodically, but without drafts. Do this up to 2 times a day for about 10 minutes.
Watering rules
Growing Gloxinia loves moisture. Watering is carried out frequently, but in small doses. The soil should not dry out. Based on its condition, it is easy to determine the need for watering. If the soil surface begins to dry out slightly, irrigation is required. Use filtered water, 2 °C warmer than room temperature. Compliance with this condition is important to avoid root rotting. During irrigation, try to wet only the soil. It is undesirable for water to get on the foliage.
It is optimal to water gloxinia in a tray
Excess water after watering should drain into the pan. They should be thrown out. You can organize the watering process itself through the tray. When the soil has absorbed the required amount of moisture, the remaining water is poured out in the same way.
Read more: Transplanting gloxinia from one pot to another: in the fall, after purchase, video
Top dressing
Numerous buds on an adult gloxinia will signal that the seedlings have been properly cared for. Up to 20 of them are formed on one plant.
Complex preparations are used for feeding
When gloxinia is propagated by seeds at home, the flower is fed three times a month with complex fertilizers throughout the growing season. In stores they buy special ready-made compositions for flowers. From August 15, a period of calm begins. At this time, nitrogen is completely excluded from fertilizing. Fertilizers containing potassium and phosphorus are suitable.
Picking gloxinia from seeds
Picking is necessary if sowing was carried out not using peat tablets, but in a common container. The process helps to avoid crowding of seedlings.
It is convenient to pick plants with a plastic or regular metal spoon
Usually 3-4 picks are carried out for gloxinia. The first time is transplanted a month after germination. The plant should have two full leaves at this point. The extracted seedlings are transplanted into another container with soil of a similar composition. Maintain a distance of 2 cm between plants.
Advice! The first picking is needed if the seedlings are dense. For normal crops, the procedure is not necessary.
The second picking is performed 2 months after seed germination. It cannot be ignored. At this moment, the plants grow four full leaves. Plants are transplanted into soil of a similar composition, maintaining a distance of about 5 cm.
The third pick may be the last if the plants are planted immediately in separate pots. The flower must have 6 full leaves. If the plants are replanted in groups in a container, then maintain a distance of 10 cm. In this case, after growing, 4 picks will be required over the already permanent pots.
Breeding methods
The crop can be propagated either by vegetative or seed methods.
The vegetative method is used if there is an adult bush.
Propagation is carried out by leaf blades, roots or cuttings.
Leaf propagation procedure:
- Select the most compact sheet plate. You can also split a large leaf with a knife. The separation is carried out along the plates. The petiole should be shortened to 2 cm.
- Place the parts in different containers. They need to be filled with light, moist soil.
- The containers are immersed in plastic bags to create a greenhouse effect.
- After a month, when rooting occurs, the protection should be gradually removed. Thanks to this, the plant will better adapt to the environment.
Reproduction by dividing tubers is carried out according to a similar principle. The seed method will be discussed in more detail below.
When does gloxinia bloom from seeds?
Under good growing conditions, gloxinia produces up to 20 buds. However, to wait for flowering, at least 7 months must pass from the moment of sowing the seeds.
Flowering begins in the seventh month
From September-October, the flower begins a period of calm. At this time it does not bloom. So that before this time the indoor crop has time to grow from seeds, form and bloom, it is reasonable to start sowing no later than February.
Features of culture
The ornamental shrub is characterized by the following features:
when flowering ends, the above-ground part begins to die off;
before winter requires fertilizing that does not include nitrogen;
adult bushes are planted in large containers;
needs additional lighting, which has a positive effect on the flowering of the crop.
Tuber storage
Gloxinia tubers should be kept in a dark, cool place in winter (storage temperature - from +5 to +15 °C).
Storing tubers in pots
Tubers are not dug out of the ground. The soil in the pots is slightly moistened. Each pot is placed in a regular plastic bag (or dark) or, even better, in a Zip Lock bag. The packaged pots are transferred to a cool, dark place (the bathroom floor, a cabinet in the kitchen or hallway will do).
Once every 2 weeks, you need to check whether the soil in the pot has dried out; if necessary, moisten it with 2-4 teaspoons of water. The dormant period ends when a tiny red shoot sprouts from the ground (the red color is due to lack of light).
Description of Gloxinia
Gloxinia is a southern guest; she arrived on our windowsills from hot Brazil. This beauty belongs to the genus Gesneriaceae, a tuberous plant.
The flower is relatively unpretentious in care. Gloxinia is very photophilous, but does not tolerate direct sunlight, from which it can get burned, and will be grateful for watering with warm water and loose, light soil. Water the flower with settled water, avoiding getting into the center of the tuber and the axils of the leaves. The soil must not be over-moistened.
Gloxinia should be protected from drafts to avoid the appearance of unwanted flower diseases.
Gloxinia blooms from mid-March to October. Following this period comes peace. It is then that the plant begins to shed its leaves, which first turn yellow, then dry out and fall off. The tuber can be left in the ground and the plant can be removed to a cool (+12 °C), dark place (without access to light), slightly moistening the soil once a month. It is permissible to remove the tuber and put it in sawdust and store it at a temperature of 8–13 °C.
As soon as the buds appear, the tuber is washed in running water, examined for diseases, if necessary, treated with a fungicide, dried for about an hour and planted in the prepared substrate. Suitable soil for violets, pre-moistened.
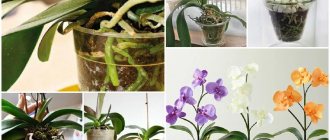
Photo gallery: beauty - gloxinia
A guest from Brazil confidently took her place on our windowsills. The southern beauty Gloxinia does not tolerate drafts. Gloxinia is an unpretentious, beautifully flowering plant.
Young shoots of gloxinia, obtained several months ago during the propagation process, are not sent to rest - they must gain strength and grow tubers.
The bowl for the flower should be shallow and wide, since the roots of gloxinia are superficial. We must not forget about drainage with a height of 2–3 cm.
This beautiful plant is surprisingly easy to propagate, making it easy to get new young flowers.
Problems encountered during gloxinia propagation
But sometimes it is not possible to propagate even the not too whimsical gloxinia: the mother leaves wither, the peduncles and tubers rot. There is always a reason for this.
The reason for the unsuccessful attempt to reproduce gloxinia lies in non-compliance with simple rules
- The peduncle or leaf was not cut with a sterile instrument, but simply torn from the plant. Under no circumstances should you do this! You need to wipe the blade with an alcohol solution.
- Exposure to direct sunlight. They are destructive to gloxinia and cause burns on the leaves. From 11 a.m. to 4 p.m. every day, the plant should be shaded using transparent fabric (curtain).
- Heavy ground. The substrate for the flower should be loose, light, permeable to water and air (ready-made soil for violets is ideal). The soil needs to be changed.
- There is no drainage. This moment cannot be omitted. It is drainage that helps remove excess moisture, thereby preventing root rot. You need to transplant the plant into a substrate with vermiculite.
- Excess moisture. Be sure to adjust the watering regime according to the recommendations and prevent water from stagnating in the bowl.
- Lack of light. Move the plant to the brightest place; in winter, provide additional illumination using lamps.
- The temperature is too high or too low. Optimal: 23–25 °C. Provide the recommended air temperature.
- Undisinfected soil brought from the street (greenhouse), which may be infected or inhabited by pests. It is necessary to use only special soil purchased in the store. The brought soil should be treated with insecticides and fungicides according to the instructions.
- The tuber is divided incorrectly or is infected. With this method of reproduction, you must strictly follow the recommendations.
How to save young plants and tubers
- The mother leaf, its fragment or peduncle has rotted or died. Unfortunately, he can no longer be saved. You should determine the reason listed above and take new material for propagating the flower.
- Young shoots wither. Inspect them. If the nodules are healthy and there are roots, then transplant them into another container, having previously disinfected the soil with a solution of potassium permanganate. If the underground part of the plant has rotted, cut off the rotten area with a sharp blade (when the affected area is small), powder it with activated carbon and plant it in a new substrate. In case of extensive rotting of the stem and roots, it is more advisable to dispose of the young shoot.
- Seeds do not germinate. You always need to monitor the expiration dates of the seed, and when planting, you should not cover the seeds with soil!
- Tubers and cuttings rot. You should remove the tuber from the ground and inspect it. Cut off rotten areas with a disinfected sharp blade; it is best to treat the wounds with garden varnish. If mold is observed on the tuber, rinse it in running water and place it in a solution of any fungicide for two hours (dilute according to the instructions). Then take it out, dry it for an hour, and plant it in fresh soil mixture.
Gloxinia is one of those rare species of flowering plants that have minimal maintenance requirements and make it easy to get new beautiful offspring just by following simple rules and recommendations.
- Author: Maria Osmis
Rate this article:
- 5
- 4
- 3
- 2
- 1
(17 votes, average: 4.2 out of 5)
Share with your friends!
How to protect against diseases
For pests, spray with insecticides and acaricides such as “Fitoverma” and “Intavira”, “Kleschevit”. If you are attacked by a spider mite, then take a high concentration of 5 ml per liter of water. Spray three times at intervals of 3-4 days. After spraying, keep gloxinia away from the sun and wind until all drops have dried.
For fusarium (root rot) and gray rot, shed with a copper-containing preparation such as “Hom”, and for prevention, water with “Trichodermin”. Gloxinias really do not like extremes: drying out and waterlogging, dry air. This is what causes most diseases. Therefore, you need to water it on time and moderately, humidify the air and be sure to ventilate.