Nowadays, surprising your friends with a blooming orchid, such as phalaenopsis, is not always possible.
Even if it blooms in your apartment and it’s a freezing winter outside. After all, they may have the same beauty in their collection.
But these beautiful flowers will not leave anyone indifferent. That's for sure.
There is a lot to tell and learn about her:
- Centuries-old history. Scientists provide evidence of its existence millions of years ago;
- She is endowed with magical properties;
- Healers have been preparing medicines for many years. And many healers use a love potion;
- In some states, some types of orchids are even reflected in state symbols.
Origin and description of the royal Vanda orchid
Vanda is a special genus of orchids and has 53 species. In nature, plants with bare hanging roots can be found in the tropics of Asia, Australia, and America. The species was first described by botanist William Johnson in 1795, the name being given is consonant with the Indian name of the plant - Vanda.
The central shoot is clearly expressed, there are no pseudobulbs. The growth point is apical. The solitary plant has a pronounced stem growing upward and often opposite leaves. In a tropical forest, an orchid can reach several meters in height. At home, the limit is 80 cm.
The Vanda orchid is an epiphyte, the distinctive feature of which is the aerial roots that hold the plant on the carrier. They are thick and powerful, covered with a layer of velamen, which allows them to absorb moisture from the environment. Under natural conditions, the root system can reach 2 m in length.
Vanda orchid is an epiphyte
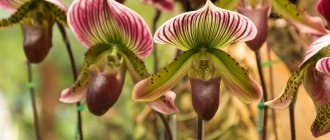
The leaves are fleshy, cylindrical in shape, tightly adjacent to the stem. Peduncles emerge from the leaf axils, and from 1 to 4 arrows may appear simultaneously. The color of flowers is dominated by pink, blue and purple or a combination of these shades. The buds open gradually over 3 months.
Some species emit a pleasant aroma, but the plant has no place in the bedroom or children's room.
The royal flower is difficult to grow at home. He is more picky than other orchids. Wanda does not tolerate crowded spaces. The light should be diffused, the air moist and warm. But thanks to the persistence of breeders, new varieties are appearing that are quite compatible with simplified care.
If the plant has green roots, it means everything suits it.
Video: blue orchid
Plant characteristics
All types of Vanda orchids have a cylindrical, densely leafy stem and aerial roots of green or gray-green color.
View:
- epiphytic - growing or attached to another plant;
- lithophytic - adapted to life on rocks.
- The stem can be drooping, creeping or creeping.
- Flower color: white, cream, yellow, blue, indigo, violet, pink, red, brown, as well as combinations of shades, with inclusions or mesh patterns.
- Leaf color: green, without inclusions.
- Sun requirement: photophilous, but does not tolerate direct sunlight.
- Size: from 90 cm to 3 m.
- Flowering: 1 to 3 times a year for 1.5-3 months.
- Aroma: absent or delicate and subtle.
Reference . Tinctures and decoctions of orchid roots and leaves are used in folk medicine to treat the respiratory system and eliminate neurological pain.
The Vanda orchid is completely unpretentious in reproduction, but requires constant care for development and flowering. When the necessary conditions are created, it amazes with its flowers of extraordinary beauty.
Description of varieties, including Vanda blue
- Vanda valvata - the stem is branched, the root system is powerful, the leaves are long and cylindrical. Up to 20 cm long. The flowers have pink petals, the lip is three-lobed, the middle part is purple, the side parts are yellow with specks and veins. The orchid blooms in October.
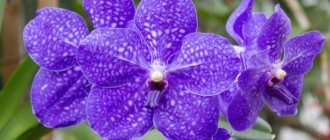
- Vanda blue is distinguished by belt-shaped leaves with teeth along the edge and obliquely cut at the end. On one peduncle there are up to 15 flowers, 10 cm in cross section. A blue flower with a small dark blue lip blooms in October. It has varieties with a lavender hue and a pattern resembling a mesh.
- Vanda tricolor grows up to 2 m in height, with a double crown of leaves. 7–10 flowers with a strong aroma are formed on the peduncle. Graceful side lobes frame the large lip. With good care, you can enjoy flowering twice a year - in winter and summer.
Photo gallery: which Wanda to choose
Vanda valvata has a long stem
Vanda blue flowers have a net pattern
Vanda tricolor exudes a strong aroma
Kinds
Vanda is the common name of a genus of perennial herbaceous plants from the Orchidaceae family. It consists of 53 epiphytic, less often terrestrial or lithophytic species. On the window sills of flower growers they often notice “Blue”, “Tricolor”, “Valkovata”, “Vanda Sander” and “Rothschild”.
"Blue Vanda" has a straight, meter-long stem with two rows of leaves and powerful roots. From the axils of the leaves, a 50-centimeter peduncle with an abundance of buds (6-12 pieces) is formed, exuding a pleasant aroma. The color of the buds is blue or blue with a mesh-like pattern. The lip is darker than the petals.
"Vanda tricolor" is an orchid that grows on other plants, using them as support. The length of the stem is up to one and a half meters. Adjacent to it are leathery leaves in two rows up to 0.4 m long. One inflorescence is formed by up to 10 star-shaped buds (diameter up to 7 centimeters). The edges have curly petals that are snow-white or pale yellow with reddish spots. The lip is inky pink, shaped like a guitar, and the petals are the same length.
"Vanda sandera" has strap-shaped leaves. When it blooms, one inflorescence forms up to 9 buds. Their diameter is about 15 centimeters. The petals are ruddy, the lip is peach-colored, and the edge is white.
When crossing “Blue” and “Vanda Sander” they got “Vanda Rothschild”. From the first, the plant received blue flowers, and from the second, belt-shaped leaves.
"Roll Vanda" has a long branched stem up to 250 cm long. It is drooping or climbing with many roots growing in the air. Up to 6 pinkish buds with a diameter of up to 10 cm can form on one peduncle. The shape of the petals is either an oval or a diamond. Their edge is wavy. The part of the lip located in the center of the purple area and divided in two is broadly wedge-shaped. Yellow blades with red spots are located on the sides.
Conditions for seasonal plant care
There are some seasonal patterns that ensure the existence of the species. In captivity, the plant will lose its decorative appearance, refuse to bloom and die if its needs are neglected. Vanda orchids are the most demanding in terms of maintenance conditions. When breeding at home, you should start with hybrid varieties; they are better adapted to indoor conditions.
How to care depending on the season and avoid sunburn - table
| Season | Lighting | Humidity | Temperature |
| Spring | Bright lighting is required, but the sun's rays must be avoided; their exposure causes burns on the leaves. Daylight hours are at least 12 hours. It is best to place it on western and eastern windows. The north window is not suitable. | Vanda requires high humidity - not lower than 80%, especially at elevated air temperatures. Spraying daily, and sometimes 2-3 times a day, will help avoid problems. Make sure that when moistening, water does not collect in the axils of the leaves. If the air temperature is below 18°C, do not spray the leaves. | Vanda is a heat-loving plant. Ideal conditions are achieved at 22 - 28°C. The maximum threshold can reach 40°C, and the minimum 8 - 10°C. The night temperature should differ from the day temperature; it should be lowered to 14°C. The orchid loves ventilated rooms, but it needs to be protected from drafts . |
| Summer | |||
| Autumn | In winter, you can place the plant on a south window. If Wanda remains on the east window, she will need additional lighting. | ||
| Winter |
Care during flowering
When purchasing a Vanda orchid, you should inquire about the age of the plant. If maintained correctly, the plant begins flowering one and a half to two years after planting. If it is impossible to determine the age, then you can be guided by the number of sheets, there should be at least five.
If the Vanda orchid has not bloomed, then stimulation can be carried out
If flowering does not occur in the prescribed period, then the plant can be stimulated in the following ways:
- reduce watering for half a month;
- lower the temperature to sixteen degrees for the same time.
You cannot combine both methods, as this can greatly harm the plant.
Important : in order for flowering to last for a long time, during the formation of buds you need to double the amount of watering and increase the night temperature by five degrees.
Requirements for planting and transplanting
For planting, it is better to choose a plastic container with good drainage holes. In addition, the side walls should also have holes, which will improve root aeration. If you choose a ceramic pot, it should be poured, with smooth walls, which will make it easy to remove Vanda when replanting, and have holes at the bottom and sides. Wicker baskets or flowerpots are suitable.
To plant Vanda orchids you need to choose perforated pots
The plastic pot may not be transparent. But for a novice gardener, it is better to choose a transparent container; it is much easier to control the condition of the roots.
In specialized stores you can purchase ready-made substrate for orchids. When making your own mixture, use the following ingredients:
- old pine bark, boiled, dried and crushed;
- sphagnum moss;
- charcoal;
- coarse sand;
- crushed cork;
- To improve air and moisture permeability, you can add perlite.
The presence of drainage in the planting container is mandatory!
Healthy plants are replanted every 2–3 years, after flowering. The purchased Wanda must get used to the new conditions for a week before transplantation.
An emergency transplant is required if:
- the substrate has become compacted and the roots do not receive air;
- the moisture-intensive composition does not dry out for a long time;
- incorrect composition;
- the roots are too deep;
- The roots are rotting.
You can buy the substrate for planting or prepare it yourself
Step-by-step transplant
- Carefully remove Wanda from the old pot. If the roots are in the transport substrate, carefully remove it.
- Inspect the roots and rinse in warm water. Remove the damaged ones, and treat the cut areas or wounds with activated carbon.
- Place drainage in a new container and new soil mixture on top.
- Place the orchid in a new pot without damaging the roots. Add the rest of the mixture from the sides. Do not compact!
- If all the roots do not fit in the container, you can leave some outside.
- For the first 5 days, do not water, but only spray the leaves.
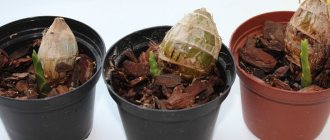
Most often, Vanda is grown not in a substrate, but with open roots - in baskets, lattice containers or on a piece of bark. In this case, it does not need replanting; attention should be paid to the root system, moisturizing and feeding it in time, as well as removing dried roots.
When growing Vanda in lattice containers, you need to pay more attention to the roots
What orchids can be grown from rhizomes?
It is easiest to save an orchid from death that is over 3 years old, since the loss of most of the vegetative mass will be less painful. The species that are reborn from the roots are those that form pseudobulbs on the shoots - thickened parts with reserves of nutrients that are capable of reproduction:
- cymbidium;
- paphiopedilum;
- Cattleya.
In phalaenopsis, vanda, and ascocenda, flower renewal requires the presence of a living growth point, only it will produce a new young shoot.
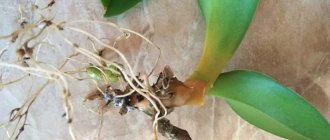
If the orchid does not have a single leaf left, it is urgently removed from the pot and the root system is examined. A healthy one has a light green color with a silvery coating, is elastic, and acquires a light brown tint in the substrate.
Problematic roots are dark and soft, covered with mucus; when pressed, they release a cloudy liquid with a putrid odor. If the entire root system is completely damaged and there is not a single leaf, then it is impossible to save the flower.
Home care
The Vanda orchid requires special care.
Watering and fertilizing
Vanda needs good watering, but it can be somewhat unconventional. It all depends on the growing method.
- If the plant is grown in a substrate, watering is carried out 1–2 days after the substrate has almost completely dried. This prevents rotting of the root system.
- You can use the dipping method - lower the pot with the plant 1/3 into a bowl of water for 20–30 minutes. Then take it out and let the water drain.
- With an open root system, when the plant is in a hanging basket or on a piece of bark, moistening is carried out by soaking the roots, lowering them for 20 minutes in a container of water. This type of watering can be replaced with a good shower. It is important not to soak the leaves!
In winter, if the air temperature is low and the lighting is insufficient, Wanda can go without watering for almost a week.
Only the leaves need to be sprayed. The root system does not require such thorough hydration.
An aquarium, a tray with pebbles and wet moss, and a decorative fountain will also help to humidify the air.
Vanda needs high air humidity
Water for irrigation should be well settled and have a temperature of 30–50°C.
You can water orchids growing in soil mixture by dipping.
The Vanda orchid must be fertilized during the period of active growth. To do this, use a special balanced composition for orchids, which has the same ratio of phosphorus, nitrogen and potassium. The solution is diluted several times more than indicated. If the plant is cultivated without a substrate, the roots receive nutrition from the bath, where they are placed for 30 minutes, adding fertilizer to the water.
For better absorption of nutrients, it is recommended to alternate root and foliar feeding.
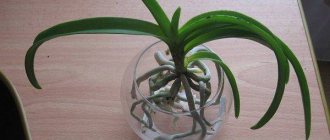
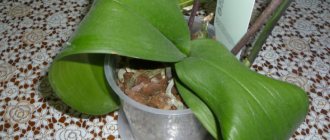
Features of growing in a glass flask
The Vanda orchid placed in a glass flask looks unusual. It is necessary to choose a vessel that is low, but wide at the base and tapering at the top. Only the roots are placed in it, the green part is located above the flask or vase. It is very convenient to care for a plant placed in this way.
Watering is carried out by dipping the roots into a container of water or filling the flask with liquid. In this case, the water should be poured out after 20 minutes.
If rotten roots appear, they should be removed
If rotten roots appear in the vase, they should be removed to avoid rot.
Growing Vanda in a tall cylindrical vase is not very convenient. The plant in it is in unnatural conditions, with folded leaves. Increased humidity will lead to the formation of a fungal infection that will damage the leaves and roots.
Growing Vanda in a tall glass flask is not very convenient
Flowering period
The first and main condition for the abundant flowering of Vanda is the love of the owner or mistress. In good conditions, an orchid can bloom several times a year. You need to spray Vanda very carefully during this period, trying to avoid getting water on the flowers - this will significantly shorten their flowering time.
The main reasons why Vanda does not bloom:
- there is not enough daylight hours, you need 14–16 hours;
- excess nitrogenous fertilizers;
- waterlogging of the substrate;
- the difference between day and night temperatures is not observed;
- cold content or presence of drafts.
If Wanda doesn’t want to bloom, then you need to give her a little shake-up and play with temperature changes during the crescent: up to 25°C during the day, and 10°C lower at night. Or limit watering. Choose a place that is lit, but shaded from direct sun. When a flower stalk appears, do not rush to flood the plant - continue to water carefully.
You should not combine both methods. You only need to choose one of them.
At the end of flowering, you need to wait for the peduncle to dry completely. After which it is cut at a height of 1 cm from the base.
Rest period
Royal orchids do not have a clear dormant period. But in winter, the temperature drops, watering and fertilizing become limited. At this time, you need to monitor the intensity and duration of lighting. If the roots remain green, the orchid is not dormant.
With a lack of light, the roots will begin to become covered with white skin. The sleeping beauty needs to be cheered up. To do this, you need to organize evening supplementary lighting until 22 hours. During the period when the roots do not work, the metabolism slows down, which is the time for infections to occur. Therefore, it is necessary to help the plant resume its growing season.
What are the reasons for this problem?
The reasons for the falling leaves and lack of roots in an orchid can be different. The most common are the following:
- Incorrect watering. Many inexperienced gardeners believe that the more often you water an orchid, the better for its growth. Actually this is not true. It is necessary to know the size of the flower roots and the period of their activity. It is necessary to water after the substrate has completely dried. To do this, the orchid is planted in a transparent container with holes, where you can see when the plant needs watering.
- Lighting. More precisely, poor lighting, especially in the autumn-winter period. If the normal lighting system is disrupted, the growth of the flower occurs. First, this affects the leaves, which wither, turn yellow and fall off. They, in turn, send a signal to the root system, which also gradually loses its vitality.
- Unsterility of the substrate. If a flower is present in the soil for a long time, then various insects - mites, fungi and other microorganisms - can accumulate in it. They can be both useful and harmful. Some aggressive representatives destroy the roots and foliage of the orchid.
- It happens that the cause of leaf falling and death of the root system has not been established. In this case, the plant is placed in a fungicide. Its dosage should be half that in the instructions. If you regularly treat an orchid this way, its immune system will be strengthened.
Maintenance errors - table
| Error | Cause | Elimination |
| The leaves become dark green in color | Lack of light. | Move the plant to a more illuminated place or add additional light by turning on a fluorescent lamp. |
| The leaves are turning yellow |
|
|
| Leaves are soft and slightly wrinkled | Overwatering. | Follow the watering schedule. |
| Transparent spots on leaves | Sunburn. | If Wanda is in direct sun, she should be hidden behind a curtain. |
Diseases and pests - table
| Diseases and pests | Symptoms | Prevention | Control measures |
| Fusarium | Dark spots appear at the base of the leaves. The leaves are falling off. |
|
|
| Shchitovka | Convex brown tubercles in the axils of the leaves are scale insects. The pest feeds on the sap of the plant, causing the leaves to turn yellow and dry out. |
|
|
| Aphid | Small insects very quickly create entire colonies on the affected plant. Due to their activity, the leaves die. |
|
How to recognize pests and diseases - photo
Orchid infected with fusarium
Scale insects on orchid leaves
Aphids greatly weaken the plant
Reanimation of a dying orchid without roots
It happens that a favorite flower dies - the roots are rotten, the top is limp. To save, you can try several methods.
Remove any bad roots and hang the plant upside down in the shade. The plant tends to grow upward, so let new roots grow upward. You need to take the fertilizer recommended for orchids, add sugar and dissolve it in distilled water in the indicated dose. Spray Vanda thoroughly every day. The water will drain, and feeding with glucose will help keep the leaves alive. After 2–3 months, the roots will grow. When they grow 5–7 cm, plant the plant in a pot.
The second method is less extreme, but also helps to save the orchid:
- Remove Wanda from the substrate. Remove all rotten roots.
- Wash the base in a fungicide solution heated to 30°C and dry.
- Then soak for 10 minutes in a growth stimulator, for example, Kornevin.
- Pour half the volume of drainage into a transparent container and moisten it.
- Place a layer of moss on top and also moisten thoroughly.
- Make a small depression in the middle and place Vanda in it, covering the sides with the remaining moss.
- Place the container with the orchid in a well-ventilated and warm room.
- Moisten the moss only along the edges.
- After a month, a new root system will form and the plant can be transplanted into a pot.
The process of reviving an orchid
After the process of resuscitation of the plant has begun and the process has begun to show its positive properties, it is necessary to create conditions for the flower under which it will grow its root mass more successfully.
How long will it take for signs of regeneration to be noticeable?
If everything is done correctly, then within a month small tubercles will be noticeable , from which roots will appear. There is no need to apply fertilizers, as this can slow down the process of root restoration.
If you follow all the instructions correctly, the orchid will soon show roots.
In a month and a half, active leaf growth will begin and if resuscitation continues in the same spirit, then with normal growth, after 8-9 months you will be able to see a new peduncle . If the old peduncle was preserved during the resuscitation process, then a couple of flowers can be seen in about 1.5 months.
Successful plant resuscitation depends on the following factors :
- From the condition of the plant itself and the amount of its strength to restore;
- In spring, resuscitation is more successful than at other times of the year;
- In winter, lighting and warmth are necessary, otherwise resuscitation will not work at all;
- It is necessary to follow all recommendations given for root growth. Because if you miss one, everything can go wrong.
The roots have shown active growth - further care
The plant must be provided with the correct substrate, consisting of bark . At the same time, it is worth organizing proper watering, taking into account your past mistakes.
When the roots of an orchid appear, it needs proper care.
The actual care needs to be adjusted according to the mistakes made so as not to repeat them again, and then the orchid will have a large root system, strong leaves and beautiful flowers.
After resuscitation, the orchid took root, but the leaves are limp - what to do?
To restore turgor, you can use compresses made from a bandage and soaked in a solution of succinic acid. But more often the leaves do not recover, but simply grow hard and green from the growing point. Over time, the old ones turn yellow and fall off, giving up their nutritional strength to building roots.
If for some reason a plant has lost its roots, it is necessary to save it and prolong its existence, and not immediately throw it in the trash.
Vanda orchid propagation
Vanda can only be propagated at home by vegetative means. Propagation by seeds is very labor-intensive and is used only in laboratories.
Using apical cuttings
In an adult plant, more and more aerial roots appear in the leaf axils.
- Cut off the top with 2-4 roots.
- Pour the bark into the pot and moisten it.
- We make a small depression in the center and insert the top into it, having previously treated the cut area with charcoal or cinnamon.
- We place the pot in a warm place, but not too sunny.
- Water only after the substrate has completely dried. Spray carefully so that water does not accumulate in the axils of the leaves.