The beautiful and delicate orchid gradually stops flowering, and the pot becomes noticeably cramped for it. To prevent problems with growing and wait for future flowering, you need to know how to replant an orchid at home. The editors of Agronom.guru will tell you in the article what pitfalls can await you during transplantation.
With proper care, the plant will delight you with beautiful flowering
Why you need to replant - the main reasons
The recommended schedule for replanting phalaenopsis into a new container or other substrate is every 2-3 years. This is due to the stress the plant experiences during this process.
Any variety of orchid needs timely replanting
The urgent need for a new pot or soil is due to the following factors:
- soil depletion;
- disturbance of the balance of mineral substances in the substrate;
- change in acidity level;
- loss of breathability;
- soil compaction does not allow the root system to develop optimally and even causes root rot;
- replanting after 3 years is necessary if the main component in the substrate was bark. If it was sphagnum moss, then the soil needs to be replaced within 2 years after planting.
A cramped pot, from which roots stick out in all directions, needs to be replaced with a more spacious one.
If the pot has become cramped, the roots will begin to push the soil out of the container, which will undoubtedly affect the health of the flower.
How to replant an orchid flower if the root is rotten: tips
Replanting an orchid flower if the root has rotted
Infrequently, but there are cases when novice gardeners, as a result of improper care, have the roots of an orchid rot. This can happen to all the roots or to a large part of them at once. Is it possible to save the plant then? How to replant an orchid flower if the root is rotten? Here are the tips:
- To revive orchids whose roots have completely died, you need a small window greenhouse.
- In the container where the leaf rosette will be located, you need to pour a small layer of drainage - this can be expanded clay or pebbles.
- Place sphagnum moss on top, which is previously kept over steam and dried.
- Now moisten the substrate and place the leaf rosette in it.
- Transfer to a greenhouse, where a constant temperature should be maintained within +21 - +27°C and high humidity of about 100% . The light should be bright, but diffused - direct sunlight is detrimental to leaves during this period.
After 3-4 weeks of this regime, root rudiments will begin to appear at the base of the leaf rosette and then they will begin to grow. Epin , to the water for irrigation .
If a diseased orchid has several living roots left, or even just one, the chances of saving it increase:
- After trimming the rotten roots, you need to rinse the remaining living roots under warm water and sprinkle the cut areas with charcoal.
- A pre-prepared pot up to 8 cm in diameter is filled with ordinary substrate and a leaf rosette with roots is planted in it.
- Next, the plant is treated as in the first case, placing it in a greenhouse.
If everything went well, new roots will begin to grow in 2-4 weeks .
Is it possible to replant a flowering plant?
An emergency transplant during flowering can be done for a number of reasons: an army of pests has appeared on neighboring plants, you notice signs of rotting or other diseases. An orchid is also replanted after purchase, even during flowering, if it is obvious that the flower does not feel well in this soil. We will tell you how to do this below.
Sometimes you have to make a choice: a long life of a plant with delayed flowering or short days in bloom and the death of the orchid. If you want to see your plant healthy and pleasing to the eye for many years, then do not ask whether it is possible to replant the plant during flowering. It’s better to cut off the peduncle and replant the beauty.
Which one doesn't fit?
But there are a number of pots into which you should not replant a delicate orchid . In them, the tender roots of the plant can begin to rot and it will eventually die.
- For an orchid, transplanting into a glass container is unacceptable, as it will not allow the roots to “breathe.” Such a container can only perform a decorative function.
- For the same reason, a ceramic pot that is covered with a layer of glaze is not suitable: there is absolutely no chance for air to penetrate to the roots.
- You should not take an excessively large container for the flower; it is enough that the new pot is 1-2 cm in diameter larger than the old one.
What kind of pot is needed - capacity requirements
A pot for orchids must be transparent. This condition is necessary in order to observe the development of roots and monitor the condition of the soil. If desired, transparent containers are placed in a pot that is pleasing to the eye. We recommend choosing a larger pot. It will be enough if the new container is several centimeters wider than the previous one.
Before replanting, the new container is disinfected, and then only a layer of drainage is laid out.
Containers for orchids
To choose the right pot for growing orchids at home, you need to consider how their root system provides nutrition: if the roots are photosynthetic, the planting container must be transparent so that they can perceive solar energy.
Photos of what pots are needed for orchids with photosynthetic roots.
When determining what size pots orchids need, it is worth remembering that the volume of the pot must correspond to the size of the root system : if it is too large, it can slow down flowering.
Regardless of what type of orchid is - lithophyte or epiphyte - it is very important that the pot facilitates the outflow of excess liquid and good air exchange , because stagnation of water and insufficient aeration can lead to rot and other fungal diseases of the root system.
Important! Whatever material the pot is made of, it is important that it be equipped with special holes for water drainage.
How to choose a substrate and which soil is suitable
The beautiful orchid needs a loose substrate. It is preferable to purchase a ready-made mixture in a store. If you undertake to prepare the soil yourself, then take expanded clay for drainage, sphagnum moss or crushed conifer bark and charcoal.
The substrate should not only provide the flower with nutrition and oxygen, but also help secure the plant in the pot
After a couple of years, you will notice that the coal and bark have turned into dust, the soil has become dense and settled - it’s time to replant. To help you appreciate the benefits of breathable soil, we offer an introductory video on how to replant an orchid at home:
How to determine that a flower needs replanting?
When purchasing an orchid, owners wonder how to properly replant the flower. Should I replant immediately or wait until after flowering? How to choose a pot and substrate for a plant?
Let us list the signs by which you can determine that Phalaenopsis needs a transplant.
Accumulations of algae and moss are visible on the walls of the pot. This means that the substrate is compacted and poorly ventilated. Orchid roots can rot from excess moisture. The purpose of replanting is to provide the plant with fresh, high-quality substrate.- The roots filled the entire volume of the container and were closely intertwined. This is clearly visible through the transparent walls of the pot. In this case, the purpose of replanting is to change the container to a larger one that is more convenient for the plant.
- Root damage. Healthy Phalaenopsis roots are greenish in color with a silvery coating. If blackened, moldy or dried roots are visible through the walls of the container, the plant should be replanted.
- Pests seen in a pot are a reason to change the substrate.
- The leaves of the plant are limp and do not restore turgor after watering. It is necessary to remove the orchid from the pot and examine the roots.
- The plant moves freely in the pot - a sign of root death. This is a signal for an urgent transplant!
Important! The presence of aerial roots outside the pot is normal and is not a signal for replanting.
When to act immediately
If you notice that the soil has become dense, all the large components are more like dust, the orchid has become a refuge for aphids, thrips, scale insects and other “cute” guests, then it won’t be long until the plant dies completely. Sometimes you can notice rotting of the roots, or the green mass of leaves has become much larger than the size of the pot, which means you need to urgently replant the orchid, and we will tell you how to do this correctly at home.
If your orchid has just arrived at its new location from the store and looks completely healthy, replanting is not required. But when your ward looks unwell after purchase, it is better to start replanting it immediately.
How to get rid of midges in indoor flowers using simple methods. In a special publication on our portal, we will talk in detail about how to get rid of pests in indoor plants. You will learn the reasons for their appearance, the types of midges and their signs and measures to prevent the appearance of midges.
Substrate
It is important to know not only when you can replant an orchid, but also what substrate is required for this. The stores are full of ready-made mixtures for orchids. But you can cook it yourself.
The main component of the substrate for orchids is bark. Mostly pine bark is used, less often larch bark. It is best to get the material from sawmills or timber warehouses. You can also collect it in the forest - you need to carefully, without damaging the tree, cut off pieces of bark, avoiding rotten and affected areas.
Next, the material must be crushed to pieces of 10-15 mm. Then the bark is boiled in a water bath to eliminate the possibility of infection, and dried well.
Experienced gardeners, in addition to the main material, fill the substrate with additives - moss, charcoal, nut shell, etc. It is not recommended to add peat.
For beginning lovers of exotic plants, it is better to use a monosubstrate - only from the bark.
Occasionally, an unconventional substrate is used, for example, expanded clay, pieces of polystyrene foam or mineral wool. But usually flower growers with extensive experience carry out such experiments.
Preparation
The more responsibly you approach the transplant, the more successful the process itself will be. Before you get started, prepare everything you need: disinfected scissors or a sharp knife for cutting faded peduncles, a new transparent pot, fresh loose substrate, an activated carbon tablet.
If the orchid has just finished delighting you with its flowering, then the peduncle needs to be cut off. After this, you can begin the process of replanting the plant.
Consequences and best time in spring
Phalaenopsis are the easiest to adapt after transplantation during the flowering period. They practically do not suffer - they continue to flower and quickly take root.
Other, more demanding varieties may suffer for a long time or even die.
For them, it is better to carry out the procedure in late February - early March, after the dormant period ends and before active growth begins.
Step by step guide
To make the process of transplanting an orchid at home easy, we suggest studying all the key points step by step.
We remove the flower from the previous pot. The more careful the better. The root system must remain intact
For trouble-free removal, it is recommended to knead the pot with your hands.
If the soil or pot is too dense and the plant does not give in, then it is better to sacrifice the container rather than the flower and cut it with scissors. Since the process can be messy, we recommend laying out a large newspaper or heading to the bathroom.
It is generally preferable to remove a plant from a pot under running water, so the roots can be removed painlessly and immediately inspected for pests or rot
Now we will tell you how to properly plant an orchid in a pot. Expanded clay is placed in a new container and lightly sprinkled with substrate. Then you need to carefully plant the orchid, spreading the roots evenly. Hold the plant by the root collar. The remaining space is filled with substrate, the pot is tapped and the plant is watered.
The upper aerial roots should not be forced into the pot; leave them on the surface of the soil.
When examining the roots during transplantation, rotting processes or parasites can be detected. Diseased parts of the roots are cut off and thrown away, the sections are treated with Kornevin and sprinkled with charcoal. The same applies to dried roots. If you notice pests, the plant must be placed in a container with warm, clean water for 2-3 hours, and then treated with a suitable insecticide.
Planting into new soil after washing the roots is carried out only after the root system has completely dried
The lower yellowed leaves of the plant are also removed.
Now you know how to painlessly transplant an orchid into another pot
Transplantation process
A properly selected substrate is 60-80% of success in growing phalaenopsis.
Substrate requirements
The substrate for phalaenopsis should be:
- moisture-intensive - must take and retain moisture;
- breathable - should not cake and become dense (do not have fine dust and fine bark).
The best substrate is well-boiled pine bark (at least 16 hours), 2-3 cm in size.
If the bark is not cooked , it does not absorb and retain moisture well. Therefore, you need to add chopped sphagnum moss (30% by volume).
The bark is cut into pieces with pruning shears:
- For adolescent phalaenopsis, the optimal fraction size is 1–1.5 cm.
- For adult specimens, prepare pieces of 2.5–3 cm.
You can read about bark and sphagnum moss in the article “Substrate for orchids.”
Preparatory stage
Before transplanting, soak the bark in water at room temperature for 4-5 days. Then drain the water (no need to dry).
Important! You cannot plant phalaenopsis immediately after a moisture-intensive substrate in clean bark!
Before transplanting, the orchid needs to be watered . The roots will become more elastic and will easily tuck into the pot.
Carefully remove the orchid from the pot, lightly shake off the old substrate that has grown in - do not tear it off .
Inspection of the root system
It is necessary to check the root system of phalaenopsis. Dry, wrinkled roots, as well as threads without velamen, rotten, should be removed.
Important! Do not wash the roots before planting!
All roots should be dense, without blackness or soft wet spots.
Normally, the roots of phalaenopsis are dense, white or yellowish in color; when moistened, they acquire a green color.
If there was pruning or stripping, then dry it for a couple of hours before planting .
Preventative treatment
If there is wet rot on the orchids, they need to be cleaned to the living thing and treated with systemic fungicides : foundationazol (benomyl) or Previkur.
If the stains are local , then make a paste of foundationazole and coat it. If you need to spray or soak the entire plant, then dilute 5-10 g of foundationazole in 1 liter of water.
Transfer
At the bottom of the pot, about 1/4-1/3, put large bark.
Important ! Phalaenopsis should be planted a moist substrate and watered immediately or the next day, but no later.
Align the orchid vertically in the center of the pot.
Do not compact the substrate , but pour it in parts between the roots, tapping the wall of the pot with your palm.
Important! be no substrate in the leaf axils !
When replanting, you need to fall asleep right under the leaves , that is, deepen the orchid.
Why do you need to remove the lower leaves and plant in a hole?
Because new roots are important , which will grow in your conditions and will be adapted to them.
If the lower leaves get in the way (when the roots grow high above the lower leaves), then the leaves are torn off without leaving any residue.
Important! should be remains of dried on the phalaenopsis stem .
Leaves are removed as follows: cut the leaf along the longitudinal vein and tear it off in different directions from the base.
When replanting phalaenopsis with flowers or with peduncles, the orchid takes root faster and grows roots better.
Video from manufacturers about proper transplantation.
Post-procedure care
The period after transplantation is called recovery for a reason. Any major intervention in the life of a plant creates stress for it. So, a few rules on what to do after transplantation:
- the pot is placed in a shaded place, closer to the eastern window;
- air temperature is maintained within +21°C;
- watering after transplantation is done after 5 days;
- leaves can be sprayed daily with warm water;
- after a month they begin to apply fertilizers.
Simple care techniques will allow this beautiful flower to quickly gain strength.
Does the plant need to be transplanted into a new container?
The substrate of a store-bought orchid most often consists of tree bark with the addition of moss, peat, and charcoal . The nutrients contained in such a mixture last for 2–3 years. Only after this period has passed should you think about replanting the plant. And also if:
The root system has grown enormously, and the plant literally “jumps” out of the pot.- An unpleasant smell of mold and rot appeared, and the roots, which were bright green (in a wet substrate) and silver-gray (in a dry substrate), turned brown or began to turn black.
- The general wilted appearance of the plant, the leaves began to turn yellow and dry out.
- The substrate sank significantly, and a lot of free space appeared in the pot.
Read more about when is the best time to replant an orchid here.
What problems may arise
Let's consider possible problems that may appear after transplantation.
- If the leaves look lethargic, it means you are being greedy with watering: the substrate should not dry out completely. Another reason may be exposure to direct sunlight. Try putting the plant in the shade for a week.
- The plant does not bloom for a long time: if the establishment process is delayed, start feeding earlier.
The more carefully and accurately the transplantation process is completed, the less chance there will be problems after it.
What to do if your home orchid withers after transplantation?
A home orchid withers after transplantation.
Most likely the plant is sick. If planting rules are violated, when mechanical damage to the roots occurs, the leaves do not receive full nutrition. What to do if your home orchid withers after transplantation? Here are the tips:
If you watered a lot, replant the plant:
- With good watering and stagnation of liquid at the bottom of the container, especially if there is no drainage, the roots may begin to rot.
- Then the wilting will soon be replaced by yellowing of the leaves and the plant may die.
- Here an emergency orchid transplant will be needed to save it.
Control pests:
- Another reason could be a pest attack.
- Spider mites, the worst pests of indoor plants, thrive in dry air.
- It can be difficult to notice them right away - they are very small and the bad effects begin to appear when there are a lot of them.
- Whiteflies and scale insects also harm orchids. Providing optimal air humidity will help to significantly reduce the number of these insects.
Protect from the sun:
- If the orchid is not protected from direct sunlight, its leaves will begin to wilt.
- This indoor flower feels best on windows that face east, where the sun appears only in the morning and for a short time.
Containers must be provided with drainage holes, and they need to be made not only at the very bottom of the container, but also on the sides to ensure good air exchange for the roots.
Reproduction at home
The royal flower is the orchid. Care and reproduction at home. In a special publication on our portal, we will talk in detail about how to care for and propagate an orchid at home. You will learn how to properly water an orchid, the nuances of caring for different varieties of orchids, and how to make an orchid bloom at home.
If your plant is mature and you know how to plant an orchid at home, you can start propagating it by getting several flowers at once.
If you have an unusual variety, share it with friends or exchange it with others. This is common on flower forums and is a great chance to add to your collection.
Despite the known four methods of reproduction, two are usually used at home: by children and by dividing roots. After the orchid has bloomed, you can find children from it - side shoots. They are planted in a new small container, maintaining high temperature and humidity in the room.
After some time, the babies take root and turn into an ordinary orchid.
The plant is propagated by dividing the roots, provided that the bulb grows well. It is cut in half, treated with charcoal and planted in different pots. Whatever method you choose, you will need to maintain high temperature and optimal air humidity around the indoor plant for some time.
We can say that the orchid is an amazing plant, and you should not be afraid of the difficulties in growing it. If you want to learn more about how to replant an orchid at home, in addition we offer another educational video where you will hear a lot of tips:
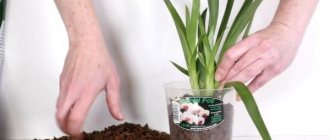
How to transplant children, one child, a shoot of a home orchid: step-by-step instructions
Replanting a baby home orchid
An orchid growing in normal, ideal conditions can produce young shoots, or babies. This is a great opportunity to propagate the plant. What should be done? How to transplant children, one child, a shoot of a home orchid? Here are the instructions step by step:
- The baby should have fairly long roots - more than 5 cm and 3-4 leaves - these are the most suitable parameters for transplantation.
- Children usually appear on the stem or near the root collar. Using a sharp knife, you need to cut off part of the stem with the baby, stepping back to the sides at a distance of about 1 cm . Sprinkle the cut area with coal.
- Prepare a small glass in advance, preferably a plastic one, and add a small layer of drainage.
- Place the baby in a glass and carefully cover it with substrate. for the first 3-4 days .
- Place the glass with the baby in a place where the air humidity is high. You can simply spray the surface of the window sill where the glass is located more often. Try not to get it on the leaves.
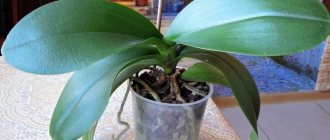
The baby will grow in such a container for about a year, after which it can be transplanted into a larger container. An orchid grown from a child will bloom in three years .
Why replant an orchid after purchasing it?
IMPORTANT! You need to replant your orchid immediately after purchase!
1. Update the substrate.
Over time, the qualities of the substrate necessary for the growth of the orchid are lost.
Hard mineral salts accumulate and air permeability deteriorates.
2. Remove the peat (coconut) cup
Very often, in the roots of an orchid there is a peat (coconut) cup or a lump of pressed moss.
3. Inspect the roots
Orchid roots are an indicator of plant health.
It is unknown how the orchid was cared for during transportation and sale in the store.
Orchid transplant in February. What are the favorable days for orchid transplantation in 2022?
Without exception, all exotic domesticated plants need special care - if you make even the slightest mistake, the beautiful flower will inevitably die. In addition to the basics of caring for pots of orchids on the windowsill, experienced gardeners now rely on other, more ancient knowledge. Wanting to protect their Phalaenopsis and Dendrobium from possible diseases and drying out, people are increasingly paying attention to the lunar calendar.
So, in every year there are a number of the most favorable dates for replanting orchids and caring for them, and there are also days when you should refrain from any work with home ornamental plants.
Favorable for orchid transplantation in 2022
First of all, it is important to remember that any orchid is a plant with a fairly powerful root system, which often looks quite massive and impressive. This means that the underground part of the orchid is just as important as the outer part - the green shoots and flower arrows.
Thus, orchid houseplants certainly cannot be classified as green flowering plants with a weak or underdeveloped nutritional system - rather, everything is quite the opposite here.
As you know, it is the thick and long root shoots of an orchid that allow it to survive in the wild - an exotic beautiful plant clings with its roots to stones, rocks and other soil that is unsuitable for most flowering plantings, literally being held in place by this method. Therefore, orchids are usually classified as varieties of domestic plants with a very developed root system, which plays a primary role in the health of the flower.
That is why orchids are replanted according to the lunar calendar, along with tuberous and bulbous flower plants. In a word, with those that are distinguished by powerful roots.
For this reason, the days most suitable for transferring ordinary cultural plantings in the house to new pots will not be as favorable for orchids. The thing is that plants with large leaves or a massive upper part and weak roots are transplanted into other flowerpots at the peak of the waxing moon.
But this rule does not apply to an orchid - it has a very solid underground part. That’s why planting her in a “new house” is at the peak of the waning, old moon.
An exotic plant is often replanted in September or spring, however, the lunar phase calendar for 2022 suggests that there are actually year-round availability of especially suitable dates for this manipulation. Therefore, you can easily choose the next favorable day and transfer your orchid to a new pot.
For which species is it better not to do this?
Phalaenopsis tolerates the procedure most easily during this period - it quickly adapts and practically does not lose buds.
However, there are also capricious varieties. These include:
- cymbidium;
- dendrobium;
- angrecum.