How to propagate an orchid at home: methods
There are several ways in which you can propagate an orchid:
- Seeds
- Cuttings
- Children
- Dividing the root
In some countries, such as Thailand, you can find flasks with ready-made seedlings that look like decorative decorations for your home. Similar products can be purchased at a flower shop. In this case, practically nothing needs to be done. It is enough to remove the seedlings from the flask and root them. Which also requires some skill and patience. If you don’t have such children, but can boast of a recently acquired plant that is blooming, we recommend waiting a little.
It is best to start propagation in the spring from a ready-made adult bush. You can get a new plant by dividing the roots or by bulbs. You can also use root or stem babies, but they appear only in conditions where the room is very hot and has high humidity. We do not recommend cutting off the roots of children, because in this case both plants suffer: young and adult. The best option is to divide the bush, as well as the children that form on the stems.
Orchid flowers
Orchid: propagation at home by cuttings
Some types of orchids are propagated by cuttings.
Instructions:
- In order to propagate in this way, it is necessary to cut off the side stem and cut it into pieces 10-15 cm long.
- It is necessary that there are at least two dormant buds on one piece. Next, you need to take light soil, moisten it and place these pieces of the plant on the soil.
- Cover everything with cling film or a glass cover and constantly spray the pieces.
- After some time, roots and new sprouts will appear from the cuttings, that is, from the dormant buds.
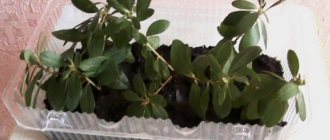
Orchid propagation by cuttings
General information
Phalaenopsis is one of the types of orchids that delights its owners with long-lasting flowering, as well as bright colors and a breathtaking aroma.
Caring for this plant, which grows at home, requires certain skills, but nevertheless, the process of growing phalaenopsis is considered quite simple and suitable for beginners. This is primarily due to the fact that most of the varieties of this plant are perfectly adapted to living in a home environment and, in addition, each of them has been instilled with immunity from most pests by experienced gardeners.
Let us next consider the main features of caring for phalaenopsis in apartment conditions.
Propagation of orchids with peduncles at home
One of the least traumatic methods of division for a plant is propagation by peduncles. Mainly used when plants bloom regularly.
Instructions:
- After the plant has flowered, the peduncle is cut off at the very root. Next, this stem is cut into pieces 3-4 cm long.
- The cut area is treated with charcoal. These pieces of the plant are laid out on moist, light soil and covered. A mini-greenhouse is constructed using a plastic bottle or plastic film.
- Rooting and growth of children occurs at a temperature of 25-28 degrees. Therefore, we recommend that you control the temperature and humidity in this mini-greenhouse and constantly spray the plant.
- Do not let the soil dry out or any stem pieces dry out. After some time, new children and roots will appear.
Reproduction by peduncles
Orchid: propagation at home by children
Reproduction by children can be carried out in several ways. The fact is that in conditions of high humidity and temperature, children produce strong plants on their own. They can be located both on the peduncle and on the side stems. In order for the branch to develop strong roots, it is necessary to constantly spray it with a sprayer.
As soon as the roots appear, the baby is cut off and planted in prepared soil. If your plant does not have children, then you can stimulate their growth. For this, hormonal paste is most often used; it can be purchased at any flower shop.
Instructions for raising children with hormonal paste:
- You need to examine the peduncle as well as the side stems for the presence of white membranes. Now, using a thin blade, you carefully remove this film and use tweezers to pull it down.
- You will see a green dot on the stem or peduncle itself. This is a dormant bud from which children can grow.
- Next, you need to use a toothpick to treat this particular point with hormonal paste. Treatment is carried out once every 4 days. A total of 4-6 treatments are necessary. After them, the sleeping bud usually awakens and a baby grows from it.
- As soon as you see that a new sprout is hatching from this green dot, you need to constantly treat it with a growth stimulator, as well as with water from a spray bottle.
- After 4 leaves appear on the baby, as well as two strong roots, it can be cut off and transplanted into a prepared pot.
Orchid propagation by children
Watering
Orchids are very picky about the quality of water used for irrigation. In order to avoid plant disease, you must use only settled, filtered and melted water.
The watering process can be carried out in different ways: by spilling along the edges of the pot and then draining the water into a tray, by completely or partially immersing the container with the plant in water, as well as by organizing a warm and shallow shower.
The plant in question is very sensitive to the moisture level of the pot, which is why if it is over-watered, its root system can rot and die. The frequency of watering directly depends on the apartment conditions in which phalaenopsis grows. Experienced gardeners recommend supplying a new portion of moisture only 2-3 days after the visible parts of the roots acquire a silvery tint.
Orchid propagation by rooting in water
Many people have heard that an orchid can be propagated in the classical way, that is, by rooting or propagation in water. To do this, you need to use an already faded sprout, that is, the peduncle itself.
Instructions:
- You will need to cut it directly at the roots and place it in a bottle, the neck of which must be cut 5 cm from the top.
- Pour water, it should be purified, soft, filtered. It is best to melt, add an activated carbon tablet to it. This will help disinfect the sprout to prevent the spread and reproduction of diseases.
- Place the peduncle about 4-5 cm into the water. Now you need to start waking up the sleeping bud.
- You need to use a razor or blade to carefully cut off the scales that are located above the bud. Lubricate the bud itself with a cytokinin mixture, which is sold at any flower shop.
- Now you need to treat with this ointment every week for a month. Be sure to change the liquid in the bottle once a week.
- Remember, temperature is very important, as well as humidity. You will not get any babies or new shoots if the room temperature is below 25 degrees. The optimal temperature is 28-30 degrees. This temperature regime is suitable for flower propagation.
- The ideal period for propagation is after flowering. It is then that the plant is set up to reproduce and all efforts will be directed towards raising children.
Rooting in water
Orchid propagation by roots
Propagation of orchids by roots is suitable even for beginners, because the method is quite simple and does not require more time or effort.
Instructions:
- After flowering, you need to remove the plants from the soil and free them from soil. You can rinse under running water to leave the roots bare.
- Next, you need to sterilize the knife, pruning shears, and divide the plant, that is, the roots themselves, into three parts.
- Be sure to apply a little charcoal to the cut area. Now you need to transplant each part into a separate container with new soil.
- Spray the plants morning and evening until you get new leaves and good roots.
Reasons why plants do not reproduce:
- This is possible if you use an initially unhealthy plant. If an orchid has a strange color of leaves, black roots, and also has mucus on them, it is useless to use such a plant for propagation.
- The only method suitable for propagating diseased plants is germination in water by cutting off the peduncle.
- It is necessary to sterilize the cut areas; for this, wood ash or charcoal is used. Never place plants in direct sunlight. This is dangerous and you will not get new babies and good roots from the cuttings.
- Be sure to maintain optimal temperature and humidity conditions. The ideal humidity for orchids is 50-80%, and the temperature is 28-30 degrees.
Root division
Orchid propagation by seeds
You can propagate an orchid by seeds. This is one of the most labor-intensive and costly methods, which requires a lot of time. Getting seeds is easy. In order to get the seeds, you need to pollinate the orchid flower with a toothpick. If you are not ready to do this, you can use already purchased seeds. You need to open the boxes, remove the seeds from them, and prepare a special paste in which your seeds will grow.
Recipe for making paste for sprouting seeds:
- You need a sachet of agar-agar powder, 12 g of glucose and a few drops of phosphoric acid, calcium carbonate and 210 ml of purified water.
- Pour agar-agar with a small amount of water. Let it sit until it turns out something like jelly.
- Boil the remaining water and add the swollen agar-agar. Enter fructose, calcium carbonate, glucose, acid. You should get a substance without crystals.
- Jars with screw caps must be thoroughly sterilized. After that, wipe them with alcohol and let them dry well. Remember, everything must be absolutely sterile.
- Now pour 50 ml of the prepared solution into each jar. Screw on the lids and leave for about a week. Observe what happens to the solution.
- If mold has grown on the surface, you will need to discard this nutrient. If everything is in order, you followed all the instructions, then the solution will not show any signs of mold.
- Now you need to pour a 1% bleach solution onto the seeds. Leave for 15 minutes to disinfect the seeds. Remember to shake the container constantly to ensure the seeds are completely covered with the bleach solution.
- Take a sterile syringe and remove the needle from it. Use a syringe to suck out about 2 ml of the solution with seeds, pour it into the prepared solution through the lid, making a small hole.
- Close the container and place the jars in the greenhouse. After about six months you will get small sprouts, this is if your seeds germinate.
- Now you need to pour another 50 ml of warm, purified water into this jar and add 3 drops of 1% findazole. Leave the extracted sprouts in the prepared solution for 20 minutes.
- This will stimulate their root system. Now these sprouts can be transplanted into a container for further germination. You need to prepare a mixture of soil and bark. Place it in a pot, now add a few crushed fern roots and a little crushed activated carbon.
- Next, take a soft brush, which lifts the sprouted seeds and with its help everything is transferred to the nutritious soil. Only after six months you will be able to transplant the sprouts to a permanent place. Unfortunately, such a plant will not bloom earlier than 5 years after germination and planting in a permanent place.
Orchid blooms
Step-by-step instructions: how to propagate a flower using this method?
The algorithm for separating and planting a baby is as follows:
- Carefully separate the shoot from the mother plant. For this, a blade and a sharp knife are used. Before separation, it is important to make sure that the baby is able to grow independently and has roots.
- After this, let the cut area dry for at least half an hour; for this, it is recommended to place the baby in a sunny place. After this, crush the activated carbon and sprinkle it on the cut areas for disinfection.
- Check the planting container for drainage holes. If they are not available, do it yourself. Moreover, it is recommended to make holes not only at the bottom, but also along the walls of the pot (on the lower 2-3 centimeters).
- Now you can proceed directly to planting the baby. Plant the shoots so that the root collar is above the soil. During planting, handle the roots carefully so as not to damage them.
- Please note that the container should not be bulky. For the first time, a pot with a diameter of 10-12 cm will be enough. Next time, choose a pot whose volume will be 2-3 cm larger than the volume of the root system.
- The pot is filled with substrate prepared in advance. The roots are completely covered with soil. If the entire root system does not fit into the soil, it is left on the surface, but covered with moss.
- When filling the pot, be sure to shake the pot so that the substrate settles. Under no circumstances should the soil be compacted, otherwise it will stop allowing air and water to pass through.
- After planting, place the flowerpot with the orchid on the sunny side of the room, but remember that it is important to protect the plant from bright sunlight.
- You cannot water a young crop in the first three days. This break is necessary to allow the sections to dry. This will prevent the development of diseases and pests.
- For the first 5-7 days, the young orchid is kept in a room with high humidity.
From the video you will learn how to properly separate a baby orchid from a peduncle:
Orchid propagation at home: tips
General tips:
- An orchid can only be propagated if it has been in full bloom for more than 2 years. This is when the plant is considered healthy, mature and suitable for propagation. Otherwise, you will not get results, or worse, you may ruin the main plant.
- There are also defined standards in which stimulation must be carried out. Rooting work is best done in February.
- In this case, you need to plant a flower that has bloomed directly on the western or eastern side, where there is not much light.
- You also need to shade the leaves and not allow sunlight to reach the flowers. During the day, the temperature should be at 28 degrees; the temperature at night can be reduced to at least 18 degrees.
- In this case, watering is reduced to a minimum, fertilizing is not applied until you receive a bud. You will have to spend about a month and a half waking up the sleeping kidney.
- As soon as you see that the plant has appeared, you need to move the flower to the shade. Because it is impossible for the baby to be exposed to direct sunlight. Now you can fully water the plant and add bait that will feed the plant with useful substances.
- Remember that the process of germination and growing a baby is quite long. It will take you about six months to get a full-fledged baby that can be transplanted to a new place. It is in six months that approximately 3 leaves and roots 3 cm long appear.
- Now all you have to do is carefully separate the plant from the main one, that is, the mother one, and replant it in a pot.
Orchid flowers
Despite the apparent difficulties, growing and propagating orchids is simple, provided you follow the instructions and follow all the rules and recommendations. Do not forget to regularly water and feed young plants, as well as rooted cuttings.
Lighting
With the help of light, plant roots take a direct part in photosynthesis. That is why the lucky owner of a phalaenopsis faces the primary task of providing him with the correct lighting. As noted in many comments left by the owners of this type of plant, the longer the daylight hours last, the more often the orchid pleases with its blooms, otherwise the flower may only have abundant and pale foliage.
At home, phalaenopsis should be installed in shaded areas; the best option would be placement on eastern, southern and southwestern windows.
Practice shows that an adult plant needs the average duration of daylight to be about 12-16 hours; as for teenagers, they need to be provided with it for 15-18 hours a day. Some experienced gardeners recommend using phytolamps to create additional lighting.