There is absolutely no need to buy an orchid pot in the store. You can create a beautiful and functional flowerpot with your own hands. Any available materials are suitable for this: from the simplest to the exotic.
When manufacturing, it is necessary to take into account the characteristics of orchids, most of which are epiphytes and lithophytes. Errors in the design can lead to plant disease, or even its loss.
Primary requirements
The best pot for orchids is transparent, with smooth inner walls and plenty of drainage and ventilation holes , such as plastic. These requirements are due to the fact that:
- orchid roots participate in photosynthesis ; direct access to light is vital for them;
- the roots try to cling to any surface, including the walls of the pot; if the inner surface is rough, the roots will definitely take advantage of this; when replanting an orchid, there is a high probability of damage to them, which is undesirable;
- the roots do not tolerate stagnation of moisture , which means that high-quality drainage is needed to ensure rapid removal of water;
- To protect against rotting, good ventilation is also necessary, literally “bathing” the roots in the air.
Special orchid baskets made from various materials that meet the specified requirements are also suitable.
The general wish for orchids is sufficient, but not excessive volume.
What should it be - transparent or not?
Both transparent and non-transparent flowerpots are used by experienced gardeners. Fans are also advised not to limit themselves to one specific option. Beginners are still recommended to use transparent flowerpots . This way they can learn how to properly care for a flower and water it correctly.
There are certain types of orchids whose root systems directly participate in the process of photosynthesis. In this case, it is also recommended to use transparent flowerpots. However, there is a certain type of terrestrial orchids for which the transparent walls of the pot will only be harmful.
Some gardeners advise using various combinations. For example, place a transparent pot in an opaque flowerpot. The reverse is also possible.
DIY orchid pot
You can make your own orchid pot from various materials. It is important to follow the basic rules - lighting, aeration, drainage, smooth walls.
Options
You can make a container for planting an orchid with your own hands in the following ways:
- A simple orchid can be made from a transparent or translucent food-grade plastic container if you make a large number of drainage holes in the bottom and lower part of the walls;
Advice! Beautiful holes can be easily made using a hot soldering iron or a nail.
- A similar container is obtained from a plastic pet bottle ; craftsmen also arrange some kind of hydroponics and aeroponics system;
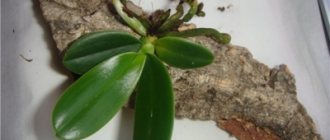
- Experienced craftsmen who prefer eco-style make beautiful eco-friendly orchids from tree bark , which can be placed on a stand or hung;
- A recess is made in the cut of the tree (in the stump), drainage holes are drilled and an original pot is obtained from a piece of wood;
- Successful baskets for orchids made from wooden dies and scraps of plastic;
- Beautiful graceful arboretum orchids are obtained from a transparent glass vase . Here it is important to pay attention to the timely removal of excess moisture and ventilation;
- Orchids are made from a ceramic vessel by drilling several large drainage holes in the bottom and in the lower part of the side surfaces;
- Small aquariums are adapted for breeding orchids ;
- The most difficult and controversial way is to cast pots from plaster or sand-cement mixture , there are also such flower growers. But such containers are least suitable for orchids, unless numerous holes are immediately made in them during manufacture.
Advantages and disadvantages
The advantages of a self-made orchid pot are rightfully considered:
- originality and uniqueness of the art object;
- the ability to make a container without additional financial costs, from auxiliary materials;
- the ability to make a pot that matches the size and characteristics of the plant specimen, organically fitting into the interior of the room, corresponding to the taste of the gardener.
A coconut flowerpot will fit perfectly into an ethno-interior.
Attention! Homemade orchids from food containers and plastic bottles comply with all the rules for growing orchids.
Possible disadvantages of the craft:
- insufficient grinding of internal surfaces, for example, wooden or clay;
- insufficient aeration of glass and ceramic containers;
- lack of quality drainage.
The importance of making the right choice
In the wild, orchids typically grow on trees and rocky mountain slopes.
That is, in other words, in places where there is practically no soil. Also, the orchid does not tolerate large amounts of moisture . Therefore, growing these flowers at home poses certain difficulties.
If the owner has not guessed correctly with the size or material of the container, the liquid will begin to stagnate and the roots will rot. This will lead to the death of the plant. That’s why you should pay special attention to choosing a pot and flowerpot for this flower.
Manufacturing technology
From plastic bottles
Orchidists have come up with several ways to make containers from plastic bottles of different sizes.
Options
A five-liter bottle of drinking water makes an excellent greenhouse for nursing a diseased plant or for creating a composition. Smaller volume PET bottles are suitable for creating small containers, even with an automatic watering system.
PET pots with automatic watering.
Technology
How to make a self-watering system? To do this, take 2 bottles of 1 and 2 liters.
Cut a two-liter bottle crosswise at a height of approximately 20 cm from the bottom. Make 8 cuts, 4 cm long, perpendicular to the upper edge of this lower part. Bend the resulting petals inside the container.
The neck is cut off from the upper part and inserted into a pre-prepared hole in the base (lower part). Secure with glue using a hot-melt gun.
Now cut a small bottle in the same way, at a height of 15 cm from the bottom. The upper part is bent outward, in a strip of about 1 cm. Several holes are made in the bottom with a hot nail, knife or soldering iron, and a long hanging woven cord (7–8 cm) is passed through them.
Fill the pot with substrate and plant the orchid.
This part of the structure is lowered into the base container so that it is held suspended by the previously concave petals. Water is poured into a large container. Moisture will gradually flow through the woven cords into the upper pot.
Attention! Water is added through a spout inserted into a cut in the lower part of the structure.
Made of wood
Orchid pots can be made from wood in several ways.
From a stump
In the first case, they take a piece of log - a stump, also known as a log. The size depends on where the plant will be located and the size of the specimen:
- for large orchids, a floor pot made from a whole piece of wood is suitable;
- for a compact one, a piece of wood the size of a 0.5–1 liter jar is sufficient.
At one end, blind holes are drilled around the circumference with a drill, as close to each other as possible. Then, using a chisel and hammer, remove the marked middle, level it, and sand it with sandpaper.
Then, in the resulting bottom of the future pot, drainage holes must be made . There should not be enough of them, because not only the health of the plant, but also the durability of the container itself depends on high-quality drainage and moisture removal. If the bottom area is small, you can drill holes in the lower part of the side surfaces.
Hemp pots.
Internal surfaces are treated with a non-aggressive deep impregnation antiseptic. On the outside, it is also useful to treat the wood with a protective compound; this will extend its service life and maintain its attractive appearance for a long time.
If desired, the wooden pot is decorated , for example, with jute twine.
Basket of dies
Another way to make a container for an orchid from wood is a traditional orchid basket made from wooden blocks. To do this, take bars of the same size; slats made of oak, beech, pine or bamboo sticks with a diameter of 10 mm are suitable.
Holes are made along each edge of the workpiece with a thin drill.
Attention! To make the basket even, the holes must be exactly the same distance from the edge of the slats.
Thoroughly sanded and coated with a protective compound. To do this, you can immerse the workpieces in an impregnating wood antiseptic for a couple of hours, and then dry for 1-2 days.
We assemble the frame of the future bottom from strong wire, attach pieces of wire perpendicular to the corners, slightly longer than the height of the future basket. We string the first two bars onto the wire from opposite sides, threading the wire through the holes. This is the basis.
We attach several others to these bars, arranging the bottom. The dies can be attached to the base with small screws.
Then we attach the bars to the wires one by one, tighten them firmly from above, making loops (you can use round nose pliers). Another option is to tie the wire in a knot under the bottom. For large orchids, it is preferable to weave the bottom from strong wire.
This pot is not only environmentally friendly, it has better drainage and aeration than others.
From planks
A box is assembled from thin planks or plywood, having previously treated each part with an antiseptic. For fastenings, it is better to use small nails, wire or screws, but not glue.
For a tabletop wooden pot box, it is worthwhile to provide outlets - legs. For a wall composition, one side is made larger; it will serve as a panel to which the container with the plant is attached.
How to make a hanging flowerpot at home?
An orchid in a hanging pot looks impressive and becomes the main accent in the interior. Several methods of making this design detail are popular:
- twine, thin wire or fishing line are attached to the corners of the orchid basket described just above - and the hanging pot is ready;
- You can hang any container with an orchid in a basket made of twigs or wire. To do this, you need to weave a basket slightly larger than the selected pot, place a vessel in it, hang the basket on a hook fixed in the ceiling or on the wall;
- 3 or more holes are drilled along the edge of any pot, twine, fishing line, wire or a decorative thin chain are attached to them. Fasten at one point at an arbitrary (desired) length and hang.
One of the options for hanging flower pots.
Unusual containers
To create original art objects with orchids, you can use other materials at hand.
Made from natural bottle caps
Miniature orchids look original in bottle caps made of natural material. To do this, remove a little porous material from the end of the cork with a narrow knife, place the roots of the orchid inside, and secure the plant with soft thin wire or fishing line.
Using a heat gun, a magnet is attached to one side of the cork, and the composition is attached to a metal surface.
Advice! You can create a composition from several of these cork pots by attaching them to the base of the panel.
From pieces of tree bark
More often, the bark is used to make blocks on which epiphytes are planted.
If desired, you can plant the orchid in any other container. Cover it tightly with thin pieces of bark, tie it tightly with wire, which is decorated with moss or jute.
From a vinyl record
When heated, vinyl records become plastic, they make nice stylish planters, they can be given any fancy shape.
Vinyl record pot.
Baskets
Orchids are placed in baskets made of plastic, wood, wire, or bamboo. Bamboo is considered the most successful - it is a natural material with a smooth surface that prevents root growth:
- One or more containers with orchids are placed in baskets of various shapes and sizes. But more often, orchids are planted directly in baskets filled with substrate;
- Another option is to lay the bottom and walls of the basket with sphagnum, place the main substrate on it, plant an orchid and hang the structure.
Important! Baskets are considered one of the most correct ways to plant orchids. They are second only to blocks.
From coconut
Another natural material, beautiful, comfortable, ideal for orchids is coconut shell. To do this, the nut is cut, the core is removed, cleaned, and dried.
Holes are drilled in the rounded bottom and along the edges, and half of the shell is filled with substrate. Thin chains, fishing line or wire are passed through the holes located along the edges and the “live” composition is suspended from the ceiling or wall.
Are there any disadvantages?
Yes, unfortunately, wooden baskets have one drawback - if an orchid is grown in it, like in a pot, then the roots of the plant gradually stick to the walls. And subsequently, during transplantation, if you tear them off, they, as a rule, break.
Bamboo containers are easier because the surface of bamboo is smoother. But you may also have to suffer during the transplant.
Some people simply place the old basket along with the houseplant in a new one, and fill the voids with substrate. But this is a dubious way out of the situation. Firstly, an old, gradually decomposing substrate remains inside the coma. Secondly, if you constantly do this, the wooden container will eventually take up too much space.
As an option, you can cover the wooden blocks with parquet varnish in several layers. This may solve the problem, but again, will the varnish be harmful to the plant? And the sheen of the varnish itself seems to “kill” the naturalness of the wooden basket. So, here you need to weigh the pros and cons.
Are there blue orchids?
It is easier and simpler, of course, to use ordinary plastic or metal baskets. But they are very inferior to natural wooden frames. Therefore, despite all their advantages and conveniences, wooden ones continue to be in demand.