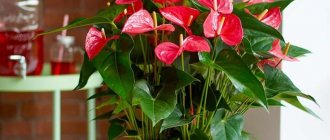
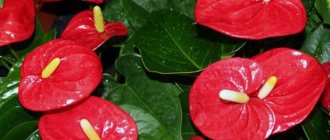
The success of anthurium among floriculture lovers became possible not only due to the relative ease of maintenance, spectacular flowering and decorative foliage, but also the ability to propagate a plant you like at home, root a cutting or rejuvenate an existing specimen of a flower.
Most often, flower growers use vegetative propagation methods, and use the following as planting material:
- cuttings with aerial roots;
- whole top of the plant;
- stem shoots.
Anthurium can also be propagated by seeds, but this is more labor-intensive and time-consuming work.
Dividing a large anthurium bush
This method of propagation is suitable for an adult, well-grown bush. It is usually carried out during a planned transplant in the spring. By the way, this is a good way to rejuvenate a plant, since from one large bush you can get about a dozen new ones.
The separated bushes are completely independent and easily take root in separate pots. If you are still worried about their condition and survival rate, then you can spray the seedlings once a week with any biostimulant (Kornevin, Zircon, etc.)
Before the procedure, water the mother plant thoroughly and allow the moisture to be absorbed. Then carefully remove it from the pot and shake off the soil from the roots. We begin to divide the bush and at the same time make sure that each small bush has its own growing point, several leaves and several developed roots.
When dividing the bush, be very careful, try to untangle the roots and not tear or cut with a knife, since the root system of anthurium is very fragile. If “wounds” could not be avoided, be sure to sprinkle them with cinnamon or activated carbon.
Inspect the resulting bushes: remove dry and wilted leaves, cut off rotten roots. And then plant them in small pots with the soil that you usually use when replanting an anthurium (for more information on how to do this, read the article How to replant an anthurium). Just make sure that the roots of the new specimens are buried in the same way as in the mother plant.
It happens that a young plant is quite tall, and the roots cannot yet hold it - then use supports to tie up the stem. But foresee such a scenario in advance, since the support is installed before planting in the ground, and not after.
Selection of fertilizers
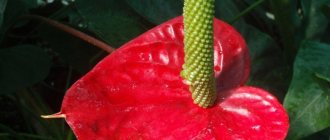
At the active growing season, anthurium bushes need feeding. It is enough to apply nutritional compositions twice a month. Buy fertilizer for indoor decorative foliage plants at a specialized store. In summer, give preference to special fertilizers for ornamental flowering crops. This will help the anthurium (also called the flamingo flower and men's happiness) to delight with beautiful buds abundantly and for a long time.
By the appearance of the bush you can determine which microelement the plant lacks. If it lacks nitrogen, the leaves turn yellow. Then they dry out and fall off. The buds are small, and the shoots stop growing. Often bushes have to be rejuvenated. Here, knowledge about propagating anthurium using leaves at home will be useful to you.
Rooting side shoots
This method of reproduction is natural, and is laid down by nature itself. Children are formed as shoots from the parent plant. They are separated during planned transplantation. You cannot pull out shoots from an anthurium standing in a pot, as the roots will be damaged.
It happens that a shoot is needed urgently, but the plant is still far from being transplanted. Then you can, after thoroughly watering the plant, carefully remove it from the pot, preserving the soil as much as possible, and separate the “baby”. And then return the anthurium back to the pot.
Since the “baby” is less developed than the separated plant, it is necessary to create certain conditions for it to survive better. Fill the seedling pots with sphagnum and moisten it well. Next, we put the children in it and cover them with plastic bags or plastic bottles. We also observe other greenhouse conditions: temperature not lower than 27 degrees, humidity - 80% and above, maximum illumination, but not direct sunlight.
Remove the cover from the plantings every day for 15-20 minutes to ventilate them. Spray with any biostimulant every 3-4 days. After about a month, the young shoot will be sufficiently strengthened and strong enough to be transplanted into ordinary soil.
Air humidification
In nature, anthurium grows in tropical forests, so it is important to create an appropriate microclimate for it. It cannot grow and bloom in a dry room. You will need a humidifier or other proven methods. You can use a tray with wet expanded clay for this procedure. The moisture from it will evaporate, but will not get into the pot. The plant will feel comfortable if you regularly spray the air around it. Just try not to get it on the leaves, otherwise it will lead to limescale deposits on them. The flower then becomes unattractive.
Anthurium propagation from root
This type of reproduction is the initial stage of the previous one. Only when propagating by shoots do we take a ready-made plant, but here we have to grow it from the root ourselves, so the method is more time-consuming.
For the operation you need good roots - strong and healthy. They are separated from the mother plant when transplanted. Next, the separated piece of root is placed in sand or perlite and covered with polyethylene. Make sure the substrate is always slightly damp.
The process is slow and takes about two months. Usually 1-2 leaves appear by the specified date, and then you can remove the polyethylene from the planting. And only after another month the young anthurium is ready for transplanting into ordinary soil.
When it is necessary?
It is best to combine vegetative propagation of anthurium with transplantation. The rhizomes are divided after flowering, otherwise the flower stalks will have to be cut off. Without this, the young anthurium will most likely die: the plant will not be able to both maintain flowering and take root.
Plants are propagated by apical or leaf cuttings with a piece of stems if the root system dies. Sometimes at a sale they buy an old flower with an elongated stem, which will not bloom without rejuvenation, so the top is cut off and rooted.
Growing like a liana, climbing anthurium is propagated by cuttings with one or two internodes at the end of spring, being careful not to damage the aerial roots.
Note! Self-obtained seeds are planted immediately after ripening, regardless of the season. Due to poor germination, you should not wait for spring.
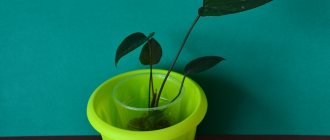
Cuttings
This is also one of the simplest and most frequently used methods. Cuttings are best done in the spring. For the operation, you need stems 15 cm or more long, which have at least 2-3 leaves. The cutting itself is a part of a stem with a leaf on it. By the way, the sheet itself can be deleted.
The cut site on the mother plant must be disinfected with ash or iodine. Leave the finished cuttings in the air for 15-20 minutes to dry. Next, we plant them in plastic cups with sphagnum moss. Don't forget to make holes in the bottom of the cups to allow water to drain.
Another option is to grow cuttings in water. But remember that the water must be warm, purified, and it must be changed every day. You can add a few drops of biostimulant to the water. Make sure that no more than 4-5 cm of the lower part of the cutting is in water or moss.
To create greenhouse conditions, cover the cups with polyethylene. We constantly check the moisture content of the sphagnum moss.
The roots usually appear after a week, and when they reach 2-3 cm in length, young anthuriums can be planted in ordinary soil. In this case, the pots must be small, otherwise the soil will turn sour and the plant will become rotten.
For more information on how to propagate anthurium by cuttings, watch the video:
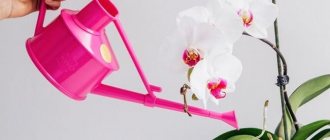
Watering the plant
Anthurium loves water very much. Sometimes it can remain in water without soil for a long time. You need to water the flower abundantly. Stick to the golden mean: too much or too dry soil can harm the plant. Check the pan regularly to ensure that excess water does not remain in it.
Water as soon as you notice the top layer of soil drying out. If the room is very hot, then increase the irrigation, and if the temperature is low, reduce it. For the summer period, two waterings per week are sufficient. In winter, make do with one at a time. Use warm, soft (rain or settled) water for irrigation. Do not use lime water, because anthuriums love acidic substrates.
Germination of seeds
The method is very labor-intensive and unpopular among gardeners. There is a great risk that nothing will work out at all or that the grown offspring will not inherit its properties from the parent plant, since many domestic varieties are hybrids.
But if you still decide to breed anthurium in this way, be prepared for the fact that you will see the first flowering no earlier than in 3 years.
Where can I get the seeds? They are sold at any flower shop. When choosing, look at suitability: if the seeds are more than six months old, then the chance of germination is minimal. Optimally – 3 months between collection and planting.
You can get seeds yourself, provided that you have 2 anthuriums in your house. When the first one blooms, carefully collect the pollen from the cob onto a piece of paper and place it in the refrigerator. We wait for the second one to bloom, and then use a cotton swab to distribute the pollen over its cobs, moving in different directions.
The procedure must be repeated at least 4-5 times. If you succeed, then in a month the cob will begin to swell. The fruit will ripen for about a year. The ripe inflorescence will be greenish-brown and the berries will be very dark. Then we cut off the inflorescence, remove the seeds and dry them for 3-4 days. The sooner you sow the resulting seeds, the better.
For better germination, sow the seeds in peat, after soaking them in a pale pink solution of potassium permanganate for 15-20 minutes. We cover the planting with polyethylene, arrange bright light and 25-degree air temperature. It will be ideal if you can provide light bottom heating of the pot.
Shoots should appear in a week. They need to be ventilated daily for 10-15 minutes and sprayed periodically. The film can be removed only when real leaves begin to appear. Young plants can be planted in cups no earlier than they have formed 3-4 leaves.
Plant diseases
It will not hurt you to know one feature of anthurium: an adult plant begins to shed its lower leaves, they die. Because of this, the flower loses its attractiveness. That's why you need to know several ways to rejuvenate it.
Anthuriums at home can suffer from chlorosis, stem rot, plant pox, anthracnose, leaf bronzing virus, enacium, septoria, and fusarium wilt.
A slowdown in growth and flowering is observed with a lack of phosphorus. Then the leaves begin to curl and become covered with reddish-purple or brownish-purple spots. Acute phosphorus deficiency leads to the cessation of flowering.
If anthurium lacks potassium, brown spots form on the leaves. Only the leaves in the center remain green. Also, a lack of potassium leads to fungal diseases and pest damage.
A lack of magnesium causes leaves to turn pale and curl at the edges. Yellow coloring and spots of the same color indicate a lack of lighting. Affected leaves should be cut off and the wounds should be sprinkled with an antiseptic, such as charcoal, cinnamon powder or wood ash. Even if you are a beginner gardener, then if you follow all our recommendations, you will be able to propagate and properly care for the beautiful anthurium flower.
Leaf propagation
This type of propagation is only suitable for some varieties of anthurium that have thick veins on the leaves. For example, Scherzer's anthurium, Andre, leathery.
For the operation, we cut off the leaf with part of the cutting. Next, roll it up into a tube and lightly tie it with an elastic band. We plant this tube 2/3 of the way into a mixture of peat and sand and cover it with a plastic bag.
We provide greenhouse conditions for planting, ventilate daily and spray with a root formation stimulator. After about 3 weeks, a sprout should appear from the funnel, and after another month the young anthurium can be planted in regular soil.
Temperature
It is important for a novice gardener to know about propagating anthurium at home by leaves and cuttings. Flower care is no less important. The beautiful anthurium is suitable at room temperature. The natural environment of this plant is the tropical zone. The optimal temperature for it is +20-25°C. In winter, it is enough to warm the room to +18°C. Do not place plants near hot radiators. The cause of flower death and disease can be unwanted temperature changes and drafts.
How to plant?
Transplanting and propagating anthurium is permissible only during the active growing season. Each year, only young specimens under 5 years old can be replanted.
Important ! Before planting a flower, it is necessary to treat the container for it; for this purpose, it is recommended to use laundry soap and boiling water.
Soil preparation
The soil mixture for anthurium should be characterized by a slightly acidic reaction, lightness and friability. Since most types of substrate sold in stores are not suitable for anthurium, it is better to prepare it yourself. All the components necessary for this are available for free sale. To get the composition you will need :
- perlite or vermiculite;
- fertile turf;
- leaf humus.
The components should be mixed in a ratio of 1:1:3, and then crushed birch charcoal (5% of the total volume) should be added to them.
The substrate for anthurium prepared independently must be processed by placing it in the oven for 20 minutes at a temperature of +220 °C.
More information about preparing the soil for planting anthurium is described in the video:
Diseases and pests
Lack of proper care causes problems with anthurium:
- The leaves become darker - excessive lighting.
- Anthurium leaves turn yellow or brownish - low air temperature.
- It blooms poorly - lack of light, lack of nutrients in the soil.
- Black and brown spots on the leaves - excessive watering, dense, heavy substrate.
- Anthurium leaves curl - excess or lack of lighting, low air humidity.
- The tips of the leaves turn yellow - low temperature, drafts, too dry air.
- The leaves partially turn black - excess calcium in the soil, too hard water.
Anthurium can be affected by mealybugs, spider mites, root nematodes, and aphids.