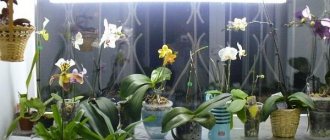
Every experienced gardener knows the huge role that properly selected lighting for indoor plants plays. Along with watering and soil, light is an indispensable component on which successful growth directly depends. It is no secret that in the natural environment, some plants thrive in shaded areas, while others cannot develop without direct exposure to sunlight. At home, the situation looks similar. Let's talk in detail about how to properly make artificial lighting for indoor plants.
Check the spectrum of diodes in the phytolamp
It is well known that plants require sunlight, consisting of waves of different lengths and colors, to grow and develop. In the spring, during the period of growing seedlings, when there is not enough sunlight, artificial lighting lamps are usually used to illuminate the plants. However, their emission spectrum is limited and occurs mainly in the yellow and green color sectors. In addition, incandescent lamps consume a lot of electricity. Fluorescent and modern energy-saving lamps are more economical, but emit little light in the red and orange spectral regions. And plants respond well with response growth to blue and red colors.
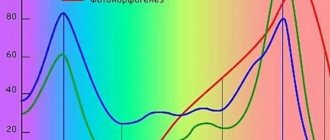
This optimal combination of colors was achieved by using LEDs in phytolamps. Therefore, these lighting sources are called bicolor. To choose the right lamp, you need to look at the so-called spectrogram (see Figure 1). It is also on the packaging of the lamp itself. The spectrogram should have peaks in the blue and red sectors of the spectrum. In the blue sector, the optimal wavelength for seedlings is 440-450 nm, and in the red sector – 650-660 nm. If the spectral indicators deviate strongly in both directions, such a lamp is not worth buying, since waves of other lengths are ineffective for seedlings.
Picture 1
What light is best for growth?
Of course, the ideal light source is solar energy. In apartments with windows facing southeast and southwest, you can grow any flowers, placing them in different parts of the room. But don’t be upset for those who only have a north-facing view from their window. Fluorescent and LED lamps for lighting plants compensate for the lack of sun rays.
Fluorescent lamps for plants are a time-tested budget option. They are suitable for those who are trying to create normal conditions for a flower with little investment. LED phytolamps are for those who want to speed things up and achieve the best results in a short time, despite the price of several thousand rubles.
Distinguish between real and rated diode power
Diodes come in different powers - 1 W, 3 W or 5 W. For the needs of a “home greenhouse,” the most suitable are emitter lamps with a primary lens that scatter light at an angle of 120 degrees. A 3 W lamp with the correct ratio of emitted light and heat is considered optimal.
In order not to make a mistake when choosing a lamp, you need to distinguish between the concepts of nominal and real power. Let's figure out what they mean. Rated power is the power at which the diode operates at its maximum limit. This means that the “life” of the diode under such a load will be short. To make diodes last longer, they are “powered” at half their power, that is, a 3 W diode will actually “show” 1.5 W. This is its real power. Self-respecting manufacturers of LED lamps are required to indicate this information on their websites (see Figure 2).
Figure 2
Content
- 1. Groups of plants according to light needs
- 2. Which plants require additional lighting in winter?
- 3. How to add light to the plants? Plant lamps
- 4. How to organize additional lighting for the plant?
- 5. How can you tell if a plant doesn’t have enough light?
- 6. A few final tips
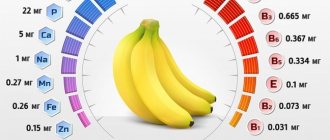
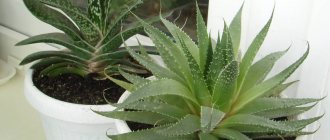
The most unique and amazing property of plants is their ability to create complex organic substances using sunlight. No other living creature on the planet has this property! However, different plants have different light requirements, and they depend, first of all, on the origin of a particular species. Thus, Aloe Africanus, growing in the desert and accustomed to being under the scorching rays of the African sun, requires much more light than Aspidistra, a resident of the gloomy tropical forests of Indochina.
Correctly calculate the power of the LEDs in the lamp
How to calculate the total power of LEDs? How many diodes should there be in a lamp? The answer to these questions depends on your specific situation. The most important thing in the choice is the relationship between the diode and the radiator (more on this in paragraph 6).
The formula for calculating the number of diodes is quite simple: M = K × M1 , where M is the total power of the lamp (W), K is the number of diodes, and M1 is the power of one diode. However, not all manufacturers are completely honest with customers. In order not to fall for the bait, we will close the gap in knowledge.
Let's say you choose a lamp with a power of 54 W and 18 diodes from Aliexpress, where the manufacturer claims that the power of each diode is 3 W. If you measure it with a wattmeter (a device for measuring the power of connected devices), it turns out that it produces 11 W.
It must be taken into account that the diode cannot operate at maximum for a long time! So, let's calculate: 54 W divided by 18 diodes, we get 3 W for each diode, which work at full capacity! But this cannot be! However, you are paying for 54 watts of rated power and 27 watts of actual power (see information above.) But when measured, it produces 11.6 watts. This is a far cry from 27W.
The real output of the diode is half the power. Then if we take 1.5 W of the power of each diode and multiply it by 18 diodes, we get that this lamp should consist of at least 27 diodes, and not 18, as it actually is. Deception? No, it’s just that there are diodes of lower power, that is, 1 W, which operate at half their power. Manufacturers, of course, do not write about this.
But how did this happen? We take 11.6 W of real power from the outlet, divide it into 18 diodes. And we get 0.64 W! That is, 0.64 W is almost half of 1 W.
Now we take the Minifermer.ru lamp. The packaging says that the lamp consists of 12 diodes with a power of 3 W - in total this is 36 W, that is, the real power from the outlet should be 15-18 W. This is true!
This means that the lamp contains exactly 3-watt diodes! They will work for a long time, and at the same time you will get good results. So the information for the lamp must indicate both the rated power and the real one.
How to organize additional lighting for a plant?
It is very important to place the lights correctly. The optimal position is when the light from the lamp hits the plant at a right angle. Beginning gardeners often make the same mistake: they hang the lights too high, trying to cover as many plants as possible with light. As a result, none of them receives enough light.
The main illuminator is placed 20–25 cm from the upper leaves of the plant if it is light-loving, and 55–60 cm if it is shade-tolerant. When installing a lamp, remember that your flower will soon begin to grow, and it is better to provide options for adjusting the height of the lighting fixture in advance.
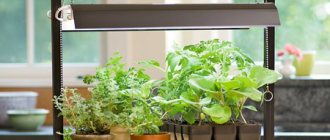
IN THE PHOTO: A ready-made solution with additional lighting for a kitchen or small garden, which includes adjustable lamp height
If your green pets “live” on a shelf or in a plant cabinet, you can use fluorescent tubes installed along the width of the shelf for additional lighting. Mirror self-adhesive glued to the sides is suitable as a reflector.
Mirrors on the side slopes of the window frame will help increase the intensity of natural light for window plants. Firstly, this little trick will allow you to extend daylight hours a little. And secondly, this technique will create the illusion that there are “more plants” on the window, which in itself is very beautiful (but do not forget that mirrors reflect less light needed by plants than ordinary white surfaces).
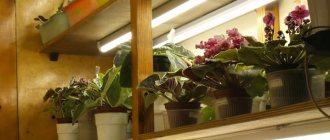
IN THE PHOTO: Organization of additional lighting in a room without windows. Reflective film in the background to increase light output
Windows and reflective surfaces should be regularly cleaned of dust and dirt, even if they appear clean on the outside. During the day, a thin layer of dust, often invisible to the eye, settles on them, which significantly reduces the intensity of natural light.
Consider the radiator area
The radiator is an aluminum housing, which in base lamps is located in a circle or, if it is a linear lamp, the entire housing is the radiator. In Figure 3, the radiator is indicated by arrows.
Figure 3
The heatsink is designed to disperse the heat produced by the diodes. Therefore, the volume of the radiator must be designed for the number of diodes so that they do not overheat. The maximum temperature on the diode crystal should not exceed 70-75°C, otherwise they will “degrade”. That is, if there are many diodes in a lamp and the radiator is small, such a lamp will quickly fail.
Figure 4
In order for the LED phytolamp to work properly, the ratio between the radiator area and the number of diodes must be well adjusted. The distance between the diodes is equally important, that is, if there is enough space between the diodes, the heat is distributed faster. An example of the correct “fitting” of diodes on a radiator is shown in Figure 4.
You can find out detailed information about LED phytolamps from the following video:
Principle of operation
The phytolamp uses linear LEDs and electronic control chips. Power converters help achieve variety in color. Blue lighting promotes the development of the root system and leaf growth, while red lighting enhances flowering.
In lamps, the light sources are configured so that these colors predominate. To a person, such a glow appears purple-pink.
Consider the distance from the lamp to the illumination area
At what distance from plants should phytolamps be placed? The answer to this question will depend on the room and how many plants you plan to grow, as well as the length of daylight hours.
| Real lamp power | Distance to plants | Area coverage (diameter) |
| 7-10 W | 20-30 cm | 25-30 cm |
| 10-15 W | 35-40 cm | 45-50 cm |
| 15-20 W | 40-45 cm | 85-90 cm |
To ensure that the lamp retains its functions and the effect of such lighting does not decrease, it can be equipped with additional lenses in order to narrow the beam of light. The area of illumination will depend on the selected lenses. In order not to overpay for extra lamps and unnecessary power, it is better to select them with the help of professionals.
Consider installing additional lenses
As mentioned earlier, the diodes already have a primary lens and an illumination angle of 120 degrees. But if you hang the lamp too high, less light will reach the plants and it will be more scattered. That is, the light will cover an unusable area. This use is ineffective, but you will have to pay extra for electricity. Installing additional lenses will help solve this problem. They come in 15, 30, 45, 60, 90 degrees. Selecting a lens will make it possible to choose the desired height and maintain the useful lamp power needed by the plants.
Select a lamp of the desired spectrum
Bicolor spectrum - the main spectrum for giving the plant the energy necessary for photosynthesis. A lamp with this spectrum is recommended:
- for illuminating any plants on the windowsill, balcony and in places with minimal sunlight;
- for growing seedlings and young plants;
- for additional illumination of adult plants indoors with additional light sources;
- to support plants in winter and in low light conditions.
Full spectrum. These are bicolor lamps with a wider range of peaks in the red and blue fields. They are universal and will suit many plants. In terms of energy efficiency and spectrum peaks, these light sources are slightly inferior to bicolor lamps, but due to a wider spectral zone they allow the plant to receive maximum artificial light, similar in effect to solar light.
There are more advanced lamps - these are full-spectrum lamps with the addition of white light. They are suitable for use in places where people live. The light from such a lamp looks warm white, but contains wavelengths useful for plants.
Multicolor spectrum is a unique lamp that combines red, blue, warm white and far red light. It provides maximum stimulation of flowering and fruiting in many plants, including orchids and adeniums, as well as a large proportion of red and blue light for photosynthesis during the growth stage. A lamp with this spectrum is recommended:
- for illuminating adult plants;
- to stimulate flowering and fruiting;
- for growing indoors in the absence of sunlight;
- for additional illumination of indoor flowers, especially orchids;
- for illuminating decorative foliage plants.
The average recommended time for additional illumination with phytolamps is 13-14 hours a day. These lamps can be used not only to extend daylight hours, but also to replace it in a dark room. At night, plants take a break because, like humans, they have a biological clock, and they need “sleep” at night.
Peppers, tomatoes, eggplants, and cucumbers are recommended to be illuminated for 8 to 13 hours a day. Green crops (salads) - 8-11 hours a day, slow-growing plants (celery, radishes, turnips) - 12-16 hours a day.
Making LED lighting for flowers with your own hands
There is no point in making LED lamps for a base. It's not practical. We will use LED strip. Making a homemade phytolamp for flowers comes down to three points:
- Calculate the required power of LED lighting for flowers.
- Select the tape model.
- Select a power supply.
LED lighting power calculation
The required illumination for the full growth of flowers is 10000-15000 Lux. Based on these figures, you should start when calculating LED lighting for plants.
Let's look at a specific example . We illuminate the seedlings in a box measuring 0.75 x 0.3 meters. We will provide plants with lighting of 15,000 Lux.
15,000 Lux – radiation intensity of 15,000 Lumens illuminating a surface of 1 m2 from a height of 1 meter.
Our illuminated area:
0.75m * 0.3m = 0.225 m2
So our required light intensity is:
15000 Lm/m2 * 0.225m2 = 3375 Lumens
Let's determine the height of the lighting. The resulting lighting intensity of 3375 Lm is needed when LED lamps for plants are located at a height of 1 m. By reducing the height by half, the required intensity will drop by a factor of 4 (inverse square law). By placing the lighting at a height of 0.5 m, we obtain the light intensity:
Inverse square law - when the distance to the light source increases by 2 times, the intensity of light radiation decreases by 4 times.
3375 / 4 = 845 Lm
All that remains is to select the LED strip according to these parameters.
Selecting LED strip to illuminate flowers
From the calculation, we obtained the required light intensity of 845 Lm. Given the size of the box with flowers, it is better to take 2-4 pieces of tape, 0.75 m long, to evenly cover the entire area.
The luminous flux of the LED strip is indicated per 1 m. If we only need 0.75m, then we need to add 25% to the luminous flux intensity declared by the manufacturer.
845 / 2 * 1.25 (we compensate for the length of the tape) = 530 Lumens (for two segments)
845 / 4 * 1.25 = 265 Lumens (for four segments)
Final parameters of the tape:
- Light intensity (brightness) 465 lm;
- Light temperature – combine warm + cold (3000K + 6000K);
- Supply voltage 12V is the most common type of tape.
SMD3528-W-60led is suitable for us - 3 meters, or SMD2835-W-60led - 1.5 m. Here you can read about tape markings.
Choosing a power supply for LED strips
It is important to choose a suitable driver for powering the lighting of indoor plants. There are only a few criteria:
- Power (most important);
- type of shell;
- additional functionality.
Power supply power calculation
. Let's look at the example of 3 meters of SMD 3528 tape, 60 LEDs per 1 linear meter. Power 1 l.m. 4.8W. Let's add 25% reserve for losses in connections and conductors and we get:
3m (length) * 4.8W (power 1 meter) * 1.25 (stock) = 18W.
Any power supply with a power of more than 20W and a voltage of 12V will do.
Type of shell . There are cases with different levels of dust and moisture protection, in an aluminum or plastic case with forced or natural cooling.
- We select the degree of protection depending on the operating conditions. At high humidity (placed inside greenhouses), the degree of protection should be at least IP67.
- Choose any body material. Doesn't provide any benefits.
- Forced cooling is necessary when the power supply is high (over 200W). Otherwise, passive cooling is sufficient.
Additional functionality . Power supplies can have remote control from a remote control, be equipped with LCD screens, and have timers. Purchase additional functionality as desired. The more functions, the more expensive the power supply.
Connecting the tape to the power supply
Connection diagram to the power supply
Connect all pieces of ice tape in parallel to the power supply. When connecting, use connectors (read more about connecting pieces of tape). One continuous section of tape should not exceed 5m in length.
Remember about the protection class of the LED strip for plants and the power supply. When choosing an IP20 class, place lighting and power in dry, dust-free places. If the class is IP67.68, you can even place it in wet greenhouses.
Buy phytolamps with a guarantee
This is a very important point. Manufacturing companies and conscientious sellers must issue a warranty for the lamp. It is very important. If you buy a lamp from an unverified seller, you will not be able to prove to him that it failed not through your fault, but, for example, due to a power surge. And not everyone will undertake to repair such a lamp. Therefore, choose LED bulbs that come with a minimum 1-year warranty.
Some companies, including Minifermer.ru, offer post-warranty service, which is also important. After all, if one diode fails, it will be replaced immediately. And you don't have to figure out which diode is needed and how to solder it.
If you are an avid summer resident who is used to “preparing the cart in winter,” take care of the future harvest now. With lamps from the Minifermer.ru company, your seedlings do not face a lack of light and heat on the windowsill.
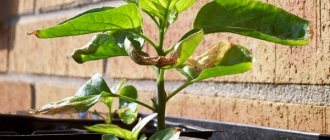
Signs of lack of light
There are a number of signs by which it is easy to identify a lack of light. You just need to take a close look at your flower and compare it with the standard. For example, find a similar view on the Internet. A clear lack of illumination manifests itself as follows. The plant slows down its growth. The new leaves are smaller and the stem becomes thinner. The lower leaves turn yellow. The flower either stops blooming completely, or the number of buds formed is less than the statistical average. It is assumed that watering, humidity and air temperature are normal.