Selecting container and soil
Selection of container:
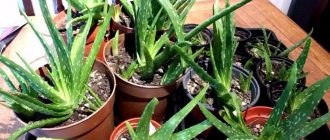
Cacti are quite demanding on the container in which they will grow. The size of the pot should match the root system of the cactus. To choose the right pot , you need to remove the cactus from the old container, carefully straighten the roots and inspect the root system. In some cacti, the roots are better developed in the upper part and are not very long, then the pot should be wide enough, but not deep. In other cacti, the roots grow in length, especially if the root system has a main taproot, then the pot should be deep , but not wide. In any case, the volume of a pot or other container for planting should not greatly exceed the volume of the root system in a straightened form, but it must be taken into account that some space in the pot will be taken up by drainage.
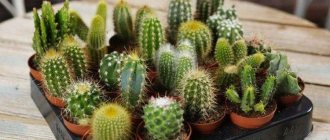
brown spots have appeared on it , or has been damaged in some way, then the dishes should be slightly smaller in size than the volume of the root system. Also, when choosing a container, you should take into account the growth pattern of cacti. For example, mammillaria form many children and many plants are obtained in one pot, so they need wider pots, but not deep ones (see picture). But for Ariocarpus, for example, the container should be deeper than wide.
What material the container for growing a cactus is a matter of taste. Cacti are usually grown in plastic pots, but they can also be grown in clay pots, plastic yogurt cups, ceramic cups, coconut shells, etc. It is undesirable to grow cacti only in metal containers, which can rust, and this will adversely affect the plant.
If there are a lot of cacti and the collection is growing, then it is quite convenient to plant the cacti in square or rectangular containers, which are then placed easily and tightly together on a common tray; this makes it easier to carry the cacti; the tightly arranged pots occupy a stable position. the frequency of watering depends on what material the container is made of . In plastic dishes, the earth retains moisture longer than in clay ones.
Another condition for containers for cacti is drainage holes. I would say that this is a mandatory condition, since cacti really do not like stagnant water in a pot (especially epiphytes). Water that remains in the roots can lead to rotting and death of the plant.
The soil:
Preparing soil for replanting cacti is a complex and controversial issue, in the sense that the composition of the soil depends on many factors, for example, the type of cactus, its age, etc. Different literature provides different recipes and methods for preparing soil for cacti. Despite the fact that they sometimes differ, each author who recommends one or another soil recipe, as a rule, relies on his own experience, which has had good results. The ingredients included in traditional cactus soils are varied, but always the same, these are:
| Ingredients | Properties | Where to get them |
| Leaf ground | rich in nutrients, loose, light, easily absorbs water | In the spring (April), when the snow is just melting in any birch grove or park where there are deciduous trees, the snow, old leaves are raked and the earth is collected with a scoop |
| Clay-turf soil | holds water firmly, and nutrients are washed out of it more slowly | Near the garden, where the ground is overgrown with turf (dense grass), this turf is removed along with the soil with a shovel and laid in layers that can be shed with slurry, then covered and left for at least one year. If this technology is difficult for you, then you can get this soil differently. You need to dig up the turf and, holding the grass, thoroughly shake off the soil from its roots. In this case, it will not be as nutritious as if it had been pressed for a year, but the structure will meet the requirements. |
| Old greenhouse land | used when it is not possible to obtain leafy and clay-turf soil | In the vegetable garden |
| Well-rotted manure (humus) | used in limited quantities to add to very nutrient-poor soil | In the spring, cow manure in the garden or vegetable garden is placed in a tank or compost pit and covered with leaves (birch or apple) and soil, then dug up and used the next spring. |
| Coarse river sand | gives the soil looseness and porosity, is an essential component in any soil for all cacti | On the river, on the beach, be sure to wash well |
| Charcoal | (only deciduous trees), used for disinfection in powder form (sprinkled on wounded roots) and added in pieces to the soil, because has anti-putrefactive properties | Burn any stick made of deciduous trees in the garden or vacant lot, preferably birch, break the firebrand into pieces. Crush some into powder, and leave some in small pieces and add to the soil. |
| Brick chips | Gives the soil looseness and porosity, has the ability to retain excess moisture | Use a hammer to crush red bricks into crumbs, which can be found wandering around the city or at the nearest construction site |
Before choosing a particular soil mixture, you need to know that in any case, it must meet the following requirements:
- the soil for any cacti should be loose, easily allow water and air to pass through,
- The acidity of the soil for almost all cacti should be slightly acidic, better than pH = 4.5 - 6.
You need to know that leaf soil is looser than clay-turf and greenhouse soil. Brick chips and river sand give the soil looseness. And to give the soil the necessary acidity, add either peat (to increase acidity) or lime (gives an alkaline reaction and reduces acidity). It should be borne in mind that young cacti and prickly seedlings need looser and more nutritious soil, so leaf soil makes up a significant proportion of the soil mixture for them.
Adult and old cacti need denser soil, so they take more greenhouse and clay-turf soil. For fast-growing cacti, humus is added to the soil mixture. What else will the composition of the soil mixture depend on? Depending on the species characteristics of the plant, for example, cacti that have absolutely no spines need less calcium in the soil than cacti richly decorated with spines, which benefit from adding crushed, crushed eggshells to the soil.
Landing
Cacti reproduce in three ways.
Children
Planting by children is most common because of its simplicity. To do this, you need to adhere to certain actions.
- Separate the baby (lateral process). Some of them may fall off on their own over time. If this does not happen, you will have to separate it with a knife. This must be done with caution so that no foreign pieces remain on the adult or baby cactus, which may subsequently rot.
- If there are no roots for the children, they need to be grown. First, the baby is put aside for several days so that the cut dries. Then wet sand or water is poured into a narrow bowl, and the baby is placed so that there is no direct contact with moisture. Putting babies directly into water is risky because they can rot.
- The baby with roots can be planted in a pot. To begin with, it should not be large - only a few centimeters larger than the diameter of the baby. For planting, take a pot with prepared soil mixture, as described above. Then a small depression is made in the center, into which the roots of the cactus descend to the border of its neck. The soil around should be compacted a little.
- To keep the cactus straighter and its neck not to be in the ground, you need to sprinkle some drainage stones on top , for example, expanded clay.
Cuttings
Planting cuttings is a little similar to the previous method. For cuttings, you can take the top part of a cactus. It should not be too short, because the substances accumulated in it should be enough for growth. In this way you can revive a broken plant. The procedure in this case will be as follows:
- after separating the top, the cut on the cactus can be left as is or powdered with crushed charcoal;
- the cut needs to be trimmed slightly into a cone shape; it must air dry, which can take up to 10 days;
- then you need to treat it like children who do not have roots - fix it in a vertical position above wet soil or water;
- After the roots appear, we begin planting.
Seeds
Growing cacti from seeds is the most difficult. Even professionals have a certain percentage of losses. For amateurs it will be very high. However, over time, you can take into account your previous experience and delve into the intricacies of this matter in more detail. To germinate seeds, you must follow these steps:
- treat the seeds with potassium permanganate; the ground must be disinfected with steam or boiling water;
- soil is poured into a shallow but spacious container with numerous holes in the bottom, then seeds are laid on top in rows;
- to prevent the seeds from moving, watering should only be from below;
- the entire structure must be covered with any transparent material (film, plastic or glass).
After germination, seed residues must be removed. And the first stage of picking begins. They need to be carefully moved to another container with proper soil and good drainage. It happens like this:
- With any available tool, a symbolic groove should be drawn in the ground;
- with minimal deepening, you need to plant sprouted cacti in them - for this it is better to use tweezers.
This is interesting: How does chestnut bloom and how long does it take to grow?
What do cactus seeds look like?
Many novice cactus growers are interested in whether it is possible to grow a cactus from seeds? The answer is clear: it is not only possible, but also necessary, because seed propagation is the most complete way to replenish the collection, but it requires quite a lot of time.
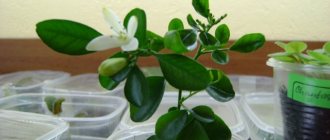
In addition, this is the cheapest option for creating your own collection. Of course, you can buy already grown plants, but here a novice cactus grower will face many pitfalls and disappointments. Purchased specimens may be affected by pests and rot, and cacti grown with fertilizers stubbornly refuse to grow in ordinary soil. In addition, cacti that have been in stores for a long time with a lack of light often have stems that are hopelessly damaged. Finally, the attitude towards these cacti will be completely different than towards plants grown by yourself. Before planting cacti, you need to get the seeds from somewhere. Purchasing planting material will not cause much difficulty. They can be bought in clubs for cactus lovers, borrowed from friends, ordered from private catalogs, and finally purchased via the Internet.
So, what do cactus seeds look like? According to the current definition, a seed is a fertilized mature ovule that has an embryo, reserve nutrients and a protective shell. The seed embryo is divided into an embryonic root, a subcotyledon (hypocotyl), which is part of the stem, an embryonic bud and cotyledons, the number of which in cacti is usually two.
The rest of the seed is filled with a nutrient substance called endosperm. On the shell you can distinguish a hilum - the place where the seed is attached and a micropyle - a narrow channel through which the pollen tube penetrates and fertilization occurs. When seeds germinate, the root elongates and penetrates into the soil. At the beginning of germination, all cells of the embryo divide, but after the formation of the seedling, cell division is localized at the tips of the shoot and root.
The lifespan of plant seeds, including Cactaceae, varies greatly. For example, there is a known case when lupine seeds from the Arctic tundra, after lying in frozen silt for about 10 thousand years, germinated well. Cactus seeds have different life spans.
The seeds of rebutia, ailostera and some other genera have a short life. The period for germination of cacti from such seeds is limited to approximately one year. Conversely, in representatives of the genus Cereus and Mammillaria, the lifespan of seeds can reach 7-9 years. Longer-living seeds are also known. In addition to biological reasons, the lifespan of seeds depends on their storage conditions. There are two independent rules for storing seeds: 1) with an increase in water in seeds by 1% (with an optimum of 5-14%), their lifespan is reduced by 2 times. At the same time, below the optimum, oxidation of seed fats occurs, above the optimum, fungal damage occurs; 2) with an increase in temperature for every 5 °C (in the range of 0-50 °C), the lifespan of seeds is also reduced by 2 times. In other words, so that cactus seeds do not lose their viability, it is advisable to store them in the optimal range of temperatures and humidity, without changing these parameters if possible. For cactus seeds, a good place to store seeds is on the shelf on the door of your home refrigerator.
How cacti grow from seeds in winter
Before transferring to wintering, watering is gradually reduced. After the last watering, the soil is dried and the seedlings are placed in a cool place designated for wintering. The top additional shelf on the window is best suited for this. This shelf provides a higher temperature than on the windowsill, which is important for young plants.
To prevent excessive loss of water by seedlings and contamination with dust, they should be kept on trays covered with glass covers. At first, especially on sunny days, the caps may fog up in the evening, since the plants have not yet completely entered a dormant state, and there is residual moisture in the soil. Fogged caps must be removed to dry.
Wintering of seedlings lasts two months - January and February. In the first year of life this is quite enough. It is necessary to regularly monitor the condition of the seedlings during wintering, and if some of them are too wilted, the soil should be slightly moistened. As a rule, such wintering does not cause problems. In March, with an increase in the number of sunny days and window temperatures, the seedlings begin to be sprayed, and with the appearance of fresh thorns, they begin to be watered. Seedlings that have begun to grow are transplanted into fresh soil. Good results are obtained by growing young plants in the second year of life in common boxes.
When grown together in a large volume of soil, they grow more vigorously than plants planted in individual pots. By the end of the growing season, large specimens of certain species may be quite suitable for transplanting into individual pots to replenish the collection.
Light and temperature
When growing cacti, you need to remember that they are light-loving plants. Lack of light leads to deformation of stems, underdevelopment, and plant diseases. Cacti love south windows. Place them in the brightest sunny location. Some people from deserts, as well as cacti grown on northern windows, require additional lighting with fluorescent lamps in winter
For a better understanding of all the life processes of these prickly creatures, we recommend acquiring serious, high-quality literature about cacti.
If the top of the cactus begins to stretch out and become thinner, it means that it does not have enough light.
Most cacti do not suffer from bright sunlight; in summer, rhipsalis and other tropical forest plants need to be carefully protected from direct sunlight. In summer, provide ventilation and fresh air to the cacti by placing them on a balcony or in a window box, but do not forget to cover them with plastic wrap in rainy weather.
In winter, in apartments with steam heating, cacti suffer from high temperatures and dry air. Place them on a light window between the frames or on a windowsill protected from steam heating radiators with plexiglass. Epiphytic species of cacti are kept in a warmer place in winter.
Wash your windows more often; city dirt settling on the glass greatly reduces the passage of light.
Protect cacti from drafts. Slots in the frames will, of course, lower winter temperatures on your windowsill, but this is not a solution to the problem of cold wintering.
Don't change the location of the cactus unless absolutely necessary, they don't like it. Do not turn the cactus around its axis to make it grow more evenly. In both cases, you may lose the long-awaited flowering. And even more so, there is no need to rearrange a cactus that is gathering buds. In order to always know, and in case of a forced rearrangement, not to be mistaken, which side a given specimen was facing the light, you should make marks on the pots.
Fresh air is much more important for cacti than for most other plants. Many cacti may not bloom only because they do not have enough fresh air. Therefore, in the summer it is better to place them on the balcony or veranda. At the same time, care must be taken to ensure that they are protected from dust, wind and rain. If the balcony is glazed, then the cacti are provided with both shelter and fresh air, and if not, then you can make a canopy over the shelf with the cacti from a light-transmitting material, for example, from a greenhouse film. If there are a lot of cacti, then it is best to put the pots on one common tray, so they are easier to transport.
Ideally, it would be good to gradually accustom cacti to the street, and leave them in the fresh air around the clock until the end of summer and even until the beginning of autumn. Accustoming cacti to night temperature changes helps strengthen the skin on the plant stem; the hardening procedure prepares it for a cold winter. Such cacti are distinguished by shiny spines, bloom better and easier, and have greater resistance to disease. However, with all the love of cacti for fresh air, drafts can be destructive for them.
When is the best time to plant?
There are no clear seasonal boundaries for planting cacti. You can plant a young plant even in winter. However, its growth will be slower. In addition, during this period you need to be especially careful about hydration, or rather, do it as rarely as possible. The optimal time for planting a young plant is the beginning of spring. At this time of year there are all conditions for intensive growth. Sometimes it is important for gardeners that the cactus has an ideal shape.
If it does not receive the required amount of heat, light and moisture at the right time, the shape will be slightly different. But an excess of all this can lead to death.
According to experienced cactus lovers, sowing cactus seeds is best done in February, and sometimes earlier. It will take time for seedlings to appear - from several days to two months. In addition, when planting seeds, greenhouse conditions are created - the container is covered with glass or film, which protects them from cold and dry air. Thus, their picking occurs already in the spring, when daylight hours increase sufficiently and give them every opportunity for development.
Another thing is replanting an already mature cactus. Spring and summer periods are not suitable in this case precisely because of the possibility of buds appearing. In this case, you may not even wait for flowers.
During the period after flowering, the cactus is most vulnerable; it requires some period of recovery.
Drainage for cactus
For cacti, drainage is simply necessary. Even drainage holes will not prevent stagnation of water in the roots, because excess water remains in the pan, from where there is not always time to drain it. Good drainage will certainly protect the cactus from stagnation of water. The dimensions of the drainage are relative - at least 1/6 of the volume of the pot, maximum - 1/3. For drainage, you can use expanded clay, small pieces of broken red brick, small crushed stone, and, for lack of a better option, pieces of foam plastic.
Broken egg shells are also added to the drainage. Preferably for drainage, or you can simply add pieces of charcoal (preferably birch) to the soil mixture.
Even my cacti dry out: 6 most common mistakes that cause succulents to die
Adding an article to a new collection
By some strange coincidence, cacti are unofficially considered among many gardeners to be the most trouble-free indoor plants, suitable for even the laziest beginners. Like, they only need a handful of land, and any place in the room will do, and you don’t even have to think about watering for months.
And when succulents wither and die from such “care”, the first feelings of such gardeners are usually confusion and even annoyance - how come, they promised that these were the most unpretentious plants, but they are capricious!
Let's decide right away - they are not “capricious”, but need care and attention, like any other indoor flowers. The definition of a “low-maintenance plant” does not mean that you can simply forget about it by sticking it in the first pot you come across. Yes, succulents are undemanding and hardy, but to keep them looking and feeling their best, you still have to give them some attention.
So, what are the main mistakes beginners can make when caring for cacti and other succulents? Let's figure it out together.
Fertilizing cactus
There are many different points of view regarding feeding cacti with fertilizers. This is a rather controversial issue and, as a rule, it is based on someone else's experience. Since cacti are very unique plants, fertilizers are special for them. First of all, they differ in that they contain much less nitrogen.
In cacti, the need for nitrogen is extremely limited due to certain physiological characteristics. If there is a lot of nitrogen in the soil, or a lot of nitrogen is in the applied fertilizer, then the cactus stem begins to grow quickly, becomes loose and watery. Many children and offspring appear, but they do not develop into full-fledged plants; the skin of the cactus does not have time to grow and bursts. Wounds and scars appear that rot or become crusty, and as a result the plant will be disfigured or die. Therefore, organic fertilizers are not used for cacti, except in very small doses for epiphytic, fast-growing cacti.
Cacti need phosphorus and calcium more; plants also need potassium during flowering. It is best to use special fertilizers for fertilizing cacti, which are now on sale almost everywhere.
These include “Cactus”
– special concentrated liquid
humic fertilizer
, contains auxins, cytokinins, vitamins B, C, humic acids, nitrogen, phosphorus, potassium. Promotes growth, rooting, flowering, increases resistance to disease. Available in 0.5 liter bottles. Forest cacti - during the period of budding and flowering, 2 caps (8-10 ml) of fertilizer are diluted in 1 liter of water and watered after each watering. Desert cacti - 1 cap per 2 liters of water - water once every two weeks from March to October. Do not use during rest period. Feeding begins no earlier than two weeks after transplantation.
This is important: Since flowering in cacti does not always coincide with the growth period, do not feed your cacti with anything during flowering in winter. You can start feeding cacti only with the onset of the growth period - late March, early April. Fertilizing should be completed before the dormant period begins, i.e. in September. Winter-blooming cacti do not require additional feeding, since the plant itself does not grow, so watering is only slightly increased.
Caring for a transplanted plant
The cactus is not watered immediately after transplantation. Avoid this for about three to four days if the cactus is healthy. If there are any problems with the plant, then do not water it for even longer. Otherwise, rotting may begin. You can safely water the plant when you realize that it has taken root.
If there were signs of disease or pests on the roots of the cactus, then immediately after replanting and taking preventive measures, isolate it from other plants. You can put it in its usual place, making sure that the disease is behind you.
You should not place just a planted cactus in the sun. Its light can harm a plant that has not yet matured.
Photo from the site: indoor.usadbaonline.ru
Replanting a cactus
The ideal time for transplantation is the end of March - May. Young cacti growing in small and cramped containers should be replanted annually. Replant large plants after 2-3 years, but regularly replace the top layer of old soil with fresh soil without damaging the roots. Replanting is necessary for cacti, since shaking the soil provides air flow to the roots and has a beneficial effect on the development of the plant. The pot for replanting the cactus must match the structure and size of the root system.
Do not take dishes that are too large, as this will delay the development of the plant; the soil undeveloped by the roots will turn sour. A pot is considered suitable if the previous one fits freely into it.
3-5 days before replanting, stop watering the plant so that the soil dries out and the roots can be easily separated from the old soil. The soil mixture for cacti is selected based on the biological characteristics of the root systems.
The soil should be loose, easily allowing moisture and air to pass through to the roots, rich in minerals, but not containing organic fertilizers. For most types of cacti, a mixture of leaf, clay-turf, peat soil, coarse sand in equal proportions with small pieces of charcoal is suitable. Sprinkle the prepared soil with granulated superphosphate and mix well. Most cacti prefer slightly acidic soil with a pH of no more than 6-6.5.
The individual characteristics of some species require additions to the standard mixture: plants with strong spines and abundant fluff need more lime, epiphytic cacti and echinopsis need a little rotted cow manure, columnar cereus need more turf soil and crushed stone.
To create the effect of calcareous rocks, i.e., as lime, crushed limestone or marble is added to the soil mixture. The most accessible lime material is old chipped plaster. Fresh lime cannot be added to the soil!
Online store “Labyrinth” – Your guide through the labyrinth of books about succulents and cacti
Cacti with tap and turnip roots naturally grow on clay soil. In indoor conditions, the soil for them should be dense, but water should not be allowed to stagnate in the pot. Therefore, weathered or frozen clay is added to the earthen mixture, which crumbles in the hands when squeezed. You can collect such clay from the ruins of old buildings or in nature, on mountain slopes.
The soil is watered in advance; it should not be very wet before transplanting. It is convenient to carry out the transplant as follows. Cover the holes for water drainage in the pot with shards, lay on top a layer of broken crushed stone, pieces of charcoal, coarse sand in a layer of 2-3 cm, and then an earthen mixture in a layer of 2-2.5 cm or more, in accordance with the characteristics of the root system. Place the plant prepared for replanting on a hillock of soil in the center of the pot and straighten the roots.
Gradually fill the gaps between the walls of the pot and the roots with soil, shaking the pot. This promotes even distribution of soil between the roots. Then, if the pot is small, press the soil with your fingers; if it is large, compact it with a flat wooden spatula. Add soil to the level of the root collar so that the entire green part of the stem is above the surface of the ground. Sprinkle sand or small gravel over the entire surface of the pot in a layer of 1-1.5 cm, which will prevent the stem from rotting.
Cover the transplanted cacti with a glass jar or plastic cap and water for 3-4 days. Cacti cannot be replanted during the period of budding and flowering.
The buds will fall off or degenerate. To avoid frequent transplants, which are poorly tolerated by some types of cacti, fertilizing with an infusion of superphosphate or a special store-bought liquid fertilizer for cacti will help. Feed in a dark place no more than twice a month. Before doing this, water the plant with water. Do not feed cacti that you are going to transplant or newly transplanted plants.
Special treatment method
(or root bath) for cacti with damaged root systems, used during replanting. It happens that a cactus is apparently healthy, but grows very poorly, and the roots turn out to be poorly developed and weak when transplanted. Then you can try the following procedure. After the cactus is removed from the pot, shake off the old soil; you can even wash the roots in warm water, but carefully so that there are no breaks. Then hot water is poured into a cup or glass, at a temperature of about 50-55 °C. For this you will need a thermometer. A dense material is taken and fixed to a glass above the water.
A hole is made in the middle and a cactus is placed there, while the roots up to the root collar should be in hot water, but neither the stem nor the root collar should touch the water. The cactus is kept in this hot water for up to 15 minutes. It is important that the water does not cool down, but is at the same temperature all the time; you can wrap the glass in a woolen shawl, or add hot water, monitoring the temperature with a thermometer, but under no circumstances should you cover the glass with the cactus. This procedure stimulates root formation in cacti. After this, the cactus roots must be dried for 12-24 hours, and then planted according to all the rules.
Aerial Roots on Succulents
One day, while admiring your collection of succulents, you may notice that one of your beauties has begun to grow roots right on the stem! It looks strange and amazing. Like many other external changes on succulents, this is a clue that you need to pay attention to its condition. The roots that appear on the stem are called aerial roots. What are aerial roots and why they appear on succulents you will learn in this article.
Roots are a vital part of plants. Basically, roots support plants in the following ways:
Typically, roots form at the base of the plant and are located in the soil to perform these tasks. Sometimes, this is not enough - the plant's needs for water and a support point are not sufficiently satisfied by underground roots, so additional roots begin to develop directly on the stem. When you see a succulent growing roots on its stem, it means it has some needs to be met. Most often, aerial roots in a succulent mean a need for moisture or an additional support point for the plant.
What are aerial roots for?
Aerial roots are able to take water molecules from the air and transfer them to the plant. This replenishes moisture reserves in the soil. Some plants, such as mangroves, that grow in very wet and swampy areas, typically use aerial roots to do the opposite of helping the plant breathe. Most likely, succulents in such conditions of high moisture would die faster than they would develop aerial roots.
Aerial roots help the plant in several ways. They can help vines climb up or help the soil spread the plant, creating new spaces for rooting. On succulents, aerial roots tend to form where an area of the plant is in a shaky state and is likely to fall over due to damage or ongoing development. If the plant is weakened due to damage or lack of light (lack of light leads to pale color, poor development, loss of plant volume, stretching), it will develop aerial roots in case of a sudden fall to the ground, after which the aerial roots can take root in the soil. By receiving moisture and nutrients, they will also serve as a support for the part of the succulent that has lost its stability.
It happens that the plant looks absolutely healthy and happy, holds firmly in the ground, the leaves are dense and have not lost turgor, but it has aerial roots growing. This means it needs a little more water. You need to water it with a little more water, but don't increase the frequency of watering! However, perhaps the plant itself has already solved the problem by receiving additional moisture - all that remains is to observe it.
What to do with aerial roots?
Aerial roots on succulents are an important indicator of their health. If you understand their signals to us, you will be able to adjust your care in a timely manner and your succulents will be healthier and more beautiful. When you see a plant growing roots on its stem, understand the reason and respond to its needs, don't be afraid to remove them or cut them off if you don't like the way they look. But you cannot treat these roots as a trifle and thoughtlessly get rid of them without eliminating the cause. After all, the plant spent a large amount of energy and resources to purposefully grow these roots.
Aerial roots on succulents tell you that the plant needs something that a normal root system cannot provide. This is good feedback for you regarding care. Some species develop such roots more often than others, but the meaning of such a signal is the same.
Attention! The material is legally protected. Copying of material is prohibited.
Source
Incorrect pot volume
You've probably also seen picturesque compositions of many cacti in tiny pots or a small general container so that it can be conveniently placed on a windowsill or desk. But how do plants live in such a limited living space?
The main rule is that the size of the pot must match the size of the plant. Both among cacti and among other succulents there are forms with short superficial or long roots, fast and slow growing, plants of regular size and their dwarf species and varieties.
And for each of them you need to select a container “according to your needs,” taking into account all the above-mentioned features that you need to know before buying a nice arrangement where all the plants sit in close quarters and in equal conditions without taking into account “personal requirements.”
Cacti are replanted every 2-3 years in containers that are only 1-2 cm wider than the previous ones. Don’t forget that 10-20% of the pot’s volume should be drainage, so preference should be given to deep, but relatively narrow containers.
Decembrist (Zigocactus Schlumberger): secrets of abundant flowering
December is the month of searching for gifts for the New Year, summing up the results of the year, etc. Decembrist blossoms. Zygocactus Schlumbergera - a flower popularly known as Decembrist, usually blooms before the New Year holidays, but with proper care it can bloom several times a year.
Decembrist (lat. Schlumbergera) is popular due to its unpretentiousness and decorativeness - the plant looks beautiful even during the period between flowerings. Caring for the Decembrist is simple, but it has features, knowledge of which allows you to enjoy the flowering of the plant several times throughout the year.
The popular names of plants of the Schlumbergera genus are inspired by the timing of flowering (zygocactus blooms in November, December, January) - “Rozhdestvennik”, “Decembrist”, “Dekabrina”, “Christmas cactus”.
Which foundation to choose
Flower shops offer special mixtures for growing cacti. The soil for succulents is nutritious, but heavy, so it is mixed with coarse river sand and fine crushed stone.
In order not to buy soil, you prepare it yourself. The substrate for cacti includes:
- leaf or coniferous humus - 2 parts;
- turf soil taken from the garden or vegetable garden - 1 part;
- crushed coal or wood ash - 1 part;
- small stones with a diameter of 1 to 5 mm – 1 part.
Too lazy to sort through crushed stone in search of suitable specimens? The component is replaced with coarse river sand.
There is no need to sift the turf soil. Cacti will appreciate needles, unrotted remains of leaves and small twigs. The more heterogeneous the substrate, the lighter and airier it is.
The soil is combined with humus and then calcined in the oven or steamed in a slow cooker. The earth is disinfected so that the root system of the succulent is not destroyed by mold or a colony of insect pests.
Pebbles, which are pre-washed and doused with boiling water, and wood ash are added to the sterile soil. Miniature star cacti love crushed coal. The substrate is infused for several days so that beneficial bacteria appear in the calcined soil, and then it is poured into the pot.
Fine gravel, broken brick or perlite, and grated foam are placed at the bottom of a clay or plastic pot. The material draws excess water from the soil, protecting the cactus root system from fungus. The thickness of the drainage layer varies from 1 to 4–6 cm depending on the height of the container.
The soil in the pot is not compacted. If it settles over time, exposing the root of the plant, simply add a little new soil.
How to replant?
So, how can you transplant a cactus into another pot? Main stages of transplantation:
First you need to try to separate the soil from the pot. To do this, carefully tap the container on all sides. And if it is soft (for example, made of plastic), then you can kind of knead it. But be careful and careful! Next, you need to grab the cactus and pull it out of the container. To avoid getting pricked (and without protection this is almost inevitable in most cases), you can wear thick rubber gloves. You can also wrap the cactus in a soft towel or cloth, especially if it is large. If the plant is small, then plastic tweezers can be used to transplant it. But be careful not to damage the trunk and roots! Next, clean the root system by completely removing the soil from it. Proceed with extreme caution to avoid damaging the roots. If the soil is not cleared, then you can carry out transshipment, that is, move the plant to a new container along with a lump of earth. But after purchase, this is unacceptable, since the substrate will certainly need to be changed. Carefully inspect all roots for damage. If you find them, sprinkle them with charcoal or ash to dry them. Now add a layer of drainage into the new pot. Its role can be played by expanded clay or broken brick. Next, add some soil and place the plant in the container. But it must be placed so that its root collar (the place where the roots are attached to the stem) is located about a centimeter below the edge of the pot, otherwise when watering the wet soil will come into contact with the stem, which can cause rotting. Spread the roots and sprinkle them with soil, lightly compacting it. The soil should be at the level of the root collar; burying the stem is extremely harmful. You can also put a thin layer of drainage on top to avoid excess moisture in the future (it is detrimental to such a plant). This should be followed again by dry rest, which will effectively dry the soil and avoid root rot. Then you can water the plant as usual.
Decembrist does not bloom: reasons
Most often, Decembrist does not bloom due to improper growing conditions: little moisture, little light, cramped pot, poor soil, etc.
In any case, in order for the Decembrist to bloom, it is necessary to prepare it for flowering, ensuring peace in the fall, putting it in a cool room. At this time, the Decembrist is not watered or fed.
At the end of November, you need to move the zygocactus to a warm, bright place, start watering and feeding. After dormancy, the Decembrist quickly wakes up and forms buds.
When the Decembrist has formed buds and begins to bloom, it is necessary to provide illumination of the plant with an additional light source.
Rules for home care for a Decembrist
Following the simplest rules for caring for zygocacti will protect your plants from diseases and pests.
Reasons for Decembrist leaves falling
The Decembrist sheds its leaves (stem petioles) when the conditions of detention are close to unbearable. Examine the plant carefully - perhaps pests drink the cell sap of the zygocactus like fleas. If no pests are observed, then the cause of leaf fall lies in a lack of nutrients in the soil or inappropriate growth factors: temperature, humidity, lighting, etc. replanting can also cause petioles to fall off.