A shrub called spirea is a universal plant, suitable for single cultivation in the garden and for decorating hedges. Its spectacular appearance and lack of difficulties in the maintenance process were appreciated by many gardeners, as well as landscape designers. Reproduction of spirea is accessible even to beginners; it can be grown from seeds, using cuttings, layering or by division. Spring or autumn is ideal for this purpose, but the growing process can also be carried out in the summer during cloudy weather.
Transplantation into open ground and further care
The timing of planting young seedlings in open ground depends on the characteristics of the region.
In the middle zone, work is carried out in early spring or autumn before leaf fall. In colder regions, spring planting is preferred. Spiraea can be planted either in a well-lit or slightly shaded place. You should not place the shrub in the shade, as its inflorescences will begin to shrink due to a lack of light. It is worth considering that most varieties of tree peonies, clematis, and large-leaved hydrangeas will not take root in a shady place. The workpieces rooted in September-October are moved to the garden bed next spring. Cuttings that took root in spring and summer can wait until fall or next spring.
In order for young spirea to grow and bloom, the soil on the site must be slightly acidic or neutral, loose, and permeable. If the soil is heavy, then the size of the planting pit is increased several times, placing a drainage layer on the bottom
When organizing planting and caring for mock orange, this rule is also taken into account.
Even a beginner can plant young spirea in the garden, following a few simple tips:
- Planting work begins with the preparation of a nutrient substrate for filling the hole from 2 parts of garden soil, 1 part of sand and 1 part of peat.
- Dig planting holes 1.5-3 times wider and deeper than the size of the root system of the seedling. Pebbles, broken bricks and coarse sand are placed on the bottom.
- Carefully remove the seedling from the pot, place it in the hole and straighten the roots.
- Cover the bush with a substrate prepared in advance so that the root collar remains at ground level.
- Water the tree trunk abundantly and mulch it.
If you decide to plant several spireas, then leave 50-70 cm between the bushes. When creating a hedge, it is enough to provide a distance of 40-50 cm.
Video with recommendations for growing garden spirea from cuttings.
In the first years of growth, the shrub requires more painstaking care:
- The primary condition for rapid acclimatization of a spirea bush is moderate humidity. Since the root system lies close to the surface, it can dry out on hot days. Watering should be moderate; on rainy days the bush can do without additional moisture.
- To additionally protect the roots and maintain the necessary moisture, the tree trunk circle is periodically mulched with peat and tree bark.
- Growing decorative spirea is impossible without applying fertilizers. In spring, the bush needs a liquid mineral complex, in summer – organic matter and superphosphate. All fertilizers are applied after watering.
- For the winter, young shrubs are protected from the cold. The branches are tied together, bent to the ground, sprinkled with dry leaves in a 10 cm layer, and spruce branches are placed on top.
- Pruning is a mandatory procedure to maintain the beautiful appearance of spirea. The first haircut is carried out after wintering. All frozen and dry branches are cut off completely.
Cuttings are the most popular method of propagating perennials. Both green and lignified shoots take root well, germinate quickly and do not require special maintenance conditions, which means that even a novice gardener can grow wildly flowering spirea from cuttings.
Appearance and biological features
Plants of this genus can grow both small (up to 15 cm) and tall (up to 2.5 m). The branches of the bush are erect or creeping. The color ranges from light to dark brown. The roots are shallow and fibrous. During flowering, spirea is covered with numerous small flowers in inflorescences of different shapes. The color of the petals ranges from snow-white to crimson. Spiraea inflorescences can be located throughout the shoot, or on its upper part or at the end of the branch. The plant propagates by seeds, cuttings, dividing the bush, and layering.
Spirea does not need pruning. It is carried out exclusively for decorative purposes, to give the bushes a more aesthetic appearance. The crown of a plant can be thick and dense or slightly “sparse”, but it always looks attractive. The branches bloom right down to the ground, so there is no unsightly “bare leg” effect.
The shrub is hardy, adapts well to various climatic conditions, so it can be grown not only in the south or in the middle zone, but also in the northern regions. If the spirea freezes slightly in severe frosts, then after pruning it is completely restored and blooms in the same year. For normal development of the plant, a few hours a day of direct sun, fertilizing, and good soil are enough. You don’t have to cover it for the winter
Spiraea blooms on shoots that grow during the same year, so pruning does not spoil its appearance
Useful tips
To propagate spirea from cuttings, you do not need to be a professional gardener. This procedure is quite simple, even a beginner can cope with it. To successfully grow shrubs, you can use the following useful recommendations:
- to protect cut shoots from diseases and parasites, they can be treated with a solution of potassium permanganate;
- the best “neighbors” in the garden plot are coniferous crops;
- when planting in a permanent place, it is recommended to place drainage made of brick chips or a mixture of sand and pebbles in the hole;
- for one year after planting spirea in a garden plot, the plant needs careful care; Watering should be carried out constantly so that the roots cannot dry out;
- during active growth, bushes transplanted into open ground need to be fed; Mineral compounds and organic fertilizers can be used as fertilizing.
You can learn more about propagating spirea by cuttings from the video below.
Vegetative propagation of spirea
How to propagate spirea from cuttings
Most spireas are propagated by cuttings, and both green, summer and semi-lignified autumn cuttings are used for rooting. Cuttings are the most productive method: cuttings of spirea such as Vangutta, willow-leaved, plum-leaved, dwarf, Nippon, white-flowered, medium, low and dense-flowered are successfully rooted in 70% of cases. Cuttings of birch-leaved and oak-leaved spirea have one hundred percent success, and only one-third of the cuttings of sharp-toothed spirea take root.
Experienced gardeners prefer to propagate spirea by cuttings in the fall, in September or October, although spring-flowering species can be propagated by cuttings from the first half of June, and late-flowering species from July. Strong shoots are separated from the bush and divided into parts with 4-5 leaves on each. The lower leaf is removed from each cutting, and the upper ones are cut in half. Semi-lignified cuttings are soaked for 2-3 hours in water, and immediately before planting, the lower part of each segment is powdered with a root former.
The cuttings are planted at an angle of 45˚ in a substrate consisting of equal parts of coarse river sand and high-moor peat, and covered with a transparent dome. Caring for cuttings consists of regularly ventilating and moistening the substrate, as well as daily spraying of cuttings from a fine sprayer with non-cold water. Summer cuttings are planted in a permanent place in the spring, and winter cuttings - in the fall. During transplantation, the roots are picked (shortened).
Reproduction of spirea by layering
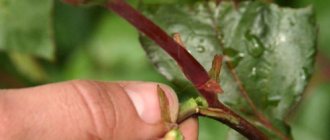
This method of propagation also gives reliable results. In early spring, a shoot of a spirea bush is placed in a dug ditch, pinned in it and covered with earth. The tip of the shoot should remain above the ground. If you need to get several seedlings from cuttings, you need to pinch the top. During the season, the cuttings are watered together with the mother plant, covering the shoots growing from it with humus, and in the fall it is dug up, divided into parts and planted in pre-prepared holes.
Reproduction of spirea by dividing the bush
Divide those spirea bushes that are 3-4 years old, since in older plants the root system is bound by a too dense earthen lump, which is difficult to destroy without damaging the roots. You can divide the bush at any time except winter, but it is better to do it in late summer or early autumn. It is advisable to choose the time so that after the completion of the procedure the weather will be cloudy for several days.
White spirea on the site
The spirea bush is dug up, trying to damage as few roots as possible. Although most likely the peripheral roots will have to be cut off. The root system is thoroughly washed, and to remove all the soil, the roots are placed in a container with water for an hour. Straighten the root shoots, divide the bush with a sterile pruner into approximately equal parts, each of which should receive several shoots and a ball of roots. The roots need to be slightly shortened, and the cuts should be treated with crushed coal. The delenki are planted in pre-prepared holes and watered abundantly several times. If it is hot, you will have to water them daily at first.
Reviews
Last year I made a cutting from my spirea sulfur Grefsheim. I planted it in a pot. He has grown up over the summer. I buried the pot in the ground for the winter, and in the spring the cuttings in the pot have already bloomed! Now it has started to grow rapidly. I plan to plant it so that the bush can be seen by me at least through some window, since its “mother” sits in front of the house, that is, behind the fence from me and decorates the lives of neighbors and passers-by.
Natalia
https://forum.orelflowers.ru/viewtopic.php?f=55&t=34&sid=a9d95a290ec00d12f613518b5fce3685&start=10
This year I buried branches in mine, having previously cut them at the burial site. Successfully.
Olga
https://www.websad.ru/archdis.php?code=61371
I'm not wise with my spirea. I cut the cuttings into cuttings. Earth + a small layer of sand. They take root even without jars in 2 weeks, and they are completely free under the jars. After a month and a half, the bushes are already growing
Elena
https://www.websad.ru/archdis.php?code=61371
All of the listed spirea propagation options are suitable for most common species. Beginner gardeners are recommended to start with a simple method - cuttings. And after gaining experience, move on to more complex options.
How to propagate spirea? This question is faced by many amateur gardeners who want to independently cultivate new plants for their plot. Like other shrubs with fairly long climbing branches, spirea supports propagation by layering and allows cuttings. Collecting seeds also makes it possible to experiment with forcing seedlings at home, but this method is suitable only for the most patient garden owners.
How to plant spirea by dividing a bush in the fall or at other times? What season is best for planting and why? Is seed propagation suitable for hybrids? All these issues are worth considering in more detail, since the process of increasing the number of spiraea on a site requires compliance with certain rules. Otherwise, achieving the desired results will be quite difficult.
Spiraea propagation methods in spring and autumn
Cuttings
For spirea, cuttings are considered the most favorable propagation. Since this is a vegetative method of propagation, all the characteristics of the variety are preserved during cultivation.
Cuttings in stages:
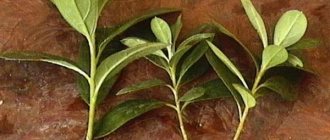
Only young shoots, preferably annual or younger, that grow strictly straight, are suitable for cuttings. The sprout is cut off, which should have 4-5 nodes with double leaves, the lower pair of leaves is removed. It is recommended to make cuts at an angle; the length of the cut cuttings is 10-15 cm.
For better propagation, after cutting, the cuttings are placed in a solution of Epin or Zircon (another biostimulant is also suitable) for 9-11 hours, the solution is made up in the proportion of 1 ml of biostimulant per 2 liters of water. It would not be superfluous to use root-forming powder stimulants - Ukorenit, Kornevin. They sprinkle on the ends of the cuttings.
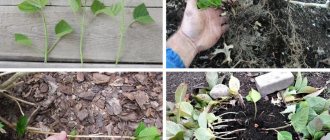
The next step is to place the cuttings in damp sand. They should be placed at an angle and buried by 2-3cm, then sprayed and covered with a jar or film. It is better to place the container with sand in a place protected from direct sunlight.
The container with the cuttings is taken outside and placed in a shady area; cuttings require regular spraying and watering. By winter they are covered with leaves, and in the spring they are planted in open ground.
Video about propagation of Spiraea by cuttings
https://youtube.com/watch?v=JIqcB-PvkWw
By layering
An easier way. Suitable if you need to get a small amount of sprouts. In spring, young branches of spirea (preferably the lower shoots) fall to the ground and are pinched with a V-shaped rod or wire. Sprinkle soil on top.
Next spring the root system of the shoots will be fully formed. You can separate the sprouts from the main spirea bush and replant them for independent growth.
Seeds
A convenient way to get a lot of spirea sprouts at once. However, there are also subtleties here. Propagation by seeds is not suitable for all types of this shrub. If you are not 100% sure or it is impossible to determine the type of spirea from the seeds, you can conduct a test sowing of the shrub. In the fall, I plant several seeds in a pot (the quantity is optional), water it well and sprinkle it with soil in an open area; for the winter, the sprouts are insulated accordingly. In the spring, it will be possible to determine the type of spirea from the seedlings.
Only Japanese spirea, Nippon spirea and oak-leaved spirea can be propagated by seeds. Seeds of other species and varieties do not germinate well, and in the future their hybrids may change.
Several simple stages of seed propagation
In the summer, seed pods are cut from the bushes and placed in a dark, dry place for 2 weeks to ripen.
It is important to have time to cut the boxes before they open (in July - August)
Next, the seeds are removed, and they can be planted in a box from mid-October and throughout November, or in the spring in April. The soil should also be prepared in a ratio of 1:4 - vermiculite and non-acidic peat, respectively. The box on the site is sprinkled with soil; if sowing is done in the spring, the soil in the box should be thoroughly sprayed and covered with film until the first seeds sprout; Regularly monitor soil moisture.
After several months, the sprouts should be pruned. By this time they usually reach a height of 2-3 cm; sit at a distance of 8-10 cm from each other.
The box is again sprinkled with soil; it is advisable to place it in a shady place for the summer and water it regularly.
In the fall, the sprouts can be transplanted into open ground into beds, and only a year later to the chosen permanent place for them. Spiraea sprouts take root and adapt well, but they will begin to bloom no earlier than three years later.
When choosing spirea as a decoration for a site, it is impossible to regret your choice in the future. This shrub pleases with long flowering and unpretentiousness. It can be propagated and replanted at almost any convenient time, and with the help of chic forms it can be used to create unique landscapes and compositions. Spiraea can perform decorative functions in the garden, delight the eye with single flowering shrubs, or serve as a hedge.
I have spirea grefsheim in my summer cottage. This is an unusually beautiful plant, which, as it turns out, does not require much care. I fertilize it once a season with universal fertilizer, and it makes me happy with its appearance. She has already provided for all her neighbors. I propagate by layering (I simply pin a branch to the ground and periodically moisten the soil). I highly recommend it to anyone who doesn’t have spirea.
Advice from experienced gardeners
Spiraea has many fans among gardeners, and they are ready to share their experience of growing this wonderful plant:
- It is best to plant spireas that bloom at different times. Blooming alternately, the shrubs will delight the eye all season.
- As a rule, summer-flowering representatives of pink plants retain their decorative properties for 15 years. Then the plants gradually lose their attractiveness. This means that the bush will need to be replaced.
- It is imperative to remove faded inflorescences. Otherwise, all the energy of the bush may be spent on ensuring the ripening of the seeds.
- Since the roots of the bush are not located too deep, there is no need to worry about high-lying groundwater. However, it is necessary to monitor the condition of the soil, and in particularly dry seasons, provide the plant with proper moisture and spray with warm water.
Spiraea japonica
Meadowsweet is a very common plant in landscape design. Due to its unpretentiousness and spectacular appearance, it is grown from Lisbon to Vladivostok.
Reproduction of spirea
Spiraea propagates by seeds and vegetatively: by dividing the bush, layering and cuttings.
Growing spirea from seeds
Not all types and varieties of spirea are propagated by seeds, but only those that form full-fledged seed material, for example, Japanese, Nippon and oak-leaved spirea. Browned but not yet opened seed pods are cut off, ripened indoors in a cardboard box, and after two weeks the ripened seeds are poured out of them. Sowing is done in the spring in a shallow box filled with a mixture of 4 parts peat and one part vermiculite. The seeds spread on the surface are not covered, but sprayed with a spray bottle, after which they are covered with film or glass and placed under diffused light. From the moment the sprouts begin to appear, the covering is removed, and the seedlings, along with the box, are taken out into the garden. As soon as the seedlings reach a height of 2 cm, they are planted in separate containers, shortening the roots that are too long by a third, and in the second half of August the seedlings are placed in the school bed. Young plants are planted in a permanent place next spring.
Reproduction of spirea by cuttings
This is the most effective way to propagate spirea with a high survival rate of 70%. Spiraea is cut from both spring and early summer, most often using plant residues from pruning. The length of cuttings with at least four internodes and an oblique lower cut should be 10-15 cm. The lower pair of leaves is removed and the rest are shortened by half. Before planting, the cuttings are kept for half a day in a solution of a growth stimulant - Epin or Zircon, after which the lower cut is powdered with Kornevin. The cuttings are planted in a container with damp sand, after which they are sprayed and covered with a transparent cap. As soon as new leaves begin to appear on the cuttings, the film is removed from them, the container is taken out into the fresh air and placed in the shade. Caring for cuttings consists of regular spraying and watering the soil. With the onset of cold weather, the container is placed in a frost-free cellar or dug in in the garden, covered with burlap or dry leaves on top, and with the arrival of warmth, the cuttings are planted in a permanent place.
Reproduction of spirea by layering
It is easy to propagate spirea by layering. To do this, you need to bend a low-growing branch or young shoot to the ground, fix it in this position and sprinkle it with earth. Caring for the cuttings involves regular watering and fertilizing. Keep in mind: if you completely cover the cuttings with soil, it will produce numerous shoots, and if you leave the tip of the shoot above the surface, then in the spring it will form a developed single plant.
Reproduction of spirea by dividing the bush
It makes sense to propagate spirea by dividing the rhizome only when replanting the bush. A plant that has reached three to four years of age can be divided throughout the season. Please note that the survival rate of the cuttings improves if the weather is cool and cloudy for 7-10 days after transplantation.
The bush is dug up, cutting off the roots that extend too far to the sides. The root system is placed in a container with water for an hour and a half to remove the soil. Using a sharp sterile knife or pruning shears, divide the bush into several parts so that each of them remains with a root lobe and 2-3 developed shoots. The sections are sprinkled with crushed coal, after which the sections are planted in pre-prepared planting holes. After planting, the surface is compacted, watered and mulched with humus or dry peat.
Growing spirea from seeds
How to root a rose from a bouquet at home
Propagation by seeds is available only for specific varieties of spirea, for example, Japanese or oak-leaved. It is better not to use hybrids for this purpose, since their seeds have a low germination rate, and after germination they are able to change the properties of the original species. Growing a shrub from seeds is easy and quick; this method allows you to get many plants at once. The seeds do not require preparation; if collected in the summer, they can wait until sowing until autumn or spring.
Important! Each branch with a seed box should be cut no later than July or August. At this time, they are in a closed state with seeds inside. The boxes are set aside to ripen, then the seeds are pulled out and removed before sowing.
The ideal time for sowing in the fall is October or November; in the spring it is better to do it in April. Seeds can be planted according to the standard scheme in soil made from one part vermiculite mixed with four parts peat. The seeds are laid out on the surface of the soil and sprinkled with earth on top, in the spring they are additionally moistened and covered with film. Containers with seeds are placed in a dark place and returned to light after germination. When the sprouts increase to 2 cm after two months, they are pulled out in bunches and divided to store larger quantities, diving into separate containers.
Spiraea bushes
A third of the length of each root is pinched. Plant the sprouts at a distance of 5-7 cm from each other. It is better to place the box with sprouts in the shade in the summer, where the plants need to be watered frequently. In the fall they are planted in a temporary bed, then transplanted to a permanent place next year.
For your information! Young bushes grown from seeds will bloom only after three years.
Propagation of spirea in summer using cuttings
Knowing how spirea reproduces in summer, it is better to choose cuttings for cultivation. Thus, the bush is propagated using green or woody cuttings, depending on the time of year. It is worth taking annual or last year's sprouts, the bark of which remains light during growth. Cuttings of such spirea are carried out in the summer, but the sprouts themselves are prepared in cloudy weather.
Important! Materials for planting are cut only from healthy bushes; if there are pests, the main plant will need to be treated
Cuttings of spirea
In order to root the cuttings well, the spirea is pruned; green shoots are selected for this procedure. Their tops need to be cut off to avoid rotting; in this case, planting will be possible even for novice gardeners. The prepared cuttings should not have leaves at the bottom; it is enough to leave only the top four. The sheet plate itself is made shorter by a third.
Cuttings from the bottom are moistened in a solution of potassium permanganate, then the shoots are planted in a substrate with the addition of a nutrient concentrate. Each branch should be at a depth of at least 1.5-2 cm, with a gap of 3 cm left between them. For rooting purposes, a place in the shade that is well ventilated is suitable. The shoots are additionally covered with a bag or glass to create a greenhouse effect. They are planted in a permanent place after complete rooting.
Reproduction of spirea
Features of cuttings of Japanese spirea in summer
Japanese spirea, or bride, whose full care and reproduction should be carried out according to the rules, has its own differences. You need to plant cuttings at least 7-15 cm long, taking into account the size of the main plant. Their shoots are cut with a razor or a sharp knife just below the node, and the leaves on the underside are removed. Then the ends of the cuttings are dipped into a solution with a phytohormone. When they have stood there for several hours, they can be planted in pre-prepared holes in the soil.
How to root white spirea from a twig
You can easily root a white spirea or Vangutta bush from a twig at home
It is important to plant the sprouts in the substrate so that they quickly form a root system. To prepare it, sand and high-moor peat are mixed.
The cuttings are kept in solution in advance, then dipped in a growth stimulator, and then transplanted into the soil. For the purpose of disinfection, plantings can be sprayed with garlic solution, adding 1 teaspoon of the resulting pulp to 1 liter of water.
How to propagate spirea
It is better to plan the propagation of Japanese, or ordinary, spirea in the spring for the period before the buds on the trees swell. Usually this is mid-March, but in other regions the dates can shift depending on the climate. If the gardener misses the right time, he will need to wait until the end of increased leaf growth in late spring, when the plant begins its flowering period.
Blooming spirea
Important! Since loss of moisture is detrimental to young shrubs, the plant can be propagated in summer on cloudy days. Due to heat and lack of water, the bushes may not take root and die in the early stages of growth.
The optimal time for summer is early to mid-June, but you should wait until the plants stop blooming before taking cuttings. Spiraea of any variety can be propagated by cuttings in the summer. If the gardener does not want to spend a lot of time, he should postpone the work until the fall, and it must be completed strictly before the onset of frost.
The optimal period is mid-September, but plants can be planted until the beginning of October inclusive. It’s worth finding out in advance how to propagate spirea correctly in the fall. At this time of year, new plants will not need careful care; they will only need to be insulated to protect them from the cold in winter. This saves time, because in summer and autumn the bushes need to be watered and sprayed frequently so that the planting material takes root faster.
Rooting
To stimulate root growth after cutting, it is recommended to place the branches in a special composition for some time. In the store for these purposes you can purchase such products as “Kornevin”, “Heteroauxin” and “Vympel”. After processing the branches, they need to be planted in small containers. Let's look at the rooting process step by step.
To root shoots at home, you first need to prepare the substrate. The easiest way is to use wet sand. You can also mix sand with peat or use any other loose soil. It is recommended to treat the substrate with a fungicide to prevent root rotting. As for the containers in which the branches will be planted, any containers with holes in the bottom will do. Correctly plant cuttings to a depth of 3 cm at an angle of about 45 degrees.
It is necessary to maintain the angle of inclination so that the growth of the upper parts of the branches slows down, and root formation, on the contrary, intensifies. It is important that the soil is moist during planting. After the branches are immersed in the substrate, they also need to be sprinkled with water
It is advisable to cover the top of the cuttings with film or a cap from a plastic bottle. This manipulation is necessary to create conditions of high humidity and maintain temperature. Periodically, the seedlings are taken out of the shelter and moistened with a spray bottle. During cultivation, it is important to prevent the soil from drying out, but at the same time not to over-moisten the spirea. Containers with cuttings should be placed on the windowsill, where the sunlight will not be too bright. An alternative way to keep seedlings for rooting is to bury containers in the garden. Dry leaves or peat should be placed on top of the soil so that the root system does not freeze. In winter, containers with seedlings are put into the basement or transferred to another dark, cool place.
You can grow shoots not only in pots. If desired, a greenhouse can be built on the site for the spirea.
- First, the bed is dug up and organic fertilizers are added. It is recommended to add peat mixture and river sand to the soil. Then it is recommended to moisten the soil well.
- The branches are planted at a distance of at least 10 cm from each other. Next, you need to install the greenhouse frame and stretch the film on top. The polyethylene must be firmly fixed, pressed to the ground along the perimeter of the greenhouse with bricks or other heavy objects.
- It is recommended to open and ventilate the mini-greenhouse periodically. And also do not forget about regular watering of seedlings. For the winter, the film is removed and the cuttings are sprinkled with a peat mixture.
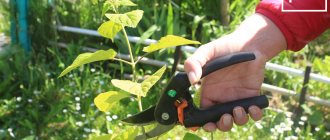
Harvesting cuttings
As noted earlier, it is recommended to harvest branches in cool and cloudy weather. Branches are cut from healthy and strong bushes. If the plant has signs of damage by diseases or parasites, then before taking cuttings the bush must be treated with special means. After spraying, shoots can be cut off no earlier than on the fourth day. If it was not possible to cure the plant the first time, it is recommended to repeat the treatment of the bush. For propagation, you need to cut only straight branches growing upward. Brown shoots should not be older than one year.
If the harvesting of branches occurs in the summer, then those shoots on which flowering has already stopped are cut off. It is desirable that all the leaves on them are intact. Both very young cuttings and annual cuttings are suitable for propagation. The length of the cut branches should be about 11–15 cm. Each cutting should have at least 4 green leaves or buds. It is necessary to cut off the shoot with a sharp knife or blade at an angle of 30 degrees. The top of the branch also needs to be trimmed, but this time exactly at a right angle.
Important! It is recommended to trim the leaves a little: the two lower ones are completely removed, and the upper ones are shortened exactly by half. This procedure will speed up the rooting of cuttings, as it will ensure less moisture loss
Diseases and pests
The plant is very resistant to most dangerous diseases, but sometimes gray mold or spotting may appear on the bushes. These are fungal infections that require fungicidal agents, for example, foundationazole or phytosporin-M, to combat them. There are also pests that can damage bushes if measures are not taken in time. Their list includes:
- rose leaf roller. It can appear on shrubs in late spring and damage leaves. To eliminate caterpillars, it is necessary to use pyrimor;
- spider mite In the presence of mites, spirea leaves begin to turn yellow, and a thin cobweb appears on their underside. Plants should be treated against pests with karbofos, acrex or tincture of tobacco dust;
- aphid. This pest can be found in the summer; aphids can damage both leaves and flowers. To eliminate it, you will need to treat the bushes with tincture of tobacco dust or the drug pirimor.
Damaged shrubs treated with drugs should stand for at least a day, covered with cellophane. If necessary, the procedure must be repeated several times and the bushes should be opened only after the pests have been completely eliminated.
Cuttings of spirea
You can get several cuttings from one plant at once. This is convenient and cheap if you need, for example, to prepare material for planting a hedge. Branches are cut specifically for propagation, or specimens obtained as a result of formative or sanitary pruning are used.
The deciduous spirea shrub tolerates pruning well, resulting in a more attractive appearance.
You can harvest twigs for propagation in spring, summer and autumn. The process of cutting, planting and caring for cuttings at any time of the year is almost identical. In each case, transplanting the rooted shoot to a permanent place is carried out only the next year.
Obtaining spirea cuttings in spring
In May, annual shoots of brown color are taken; they are semi-lignified. The length of the cutting is chosen to be 12-15 centimeters, the number of internodes on it should be 4-5 pieces.
We always use branches that grow vertically; it’s good if they are straight. Taking into account the season, we help the cuttings with special stimulants so that they take root faster and more painlessly.
You can use epin, zircon (liquid preparations), then granular or powdered heteroauxin, rootevin.
We plant the prepared cuttings in damp sand or peat and cover them with polyethylene (a cut plastic bottle). Pots, containers, mini-greenhouses, greenhouses or special cuttings - there are many options for planting.
Cuttings of spirea in summer
In June (Japanese spirea) or July (most other species), we take shoots that have just faded, and the leaves on them grow from each internode. Gardeners successfully use both green young twigs and semi-lignified annual stems.
- The length of the cutting is 10-15 centimeters, there are at least 4 buds on it;
- Remove the lower leaves and cut the upper leaves in half;
- Place the branches in a solution of root formation stimulator (epin) for 4-6 hours;
- Before planting, dip the lower cut into dry root or heteroauxin (do not shake it off);
- You need to plant in a mixture of wet sand and peat, or simply in wet sand or vermiculite, in any case, the soil should be light and loose;
- We place the branches in the ground at an angle, deepening them no more than 3 centimeters.
Sprinkle the shoots with water and cover them with plastic wrap or a plastic bottle (remove after a couple of weeks). The seedlings are provided with a warm, humid environment. From time to time we water and spray the shoots, avoiding drying out and waterlogging.
Sprinkle seedlings wintering outside with peat or spruce branches. For the winter season, containers or boxes are also brought into the basement, pots are left in cool rooms or on a dark windowsill.
It is convenient to root spirea shoots both in a pot and in a greenhouse. I am building a kind of greenhouse for cuttings of any garden crops. I do this:
- In a sunny area I dig up a small bed;
- I add humus, peat and sand and water it;
- I level and plant shoots at a distance of at least 10 centimeters;
- I stick arcs directed from east to west and cover them with polyethylene;
- I sprinkle the edges of the film with earth (can be reinforced with bricks or boards), and shade the top with tree branches (I have bird cherry or willow);
- I don’t cover the ends with branches, there’s only a film there.
Sometimes we ventilate the cuttings, water them, and for the winter we remove the film cover and sprinkle the rooted seedlings with peat or humus.
Technology of spirea division
Dig up a spirea bush, covering about 60% of the crown projection. It's okay if you have to cut off a few roots that go far to the sides. Wash the roots. To wash away the soil from the roots, it is convenient to simply place young plants in a bucket or bowl of water for an hour. Soggy soil is easily washed off. If possible, straighten the roots of the spirea.
You can divide the spirea bush together with the earthen lump without washing it. But in plants that were planted at one time from containers, the roots sometimes become so twisted that when dividing “blindly” you run the risk of leaving half of the spirea bush almost without roots.
Cut the bush with pruning shears into 2-3 parts. Each division should have at least 2-3 strong shoots and good roots.
It is desirable that the divisions turn out to be more or less equal.
Trim the roots of the spirea: renew the soaked sections (where they are clearly visible), shorten the long cord-like roots, trimming them to the length of the rest. After planting, they will begin to branch intensively, ensuring the plant’s survival rate.
Dig a hole for planting a spirea section and place a mound in the middle of the hole. Place the division on a mound and distribute the roots so that they are directed more or less evenly in different directions.
Fill the hole and thoroughly water the young spirea in several stages. In hot, dry weather, you need to water the spirea at least every other day, in rainy and cloudy weather - once a week. Spiraea, divided in late summer-early September, takes root more easily. Even if the weather is hot during the day at this time, fog gathers in the evening. And high air humidity with warm soil promotes rooting of plants.
Propagation of spirea by cuttings in spring
And, by the way, purchasing seedlings is not necessary, because vegetative propagation of spirea shrubs is possible. We will talk about cuttings in the spring.
Propagation of spirea by cuttings in spring - cutting shoots
Cuttings are one of the most effective methods for propagating spirea. It is usually held in mid-summer or autumn. But if you wish, you can do this in the spring, in May. In this case, spirea is propagated by green or semi-lignified annual cuttings. For spring cuttings, young annual shoots that grow straight and stretch upward are used. Using a sharp knife or pruning shears, cut the branch into cuttings up to 10-15 cm long. Each should have 4-5 internodes (that is, pairs of leaves). Moreover, the lower internode should be cut off without leaving any petioles. Cuts on cuttings should be oblique, at an angle.
Reproduction of spirea in spring - planting cuttings
In general, spirea cuttings root well. However, during the procedure carried out in the spring, special processing of the workpieces is recommended to promote rapid root formation. Prepared cuttings should first be placed for 4-12 hours in a solution of any biostimulant at your disposal - Epin, Albit, Energen, Zircon and others. In their absence, experienced gardeners advise using natural biostimulants, for example, aloe juice (3-5 drops in water). It also doesn’t hurt to sprinkle the ends of the cuttings with a root-forming stimulant in powder form, for example, Kornevin, Heteroauxin, Ukorenit.
After this treatment, the cuttings are placed in a container with wet sand, buried at an angle to a depth of 2-3 cm. Do not forget to spray the cuttings and then place them under a jar or film.