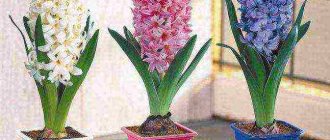
Geranium, or pelargonium, is very popular among gardeners for its unpretentious nature and wide palette of colors. Bright and varied inflorescences serve as decoration for the garden and add color to any interior, be it an office or a living room. The plant is easy to care for and easily reproduces vegetatively and with the help of seeds.
Geranium, or pelargonium, is very popular among gardeners for its unpretentious nature and wide palette of colors. The illustration for the article is used under the standard license ©dachnyedela.ru
Cuttings
There are two methods of cuttings:
- You need to select side shoots 5-7 cm long with 2-3 leaves. Cut the shoot from the parent stem with a sharp knife. The resulting cuttings should lie down for 2-3 hours so that the cut area dries out. After this, treat the cut area with activated carbon.
- Two weeks before the cutting procedure, make circular cuts through the bud on the bare trunk of the parent plant. At the site of the cut, gum appears, in which the rudiments of roots are formed. Carefully separate the cuttings from the mother stem.
This method of cutting is considered radical, but more effective. The shoots quickly take root and grow.
Flower growers prefer the vegetative method of propagating pelargonium. The illustration for the article is used under the standard license ©dachnyedela.ru
Geranium and pelargonium: what is the difference?
Pelargoniums are often called geraniums because of their similar appearance. But there is still a significant difference between them. Geranium is found in many parts of the world, usually in the Northern Hemisphere, so it can grow both indoors and easily endure winters in the garden.
Pelargonium is a native of Africa and feels better on the windowsill. It is also planted in the garden for the summer, but completely dies out during winter. Therefore, in the garden, geranium is considered a perennial, and pelargonium is considered an annual. In addition, “African” is distinguished by more lush inflorescences. Despite this, the principles of care and breeding of the two plants are practically no different. This article will discuss how to properly propagate geraniums.
How to root shoots correctly
In order for the plant to take root and take root, it is necessary to prepare the right soil. Its composition should include soil with ⅓ agrovermiculite and sand. The bottom of the container where the cuttings will be planted is lined with expanded clay or polystyrene foam, and the prepared soil is poured on top. Before planting, the soil must be disinfected.
- Shoots with root rudiments are planted in the soil to a depth of 2-3 cm.
- Leave in a cool place, without direct access to sunlight.
- Water the cuttings carefully, moderately, through a tray. Avoid excessive moisture.
- If the leaves begin to turn yellow, cover the plant with a glass jar.
- A full-fledged root system develops within a few days.
For rapid root growth, you can use water:
- Cut shoots treated with charcoal are placed in a jar of water.
- To speed up the process, you can add activated carbon to the water.
- The roots are expelled very quickly. Within 2 weeks, a full-fledged root system is formed.
When is the best time to propagate pelargonium?
To propagate geranium from seeds, sowing is done from December to April. It all depends on when they want to get flowering: for different varieties and species it occurs 4-6 months after germination.
If the owners cannot provide sufficient lighting and the “correct” temperature for the seedlings, it is better to avoid propagating geraniums by seeds at home in winter. And reschedule the operation for March-April.
You can propagate the crop vegetatively at any time. But cuttings produce roots better and faster from the first days of spring until the end of summer inclusive. For rooting under favorable conditions, most varieties will need:
- in March and April – about 10 days;
- from May to the end of August – approximately 2 weeks;
- September and February – from 14 days to a month;
- from October to January the result will be unpredictable, much depends on the condition of the mother plant and external conditions.
In a cold room with a lack of light, it is better not to propagate geraniums in winter. Just like in 30-degree heat in the summer.
Breeding Royal Pelargonium is the most difficult. The operation is carried out only in the spring, so there is a greater chance that the cuttings will take root. In autumn or winter they are more likely to rot than to take root.
Dividing the bush
Pelargonium must be replanted every 3 years. If this is not done, the plant grows greatly, the stems become denser, the inflorescences become smaller and lose their attractiveness.
This method is quite traumatic for geraniums, and if the division is done incorrectly, the flower may die.
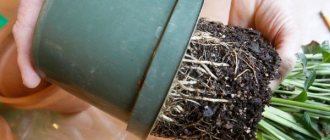
- Carefully remove the geranium from the flowerpot. Remove excess soil and inspect the roots.
- The roots are divided into ground buds. They must be healthy, without signs of rot or wilting.
- The division with buds is carefully separated from the main plant and transplanted to a new location.
- Geranium does not like excessive watering, especially in the first days after transplantation.
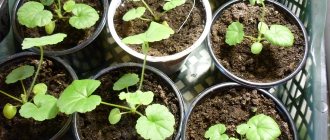
In order for the plant to take root and take root, it is necessary to prepare the right soil. The illustration for the article is used under the standard license ©dachnyedela.ru
Aftercare
How to water correctly?
The first watering of the plant after planting is done after 10 days.
In the future, the watering schedule is set at the following interval: once every 4-5 days. More often in summer, less often in winter. Watering is moderate. There is no need to flood the plant for future use .
Water requirements
- It is better to choose water at room temperature. Too cold water can cause root rot and lead to various diseases.
- The water should be soft. If you water with hard water that contains lime impurities, whitish spots will form on the surface of the soil.
- Hard water can be filtered using a water filter.
- As an alternative, you can use melt or rain water at room temperature for irrigation. This water is cleaner and softer than sewage water.
Geranium is indifferent to changes in environmental humidity . There is no need to spray it. This may cause darkening and drying out. An indoor flower can absorb and accumulate water, so it has dry-resistant properties. Water the flower only when the soil is completely dry.
Subject to simple conditions of vegetative propagation, you can constantly update indoor geraniums and obtain dozens of daughter plants with good decorative properties. Geranium can delight its owner with abundant flowering all year round. And this is the best reward for your troubles.
Is it possible to grow from a leaf: features
As we already understood, geranium reproduces well by vegetative means. One of them may be leaf propagation.
Geranium can be propagated vegetatively throughout the year, however, it is best to do this in the spring , because... The length of daylight hours increases, and the new plant will have time to give you more shoots. Let's look at the intricacies of growing from a leaf.
Pre-landing preparation in water
We carefully examine the bush and select a healthy leaf with a dense stem. Using a well-sharpened knife or scissors, cut it at an acute angle. Now let's place it in a container of water. Keep the leaf in water until the first roots appear.
Choosing a pot
You need to choose a small pot, since in a large pot the geranium will produce new shoots, but will not bloom. The material from which the pot is made does not matter. Pay attention to the presence of drainage holes at the bottom. They are required, since geranium, native to South Africa, does not like excess moisture.
Soil requirements
Indoor geranium is not picky about soil, but there are still some recommendations.
Geranium loves fairly loose soil. Soil for a flower can be purchased at a flower shop; any substrate for flowering indoor plants will do. Specialists, as a rule, use universal soil and enrich it with fertilizers and other necessary impurities. Washed river sand, vermiculite and perlite should be added to the substrate. When choosing a universal soil, you need to make sure that there are no various types of insect mold. Also, such soil should not cake into a lump. The soil must contain peat , then your plant will develop and grow well. The stores also offer specialized soils for geraniums.
Soil treatment
Before planting a leaf with roots in the ground, it is necessary to disinfect the soil in order to avoid plant diseases at a very early stage. The soil can be calcined in a frying pan, in a microwave oven or oven. But you can go the other way by spilling the soil in the pot with a weak solution of potassium permanganate.
Landing
Let's start the procedure by correctly filling the container with the contents. We lay a layer of drainage on the bottom of the pot: this can be brick chips, small pieces of foam plastic or expanded clay. Next we put a layer of soil. The soil should be slightly moistened so that the young roots take root faster.
We make a small depression and place a leaf there. All actions must be extremely careful so as not to damage the young fragile roots. There is no need to cover it with jars and bags.
Tips for choosing a substrate
One of the key points in the question of how to propagate geraniums by cuttings is the choice of soil. To successfully root pelargonium, you need very loose soil. As a base, you can use peat (non-acidic), which is mixed with vermiculite (1/3 part). The latter retains moisture and, when the soil dries out, releases it to the plant. Other types of substrate are also used:
- clean coarse sand;
- a mixture of peat and sand;
- a mixture of universal soil with sand;
- a mixture of soil, sand and perlite.
Germination in sphagnum is irrational, as it accumulates too much moisture.
After rooting the cuttings, they are transplanted into more fertile soil. It is not recommended to plant immediately in such soil, since it contains a large amount of organic matter, which provokes the process of decay. The soil is shed with fungicides (Fitosporin and others). You can also pre-treat the soil with boiling water before planting.
The pot for the cutting should have drainage holes. After deepening it, it is recommended to water the soil with a solution containing a root formation activator, and drain excess moisture from the pan.
Growing in peat tablets
There are several useful recommendations on how to propagate geranium from cuttings using peat tablets:
- tablets are placed in plastic containers with the hole facing up;
- fill them with water;
- keep the peat for a period of time until it swells and increases in size;
- The central hole is widened with a pencil and the cuttings are placed in them.
The formation of new roots begins in about 2-4 weeks, after which they are transplanted into small seedling pots. There should be no water in the containers, as peat accumulates enough moisture. Otherwise, the cuttings may rot. Transplantation is carried out together with peat tablets.
Conditions for rapid growth of geraniums
Caring for geraniums is not that difficult. It is necessary that the room has a suitable temperature, moderate watering, certain lighting, and loosening the earthen clod. Then the geranium will grow faster and will delight you with abundant flowering.
What conditions are necessary for the rapid growth of geraniums:
- Watering should be moderate, as mentioned above. In summer it should be made abundantly, but do not overdo it. Overwatering will lead to death, then no one will be able to see the rapid growth and abundant flowering of geraniums. Note! An important condition for cultivation is monitoring the condition of the soil. You should add water to the flower only if the soil is dry.
- Another important condition is good lighting. Geranium loves light very much, so it should be kept on the south side. But please note that it should not be placed in direct sunlight. In this case, the leaves will get severe burns.
- The suitable temperature for rapid growth is +12 degrees and above. But it is best to grow at normal room temperature.
- The plant should be exposed to fresh air from time to time.
- If the roots have grown greatly, a transplant should be performed. Also if you flooded the soil with water.
- Rapid growth also depends on whether the plant is fertilized or not. The fertilizer should contain nitrogen, phosphorus and potassium, as well as other useful microelements for the growth of geraniums.
The best time to propagate geraniums
Geraniums should be propagated in the spring. It is at this time of year that all vital processes in the plant are activated, they are significantly accelerated in their work, and this, in turn, contributes to rapid adaptation and growth.
Of course, it is not forbidden to propagate geraniums at other later times, but then flowering will be significantly delayed. You won't see it until next year.
Plant propagation methods
A new geranium can be obtained using three different materials that the plant produces: cuttings, leaves, seeds.
All methods are quite simple and effective, since the flower is unpretentious in everything, including propagation. Of course, there are varieties that will require some work, for example, royal geranium. But in most cases, the undemanding nature of this flower allows even beginners to achieve success in growing it.
Cuttings are a simple and reliable way
Answering the question of how best to propagate geranium, many plant lovers will answer that the simplest and most proven method is cuttings. There are several rules regarding how to propagate geraniums from cuttings at home, following which you can easily get a new flower. The breeding scheme includes several stages of plant preparation: cutting cuttings, processing and planting.
Preparing the flower in advance. Before propagating geranium by shoots (cuttings), it must first be prepared. To do this, two weeks before the start of the procedure, it is fertilized with an ash solution (2 tablespoons per 1 liter of water), after which the flower is no longer watered. Then they are removed to a dimly lit place. All this is done in order to give impetus to the development of healthy, strong cuttings, which will quickly take root in the future.
Cutting cuttings. It is best to take the apical parts of the plant for cultivation. If the geraniums are small in size, you need to cut off the top, retreating about 2.5 cm. If they are tall, then the cut is made at a level of 5 cm from the beginning of the shoot. The general rule is that the branch for seedlings should be strong, not elongated and contain 3-4 pairs of leaves. The stems are cut with a clean, sharp knife or scissors; the main condition is that they all must be sharp. The instrument should first be doused with boiling water or treated with alcohol. Pruning is carried out at right angles to the stem, stepping back half a centimeter from the internode.
Preparing cuttings for planting. The prepared cuttings are left for a short time (3-4 hours) in a shaded room. Such drying or “withering” is necessary in order to avoid the formation of rot at the cut sites. Geranium is protected by a special shell that prevents the development of an unpleasant problem. After its violation, the plant becomes more vulnerable to this disease. Therefore, when a barely visible protective layer appears at the cut site, the shoot can be used for planting.
By the way, for the same reason it is better not to propagate geraniums by cuttings in water. Water is an excellent environment for the development of putrefactive processes. The likelihood of losing a valuable seedling increases. Therefore, before propagating geranium in water, you need to play it safe and leave “spare” cuttings. But still, most often flower shoots for seedlings are planted directly into the ground.
After drying, the cut parts are sprinkled with crushed charcoal (can be replaced with activated one). A kind of disinfection is needed not only for the daughter cut layers, but also for the mother plant. The places where the petioles were removed from the donor flower should also be treated with crushed charcoal.
There is no need to cut off leaves from planting petioles unreasonably often. With their help, the shoots quickly take root, since the foliage provides the roots with all the necessary elements for their normal development.
Preparing the soil for planting
Much of how to propagate geranium depends on the composition of the soil. It is not difficult to purchase it in a store, but you can spend a little effort and time preparing the soil yourself. The main condition is that the substrate must be loose, nutritious and well-drained.
To propagate indoor geranium by seedlings, take peat, leaf humus, turf, soil from under deciduous trees, charcoal and sand (preferably river). All components are placed in two parts, except for the last two. They must be added one piece at a time. A few days before planting, the prepared substrate is spilled with a weak solution of potassium permanganate or boiling water. Another option for insecticidal and antibacterial treatment is to combine two types of disinfection and spill the soil with potassium permanganate and water brought to a boil. Then the soil is watered with warm, clean water and left on the tray for a while to allow excess moisture to escape. Now you can plant the prepared shoots into the substrate.
Planting cuttings. For planting seedlings, either separate containers approximately 10 cm high or boxes are selected. Holes are formed in the soil, 2-3 cm deep, and cuttings are planted in them. If planting is done in common containers, then the distance between young plants should be within 3 cm, and the same amount should be retreated between the rows. Having sprinkled the roots with moist soil, they need to be lightly pressed down near the base. Immediately after planting, the seedlings do not require watering, since the soil has been previously moistened.
Care after landing. After transplanting into pots, the seedlings must be moved to a well-lit room, where aggressive direct exposure to the sun's rays on the plant is excluded. You should not be overzealous with watering, as this can lead to rotting of the cuttings. Based on the same considerations, the plant must be moistened so that water does not fall on the leaves and stems. Many people advise carrying out the procedure through pallets. The easiest way is to determine the right time to water the soil in the container; it should be dry.
The most optimal temperature during the period after planting is considered to be +18-+24°C. After a month, the main part of the seedlings will take root, this will be evidenced by the appearance of new leaves in the upper part of the young flower. After two months, the seedlings are completely ready for planting in a permanent place.
The most suitable time for breeding
There is a lot of disagreement as to when it is best to propagate geraniums; what time of year is most suitable for this procedure? And many experienced gardeners have come to the conclusion that the best time to propagate geraniums and be sure that the seedlings will take root is spring and autumn.
Spring is an ideal option for cuttings
At the beginning of spring, active growth has not yet begun, but after winter the plant has accumulated a lot of strength and energy, which will help young seedlings quickly adapt to new conditions, put down roots and quickly take root. In addition, at this time of year the plant will be provided with sufficient light and heat.
When choosing the best time to propagate simple geranium, most gardeners will give preference to the period March-April. But spring breeding also has its drawbacks. The main one is that after trimming the tops of the mother plants, the number of buds, from which flower caps were subsequently to be obtained, is reduced. The flowering of such geraniums will be much less spectacular.
Spring cuttings are the best answer to the question of how to propagate fragrant geraniums, because the most important thing in it is the aroma, and not the beauty of the inflorescences. Therefore, you can safely take cuttings in the spring without fear of damaging the decorative appearance of the flower.
Autumn is the time to take cuttings
Autumn cuttings are carried out in the period August-September and also have their pros and cons. With the onset of cool, autumn weather, the life processes of geraniums noticeably slow down. Accordingly, cuttings will also take root more slowly. But planting new bushes in the fall has its own significant advantages.
Firstly, after cutting the shoots, the mother plant will have time to gain color and will delight you with beautiful inflorescences in the spring. Secondly, young shoots planted on the eve of winter, although slowly, will be able to become full-fledged plants that will bloom in the spring and summer. Moreover, with the onset of warmth, they themselves will become suitable material for obtaining seedlings. The cutting technology is completely identical to the spring propagation of geraniums using this method.
Of course, you can plant geraniums in winter for spring. In this case, geraniums in the spring for the dacha will also turn out quite good. But growing seedlings in winter is fraught with some difficulties. First of all, the survival rate of seedlings is poor at this time of year. In order for the “young generation” to feel good during the cold period, they need to be provided with a warm room and additional lighting. Only in this case will it be possible to obtain high-quality shoots that are guaranteed to bloom in the garden in the summer.
Propagation with leaves
Sometimes it happens that the plant begins to die, so it is not possible to take a petiole from it. In this case, you can propagate geranium at home by leaf, but there is one caveat. The leaf will not take root on its own. It is necessary that at least some part of the stem around the place where it grows is preserved. Then this piece of shoot is cut out along with the leaf and processed in the same way as with ordinary cuttings. The soil is prepared and processed using the same method. Then the soil is poured into an ordinary, transparent plastic cup and a “stump” with a leaf is planted in it. The rules for caring for such seedlings are completely identical to those suitable for the cutting method. A lot of information has been written about whether geranium can be propagated by leaves, and many recommendations have been given. But still, this method should be used extremely rarely, since there is a risk of poor survival of such planting material.
Cultivation by seeds
Another technique that helps resolve the dilemma associated with how to propagate geranium is propagation using seeds. Basically, geranium is planted by seeds in order to obtain a large amount of planting material for decorating city flower beds and parks. The cutting method is not suitable for such large volumes.
This method has one big drawback. Most often, seeds produce plants that have not fully preserved all varietal characteristics, such as the color of flowers and leaves, their shape, terryness, corrugated edge - all those delights of hybrids that were so carefully created by breeders. If the gardener’s goal is to quickly green up the garden, without paying attention to the varietal qualities of geraniums, then propagation by seeds is the best option. You can learn how to grow pelargonium from seeds at home here.
Seed planting technology
The best time to plant geranium seeds is late December - early January. At this time, the daylight hours begin to increase. The light factor is very important for a flower, since the plant is very light-loving.
The seeds are planted in special boxes. The composition of the soil is identical to that used for cuttings. The soil is pre-moistened and seeds are laid on top. Then they are covered with a very thin layer of soil (1-2 mm). When planting geraniums this way, it is important to properly moisten the soil. Regular watering is not suitable, as it will wash away the soil and the seeds will again appear on the surface. To prevent this from happening, the soil surface is irrigated using a special sprayer. The containers are covered with film until the first shoots appear. After two to three weeks, the first shoots will “hatch”, and when they grow 4-6 full leaves, they are moved to a separate container. Caring for all requirements coincides with caring for seedlings obtained from cuttings.
Choosing soil for pelargonium
After the roots of the future flower grow 3 cm, it needs to be replanted in the ground. Pelargonium will take root well in loose, well-drained soil. A ready-made universal substrate enriched with nutrients can be purchased at the store. Prepare it yourself by mixing in equal parts the components necessary for the growth and development of the plant:
- peat;
- turf land;
- medium grain sand;
- leaf humus;
- charcoal.
The soil should be neutral or slightly acidic, without signs of mold and insect larvae. To prevent plant diseases, the soil must be disinfected: spilled with a weak solution of potassium permanganate or heated with boiling water. You can combine these two types of antibacterial treatment for greater effect 2-3 days before planting. After disinfection, the soil should be shed with clean warm water.
Pelargonium leaves with roots