Plants » Flowers
0
421
Article rating
Kira Stoletova
Transplanting indoor hydrangea is a necessary condition for the normal development of a home flower. More often, the procedure is carried out when there is insufficient space for the growing root system and depletion of the soil. Sometimes - due to disease or pests.
Transplanting indoor hydrangea
Choosing the right hydrangea in the store
You can buy hydrangea at the market, but it is safer to buy it in a store that specializes in selling flowers.
First, the flower in the pot is inspected, starting from the stem. A healthy plant's stem has a rich green color and should be strong and elastic. The leaves should also have a bright green color and be succulent, without any spots or brown formations.
You should not purchase a plant with any deviations in the form of white or yellow spots, with limp leaves or dry fringe along the edges of the leaves. Such a plant will not please your household after purchase, growing at home - it will quickly die. It is important to know how to properly care for hydrangea so that the bush blooms luxuriantly and turns green.
We carefully examine the balls of inflorescences of a flowering plant. The cap has a dense covering of bright buds. If a flower lacks nutrients, the inflorescences are pale in color and fall off when touched.
Note!
When purchasing any flower, it must have a healthy appearance, bright and rich color.
Beneficial features
Possessing positive, bright energy, the flower spreads calm tranquility. From the point of view of Feng Shui, it has many useful properties:
- extinguishes mutual hostility, softens conflict in communication;
- in a home environment normalizes family relationships, helps to achieve mutual understanding;
- contemplation of hydrangea relieves mental fatigue after an incident or stress, helping to calm down;
- a flowering plant relieves bad mood, negativity of others, bad thoughts.
On a note. In order for the beneficial properties to be fully revealed, optimal conditions for growth are selected for the flower.
Transplantation and care after purchase
Any flower, including hydrangea, cannot be replanted immediately after purchase. It must adapt to new conditions, growing in a pot on the windowsill, this will take from 2 to 4 weeks. Subsequently, one should not forget about regular transplants; at home, they should be carried out at intervals of 3 years. Only proper care of hydrangea will give abundant flowering and a lush crown of the bush.
Hydrangea is able to please its owner with chic and lush flowering, provided that the pot for it is voluminous, because the roots love space and grow in breadth. Therefore, you need to ensure that the size of the plant matches the volume of the container.
May be interesting Replanting violets at home Tips on how to plant several orchids in one pot Schefflera: growing and caring for them at home
When replanting, the pot should not be much larger than the previous one. You can buy ready-made soil “for hydrangeas,” or you can prepare the mixture yourself. To do this, take sand, leaf and turf soil in a ratio of 1:3:3.
The pot for hydrangea is not deep, but wide, since its roots grow wide. If you take a container that is too large, the plant may not bloom for a long time.
To preserve the root system, the bush is simply transferred to another pot when transplanted into another pot. This protects the flower from stress.
A thick layer of drainage is poured onto the bottom of the pot. On him –
a small layer of prepared earthen mixture. Then we dump the hydrangea out of the pot along with the lump, which is placed in a new container. All empty spaces in the pot are filled with earthen mixture, but the neck of the plant should not be buried.
Immediately after transplanting, the hydrangea is watered abundantly so that the moisture does not evaporate quickly, and the soil surface is mulched with peat.
Reproduction by dividing the bush
With proper care, hydrangea in a pot grows quickly. And it can be propagated by dividing the bush. This method is quite simple, but requires care. Start the activity in the spring, during the annual replanting. Remove the flower from the pot and carefully divide the bush with a sharp knife so that each division has 2-3 growing points and a sufficient number of roots.
Before planting new shrubs, shorten the shoots and root shoots of crops by one third. Plant plants in individual pots filled with suitable soil and with good drainage. Be sure to moisten the substrate and mulch its surface with peat. Place the flowers in their usual place. If the event is carried out correctly, then by autumn the plants will take root and produce buds next year.
Caring for hydrangea at home
Lighting
Hydrangea loves plenty of light, but direct sunlight can damage the delicate leaves and leave burns on them. With the right location, the bush will bloom long and profusely, delighting you with its bright fluffy balls. To do this, the hydrangea pot should be placed in a bright place where the sun's rays will not hit the plant. Ideally, this place is 3 meters from the window.
Temperature
Hydrangea is quite picky with temperature. Ideal conditions for it would be a temperature in the range of 18 –
23 °C.
Drafts for hydrangea are not only undesirable, they are detrimental to the flower, it can die. In order for the bush to bloom abundantly in summer, in winter it should be allowed to rest and gain strength. To do this, the plant is placed in a room with a temperature of about 10 °C.
Diseases and pests
Dry air, excessive waterlogging or proximity to diseased specimens provokes the appearance of spider mites, thrips and aphids on stems, leaves and roots. At the first signs of the disease, the flower is treated with a specialized remedy.
If not cared for properly, the plant becomes sick:
- hydrangea leaves wither - possibly due to insufficient watering;
- light spotting indicates overwatering;
- The edges of hydrangea leaves dry out - evidence of low humidity and poor soil moisture.
Features of transplanting indoor hydrangea
For annual and abundant flowering, it is necessary to ensure proper care of the hydrangea after purchase. The bush at home should be replanted every year in a different pot. To prepare the soil for replanting, take 1 part sand, 3 parts turf and 3 parts leaf soil. Mix everything, distributing all components evenly.
Cover the bottom of the pot with a thick layer of expanded clay as drainage. Sprinkle the expanded clay with a layer of the prepared mixture, slightly pressing it down. Carefully remove the prepared flower from the pot along with the earthen lump and place it in a new pot. We fill the trunk with fresh earthen mixture, leaving the neck of the plant uncovered.
Important!
After transplanting, the flower must be watered and the surface of the soil covered with mulch, then the moisture will not evaporate quickly.
Growing hydrangea
Caring for a homemade hydrangea in a pot cannot be called the easiest. But by following certain rules, even beginners achieve significant success in growing this attractive flower.
The most difficult thing for a gardener is to maintain the cyclical growth of a crop, because it must be taken care of both during the growing season and during winter dormancy.
Choosing a pot and soil
When growing hydrangeas, choosing a pot is key. Flower growers recommend using either plastic or ceramic bowls. Both options have their advantages and disadvantages. Indoor hydrangea is transplanted into a pot of appropriate size. It should be slightly larger in diameter than the previous one. It is optimal to buy a shallow and wide container - a bowl with a diameter of 20 cm. The gardener should also take into account the place of cultivation of the bush. If it is a windowsill, then the pot should ideally stand on it. For the floor, you can select more massive containers.
Hydrangea prefers acidic soils. It can be planted in prepared soil for azaleas or citrus crops. You can also prepare the soil yourself.
Soil for indoor hydrangea prepared by a gardener contains:
- 2 parts of turf.
- 1 part peat.
- 1 part humus.
- 0.5 parts leaf soil.
All components are mixed well until smooth.
Planting and transplanting
Young specimens are planted in a prepared substrate, having previously laid drainage on the bottom (expanded clay, broken brick, ceramics).
How to replant indoor hydrangea? Breeders recommend changing the soil annually. The transshipment method should be used, keeping the earthen ball undestroyed. Since the root system of a flower is very delicate and fragile, it is very easy to damage it. Transshipment will help avoid the negative impact of the procedure.
When planting or replanting a bush, you should not bury the root collar. It should be placed flush with the soil surface.
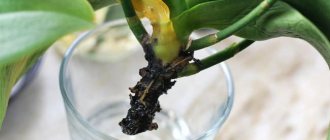
Advice ! After winter, many roots die off and therefore should be cut off. Rejuvenation of the root system will ensure stable development.
Watering and fertilizing hydrangeas
Hydrangea loves abundant watering, but to prevent the root system from rotting, irrigation should be carried out when the top layer of the substrate dries. When flowering and during the period of active growth, hydrangea needs abundant and frequent watering.
During the dormant period, the intensity of watering is reduced, and in winter, the earthen ball should not dry out, but abundant watering is not needed.
In the spring, as soon as green leaves begin to appear on the branches of the plant, watering is resumed.
Water for irrigation should be soft and at room temperature. You cannot water the plant with tap water; it must settle.
Hydrangea is fertilized only in summer with mineral fertilizers twice a week. The irrigation solution includes potassium sulfate 30 g, superphosphate 40 g, ammonium nitrate 30 g per bucket of water.
On a note!
Feeding is done all summer, until mid-August. This is the time of flower bud formation. All weak branches are removed, as well as root shoots.
Care
When grown indoors, indoor hydrangea requires almost the same care as growing in open ground.
Watering
If the leaves of an indoor flower begin to dry out and turn brown, these are the first signs of lack of watering.
How to properly replant hydrangea in a pot
Hydrangea requires plenty of moisture. It should be watered regularly as the surface layer of the substrate dries.
Use filtered water, warm, at room temperature. In order to maintain lush flowering, add lemon juice - about 5 drops per liter. The presence of lime in water leads to chlorosis of the foliage.
In summer, in addition to watering, leaf spraying is carried out. In autumn, the regularity of watering procedures is reduced, and in winter it is reduced to a minimum. And in the spring, when fresh leaves appear on the plant, the regime is restored.
Feeding
Homemade hydrangea is fed throughout the growing season.
- Primary - after awakening from a state of rest (approximately in February). Fertilizer complexes with a high nitrogen content are used. This will help activate the growth of shoots and increase green mass.
- In spring, the plant requires potassium and phosphorus to produce a large number of buds.
- In summer, nutrition is applied three times - at the formation of flower ovaries, at the beginning of the budding process and at the stage of active flowering for the blossoming of inflorescences. At the beginning of the season, nitrogen fertilizers are needed, and towards the end they increase the proportion of potassium and phosphorus; more often they use a mixture of potassium sulfate (15 g) and superphosphate (20 g), diluted with water (5 l);
- In autumn, for the purpose of future planting of flower stalks and shoots, potassium and phosphorus are used in the form of compost, peat and humus or ready-made nutritional complexes.
The interval between feedings is once every 2 weeks. The method used is root irrigation.
Trimming
To form a beautiful bush shape, pruning is necessary. A pruner or sharp knife is suitable for this.
Cuts should be made even and smooth. During pruning, it is necessary to remove all dry, diseased, damaged branches and leaves. To form a lush crown, the top is trimmed evenly and evenly. It is advisable to shorten the shoots in spring and autumn. During the flowering period, pruning is not recommended. It can be renewed when the first flowering branches appear. They should be removed immediately so that they do not begin to rot.
What to do with potted hydrangea in spring?
Around the end of March, the overwintered hydrangea should be taken out of the basement, shed with warm water and fed. If necessary, the bush can be transplanted into a larger pot, and after watering, be sure to mulch it to retard the evaporation of moisture. Before “moving” outside, the pot needs to find a bright place in the house.
For feeding, it is better to use a special long-acting complex fertilizer for hydrangeas (in granules). Coniferous litter or pine bark is well suited as mulch - rotting, it additionally acidifies the soil, and hydrangea loves this.
You can take hydrangea into the garden no earlier than the end of April, or even in May, but at first take it into the house at night or cover it with agrofibre so that the bush does not suffer from return frosts.
Particular attention should be paid to the location of the hydrangea in the garden, because it does not like too bright lighting, which will cause the flowers to fade. As long as there are no buds, the east side is best. And during flowering, it is worthwhile to completely remove the bush under a canopy so that the sun hits it only in the evening.
How to replant?
How to do it, step by step:
Place a pot with a plant on a sheet of polyethylene or on a newspaper, which is carefully taken by hand by its base, tilt the pot, take out the hydrangea with a lump of earth (if necessary, use a knife to separate it from the walls of the pot), pour a three-centimeter layer of drainage into the new pot, carefully lower the flower into new pot and sprinkle it with new soil mixture.
ATTENTION: the plant cannot be covered with soil to a greater height than before, otherwise the stem may begin to rot. The transplanted hydrangea is sprayed with water, and full watering is done the very next day after transplantation.
The transplanted hydrangea is sprayed with water, and full watering is done the very next day after transplantation.
How often does a flower need replanting?
The first transplant is often forced, immediately after purchase in a store, where the plant could be infected with mealybugs. If you have such concerns, replant the hydrangea in a new pot filled with new soil, and before that, take a good look at the roots of the plant to make sure that everything is in order with the flower.
As planned, hydrangeas are replanted every year, changing the soil, which most likely has time to become depleted, which means it will not give the plant a chance to fully bloom. When transplanting, do not forget about drainage.
When to replant hydrangea: recommended timing
Mature hydrangea bushes, like other perennial garden crops, get used to the constant composition of the soil and climate.
A transplant carried out at the wrong time is fraught with negative consequences - it will be difficult for the plant to adapt to another place, flowering will occur later and will not be as abundant as usual.
Important : young hydrangeas that have not reached 5 years of age are the easiest to transplant. In adult bushes, adaptation is more difficult.
The ideal time for replanting is considered to be autumn, since in this case the hydrangea will definitely bloom with the onset of spring. The signal for work will be the end of the budding period, which begins around mid-September.
Transplantation into open ground
In the 3rd year after sowing the seeds, the hydrangea is moved to a permanent place. Time depends on region:
- in the south - the beginning of autumn, when the heat subsides;
- in the middle zone - spring or late summer;
- cool areas - the beginning of the season, after the soil warms up to 15 ° C.
Such planting dates ensure the best survival rate. The operation is the same as for an adult hydrangea:
- Dig a hole in advance with a depth of at least 40 cm and a diameter of 60 cm.
- Prepare a fertile mixture of acidic peat, coniferous soil, sand and humus (2:2:1:1).
- Fill the hole and water it with acidified water (1 teaspoon of citric acid per bucket).
- When the time comes for planting, part of the substrate is taken out of the hole.
- Place a seedling in the center. The root collar should be a few cm below the edge.
- Cover with substrate and compress.
- Water with rooting agent. Each pit requires at least 20 liters of water.
- Mulch with bark, acidic peat or pine litter.
- Cover the hydrangea with a box or bucket with a hole in the bottom.
Hydrangeas grown from seeds in open ground are transplanted to a permanent location in the same way. Here, the owners should try to dig out as large a ball of earth as possible and, together with it, move the bush to the planting site.