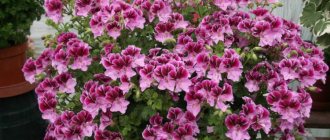
Geranium (indoor pelargonium) is an unpretentious houseplant with elegant inflorescences that takes root well in almost any conditions. That is why it is so popular among home garden lovers: both experienced gardeners and beginners. But still, there are some growing features that those who want to acquire this bright flower need to remember.
What kind of soil does geranium like?
Most plants react negatively to incorrectly selected soil composition; each flower has its own preferences.
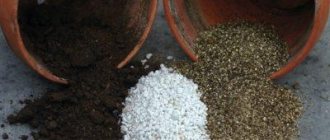
Indoor pelargonium is quite demanding on the soil. The ideal solution is unused, loose soil with good drainage. For young plants without a formed root system, light soil is more suitable, so sand and peat, vermiculite and perlite are added to the composition.
There are several soil options that are suitable for pelargonium.
- You can buy a ready-made mixture in special stores - ordinary universal black soil for flowering plants, and place expanded clay at the bottom of the pot. On the packaging, the manufacturer indicates what types of flowers the product is suitable for. If the name is not on the list, then soil for plants of the same type, for example, for succulents, is suitable.
- Mix purchased chernozem with coarse sand and perlite, this will make the soil light and breathable. Line the bottom of the flowerpot with fine crushed stone.
- There are also specialized mixtures for geranium on sale - they already contain all the necessary components and nutrients in the required proportions.
When choosing a soil mixture for pelargonium, you need to focus on neutral characteristics that make the composition universal for most plants:
- porosity, looseness of the soil, providing breathability
- moisture permeability
- moisture capacity - the ability to retain moisture
- conductivity of nutrients
- neutral acidity level.
Composition and properties
Any soil mixture has characteristics such as acidity and fertility, mechanical and microbial composition. These indicators must be taken into account when choosing a habitat for a flower.
- geranium grows well in fertile soil rich in nutrients
- the composition of the earth must be neutral or slightly acidic
- Microorganisms are necessary for normal plant life
- The air permeability of the soil directly depends on the mechanical composition, which is extremely important for geraniums.
The mechanical composition is easy to determine: you need to squeeze a small amount of abundantly watered soil in the palm of your hand - good soil will crumble, bad soil will form a dense lump.
In addition to beneficial microflora, purchased mixtures may also contain pathogenic organisms; if desired, the soil can be sterilized at home. To do this, place it in an oven or water bath preheated to 80 degrees for one hour. After the procedure, the soil is kept for two weeks so that the microbial composition is restored.
You can prepare the planting mixture yourself. For the composition in equal parts you will need the following components:
- Peat
- Sand
- Turf
- Humus
- Leaf ground
Or garden soil mixed in equal proportions with sand and peat. For better oxygen supply to the root system, it is necessary to periodically loosen the soil.
Care Tips
Proper care of a plant is a whole complex of measures: proper watering and lighting, replanting and temperature conditions. Some useful tips:
- To prevent the soil from becoming compacted when watering and not moving away from the walls of the pot when it dries, coarse impurities are added: pebbles, crushed expanded clay, chopped moss, coarse sand, large brick or foam chips.
- Water the flower with a moderate amount of water at room temperature; do not “flood” the plant. In winter, this should be done no more than twice a week. In summer, when geranium is actively growing, daily watering is necessary, but without waterlogging, avoiding water getting on the leaves.
- The optimal temperature for the normal functioning of pelargonium: 18-22 degrees in summer and 10-15 degrees in winter. This is a fairly cold-resistant plant, but it needs a lot of light, even direct sunlight is acceptable, with the exception of particularly hot days.
- Geraniums are replanted in two cases: when the pot becomes crowded, and if a lot of water gets into it during watering. The approximate replanting schedule is once every 2-3 years, in spring or summer. It is better to choose pots that are not too spacious - this will worsen flowering.
- Mineral supplements are suitable as fertilizers, but it is better to refrain from fresh organic ones - the plant does not tolerate such fertilizing. During the period of rapid flowering, mixtures with a high content of potassium and phosphorus are used, and during the dormant period, nitrogen supplements are used. You need to fertilize the flower once a week, from late spring to early autumn. If the geranium has been replanted, it is better to start fertilizing after 2-3 months.
proudobreniya.ru
What are the varieties?
Most species of the Pelargonium family are not suitable for home cultivation and only do well in their homeland (South Africa). Varieties compatible with European and Russian climates are few in number, and are represented by only four varieties of geranium:
- Sadovaya. It is grown outdoors and reaches 50-60 cm in height;
- Ampelnaya. It grows in a similar way to ivy – with long thin shoots. Optimal for placement in hanging pots and cache-pots;
- Fragrant. The most popular variety in Russia, optimally suited for indoor growing. It has a pronounced floral aroma, and not only flowers smell, but also leaves;
- Royal. Shows the most beautiful flowering (large, massive buds), but is more capricious compared to the fragrant variety. In gardening it is represented by a large number of hybrids - with individual characteristics and requirements.
The last two varieties are best suited for placement in a room. If the correct watering and feeding regime is followed, they produce large, fragrant flowers, and can grow at home for up to 9-10 years.
Temperature
In the spring and summer, when pelargonium is actively growing and blooming, it is necessary to maintain a temperature of 20 to 25°C. From October to the end of February, you can organize a cool winter for the plant with a temperature of 12 to 15°C. In such conditions it is at rest and does not grow.
In winter, it is advisable to create dormant conditions for pelargonium.
If there is no suitable place for wintering, geranium can be kept in winter and at room temperature. But in this case it is necessary to organize additional lighting.
What soil is needed for indoor geraniums?
In the spring, after pelargonium, it is advisable to replant it in fresh soil. The new soil will give the plant minerals to stimulate growth.
It is better to choose the composition of the soil for pelargoniums yourself, or you can enrich the finished soil with additives (for example, ash). You can also find special soil for pelargoniums on sale; it has a balanced composition.
If you want to prepare the soil for pelargoniums yourself, the following composition is optimal for adult plants after spring pruning: 10 liters of universal soil; 2 liters of river sand; 1 liter of horse humus; expanded clay and perlite – 1 liter.
Ordinary pelargoniums are completely replanted every year. Remove the bush from the pot, remove the top layer of soil, the bottom 3-4 centimeters, shake off the soil around the edges and drainage. If the pot remains the same, it needs to be washed and dried. Then replace the drainage layer, fill the pot a few centimeters with soil, place the plant, add soil and compact it quite tightly.
Miniature and dwarf varieties are replanted in the same way, but less frequently, once every three years. Periodically, you can simply update the soil: remove the top layer (2-3 cm) and add fresh soil in its place.
Pelargonium is not picky about soil, but you need to know some recommendations. Geranium loves well-drained and loose soil. You can buy soil for a flower at a flower shop; any substrate for flowering indoor plants will do. Professionals usually use universal primer and add the necessary components to it.
To this mixture you need to add washed river sand, vermiculite and perlite. All ingredients should be mixed, and the soil for planting indoor pelargonium is ready.
When choosing an all-purpose soil, you need to make sure that it is free from insect mold. Also, such soil should not cake into a lump. The soil must contain peat, then your plant will develop and grow well. You can buy special soil for geraniums in the store.
You can also prepare soil for pelargonium yourself at home. To prepare it, you should use the following components:
- Sod land - 8;
- Humus - 2;
- Sand - 1.
The importance of proper soil
Many lovers of pelargonium remember very well how they used to grow it in infertile soil. At the same time, the pelargonium grew and bloomed normally. Therefore, it is believed that the choice of soil for this indoor flower is not particularly important.
But experienced gardeners know: one of the main tasks is to choose the right soil mixture for each plant. Soil is the food of plants. Not a single plant can live without soil.
As diverse as the plant world is, so is the environment in which they grow, including the composition of the soil. Currently, you can purchase special soil in which pelargonium will thrive and bloom beautifully, but it is better to prepare good soil yourself.
Watering
During the growing season and flowering, the plant requires abundant watering. In very hot weather it should be watered every day or every other day to prevent the soil from drying out. But you should avoid waterlogging and stagnation of moisture in the soil.
During wintering, watering geraniums is sharply limited. Moistening the clod of earth is carried out 2-3 times a month so that the top layer of soil in the pot becomes dry. This will prevent root rot at low temperatures.
Do not water geraniums with cold water. The water should be at room temperature and should be left to stand for 2-3 days before watering.
Royal pelargonium, unlike small-flowered geraniums, does not tolerate direct watering. If water gets on the soil surface, the soil becomes compacted and the root system of pelargonium begins to rot.
In summer, the plant needs abundant watering; in winter, when pelargonium enters a dormant period, watering is reduced. If you overwater a flower, its leaves will turn yellow. Watering should be reduced, and over time, the color of the leaves will be restored.
Choosing the right pot
Periodically, the plant requires transplanting into a new pot, several cm larger in diameter than the previous one.
Pelargoniums of different types need pots of different sizes:
- Zonal pelargoniums – 1-1.8 l
- Tall varieties - 1.5-2.5 l
- Dwarf, miniature – 0.5-1 l
Dwarf varieties differ from others in having a small root system; it is quite weak, so such pelargoniums do not like replanting and do not tolerate transplantation well. Some varieties of miniature pelargoniums, after being transplanted into a large pot, grow large and lose their miniature size.
The plant can be grown at home in a pot and box. If you use boxes for growing pelargonium, then the distance between the bushes should be at least 20 centimeters. This is an important rule.
You need to select the size of the container depending on how much the roots have grown. If the diameter of the flowerpot is chosen incorrectly, then it will be quite difficult to control the growth.
It is best to purchase small pots, 2 cm larger than the previous one. In such a container, geranium will feel great and bloom beautifully with bright and beautiful flowers. The height of the tank should be about 12-15 cm.
If you correctly transplant indoor geraniums into fresh and nutritious soil, and then provide proper care, in this case the flower will bloom beautifully and delight the eyes of its household members.
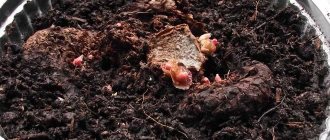
Planting process
When propagated by cuttings, the roots of pelargonium shoots begin to grow already in the third or fourth week. Then the shoots are transplanted one at a time to a permanent place of residence. To make them bloom faster, they do not need to be pruned.
When propagated by seeds, the emerging sprouts dive into separate small containers when two or three leaves appear on them (more information about the process of propagation of pelargoniums can be found here).
As the pelargonium grows, it may require another transplant into larger pots.
Every year in March, young pelargonium plants are transplanted into fresh soil. At the same time, they are severely pruned, leaving 2-5 buds on each shoot. Thanks to this, low, lush, abundantly flowering specimens are subsequently obtained.
Overgrown pelargoniums are replanted only if necessary - when the pot becomes cramped. After the threat of frost ends, pelargonium can be taken outside or planted in flower beds (5 plants per linear meter) in soil with the same characteristics as when grown at home.
Adult pelargonium plants are picky about replanting, so it is better not to disturb them unless absolutely necessary.
The transplant procedure is as follows:
- Prepare drainage, soil and pot.
- Place a layer of drainage 3 cm thick on the bottom of the pot. Brick chips, finely chopped polystyrene foam or fine expanded clay can be used as drainage.
- Carefully remove the plant from the old pot without shaking the soil from the roots.
- If the pot does not change, it must be treated with bleach. Pour bleach into a container and leave it for a while, and then rinse well with water.
- After the plant has been removed, it is recommended to carefully examine the root system for rotting and diseases. If there are damaged areas, then they need to be removed using scissors.
- Place the plant by transferring it into a new or treated old pot without disturbing the earthen coma.
- Sprinkle the roots with new soil until the flowerpot is filled and compact slightly.
- Water.
Humidity
The plant requires moderate air humidity. When it increases, the roots may rot, and when it decreases, the leaves dry out and fall off. It is advisable to regularly ventilate the room with pelargoniums, but the plants should not be in a draft.
For indoor geraniums, there is no need to create high humidity. It does not need spraying. On the contrary, getting water on pubescent leaves can cause rotting, and dried drops leave streaks on the leaves.
Temperature and feeding
After the end of the dormant period, pelargoniums actively grow, and flower buds form on the shoots. During this period, plants require fertilizing.
Feeding is introduced gradually, increasing it as new shoots grow.
Transplanted and pruned pelargoniums begin to be fed after a month, not earlier. If the plant has not been transplanted into fresh soil, then it can be fed once a week.
Fertilizers can be liquid, granular (the granules are mixed with the soil during transplantation, they gradually release nutrients), there are also stick fertilizers (similar to granular ones, they release nutrients gradually), and organic (for example, mullein). Organic matter is usually used not for indoor plants, but for ground plants. However, organic matter can be added to the bud when transplanting plants.
This DIY fertilizer, very simple, will allow your pelargoniums to bloom magnificently all year round! The plant will become healthier, more powerful, stronger, will be practically not susceptible to sunburn and disease, and will be easier to tolerate heat.
You will need a three-liter jar, 2.5 liters of settled water, 100 g of yeast, half a glass of sugar. We dilute all of the above in a jar, stir, cover with gauze and keep warm, shaking from time to time. When fermentation is over, the fertilizing is ready. The whole process lasts approximately 7-15 days, the duration of fermentation greatly depends on the temperature. Next, you can put the jar in the refrigerator and gradually use it up.
Remember:
- At temperatures below 10 C, fermentation stops.
- The optimal temperature for fermentation is 23 C.
- At temperatures from 10 C to 27 C, the fermentation rate increases in direct proportion, that is, the warmer, the faster. The quality of the resulting product deteriorates.
- At temperatures above 30 C, the yeast dies, sugar (poor quality) remains in the solution, and foreign bacteria immediately begin to multiply in this nutrient medium, and your fertilizing will be spoiled.
- The jar must be filled no more than 2/3 of the volume, otherwise it will run away.
Dilute a glass of the resulting mixture in 10 liters of water and water the pelargoniums 1 glass once every two weeks.
This product is great for fertilizing and other flowering plants!
If you have few plants, you can prepare a smaller amount of the product.
www.treeland.ru
If in winter the temperature in the room where the flower is located is about 24°C, then pelargonium will continue to form green mass and will not form flower buds. Royal pelargonium, unlike indoor geraniums, enters a dormant period in winter. At this time, the growth of green shoots stops, and pelargonium lays new buds, but for this it needs to create special conditions.
To increase the number of buds, royal geranium is fertilized with potassium and phosphorus fertilizers, and during the flowering period, pelargonium is fed with magnesium-containing fertilizers. Feeding should be done twice a month. During the spring period, four feedings are made with magnesium-containing fertilizers, then they need to be stopped.
www.glav-dacha.ru
What to do after the transplant?
- After the plant is planted, it must be watered, placed in the shade for 7 days and ensure that there is no overwatering.
- After a week, the flower should be moved to a warm place with a sufficient amount of bright, diffused light.
- After 2-3 months, the plant needs to be fed with superphosphate in order to stimulate flowering.
Pelargonium is one of the few flowers that have healing properties. It is useful to have such a plant at home. To make growing less hassle, read our experts’ advice on ways to propagate this flower by seeds and cuttings, as well as how to properly pinch and trim this plant.
Pelargonium is not a very demanding plant. To successfully grow a flower, it is important to use the right soil, choose the right size pot and provide proper care. If all these simple conditions are met, pelargonium will respond with lush and beautiful flowering.
Trimming / Support / Garter
Indoor geraniums need to be pruned to maintain their decorative appearance. Pelargonium is pruned in March before the start of active growing season.
Geraniums are formed in the following forms: standard and bush.
The standard form is not pinched from above, growing a straight trunk. All side branches on it are removed. As soon as its height reaches 70-80 cm, the top shoot is pinched, which first leads to the appearance of several new top shoots, and then to the formation of a pelargonium crown.
Bush plants are pinched after 5-6 leaves appear. With regular pruning, dry and diseased shoots are removed, and the rest are greatly shortened, leaving 3-4 buds on each of them.
Diseases and pests of geranium
Indoor geranium is susceptible to stem rot and root system rot. These fungal diseases develop when the soil is waterlogged, mainly in winter.
If the stem rots, it is better to destroy the geranium. You can cut off the top unaffected cuttings, root them and grow a new plant. If the roots rot, it is better to replant the plant in new soil and reduce watering.
Gray mold is a fungal disease. If plaque is detected on the leaves, it is necessary to remove all affected parts, and then treat the entire plant with fungicidal preparations.
Pelargoniums outdoors are often attacked by aphids, whiteflies and spider mites. Insecticidal preparations are excellent against these pests.
Improper care of pelargonium at home leads to a deterioration in its appearance, most often this is expressed in yellowing of the leaves. Main reasons:
- lack or excess of moisture, poor lighting;
- the pot became too cramped;
- if the plant has recently been replanted, then this is a natural manifestation of acclimatization and the plant will soon return to normal;
The most dangerous fungal diseases for pelargonium are those that appear from dampness and high humidity: black, gray or root rot. The disease is difficult to treat; you can try to save the plant with fungicides, but professionals recommend destroying the affected specimens to prevent the risk of infecting other flowers.
The most common pests are whiteflies, aphids, and spider mites. All of them are successfully destroyed by modern insecticides.
With good care, geranium can not only delight you with the beauty of its blooms, but also act as an air freshener. It is not for nothing that in the 18th century it was used as a room scenter; depending on the variety, it could exude the smell of apples, mint, pineapple and many others.
Video on how to care for geraniums
How to replant geraniums - step-by-step instructions at home and outdoors
Geranium is considered one of the most unassuming indoor plants. But flower growers who grow flowers on their windowsills know how important it is to create suitable conditions for them. One of the mandatory procedures is moving to a new pot. To do this, you need to know exactly how to replant geraniums.
Why replant geraniums
The need to replant the plant arises when the root system grows and it becomes crowded in the planting container. You can understand this by lifting the pot - the tips of the roots will be visible through the drainage holes. In this case, the flower begins to suffer from a constant deficiency of nutrients, is easily susceptible to diseases, and there is a risk of death.
The flower needs transplants as it grows
A transplant may be needed in the following cases:
- the occurrence of root rot due to violation of the watering regime;
- stimulating the onset of the flowering stage after a prolonged period of dormancy;
- excessive exposure of the lower part of the stems;
- soil contamination by pests and pathogenic microorganisms;
- the need to replace a damaged pot;
- severe depletion of soil for pelargonium;
- needs for rejuvenation.
Additional Information! To rejuvenate a flower, it needs to be planted in a new container. Simultaneous propagation by dividing the bush is possible.
Optimal time for the procedure
The time it takes to adapt to a new location largely depends on the time at which the flower is transplanted. Typically, transplanting geraniums at home is carried out in the spring. With increasing daylight hours, the plant begins vegetative processes, and it most easily perceives stressful changes. At the same time, some gardeners are guided by the lunar calendar, knowing about the reaction of plants to the movement of the night star.
The winter months are considered the most unfavorable time. Transshipment of the plant, carried out in March or April, will give the best results and be the most painless.
Note! Transplanting pelargonium into the garden, be it a royal, zonal or ivy-leaved plant variety, should occur at the end of spring, that is, in the second half of May.
You should move the flower back to your house or apartment before the onset of cold weather.
Is it possible to replant geraniums during flowering or in summer?
Geranium can be replanted at any time of the year, but under favorable conditions the plant blooms almost continuously throughout the summer. Is it possible to replant flowering geraniums?
During active budding, the bush spends a lot of resources and entails a protracted recovery period. As a result, the bush may not cope with stress and drop flowers. It is for this reason that it is recommended to postpone the transplant to another time.
Is a transplant necessary after purchase?
Many purchased flowers quickly die when they find themselves in a home environment. At the same time, the plant is provided with complete rest so that it can adapt to the changed external conditions, because in a short period of time the flower has gone through a number of stressful situations: replanting in the garden area, transportation, keeping in the store.
Experienced gardeners try not to replant geraniums immediately after purchase. In the first days after the appearance of a new plant, the apartment is maintained at optimal temperature and humidity.
Preparing the plant for transplantation
The day before replanting the flower, water it abundantly so that the root ball of earth can more easily come out of the pot when the plant is transferred.
Note! Some gardeners recommend using stimulating drugs that will help geraniums recover faster.
There are no other ways to minimize stress for a plant during transplantation. The only other way to mitigate the consequences of the procedure is to choose the optimal time.
Pot size and material
When choosing a new pot for replanting geraniums, the reasons for the procedure are taken into account. If you need to move a flower that has become cramped in the previous pot, the size of the new container should be 1-2 cm larger. Choosing a pot that is too large will lead to the fact that the root system will begin to develop a new space, which is why the flowering period will not occur as expected term.
In a large pot the plant will turn into an untidy overgrown bush
When a flowering-stimulating transplant is carried out, it is recommended to take a pot that exactly matches the volume of the root system. The same applies to moving geraniums for the purpose of rejuvenation and simultaneous division of the bush into several independent plants - each container must fit a new specimen.
It is allowed to use a landing container made of any material. When choosing a plastic pot, keep in mind that it has poor breathability, but is more practical to use. A ceramic pot is more expensive, but more attractive. It is environmentally friendly and better suited for long-term cultivation. Due to the porous structure of the material, delicate roots can grow into the pot, which will lead to the risk of damage during transplantation.
Important! Regardless of the material from which the flowerpot is made, it must have special holes to remove excess moisture.
Soil composition
Properly selected soil for geraniums will relieve the plant from severe stress. The soil for indoor geranium should include the following components:
- turf soil for geraniums – 2 parts;
- rotted humus - 2 parts;
- coarse sand - 1 part.
The soil may contain a small amount of peat. Another option is to purchase a universal soil for flowering crops. Purchased soil is suitable for most indoor flowers, fully meeting their nutritional needs.
Additional Information! To optimize the composition for planting geraniums, just add a little perlite and coarse river sand to it.
Drainage layer
Whatever the composition of the soil mixture, the soil for indoor geranium should include a drainage layer placed at the bottom of the pot or planting hole. Without it, excess moisture will stagnate in the root zone, resulting in rotting of the root system. The following is used as drainage:
- broken brick;
- expanded clay or pebbles;
- fine crushed stone.
To prevent the drainage holes in the bottom of the pot from becoming clogged, experienced gardeners cover the drainage layer with a small piece of construction mesh.
Drainage is placed at the bottom of the pot
How to replant geraniums - step-by-step instructions
Knowing what kind of land is needed for geraniums, they begin to transship the plant. It’s better to find out in advance how to transplant geraniums at home step by step and prepare everything you need.
In addition to moving an indoor flower from one pot to another, it is often transplanted into open ground in the spring and transferred back with the onset of autumn.
At home from one pot to another
Handling homemade geraniums is easy. The procedure consists of the following steps:
- Drainage is placed at the bottom of the container.
- A little earth is poured over the drainage layer.
- The flower is carefully removed from the previous pot along with the root ball.
- The plant is placed in a new pot, filling the voids with soil mixture.
After the transplant is completed, the flower is returned to the same place. The first watering is carried out no earlier than after 3-4 days.
In open ground
When geraniums are correctly moved into open ground, the perennial decorates the area with abundant flowering. To make the plant feel comfortable in the garden:
- The soil in a selected well-lit area is dug up with the addition of a compost mixture.
- Prepare a small planting hole with a depth equal to the height of the pot containing the flower.
- The plant is carefully transferred to a new place and the soil around it is compacted with your hands.
- The transplanted geranium is watered abundantly with settled water.
Problems
Indoor geranium is a very unpretentious plant. There are few problems when growing it. Usually this is: yellowing and falling of leaves, poor flowering, wilting of leaves and elongation of shoots.
Pelargonium leaves dry along the edges, turn yellow and fall off due to lack of moisture in the soil. Watering needs to be increased.
Sparse flowering or its absence may be due to the lack of a dormant period. Pelargonium often does not bloom due to lack of feeding or replanting.
When the geranium root rots, the leaves may wilt. The plant needs to be removed from the pot, inspect the roots, cut off the diseased parts and replant.
The stems of the plant become bare and become very elongated when there is insufficient lighting. We should not forget that pelargonium is a light-loving plant that requires bright lighting and backlighting in winter.
Plant structure
Like all other shrubs, geranium consists of a root system, stems and foliage. Each of these elements requires personal care, and quickly withers if not handled correctly. For example, the roots of pelargonium cannot tolerate excess moisture, and the foliage can turn yellow and dry out if there is insufficient watering. It is worth telling in more detail about the characteristics of each part of the plant:
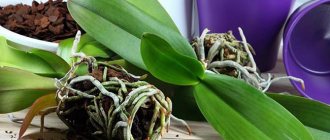
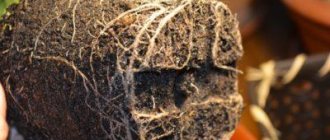
- Roots. They have a fibrous structure, and during the growing season they can fill all the free space in the pot. On the one hand, this increases the survival rate of the plant during drought, but on the other hand, it can lead to its death when propagated under artificial conditions. You need to constantly monitor the growth of the roots, and if necessary, replant the geranium into a larger pot;
- Leaves. They have a characteristic round shape and a figured border. Depending on the breed, the plants are bright green, light green or purple. Veins are clearly visible on the leaves of pelargonium, and on some varieties there are white edges. To the touch, the foliage is dry and “terry”, somewhat similar to paper. With insufficient watering, it quickly withers and turns yellow, which is a good indicator of the health of the plant;
- Flowers. They grow in the form of umbrellas in red, burgundy, pink, purple or white. They can be smooth or rough to the touch. They emit a distinct floral aroma, rich in essential oils. If geranium receives proper care, watering and fertilizing, flowering can be observed all year round (except in winter);
- Fruit. After flowering, geranium produces thin and long fruits in the shape of a bird's beak. Inside they are many small seeds that can be used for seedlings.
You should use seed material only if it is taken from a “purebred” geranium (not a hybrid). Otherwise, there may be problems with the growth of the plant, and it may die even before ripening. This is especially true for “royal” breeds, most of which are artificially bred.