When an orchid shoot is discovered, it is real luck, since exotic plants are very demanding to care for and are not always ready for reproduction. To avoid making mistakes with transplantation, the florist will be helped by knowledge about the places of origin and the rules for separating buds. You have to act with scrupulous caution so as not to destroy the flower.
Where and when do shoots appear?
The appearance of shoots, with the help of which flowers reproduce, occurs in different areas. In this case, the formation of buds can be stimulated:
- partial removal of the faded peduncle, leaving a 2 cm stem;
- providing lighting for 14 hours;
- high temperature conditions (up to +25 degrees);
- reducing watering (once a week)
- use of hormonal drugs.
After flowering, children are able to independently form in the area:
- peduncle;
- stem;
- roots.
To separate the buds from the mother stem, their readiness for further growth and development is determined.
How does the presence of shoots affect the life cycle of a plant?
Orchid babies are young daughter shoots that appear on the peduncle or at the roots of an adult plant. The shoots appear only if the mother flower is provided with good and timely care. This happens at high temperature and humidity in the room where the plant is located; it is also important to know that children appear only after it has flowered.
There is an opinion among flower growers that shoots on an orchid appear before it quickly withers: with the active growth of the children, the stem dries out and the subsequent death of the plant occurs. And in some cases this is exactly what happens, but the shoots can not only “kill” the mother plant, but also affect its life cycle.
In orchids, there are two types of dormancy: biological and forced, and it is the first of them that is affected by the appearance of shoots on the orchid. They appear when the plant’s period of active growth is coming to an end, and the end of the development of the children and the readiness to grow independently (i.e., at the moment when they need to be separated), marks the beginning of the dormant period - the time when the flower gains strength and its growth stops.
During the dormant period, new growth ripens and vegetative and flower buds form. That is, the appearance of babies on an orchid directly affects its life cycle (forces it to go on “rest” to gain strength), because the change between dormancy and active growth of a plant does not have a specific pattern and depends solely on external conditions: temperature, humidity, watering.
Read about how orchid babies appear and grow on the trunk, at the base and root, and what care is needed here.
Long formation process
If a florist discovers that an orchid has sprouted a shoot on its stem, he can not touch it for six months, but only observe the changes. During this period, a couple of leaves and roots will grow. It is necessary to allow them to fully form; you should not interfere with biological processes again, since moderation is important in everything.
A shoot with small roots is not removed; they wait until it grows to 3 cm. Too long ones will also not bring any benefit. First of all, they are difficult to separate, and careless actions can harm the root system.
But the children should not be on the trunk for more than 6 months; they will begin to deplete the mother plant. With independent growth, the shoot will gain strength and will fully develop.
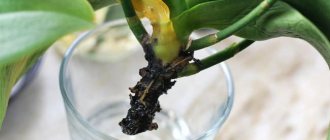
It can be difficult to decide what to do correctly if the green mass has become lush, up to 4 leaves have blossomed on the shoot, but no roots have appeared. This requires surgical intervention with cutting off the shoots and separate rooting. To do this, the removed part is placed in a bowl filled with water or covered with moistened moss.
It is not recommended to touch the basal processes, which do not have their own roots, and the nutrition comes from the mother’s body. In this case, two orchids are allowed to grow in one place; the young shoot should not be separated. Over time, the main orchid will dry out and a new flower will take its place.
Procedure for separation
- The baby orchid is carefully separated from the mother plant. Some gardeners separate the baby itself from the peduncle, which is strictly forbidden to do, because it will die. It is necessary to separate the shoot along with part of the peduncle. 1-2 centimeters above the shoot growth point and the same distance below.
- All sections of the baby orchid and the mother plant are treated with activated carbon or a bactericidal preparation. Sections must be processed immediately.
- The baby is left to dry for 30 minutes.
Then the young shoot is strengthened on the ground. This must be done carefully (
How to create greenhouse conditions
If the result is successful with the root and leaves, it is necessary to plant the orchid shoot in a pot, where it will survive a period of adaptation. At this time, greenhouse conditions are created for the flower. Activities consist of actions:
- choosing a small transparent pot;
- preparing a loose, light substrate;
- laying drainage on the bottom of the dishes;
- placement in a darkened room;
- compliance with the irrigation regime with nitrogen fertilizers.
The temperature in the room should be consistently warm (+25 degrees), without sudden changes, with humidity within 70%.
Options for stimulating root formation
Soil for orchids: soil requirements and options at home
Often gardeners are faced with the problem of insufficient root growth in children. Instead of growing a root system, orchid sprouts produce new leaves. You can start the growth process artificially. For this purpose, special designs are used at home.
Plastic greenhouse
To build such a structure, you will need two plastic cups with a slight difference in diameter or a plastic bottle.
A greenhouse will help grow additional roots
Step by step the greenhouse is assembled like this:
- A drainage layer is placed on the bottom of the lower cup, and sphagnum moss is placed on top.
- Water the lower part of the greenhouse.
- Install a vertical support, securing it to the lower cup.
- The shoot is placed on the support so that the roots do not come into contact with the moss.
- Cover the structure with a second glass.
Such a greenhouse is an improvised tropics. In this case, the goal is to create conditions for the small orchid that are as close to natural as possible.
Attention! The moss must be moistened daily and not allowed to dry out, and the greenhouse must also be opened slightly for ventilation.
Styrofoam and water
This is a rather unusual method and often less effective. It is used, as a rule, due to the ease of construction of the structure.
It looks like this:
- A through hole is made in a square of thick and dense foam.
- Place the baby in it so that the roots are inside the hole, but do not extend beyond it.
- Lower the foam with the appendage onto the surface of the water.
Additionally, to maintain the microclimate, you can install a shelter, but it must be ventilated at least 2 times a day.
How to disconnect baby
To separate the shoots you need to prepare:
- pruner;
- knife;
- scissors.
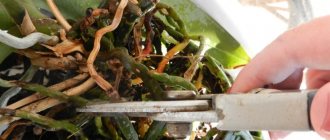
One of the sterile instruments will be enough. Disinfection should not be ignored, as infection will lead to rotting, bacterial damage to the sprout and death of the flower. If you wipe a knife with alcohol, it will not cause any harm. When the baby is ready, make a cut at the place where it is separated, and you also need to capture a small area of the mother plant. After drying for half an hour, the cut is processed. Why is activated carbon or cinnamon ground?
Stimulating root growth
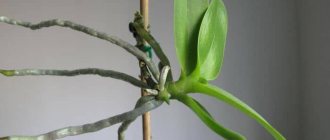
If the baby appears on a stem, it is quite possible that it does not have roots, which are necessary for independent growth, and in this case it is necessary to resort to stimulating their appearance.
To do this, the base of the shoot is wrapped in damp moss and tied with thread. It is important to moisten the moss regularly; you can wrap it in cling film or a plastic bag (then you need to ventilate the baby daily, i.e. unwind the film and let the moss “breathe” for a while).
Place the orchid under diffused sunlight or a fluorescent lamp (in winter). This approach provides the high humidity necessary for the normal development of the lateral processes of the orchid.
Transplant Basics
When it’s time to transplant the shoots, they also need to be prepared:
- pre-soak in water with added growth hormone, the wet root will not break and is more difficult to injure;
- prepare a pot with fine screenings at the bottom;
- place the sprout in the middle of the container;
- carefully cover with the substrate without compacting the earth.
The soil is sold in stores, and you can also prepare it yourself. You can collect soil from a flower bed and add humus from tree leaves.
Is it necessary to separate from “mother”?
What to do if the orchid has sprouted a shoot on a stem or root, if they grew suddenly? Nothing bad will happen if the emerging shoots are not removed. Experienced gardeners can create entire interesting plants with several shoots on one mother, and others separate them to produce young copies of the previous orchid. The choice of one solution or another will depend solely on the preferences of the grower.
Sometimes, when the humidity in the room is above 50%, the roots of the shoots can become overgrown with moss, and then flower pots with a large number of holes are put on them to provide the roots with moisture and a comfortable temperature regime. In such a pot, the roots can curl inside it.
In some cases, the process falls off, and, as a rule, this is due to non-compliance with the conditions that are required for their active and proper development.
Basic care rules
Simply planting an orchid shoot from the stem is not enough; to root the sprout, you need to provide it with good care, then in a few years it will begin to delight you with its flowering.
One rule applies here - moderation, you cannot be overzealous:
- Lighting is only diffused. In winter, artificial lighting is used because the days are short. In summer, the room is darkened with curtains and direct sunlight is excluded to avoid burns.
- The temperature in the room is kept at room temperature from +16 to + 25 degrees, do not forget about air ventilation.
- Flowers are placed on window sills on the south side, but away from radiators, if the house is heated using this method.
- After jigging, watering is organized after 3 days. At first, adding mineral fertilizers and growth stimulants will speed up rooting. Water only when the substrate is completely dry. You cannot create favorable soil for rotting by stagnating water in a pot.
You will have to carefully care for the young orchid for a whole year, after which they switch to the usual regime for maintaining adult flowers.
Care after baby's separation
After the separation of offspring, you should restore your strength. Leave the conditions for keeping the flower the same:
- Provide diffused lighting or partial shade.
- In winter, use artificial lighting, the best option is phyto lamps. They provide bright light and do not dry out the air.
- In the summer, intense sunlight should be shaded with a tulle curtain.
- Maintain a comfortable temperature in summer: +22-25ºС, in winter +16-18ºС, moderate humidity.
- Renew the soil every 2-3 years.
- Don't forget to ventilate the room.
- Use only clean, filtered water.
How to grow roots on a cake?
In order for the sprout to quickly gain strength and become capable of independent life, you need to build up the root system:
- To do this, you can use biostimulants such as heteroauxin and root.
- If you are against artificial stimulants, replace them with natural ingredients, which include aloe juice or a water solution of honey.
- Sphagnum moss also helps accelerate root growth. It needs to be soaked in any of the listed stimulants, then squeeze out the moisture and attach it to the neck of a young plant with a thread. Every day the moss is moistened with a spray bottle.
A year after transplantation, the young plant needs to be transplanted into a spacious container and cared for as an adult flower. But the sprout will be considered a full-fledged orchid no sooner than in two to three years.
Getting a baby from an orchid is not as easy as it might seem. The most important thing is to follow the rules, and then new shoots will not be slow to appear.
Separation instructions
You need to cut the shoot from the peduncle with a gap of 1.5 cm, then you need to wait half an hour so that the cut areas dry out during this time, treat them with crushed activated carbon.
It is advisable to take a transparent plastic container with holes for draining water, and place the baby in it so that the root system is slightly below the level of the edge of the pot. Fill the container with soil; there is no need to compact it; just tap the edges of the container.
Important! You can water the planted shoot only after 3 to 4 days.
We invite you to watch a video on how to separate a baby from an orchid:
Separation from the mother plant
There are several ways to properly separate an orchid shoot without damaging the mother plant.
Application of cytokinin paste
It is possible to separate a baby from an adult orchid and then plant it in the ground, provided that it has three or four leaves and at least two roots. Cytokinin paste will help speed up the growth process of the baby for subsequent transplantation. When used correctly, it gives 100% results.
Everything is very simple: the dormant bud is cleared of scales and covered with a thin layer of cytokinin paste.
Is it possible to separate a shoot without roots?
Experts do not recommend separating shoots without roots. Deprived of a connecting link for active growth, shoots, even when trying to grow roots, most often die.
Landing in the ground
After the cuts on the baby have dried, it is planted in a perforated pot of a suitable size.
The substrate is selected based on the species preferences of the plant. As a rule, an epiphytic substrate based on fine pine bark with the addition of moisture-intensive components is used. It should be moist but not wet. Planting in sphagnum moss is also
The planting procedure is the same as for an adult plant:
- Fill the pot 1/3 full with substrate, place the plant inside, straighten the roots and fill the empty space with the rest of the substrate;
- Make sure that the plant is sufficiently secured and does not wobble when moved. Do not compact the substrate. If the plant sways, you can secure it by tying it directly to the pot with women's tights or using bamboo rods and wire;
- When the baby takes root, the garter can be removed. Rooting lasts about 2-4 weeks, depending on the conditions;
- Feeding can be done after the baby begins to grow. Start with a concentration of ¼ of that indicated on the package, gradually increase the dosage as the plant grows.
Advice! When planting in sphagnum moss, use the New Zealand variety of moss. It is more resistant to mechanical stress and does not crumble when overdried.
The plant's resistance to an unfavorable environment can be strengthened by treating it with stimulants or growth regulators, as well as by frequently spraying the plant with soft water and generally keeping it in a humid atmosphere.
Favorable factors for having children
In order for an orchid to begin to sprout, a number of conditions must be met:
- the mother plant must reach “adulthood”, the signs of which are the presence of large leaves (at least four) and a fairly stable root system;
- the most favorable period for reproduction is spring and the first month of summer;
- the orchid has entered the final phase of flowering;
- optimal humidity level – 50-60%;
- the correct light mode is from 12 hours of intense soft light.
If, with the combined presence of all these factors, the plant does not begin to produce babies, you can stimulate this process. For example, ensure that the air temperature fluctuates from 17 °C at night to 30 °C during the day. A combination of moderate or even poor soil irrigation with sufficiently high humidity helps well. You can make a base in the form of a tray with wet moss and place the pot on it and plant the baby there.
Orchid growth types
Orchids can be monopodial or sympodial.
A monopodial orchid has only one apical growing point and one vertically growing stem. Such an orchid grows only upward, and not in width, which significantly reduces the methods of its propagation. Such orchids, for example, include phalaenopsis, angrecum, aerangis, vanda, gastrochilus.
The sympodial orchid grows not only in height, but also in width due to the fact that new growth points are constantly formed on its rhizome - shoots or so-called pseudobulbs. All of them are united by a rhizome, which can be divided if necessary. In particular, this is possible for orchids such as cymbidium, cattleya, oncidium, and cambria.
- The structure of orchids - simply about the complex
What types of orchids are there, why do they need a pseudobulb, and what do they even consist of? We answer all questions about this flower.
Is it necessary to artificially stimulate the flower?
Keiki themselves rarely appear in orchids, so the process of their appearance will have to be stimulated. Artificial growth stimulants include cytokinin paste and other similar agents.
Open the dormant buds and apply ointment. The procedure must be repeated three to five times. Two to three months after using the paste, keiki will appear. To speed up the effect, increase the temperature in the room to 28 degrees or place the plant in a homemade greenhouse.
Important! Orchids are propagated during the period when the plants finish flowering. This is the most appropriate time to direct the flower's resources to the emergence of new shoots.
Planting and rooting process
Rooting of the lateral shoot occurs in a transparent container. The landing itself is carried out according to the following scheme:
- Drainage (for example, pebbles) is placed in the bottom of the pot. The drainage layer should normally be 1/3 of the total volume.
- The baby is placed in the center of the pot. Its root collar is placed flush with the edge of the container.
- The roots of the shoot are carefully distributed throughout the pot.
- After this, pour the substrate into the container, distributing it evenly throughout the entire volume.
After planting is completed, the young plant should not be watered for the first 2–3 days.
How to care for the mother flower?
Proper care of the mother plant directly determines whether children will appear on it at all. And therefore, the conditions for caring for the shoots that are described above are also intended for the orchid itself, because almost everything that it receives from the outside is given to its children, who are directly on it. Obviously, it is impossible to care for the shoots in one way and the mother plant in another.
Despite the fact that orchid babies are picky about growing conditions, the method of propagation with their help still remains one of the simplest. Only the correct temperature, watering, humidity and, of course, patience can give birth to a new beautiful plant that will delight with its aesthetic appearance. Now you know what to do if the orchid has released a shoot and how to care for it.
General questions about orchid shoots
Development timeframe
With proper care of the plant, its children reach their normal size for independent existence in six months . But sometimes there are slow-witted people who take a year or a little more to develop. A little child needs this time for:
- leaf formation;
- formation and growth of roots (at least 5 cm in length).
IMPORTANT! Only the fully formed baby is separated.
The shoot can appear on its own without stimulation from the grower. This happens with high air humidity and temperature differences between night and day. In order for it to develop, the adult bush must be properly cared for.
What do they look like?
When optimal conditions are created or after stimulation of a dormant bud on a flower stick, the formation of a baby begins.
At first it is a small, blunt-shaped tubercle, from which a small bush develops, completely identical to an adult plant . First, the leaf plates develop, then the root system. Sometimes it turns out that roots do not appear on their own, then it makes sense to help the plant grow roots on the children.
Baby on an orchid peduncle.
Growth from a dormant bud and conditions of appearance
There are certain conditions for the birth of a baby:
- a place where there is a lot of scattered sunlight;
- the temperature should be within 20-30 degrees in the summer, and 18-27 degrees in the winter;
- The humidity in the room should ideally be 80% or not fall below the 50% mark;
- the plant should not be in the flowering stage.
IMPORTANT! If all these conditions are present, but the baby does not appear, it can be stimulated with the help of hormonal paste.
Read more about how to get an orchid shoot in this article.
Stimulation
All the conditions for the birth of a baby are the same as under normal conditions, but you will need hormonal paste , which can be purchased at flower shops or garden centers.
Stimulation process:
- All instruments must be disinfected with alcohol;
- Carefully remove the blanket from the sleeping bud until it turns green;
- Slightly damage the dormant kidney;
- Apply hormonal paste the size of sulfur on a match head;
- Spread over the entire sleeping kidney.
The result of using cytokinin paste.
In a week, small baby leaves will appear from the dormant bud. If more than one baby is born, the strongest one is left, the rest are removed.
When is it ready to transplant?
So, a shoot has appeared on your orchid - what to do with it? A young bush is ready for transplanting when it has 2-3 leaves and the roots have reached 5 cm in length . Only in this case is it separated from the mother plant and planted in a separate container.
Read more about how to plant a shoot here.
