Japanese camellia (Camellia japonica) is one of the most famous species of the genus Camellia and is an evergreen shrub that grows naturally on the mountain forest slopes of Southeast Asia.
The culture was brought to Europe in the second half of the 17th century, and already in the 18th century several hundred of its varieties and varieties were grown in greenhouses.
In a relatively mild climate, the shrub is grown as a garden plant, but in unfavorable natural conditions with frosty winters, Japanese camellia is grown at home and caring for it is not considered the easiest.
Botanical description of the plant
It belongs to the evergreen plants of the Tea family, which are widespread in Japan and China, where they are planted as ornamental shrubs.
More than 2 thousand varieties and hybrids of Japanese camellia have been bred, which differ in height - from 50 cm to 2 meters (shrubs), taller specimens grow in the form of trees with a thick single trunk, reaching 11 m in height. In indoor conditions, the height of the bush does not exceed 1 m.
The leaves are distinguished by their oval shape, leathery structure and glossy sheen on the surface.
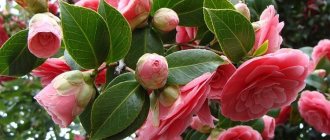
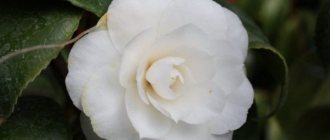
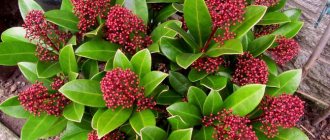
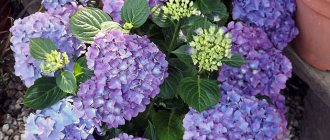
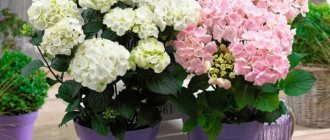
The flowers are smooth, double or semi-double, without a distinct scent, pink or peony-shaped with many petals. Usually presented in white, pink, red or shades thereof, they can be two-tone. They bloom in winter, when the air temperature drops to +10°C. Flowering lasts 1–3 months.
The fruit of Camellia japonica is an oval or round dry capsule with five compartments containing 8 seeds.
| Root system | Well developed, powerful |
| Stem | Long, thick, with many shoots |
| Leaf Shape | Elliptical or ovoid |
| Leaf color | Dark green with a glossy sheen |
| Flower shape | Rose-shaped and peony-shaped |
| Flower color | White, pink, red |
| Fruit shape | Oval capsule with five compartments, similar in appearance to a nut |
| Fruit color | Green, large, dark brown seeds |
| Taste of the fruit | Not eaten |
Varieties
There are many varieties of Japanese camellia, but the most popular are:
- Vittorio Emanuele II is a variety with semi-double buds, which consist of slightly convex petals bent in the opposite direction. The color of the buds is white-pink with rich longitudinal stripes of crimson or pink on each petal.
- Guilio Nuccio - characterized by crimson buds on which there are 2 types of petals - large round petals are attached in 2-3 rows, and in the center of the bud there is a small lush “cap” of small oblong petals.
- Double White - has double flowers of snow-white color, with spherical petals that are attached to the base in a clear checkerboard pattern, which is clearly visible when the bud is completely open.
- Desire is a variety with semi-double buds, has a two-color color: white on the inside, pink on the outside, with a smooth color transition.
- Margaret Davis - characterized by the presence of two-color semi-double buds. The petals located on the outside of the flower are round in shape, large in size and white in color, which at the edges turns into a bright crimson torn border. The inner petals are small, often closed, covering the center of the bud; they also have a crimson border, but not so bright.
- Lady Vansittart Pink is a variety with smooth flowers, characterized by an elegant bud shape. There is a clear geometry in the arrangement of the petals; in the center of the bud there are long yellow stamens, surrounded by 3 petals; under them, in a checkerboard pattern, are the remaining rows of petals, which form a medium-sized flower. The petals are white-pink with darker veins, some petals have bright crimson splashes.
- Chandlers Red is a variety with bright red buds and heart-shaped petals. The lower 2 rows of petals are large and slightly bent outward. In the center there are small oval petals, creating a lush “cap”. Externally, the flower resembles peonies.
- Asahi-No-Mai is a smooth-flowered variety with bright red wide petals arranged in 1-2 rows and a large dense center with bright yellow stamens.
- Tricolor - characterized by semi-double flowers, the petals are white-pink in color, with a small amount of red splashes and ragged thick stripes of scarlet color. In the center of the flower there are sparse long yellow stamens.
- Pink Perfection - considered one of the most beautiful varieties. It has double buds of soft or bright pink color, which consist of petals slightly bent in the opposite direction. The bud shows a clear geometry of the arrangement of the petals; in the center of the bud the petals are closed and resemble an unopened peony bud.
Conditions for successful growing at home
Ignorance of the basic nuances of growing camellia japonica often causes the death of a flower. We list the optimal indicators of the indoor microclimate and the rules for choosing a suitable place to place the pot.
Lighting
Choose a place to install a pot with an indoor flower that is well lit, but protected from direct sunlight. Windows facing west or east are suitable for placing the flower. If you plan to place the plant on a south-facing window, it must be shaded.
Important! The plant will not be able to exist normally on northern windows. Even if it grows, flowering will not occur.
The leaves may grow unevenly, and the shoots may lean towards brighter lighting, so it is recommended to periodically turn the pot in different directions. When buds form on the plant, do not turn the pot - any changes in lighting can cause the buds to fall off.
Ventilation
Regular ventilation of the room is the key to the health of the plant, since pathogenic microorganisms accumulate in stagnant air, and the risk of developing flower diseases or damage to its parts by pests increases. To minimize risks, the room is ventilated daily for 1–2 hours.
In summer, it is better to take the camellia outside or onto an open balcony, protecting it from drafts or strong winds.
Temperature
For flower development in the summer season, the air temperature in the room must be maintained at +20...+25°C; in winter it is important to maintain +10...+15°C to allow the camellia to form buds.
Important! If in winter the air temperature exceeds the specified values, the buds may fall off before they begin to bloom.
Air humidity
Japanese camellia suffers from dry air. The problem manifests itself in winter, during the heated period, when artificial heat sources dry out the air. The optimal humidity for camellia is 60–75%.
To increase the humidity in the room, use containers with wet expanded clay or place sphagnum moss near the trunk of the plant and spray it regularly. Evaporation from expanded clay or moss can provide the required level of humidity and keep the flower healthy.
Home care
In order for the camellia to grow and bloom, it is provided with care, consisting of regular watering, fertilizing, mechanical treatment of the foliage and replanting.
Watering
It is necessary to water the camellia regularly and ensure that the soil does not dry out. The soil should not be over-moistened and water should not stagnate in the container. Failure to comply with the watering schedule often causes leaves and buds to fall off and the development of diseases.
For irrigation use soft, settled water at room temperature. Water the camellia at the root and drain the excess water from the pan, which accumulates during heavy watering. In summer, the plant is watered 2-3 times a week, in winter - 1-2 times.
Top dressing
After the camellia fades and young shoots appear, the flower should be fertilized with a complex fertilizer for indoor ornamental flowering plants, according to the instructions. Next, the plant should be fertilized every 3 weeks until new buds begin to appear in the next season. During the flowering period, the application of fertilizers is suspended.
Trimming
To make the plant thick and lush, it is recommended to prune it. However, often this procedure is not carried out, since camellia painfully tolerates such an intervention. During this period, you should pay attention to the buds - remove weak and diseased ones with sharp scissors so that the remaining flowers grow better and the plant has enough nutrients to develop shoots.
On one shoot you should leave 2-3 buds, choosing large and strong ones, and remove the rest.
At the end of October - beginning of November, it is recommended to prune the shoots to stimulate the growth of axillary buds. Each shoot is cut by 5–10 cm, based on the size of the plant.
Transfer
Camellia grows quickly, so it needs annual replanting. When the flower is 5 years old, replanting is no longer required so often - once every 3 years. The right time for replanting is considered to be mid-summer, when the active growth of the plant stops.
Find out how and when to replant indoor plants.
The flower grows well in acidic soils, so the composition for replanting is selected accordingly. For young plants, prepare a mixture containing leaf soil (1 part), coniferous soil (2 parts), peat soil (1 part) and river sand (0.5 parts). For adult plants (5 years and older), prepare a substrate of the same composition, but adding 1 part of coniferous soil.
In order not to prepare the soil mixture yourself, you can purchase ready-made soil for rhododendrons, which is also suitable for camellias.
Each flower transplant should be carried out in a larger pot than the previous one, 2–3 cm in diameter. It is better if the pot is wide and of medium height. The material of the pot is chosen in accordance with financial capabilities and personal preferences.
Transplant process:
- ¼ of the volume of expanded clay is poured into the bottom of the new pot.
- 3 cm of earthen mixture is laid on top of the expanded clay.
- Carefully remove the plant with the earthen lump from the old pot.
- Having slightly destroyed the earthen lump and reached the bulk of the roots, they are examined for the presence of diseases, damage, and rot.
- Dead and damaged parts of the root system are removed with a sharp knife or scissors, and the sections are sprinkled with crushed activated carbon.
- The prepared plant is placed in a new pot and soil is added so that all the voids are filled. In order for the procedure to occur quickly and efficiently, it is necessary to shake the container periodically.
- When the plant is well fixed, the soil around the trunk should be compacted a little and watered with warm water.
How to replant garden camellia after purchase in open ground
After purchasing a flower in a pot, it is necessary to transplant it into open ground. Planting and caring for camellias in open ground takes into account a number of requirements.
What is needed for planting
How to plant camellia correctly? Camellia is a lover of acidic soils. Fertile and permeable soils are especially suitable for planting this shrub. When planting, it is important to remember that camellias do not like to be planted too deep. They are planted so that their root collar is flush with the ground.
The various species of camellia plants are generally well adapted to acidic soils rich in humus, most species do not grow well in calcareous soil or other calcium-rich soils.
The soil must be chosen so that the pH is between 6 and 6.5.
A necessary condition for the good development of plants is mulching with humus leaves, grass, crushed bark or wood chips, that is, everything that ensures the preservation of acidity and soil moisture at the roots.
Important! When mulching, it is necessary to leave the root collar open, otherwise the camellia may rot.
Choosing the optimal location
Camellias have a reputation for being demanding and picky plants, but a lot depends on how you plant them. The bush should be planted in a shady place, not in direct sun. The following rules for choosing a location should be taken into account:
- shady place;
- Avoid exposure to direct sunlight;
- eliminate the possibility of drafts;
- can be planted near a wall or hedge;
- light should reach the flower through the lace of branches, so planting between trees is possible;
- you cannot choose a place with stagnant water to prevent rotting of the roots;
- you can choose the eastern or western walls of the garden plot fencing;
- When planting, the plant should be positioned slightly higher than the surrounding soil. This allows excess water to drain away from the center of the plant;
- This shrub should not be planted where it will have competition for nutrients.
Step by step planting process
Planting Tips:
- the planting hole should be as deep as the root ball and twice as wide;
- you should center the plant and fill the hole, tilting the soil on the sides;
- the top of the root should be 2-4 cm above the soil level;
- You shouldn't cover the top of the root ball, but you should mulch around the plant.
Step-by-step instructions for planting:
- A planting hole should be dug in the prepared bed.
- The volume of the pit should be twice the volume of the earthen ball with the roots of the plant.
- Place drainage made of expanded clay or fine gravel 20 cm thick on the bottom.
- A pile of earth is poured according to the required composition.
- The seedling is placed on top.
- The roots are straightened and covered with earth.
- The root collar should not be covered.
- The soil around the trunk is compacted.
- Watering is carried out.
After planting, the soil must be mulched on top with peat.
Reproduction
Camellia japonica can be propagated in three ways. Let's take a closer look at each.
Cuttings
A popular method at home. The best period for cuttings is August.
Let's look at the process step by step:
- Young cuttings that have not yet become woody are selected.
- The selected cuttings are cut at an angle with a sharp knife, maintaining a length of 8 cm.
- On the cut cuttings, remove all leaves except the top two.
- In order for the cutting to take root better, the cut is dipped in Kornevin and planted in a pot 5 cm in diameter to grow roots.
- Planting depth is 3 cm. A peat-sand mixture (1:1) is used as a substrate.
- After planting the cuttings, water the soil, cover the container with a transparent plastic bag, place it on a bright window and maintain the air temperature at +20...+25°C.
- The bag is removed regularly (once a day for 1 hour) to ventilate the plant.
- When the roots grow (after 2 months), you will notice active growth of the cuttings; during this period, you can remove the bag and transplant the cuttings into an acidic substrate with the same composition as for transplanting young plants.
- For transplanting, choose pots 7 cm in diameter.
- It is necessary to care for rooted cuttings in the same way as for an adult plant.
Seeds
Usually this method is not practiced, since the collected seeds quickly lose their viability, and often the resulting plant develops poorly.
Did you know? Camellia seeds contain valuable oil, which is widely used in Japan and China in the cosmetics industry (usually in the production of lipstick).
If you decide to propagate camellia by seeds, you need to take into account the following tips:
- Sowing is done in small containers (solid wooden boxes) with a peat-sand mixture (1:1).
- It is necessary to sow according to the following pattern: 3 cm deep, 6 cm between seeds, 5 cm between rows.
- After sowing, the soil is watered and the container is covered with glass.
- The glass is periodically removed for ventilation (once a day for 1 hour).
- Seed germination should occur at a temperature of +20...+25°C.
- The soil is sprayed daily with a spray bottle.
- When the first shoots appear, the glass is removed.
- When 3 leaves appear on the plant, the camellias are planted in separate containers with acidic soil (as with cuttings). The pot should be 6–7 cm in diameter.
- Care continues as for an adult plant.
By layering
Camellia can be propagated by air layering.
Let's look at how to do this correctly:
- A central or lateral young shoot is selected on the plant at the beginning of active flower growth. The stem of the selected layer should have a rich green, not dark color, and its thickness should be 4–6 mm.
- The shoot is cut with a sharp knife so that it is not separated from the mother plant, but at the same time there is 2–3 mm of living tissue for the formation of roots.
- All leaves are removed from the shoot, leaving only 1 leaf - the first from the growth bud.
- At the place where the cutting is cut, an incision should be made into the shoot to a depth of 1 cm.
- The cut area is treated with Kornevin, wrapped in damp sphagnum moss and plastic film and secured with wire.
- The room temperature for normal root formation should be +20…+25°C.
- When roots 1–2 cm long appear on the layering, it is carefully separated from the mother plant and planted in acidic soil.
Did you know? The camellia appeared in Europe in 1738, brought from the Philippine Islands by the Jesuit monk Joseph Kamel. The plant was named in his honor.
Kinds
Breeders have bred more than 250 varieties, in most cases camellias are represented by small shrubs with lush flowers. Indoor Japanese camellia can be found in the following types:
- Adolphe Audusson. The flowers only bloom in spring, but they grow up to 15 cm in diameter. They have a terry surface and a rich red color.
- Japonica Purity. This camellia does not have such large flowers, but it is famous for its snow-white color.
- Pink Perfection. From the name it is clear what shade the flowers grow. They reach only 80 mm in diameter, but are great for interior decoration.
- William S. Hastie. Raspberry-colored flowers grow no more than 5 cm, but have a rich color and a lush bud.
- Chandlers Red. Lush inflorescences appear from monochromatic red flowers.
Possible difficulties during cultivation
In the process of indoor cultivation of Japanese camellia, some difficulties may arise associated with:
- rotting of plant roots under the influence of black mold or root rot. Common signs of disease are: wilting of buds and leaves, unpleasant odor from the pot. The problem can be solved by timely replanting the plant, removing all diseased roots and completely changing the soil and pot;
- the appearance of scale insects on the leaves of the flower, the signs of which are dark tubercles on the back of the leaves. You can overcome scale insects by treating the plant with Fitoverm, according to the instructions;
- the appearance of mealybugs, which manifests itself as a white coating on the leaves. The flower must be treated with Karbofos, according to the instructions.
Growing Japanese camellia indoors is not easy, but by following the flower care recommendations, you can get a healthy and beautifully flowering plant that will definitely become the center of attention.
Pest and disease control
Camellia does not have the strongest immunity, but most problems, such as dropping leaves or buds, occur due to stress and improper care.
If the shoots begin to rot, the root collar turns black, and the leaves become covered with spots - this is a fungus. Most often it develops due to too much watering. In the early stages, remove all damaged areas, treat the flower with fungicides, replant and cover with a bag or send to a greenhouse until growth begins.
At high temperatures and humidity, the plant is affected by thrips, and when the air is excessively dry, by scale insects and spider mites. Isolate the plant, treat all leaves with insecticides and repeat the procedure after a few weeks.
Photo: commons.wikimedia.org
Pushkinia (60 photos): types, planting and care in open ground