Not all gardeners know that the ancestors of forty species of such beautiful and exquisite flowers as peonies were herbaceous plants - medicinal peonies or milkflowers. Even in ancient times, people experimented and knew how to propagate peonies. And today, buds in flower beds immediately captivate our gaze: crimson, red, white, cream or yellow, lilac or pink heads of simple, double or semi-double shape on tall stems among large green leaves also of unusual shape. Gardeners love these flowers for their beauty, long-lasting flowering, and subtle, refined and “delicious” aroma. Therefore, they try to propagate their decorative flower in different ways.
Gardener breeders understand that peony seedlings are expensive, so they kindly share tips on how peonies reproduce, and tell how to grow and propagate a frost-resistant tree-like plant that pleases with its flowering for two weeks or longer in cool weather.
If you look at a peony bush, it has a height of up to 100 cm and several stems. The plant itself can tell you how to propagate peonies. The large and powerful peony root has many cone-shaped thickened processes that can be used for propagation, as well as renewal buds. The bush can be divided, stem and root cuttings, layering and seeds can be planted.
How and when to divide a peony bush?
When starting to propagate bushes, you need to decide on the timing of when to divide peonies: the best time for this procedure in central Russia is considered to be the period from August 10 to 30.
After the soil temperature drops to 12-15 °C, peonies begin to grow suction roots, and at later dates of digging they will die when dividing. It is recommended to divide peonies at these optimal times, even if you plan to plant them at the end of September and later. It is better to keep the division in moss or sand in a cool place, protected from rain, before planting (even a month or more). You can start dividing even earlier, in the first ten days of August, and then continue the division as long as necessary. In the south, the division of peonies shifts to a later time, and in the northern regions, to an earlier time in accordance with the permissible planting dates.
In order to divide a peony bush, as practice shows, the plant must reach a certain age and grow sufficiently in the ground. Delenki from a 3-year-old peony rhizome and delenki from a 4-year-old peony rhizome are distinguished by more developed storage roots.
The most suitable for division are young plants 3-5 years old that have flowered twice. Peonies at this age have accumulated in their roots a sufficient supply of nutrients that contribute to the normal development of the division in a new place. Young plants are still easy to dig up, easy to divide, and the divisions look the most attractive. This work is within the capabilities of every gardener; 5-7 year old bushes, although they will produce more planting material, will require significant physical effort to dig up.
Before dividing the peony, count the number of stems: there should be at least 8-9. And the circumference occupied by the stems near the ground should exceed 8-9 cm. If the stems are brought together in a circumference of less than 6-7 cm, such a rhizome often cannot be divided into several parts, and it is better to wait another year.
The following describes in detail the technology of how to divide a 3-5 year old peony.
For digging you need two shovels: one bayonet and the other with a curved blade, pruning shears, a sharp large knife and two buckets. You should also prepare labels with the name of the variety in advance. Excavation is carried out on a dry day and, if possible, after a dry period when the earth crumbles easily.
The stems at a height of approximately 10 cm above ground level are cut with pruning shears, chopped, placed in the first bucket, and root trimmings are collected in the second. Having retreated 25 cm from the stems, the plant is dug around with a bayonet shovel to a depth of 35-50 cm, depending on the size of the root system. Any long roots that come across are carefully cut with a knife (secateurs): they break off easily.
Using a shovel with a curved blade, dig up the peony from below, cutting off the roots remaining below. Carefully remove the plant from the ground and, placing it on its side, carefully remove excess soil with a sharp rod. Then, also carefully, immediately cut the roots to 10-15 cm in length. If possible, wash the rhizome with a stream from a hose or watering can.
Then attach a label and take it to a shady and well-ventilated place until the evening. If there is no water for rinsing, you can leave the plant to dry in a cool shed protected from precipitation, proceeding directly to pre-drying.
In the evening, for pre-planting drying, the peonies are transferred to a closed, cool room and stored there for 2-3 days, laying them on film or cardboard. If the air temperature is high, you can cover the dug-up plants with burlap or similar woven material. For longer periods of time before dividing the plant, the covering fabric should be periodically sprayed with a weak light pink solution of potassium permanganate from a spray bottle, or the fabric should be periodically moistened in this solution, squeezing out excess moisture.
To divide a peony bush, you will need a table covered with film, a planed wooden block 8X50X4 cm. Grafting-type knives, a knife with a thick and sharpened blade, a scalpel, chisels, a hammer, brushes (tooth and clothes brushes with hard bristles), a jar of ash, a box of moss
The division process itself is the most difficult and crucial moment. And it is learned and improved with personal experience. However, some rules help him master it faster and successfully.
Remains of stems are removed completely to the base. First of all, the remaining long storage roots are cut to 8-12 cm, intertwined roots are removed and thin roots, 1 cm thick or less, are shortened to 3-5 cm. To divide a peony bush as experienced gardeners advise, you need to completely remove most of the old root with which the plant was planted. It usually differs in thickness and color (darker). Carefully inspect the peony from all sides. They estimate how many sections it can be divided into and where the cutting lines will be. Taking it with both hands, try bending it in different directions without much effort: sometimes you can feel that it can easily be divided into 2 parts with one cut. After this, further division becomes simple.
The general rule for propagating peonies by dividing the bush: first separate what is clear and simple, then the order of further division will become clear to you.
It is often easy to separate a section attached to the side or top of the rest of the rhizome: start there. Once you separate it, you will see what you can separate further. If the initial choice is difficult (this often happens with a large rhizome), you have to cut the rhizome in half through the center using chisels and a hammer.
Then clean the cuttings of rotten parts, sprinkle all the cut areas with ash (it’s convenient to use a toothbrush for this) and attach labels with the name of the variety. Place the cuttings in a box with slightly moistened moss and store in it until planting for at least 2-3 days. In such conditions, deli can be stored for 2 months or more, and in well-packaged postal items they can withstand long journeys throughout the country (and even abroad) lasting more than a month.
Watch the video “Propagation of peonies by dividing a bush” to better understand how this procedure is performed:
Advice from experienced gardeners
Remember that peony has a very powerful and well-developed root system (it goes almost a meter deep into the soil).
When dividing bushes, try to save more roots of the plant.
And adhere to the following recommendations:
- To carefully dig up a peony, first make a groove around the bush and dig up the flower from below. Then, using two shovels, very carefully remove the plant, holding it by the leaves, and place it on an area with drainage.
- Immediately wash the dug up peonies with clean water from a hose. Try not to move the bushes so as not to damage the fragile roots. After washing, the flowers are dried for 3-4 hours (we need to wait for the roots to wilt slightly).
- As soon as the roots are dry, finally free them from the soil and rinse with water.
- When propagating peonies by bush division, try not to artificially cut the roots, but delicately separate them at the jumper points.
Before the event, carefully inspect peonies; diseased plants cannot be propagated.
Powder the cut areas of the bush with crushed charcoal. Then the plots are planted. It is better to do this in the fall (but previously it was believed that it was better to bury the cuttings until spring).
But still, do not keep the cuttings in the winter, but plant them in the fall. After all, the development of small pump roots occurs in the very first month after planting.
Before spring, our peonies will have time to get stronger and take root, so that in the spring they will immediately begin to grow intensively, gradually turning into a new healthy plant.
When propagating peonies using any method, in the first couple of years of the flowers' life, it is necessary to trim the buds.
This event stimulates the active growth of the flower and rapid flowering in the future.
By following all the recommendations for flower propagation, your pets will grow into luxurious and fragrant plants.
We learned a lot about beautiful peonies, their cultivation and propagation, but not everything. What are the features of growing tree peonies and ito hybrids? What diseases and pests plague our pets? We still have to cover these questions.
In the meantime, I suggest watching a video about propagating peonies by dividing a bush.
See you soon, dear readers!
Peony propagation by pruning
Sometimes the pruning method is called the Kästner method. This method was actively studied in the 1970-1980s. in the GBS of the USSR Academy of Sciences, it is suitable for milky-flowered peonies aged more than 6-7 years with the number of stems on a bush of at least 30.
Carry out in the usual time frame for dividing peonies, in the second half of August, in dry weather. They operate in the following sequence.
Before propagating peonies by pruning, the stems are cut at a height of 10 cm above the ground. The mother plant is dug in a circle, slightly retreating from the stems. Dig a groove of such a depth that the top of the rhizome with part of the renewal buds 2-3 cm above the outcrop becomes visible. Usually, a groove depth of 6-8 cm is sufficient for this. On one side, the groove is made wider so that a shovel can be horizontally placed in it. Use a shovel with a sharp, sharpened blade, preferably a curved one. The shovel is inserted into the widened part of the groove and the entire exposed part of the rhizome is cut off with a horizontal movement. The cut part breaks up into small non-standard divisions with 1-2 renewal buds. The cuts on the cuttings are rubbed with ash and placed for 2-3 days in a box with moss, like regular cuttings.
Then the divisions are planted in well-filled soil, densely, according to a 20X30 cm pattern. After growing, after 2 years they are transplanted with a lump of earth to a permanent place. All cuts on the mother plant are sprinkled with ash and covered for 2-3 days from rain. After this, add soil above the mother plant to the previous level. The next year, when the stems grow normally, the entire plant is dug up. Usually it easily breaks down into separate pieces. But often, after the first cutting, due to numerous wounds, the plant can rot and die.
A modification of this method can be considered the “partial trimming” method. It was invented and applied by A.K. Kolpakov. From the side, part of the rhizome is exposed to the depth of the usual cutting - 6-8 cm and 2-3 small non-standard cuttings with buds are cut off. Places of cuts on the mother liquor are sprinkled with ash, and then, after drying, with earth.
The principle of pion division
To separate the roots of a peony, it is necessary to cut off all the foliage of the selected plant along with the stems. Carefully dig up the root in the ground and remove it, trying to prevent damage to the adventitious roots. Remove the soil on the branched rhizome with a stream of water so that the renewal buds are better visible. The entire root is first slightly dried before dividing. To do this, place the rhizome in a dark and cool place for several hours. After this procedure, the roots will become more elastic and will not break or crumble when separated. Adventitious roots are trimmed to a length of no more than 12 centimeters. Using a sharp shovel or knife, divide the rhizome, obtaining a “division” with one or two roots and two or three developed buds. The thickness of the adventitious roots suitable for the growth of the future bush should be about one centimeter in diameter. The delenka must be carefully examined for the presence of diseased areas of root tissue. If there are any, then carefully scrape out the affected areas to healthy, white tissue. It is good to sprinkle the cleaning areas with ash or fine charcoal. The resulting cuttings are left to dry the sections in a cool, dark place for another couple of days, after which they are planted in a new place. Dried cuttings can be preserved for quite a long time by lightly sprinkling the roots with sand or moss.
Propagation of peonies by stem cuttings
The method of vertical stem cuttings is based on stimulating upward growth of the rhizome and the formation of new buds at the tips. Suitable for varieties of milkweed over 6-7 years old, the same as for the pruning method.
In the described method of propagating peonies in the spring, after the sprouts appear, a continuous fence (a box without a bottom), 20-25 cm high, is installed around the mother plant, which is filled with light soil as the shoots grow. The soil is periodically moistened. The buds must be removed. At the beginning of September, the fence is removed, the poured soil is removed and the plant is carefully exposed to the upper buds. Layerings - the newly formed upper sections of the rhizome with a bud at the base are cut off from the plant at the point of their connection with the old part of the rhizome. The resulting cuttings are planted in a garden bed for growing according to the same scheme as in the pruning method. The operation should be carried out in a dry time, the cuts should be sprinkled with ash and protected from precipitation for 2-3 days.
The most important advantage of the method of propagating peonies by stem cuttings is the production of healthy plants with a completely renewed rhizome and root system without old tissues, that is, a complete renewal of the peony.
But there is another side to the coin: the resulting cuttings are very weak, in the first winter there is a noticeable loss of some of them; it takes a lot of time to grow. The mother plant's normal physiological cycle is disrupted (it has not bloomed), and in the future it may stop blooming due to the consequences of burial. Numerous “wounds” will long affect the development of the plant, its health and flowering in subsequent years.
How do peonies reproduce: cuttings
Propagating peonies by cuttings is a rather troublesome process that requires effort and time. Flowers planted by cuttings will begin to bloom no earlier than 3-4 years after planting.
Peonies are bred in various ways that are easy to do.
Considering the peculiarities of cutting peonies, it is rational to use this method only if you need to breed rare plant varieties, or there is a need to refresh and rejuvenate it.
Propagation by cuttings of peonies is carried out by two methods - stem and root.
Harvesting cuttings
Before propagating peonies by cuttings, you need to properly prepare the planting material:
- Root propagation - the flower is carefully dug out of the ground so as not to damage the root system.
- If the stem method is chosen, the stems located in the middle are cut as close to the ground as possible. One stem will produce 2-3 cuttings.
- When cutting cuttings, each part should have several internodes.
- The cuttings are disinfected in a weak solution of potassium permanganate - 3-4 g of the drug is taken per bucket of water.
To increase the likelihood of survival of cuttings, the cutting sites must be treated with growth stimulants.
Selection of containers and soil preparation
The soil for peonies should be light so that it allows oxygen to reach the roots. Humus soil is best suited, on top of which is poured a layer of sand or perlite 5 to 7 cm thick.
Cuttings can be planted in open ground or in cold greenhouses. You can use separate disposable cups for each branch.
Cuttings ready for planting
Attention! If planting is carried out in a common container, seedlings should be placed at a distance of at least 25-30 cm from each other.
Reproduction of peonies by partial layering
To reduce the negative consequences of the vertical layering method, you can use a modification of this method. The partial layering method is the most suitable for obtaining cuttings from an old plant without digging it up and with a minimum of damage to it. The essence of the changes is as follows: I install a fence, 30-35 cm high, only over part of the mother plant, taking into account the planned number of divisions, preferably on the south side.
The fence is left over the plant for two years. In the first year, I fill the fenced part with 10-15 cm of soil. I remove buds only from the stems that fall into the fence. The rest of the plant blooms as usual.
In the fall of the first year, I leave the fence in place and raise the ground level inside it to its full height. In the second year the care is the same as in the first. In the fall of the second year, I remove the fence and carefully free the shoots from the ground. On the outside of the fence, I expose the plant below the soil level by 5-10 cm. I cut off the newly formed young parts of the rhizome with a knife and grow it in ridges, as described above.
The advantages of the method of propagating peonies by layering are obvious: the flowering of the mother plant is not interrupted, and due to the small number of cuts, the negative consequences for the mother bush are significantly reduced.
The cuttings obtained in the fall of the second year are close in size to small cuttings, and some of them can be immediately planted in a permanent place without growing. I will add to this that such cuttings have great growth energy and by the autumn of the first year after planting they catch up in growth with normal standard cuttings of the same age.
Hello, dear readers!
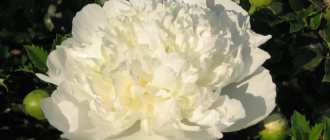
Peonies are noble flowers that bring good luck, one of the most attractive in the garden.
It is not for nothing that the ancient Greeks were actively involved in the propagation of peonies, considering these beautiful long-livers (the flowers bloom profusely and magnificently for many decades) as powerful amulets against evil spells, protectors from adversity and misfortune.
The kings of the garden plot begin to smell fragrant in the last month of spring and delight us with their lush flowering until mid-summer.
There is never too much beauty! How to properly propagate exquisite flowers?
Seedlings of these wonderful flowers are quite expensive.
Therefore, if we want to plant more bushes of this plant in our garden, let’s master the propagation of peonies ourselves.
The topic of our article today will be the propagation of peonies in several main ways.
It's time to deal with this interesting and important issue.
Reproduction of peonies using the Shlomin method
Another modification of the vertical layering method was developed and used by G. K. Shlomin.
The author began to conduct his experiment in the spring of 1982 with two-year-old bushes of the Vechernyaya Moscow and Cruiser Aurora varieties. He placed tall tin cans on the shoots, open on both sides. As the shoots grew, I poured nutritious soil made up of rotted manure, river sand and black soil into the jars, and periodically watered it with water. During the growing season, I watered the young plants twice with a weak solution of heteroauxin (1 tablet per 2 liters of water).
To prevent the jars from overheating, I wrapped them in cardboard and plastic wrap on top (on the sides, like a thermos, leaving the top open). In autumn the shoots formed a good root system. In September I cut them under the banks, at the base of the mother plants.
I planted the cuttings with a clod of earth in a permanent place in the soil, watered them well and mulched them with rotted manure (5-7 cm). With the onset of frost, it was insulated with peat chips (10 cm).
In early spring, I removed the cover, carefully and shallowly loosened the ground around the bushes, and added half a bucket of raw manure mixed with 100 g of wood ash, 100 g of superphosphate and 10 g of potassium nitrate under each bush.
The bushes have developed well. The following summer, some even had flower buds, but they were removed.
This method allows you to quickly propagate valuable varieties.
All varieties of the vertical layering method are applicable only for lactiferous peonies!
Cutting off part of the rhizome, without digging up the mother plant. This method is used in cases where it is necessary to obtain a small number of cuttings from a large bush, 2-3 pieces, and it is impractical to dig up the entire bush for them.
Carry out in the time periods usual for dividing varieties. A dry day is chosen for the operation. Carefully dig up and expose a part of the rhizome (to the depth of the roots), intended for separation from the mother plant. Using a sharpened bayonet shovel, the intended fragment is separated vertically and removed from the ground. An analogy with how one cuts a piece from a round cake is appropriate here. Cuts on the mother plant are sprinkled with ash, and the damaged part is covered from rain for several days. Then the resulting empty space is covered with fertile soil and chemical fertilizers.
This method is used only as a last resort. It is ineffective: little planting material is obtained, and the waste is large. The remaining part of the bush is sick and takes a long time to restore its decorative properties.
Propagation by seeds
Reproduction of peonies by seeds is used only for selection.
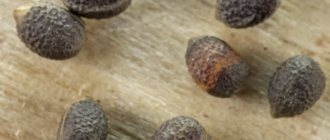
Peony seeds
Description and disadvantages of this method
Gardeners use this method very rarely, because it has many disadvantages and practically no advantages.
Minuses:
- Only 50% of the seeds germinate.
- Peonies bloom only after 5-7 years.
- Long germination - 1-5 years.
- Low decorative qualities of plants.
Breeding peonies by seeds is used only on wild varieties.
Procurement of seeds
The seed box has a star shape and is green in color. To obtain seed material, you must leave a flower on the bush. The seed will ripen at the end of summer, after which it is collected and stored in the refrigerator.
Stratification
The seeds take a long time to germinate due to their thick shell. To increase the chances of obtaining seedlings from seed material, a stratification method is used. It is carried out in 2 ways, in turn:
- Thermal. The seeds are dipped into moistened sand in a shallow container. She is placed on a heating pad. The sand temperature should be +30 degrees Celsius. The sand is constantly sprayed, cooled once a day, then heated again.
- Cold. This method is necessary when it is important to activate growth points on the embryo. The seeds are removed from the sand and immersed in vessels (cups, shallow containers) with peat, sprinkled with a layer of soil. The seedlings are left for 90 days at a temperature of 5-10 °C. If you open the seeds, they will sprout faster. The part of the stem under the cotyledons should be sprayed. A piece of bandage is moistened in 0.01% growth stimulator solution and placed on the stem. Sprouts should appear in a week - 10 days.
Caring for young seedlings
When the first seedlings have appeared, and stratification has already been completed, it is necessary to create good conditions for their growth. The sprouts are placed in a warm place where the temperature is 16-18 degrees Celsius. They need to be watered regularly.
Important! You can plant on the site only at the end of spring, but not earlier.
Ito-peonies: subtleties of care
source: https://www.supersadovnik.ru/article_plant.aspx?id=1003533
Ito varieties are complex hybrids obtained from species peonies from various climatic zones: from the steppes of Transbaikalia to the highlands of Tibet. The results of their cultivation in our middle zone were positive.
Many varieties are quite resistant to the cold of the Moscow region. We endured many winters with frosts, including the anomalous winter of 2002/2003 and the frosty winter of 2009/2010 without losses. Covering with a layer of oak leaves or spruce branches is recommended when planting new crops, especially in the first year. For planting, it is better to allocate an area of at least 75x75 cm, with a hole 45 cm deep, since most varieties develop the root system more to the sides than to the depth. The optimal soil is virgin soil or soil for garden crops. The composition of the soil mixture is the same as for herbaceous peonies. The planting time is the same as for all peonies in the middle zone - from late August to early October. Ito-peonies are more sensitive to acidity, prefer a neutral or slightly alkaline soil reaction (acidity level pH 6.5-7.5), so periodically add deoxidizing additives (dolomite or limestone flour - long-term deoxidizing agents).
Care in terms of watering and fertilizing is similar to caring for herbaceous peonies. Most Ito bushes do not need support: the stems hold the flowers well, but in some varieties the flowers are hidden in the greenery. They develop well in shade during midday. In the fall, much longer than the herbaceous peony varieties before frost sets in, Ito peonies look green and healthy. Many of them acquire a golden or purple color. Pruning of stems and leaves should be done after heavy frosts (in November), much later than for herbaceous peonies.
Unlike the herbaceous ones, the underground parts of the Ito-peony bushes grow woody and hard and often do not lend themselves to a knife. When dividing bushes, in addition to knives, chisels and hacksaws are used.
What to do with winter shopping? Today, Ito peonies have gained great popularity among amateurs, despite the high cost of individual varieties. Quite often we have to resort to spring planting. Foreign deliveries of Ito, like other peonies, occur in February - early March, when winter continues in our country. Before planting in a permanent place, in such cases, it is better to store peony divisions in a cold place, in dry peat, earthen mixture or moss at +5...+7 °C or at slightly negative temperatures.
Planting and keeping them in pots until planting in the ground at the beginning of May turned out to be successful. Late plantings should be avoided - starting from the second half of May, especially in warm weather.
Preparation of the bush
5–7 days before division, the bush stops watering and the flower stalks are removed. Then:
- Before digging, all stems are shortened to a height of 20 cm, and the foliage is removed.
- Carefully examine the mother plant, assess the presence of pests and diseases. If signs of damage are found, the bush is treated. Division is postponed until next season.
- The bush is dug to a depth of 0.5 m, the roots are carefully exposed.
5 rules for caring for peonies in autumn
The peony is removed from the ground, the rhizome is washed with running water, and the remaining soil is removed.
Botanical description
Peonies are herbaceous, semi-shrub (tree peonies) or shrubby plants, reaching a height of 1 m. The rhizome is large, the roots are cone-shaped, powerful. There are several stems, trifoliate or unpaired pinnate leaves of all shades of green, glaucous or dark purple are arranged alternately along the stems. Peony flowers are single, fragrant, reaching 15-20 cm in diameter; they are good both on the bush and as a cut flower. Peony is unpretentious, its agricultural technology is not difficult, so it has always been valued by flower growers: even when the flowers fade, peony bushes with openwork lush foliage remain attractive until autumn.
- How to sow snapdragon seedlings, how to care for seedlings
Peonies are long-lived; they can grow in one place for decades.
Breeders also showed interest in this garden plant, and to date, over five thousand varieties of peonies have been registered, bred mainly with the participation of species such as peony lactiflora and peony officinalis. Varieties of peonies differ in the color of the flowers, their size, flowering time, outline and height of the bush.
Vaccination
Propagation of tree peony by grafting is usually practiced only by experienced gardeners and is considered, perhaps, the most labor-intensive. As a rule, in this case, the rootstock can be pieces of roots of herbaceous peonies 10-15 cm long, and for the scion only shoots of the current year are used, from which cuttings with two eyes are cut. The roots prepared for grafting are kept in a cool place for about 3 weeks. Then, on a piece of the rootstock, the thickness of which is the same as the thickness of the cutting, a wedge-shaped cut is made with a very sharp knife, and the lower part of the scion is cut in the shape of a wedge so that the cut part of the cutting matches perfectly with the shape of the wedge-shaped cut of the rootstock. Both cuts must not only match in shape, but also have a perfectly smooth surface. After the cuts are made, the scion is inserted into the rootstock, and the junction is tightly wrapped with polyethylene and coated with garden varnish or tied. The rootstock and scion grow together for about a month, and during this entire time the material should not be allowed to dry out, therefore, it can be sprinkled with wet sawdust, placed in a box in several layers and sent to a cool, shaded place or planted in a greenhouse, leaving the scion above the soil level.
You can also use a simpler option - a side graft, which differs in the shape of the cut - the scion is cut diagonally, at a slight angle and inserted into the root with the same cut, after which, as in the case of a wedge-shaped graft, the grafting site is also lubricated with garden pitch or tightly wrapped. After about a month, rooted tree peonies can be planted in a greenhouse, deepening the lower eye by 6 cm and mulching the soil surface, but planting material can only be planted in a permanent place after 2 years.
Seedling care
After transplantation, daughter bushes obtained in various ways require special care. This is due to the weakness of the root system of young plants.
Peony seedlings at the growing stage require the following procedures:
- Watering . The soil should be moist, but not flooded. Water the bushes moderately so that the moisture reaches a depth of 20-25 cm. To do this, use clean, settled water.
- Loosening . After each watering, loosen the soil to avoid the formation of a hard crust and provide air access to the roots. Loose soil also helps retain moisture.
- Feeding . Seedlings need to be fed three times a season. The first time is in the spring, when the snow melts. The second is in the summer, when the bulk of adult peonies bloom. The last time was at the end of summer. For the first feeding, use only nitrogen and potassium, for the second - nitrogen, potassium and phosphorus, and for the last - only potassium and phosphorus. Nitrogen is not needed a third time so as not to stimulate the growth of new shoots before wintering.
- Shelter from frost . In order for all seedlings to survive the winter, they need to be covered for the winter for the first 2-3 years. Natural materials are suitable for this: spruce branches, sawdust, straw.
Peony seedlings can get sick in the same way as adult plants. But they tolerate diseases more severely, since young bushes are not yet strong enough. To prevent fungal diseases, treat them with Fundazol solution every week in damp weather. If it’s hot outside, the frequency of treatments can be reduced to 2-3 per month. If pests appear, treat the seedlings with an insecticide solution (Inta-Vir, Aktara).