An orchid needs careful and regular care. However, everything is not as difficult and scary as it might seem initially. Undoubtedly, a novice gardener will have to face some difficulties, but using these recommendations you can easily avoid many problems. There are several ways to root an orchid at home, each of which has its own characteristics.
Effective ways to save roots. How to grow phalaenopsis orchids?
- Signs of a healthy system
- Why do they dry?
- Ways to save a plant that has rotted
- Grow in a greenhouse
- Soaking and drying
- Reconstitute in water
- Above the water
- Fast with fertilizers
- On moss
- In the substrate
- On a piece of bark
- When can it be transferred to the ground?
- What to do to save?
- Useful video
Many gardeners at least once encounter the death of the root system of phalaenopsis. You shouldn’t say goodbye to the plant right away. There are many proven ways to restore an orchid and its roots.
Main reasons
Phalaenopsis can reach the condition described above due to overly generous watering. There is no need to blindly follow the instructions voiced in various videos. Give water only after the soil has dried out. A surplus of moisture, coupled with insufficient air permeability of the soil, leads to the development of putrefactive processes in the velamen - a special shell that covers all the roots of the orchid. Later, decomposition spreads to internal tissues.
The second most common factor is lack of light. Normal access to the latter is a necessary condition for photosynthesis to occur. Without the complex biochemical conversion of minerals and other substances into forms suitable for absorption, the orchid is unable to develop properly. At first, growth stops, then water absorption stops and, finally, the roots die.
Hypothermia leads to a slowdown in metabolic processes. As a result, most of the moisture remains in the substrate, which aggravates the condition of the roots. As a result, they get frostbite and die.
Chemical burns can be caused by complex fertilizers diluted incorrectly or applied separately before watering. The injury causes initial necrosis and starts a chain reaction leading to the death of all roots.
Another reason is illness. Microbes and fungal spores enjoy constant humidity and warmth. In such conditions, they multiply intensively, poisoning the orchid with the products of their vital activity. The first sign of a problem is leaf limpness.
Wrong choice of substrate also leads to root loss. It is worth remembering that it is necessary to grow phalaenopsis only in a mixture consisting mainly of bark. Ordinary soil, pure sphagnum moss, or the now popular hydrogel harm orchids.
The roots can not only rot, but also dry out. The latter trouble usually occurs due to extreme heat. This, however, happens provided that the owners did not have time to respond to it by increasing the intensity of watering.
And finally, the last reason is bad water. Phalaenopsis is not suitable for those that are too hard or contain a lot of salts.
Advice: if you want to grow a healthy orchid, be sure to filter the moisture or let it sit for at least 2 days and definitely boil it.
How to plant an orchid without roots?
To save your flower, it will need to be helped to grow new healthy roots . Since without them this epiphyte cannot exist. The reasons may be different, but you should not refuse to help this flower.
Planting without roots is a very difficult and expensive process, but the orchid will feel good.
Preparatory activities
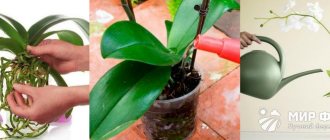
How to plant orchid shoots without roots? First of all, the flower is removed from the substrate and the roots are examined to assess the damage. After that, with sharp scissors or better yet, pruning shears, cut off what:
- Rotten;
- Dried;
- Hangs on one conductor.
Cut off all non-viable roots of the plant. After pruning, they must be treated with any antiseptic :
- Charcoal;
- Activated carbon;
- Zelenka;
- Cinnamon.
Moreover, only one from the list is used, and not all at once. If the plant has already rotted before pruning, it is treated with a systemic fungicide against rot. It can be purchased at a specialty store.
After treatment, the flower must dry its cuts for 7-8 hours. Therefore, it must be placed on paper and left in the shade for the required time. After all these procedures, we begin resuscitation. To do this, you need to have various tools with you that will be indispensable assistants.
Creating greenhouse conditions and choosing soil
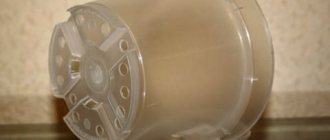
To create a mini-greenhouse at home, you can use various plastic containers . The main thing is that it has transparent walls. For this purpose, experienced flower growers use water bottles of the required volume.
An orchid without roots is often planted in greenhouse conditions.
To do this, it is cut at the required height along the diameter . But they don’t cut it off completely, but leave 2 cm, which will hold the two parts of the bottle together. The required substrate is placed at the bottom, moistened, and only then the plant is exposed.
After which the bottle is closed and both parts are secured with tape. In a mini-greenhouse, moisture is retained in the middle for a long time, creating greenhouse-humid conditions.
You can create greenhouses using food containers with airtight lids. A substrate is placed at the bottom, and a plant is placed on it and the lid is closed tightly. But such a greenhouse will already cost the gardener money, and there is not always an appropriate selection of containers in the store. When choosing it, you need to pay attention to the transparency of the walls and the size so that the entire orchid fits into it.
Each grower selects the optimal soil for planting a plant for resuscitation independently,
choosing from the proposed list :
- Sphagnum moss;
- A mixture of moss, vermiculite and fine bark;
- Water.
What mistakes are often made when growing roots?
Avoid common mistakes that can ruin all your efforts:
- incorrect choice of both the method of root restoration in the phalaenopsis orchid and its duration;
- violation of the watering regime;
- insufficient lighting;
- untimely processing after pruning.
Important! In order to properly grow roots in an orchid, it is necessary to provide it with an influx of oxygen, as happens in the natural environment. To do this, leave free spaces in the pot - air pockets.
In the substrate
This rooting method is suitable for orchids that have at least a small part of the roots remaining. In this case, moss, vermiculite or a mixture of them can be used as a substrate. They proceed as follows:
- Select a wide, closing container. For example. You can use an empty aquarium or build an impromptu greenhouse from a plastic container or a large cut-off bottle.
- A layer of expanded clay is poured onto its bottom.
- A layer of pre-moistened moss is laid on top of the expanded clay.
- The orchid is placed on the moss so that its root collar is exposed to the air, and the intended place of root formation is in contact with the moist substrate.
When rooted, moss is an almost ideal substrate; it easily releases and accumulates moisture, the main thing is not to over-moisten it. The degree of moisture content can be determined as follows: a small amount of moss is squeezed in a fist. If moisture begins to release, it should be squeezed out. If your hand remains slightly damp, then everything is fine.
In the absence of moss, vermiculite is used as a substrate. It is also capable of releasing and storing water well. It allows you to quickly grow roots without the development of pathogenic microflora. This method can also be used if you need to grow the roots of a baby orchid.
Experienced gardeners also use special root formation stimulants. For example, kornevin is very suitable for rooting orchids. This product is available in powder form. It's very easy to use. A small amount of root is simply applied to the intended location of root formation.
Another secret to successful rooting on the substrate is high air humidity. That is why the rooted plant should be placed in a greenhouse. If, despite this, the orchid's leaves still begin to wrinkle, it needs to be helped by providing nutrition through the leaves. To do this, the orchid is immersed in warm, clean water with the addition of a small amount of sugar for several hours. After removal from the water, before placing it in a greenhouse, the plant should be dried.
Useful video
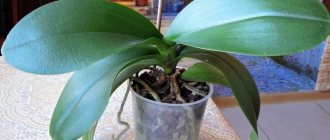
The orchid needs to be removed from the pot, peeled from the bark and placed in a container with warm water. After 30-40 minutes, it is necessary to assess the condition of the roots. Healthy ones will look nourished and brighter, while sick ones will remain dull and brown. Sometimes you can see dark-colored mucus.
Orchid
Before growing roots in an orchid, all infected shoots are cut off and then treated with a solution of Fitosporin or potassium permanganate. If parasites are found, the flower must be treated with specialized drugs.
Is the plant lost?
Not at all! Don’t worry, we’ll tell you how to grow phalaenopsis roots, even if the flower initially had no roots at all.
Caring for the plant after “revival”
Successful and complete restoration of an orchid after loss of the root system depends on creating favorable conditions for the plant and carefully caring for it. It is enough to follow the following recommendations:
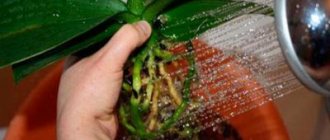
- Water the plant by immersing the pot in a tray with warm, filtered or settled water for 25 minutes.
- Inspection for pest attacks on leaves and roots. If insects crawl out of the soil during watering, the soil will have to be replaced and the leaves and roots treated with an insecticide.
- Maintaining the room temperature at 22-25 degrees, humidity – 60-70%.
- Providing intense but diffuse lighting. The duration of daylight is at least 12 hours.
- Protection from drafts and hypothermia. If the resuscitation procedure is carried out in winter, the pot cannot be placed on the windowsill, since the cold from the glass is detrimental to the fragile plant.
Why is missing roots a problem?
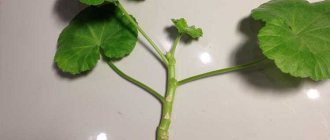
An orchid requires timely and proper care; if it is healthy, then the appearance of shoots will not take long to appear. However, without a developed root system, children will not be able to take root and develop properly.
The emerging shoot is very easy to lose, and it cannot be left on the “mother”, since in the process of growth, the baby will take more and more nutrients, which will lead to the death of the tropical flower itself.
How to speed up the process?
All the described methods of resuscitating phalaenopsis take quite a lot of time; to stimulate this process you can:
- Wipe the leaves and mix a solution of succinic acid into the water at the rate of 4 tablets per liter of water.
- Dilute one ampoule of vitamins B1, B6 and B12 in a liter of water and lower the part of the orchid from which the roots will grow into the solution, leaving it overnight.
- Feed the plant daily with glucose, sugar or honey.
- Feed with iron chelate every 2-3 days, and fertilizers containing potassium and phosphorus - once every 20 days.
It is necessary to alternate feedings, otherwise you may not notice that some of them are ineffective and the plant will die.
Is it possible to save the crop and build up the root system?
Even if the roots of the phalaenopsis have completely died, the plant itself can still be saved:
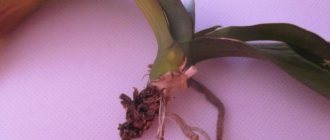
- First of all, you need to remove all dried, diseased or rotting areas. To do this, the root system is washed in warm water, no higher than 30 degrees. A fungicide can be added to the water to prevent the possible spread of infection.
- Then use a sharp knife to remove all rotten areas so that only living roots remain.
The sections are disinfected by sprinkling with powdered activated carbon. It is acceptable to use cinnamon. Important! Do not use preparations containing alcohol to disinfect cuts; they will burn the roots. - The treated plant is left to dry in a warm place for no more than a day.
Preparing for rooting
The affected plant should be carefully removed from the pot, the remaining substrate should be removed, the lower part of the rhizome should be washed with warm (+25-30°C) water and dried in the open air.
First of all, it is necessary to find out the degree of damage to the rhizome and assess the general condition of the orchid. Total resuscitation is required in case of loss of more than 95% of the root system . If 2-3 roots of at least 3 cm in length are preserved, it is enough to secure the orchid in a small container with fresh substrate, having first removed all the affected areas.
| Vegetative parts of the plant | State | Recommendations |
| Roots | Blackened, beige, light brown, dried out or, conversely, wet, slimy | Cut to healthy tissue |
| Elastic, fleshy, light green, white in the center of the root ball | Leave | |
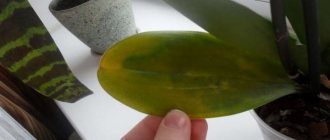
| Leaves | Drying, fading, yellowing | Should not be deleted |
| Covered with black spots | Cut out all areas of rotting to healthy tissue | |
| Arrows of peduncles | Regardless of development phase | Remove to the base (you can save the lower third for easier fixation of the plant in the container) |
Important! When preparing an orchid for rooting, compliance with antiseptic rules is of paramount importance. Wound surfaces must be disinfected, and all manipulations to clean lesions must be performed only with disinfected instruments. Otherwise, there can be no talk about the success of resuscitation measures.
Answers to flower growers' questions
Question No. 1. Is it necessary to get rid of fading leaves during the rooting process of an orchid?
It is not recommended to cut off drying, yellowing, wrinkled, or turgor-losing leaves of a reanimated orchid. In the absence of roots, they serve as an alternative source of energy, providing the plant with nutrients reserved for a rainy day.
Question No. 2. Is it necessary to artificially stimulate root growth with synthetic stimulants?
It is necessary to use various growth and root formation stimulants on orchids with unformed rhizomes with caution - correctly, in phases, in strict accordance with the recipe. It is unacceptable to change the intervals and application rates at your own discretion. If used incorrectly, the effect can be unpredictable.
To restore orchid roots, use “Kornevin”, “Zircon”, “Epin”, “Heteroauxin”, “Etamon” in a dosage reduced by 2-3 times from the recommended one.