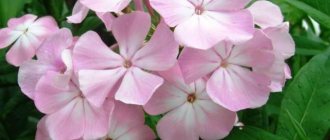
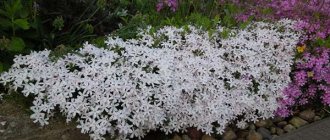
Phlox Drummond is an annual plant belonging to the Blue family. The height of the bush, as a rule, is 30 - 50 cm. The plant is quite low in comparison with other phloxes. Its shoots are decorated with bright flowers of various shapes and colors, collected in inflorescences in the form of an umbrella or shield. Flowering usually begins in June and lasts until late autumn.
Types and varieties of Drummond phlox
In its family, Drummond's phlox is the only species. All plant varieties included in it can be divided into several groups:
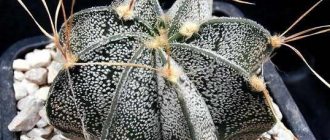
- star-shaped;
- large-flowered (flower diameter up to 4 cm).
There are many different varieties of Drummond phlox, differing in the shape and color of the flowers. The most popular of them are:
- Chanel is a variety distinguished by double pink buds that form lush inflorescences. Bush height – 20 cm;
- Promise (peach) is another terry variety with flowers of a delicate peach shade that do not fade in the sun. Characterized by extremely abundant flowering. The diameter of the flowers reaches 3 cm. Plant height is 15 - 20 cm;
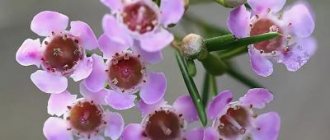
- Shustrik is a variety of Drummond phlox with unusual star-shaped flowers, painted in various shades: snow-white, pink, red, lavender and sky blue. Stems length – 30 – 50 cm;
- Etni - Drummond phloxes 10 - 15 cm high. Large flowers with a diameter of about 4 cm can be painted in a wide variety of colors;
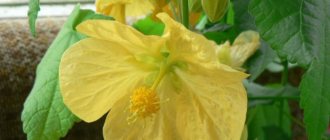
- Edmond is a variety of Drummond phlox with large creamy yellow flowers collected in corymbose inflorescences. The length of the stems can reach 45 cm;
- Caramel is a variety with highly branching shoots 40 - 60 cm long. The flowers have trapezoidal petals of a golden caramel hue, the middle of which is raspberry-cherry, and the edges of the petals are rounded.
Description of an annual plant
Phlox Drummond is an ornamental annual. The plant got its name thanks to Thomas Drummond. This Scottish botanist traveled through Texas from 1833 to 1835, and from this expedition brought a new species of phlox to Great Britain. Since then, the plant began to gain popularity.
Phlox Drummond is quite miniature - it grows to a maximum of 50 cm. It has pubescent stems and no creeping shoots. The leaves are light green, whole. The inflorescences are loose, the corolla has 5 petals. Stamens are formed in the same number.
Based on the phlox brought by a Scottish botanist, various varieties were developed over time. They differ in color and flower shape.
Growing Phlox Drummond seedlings
Phlox Drummond seeds in warm regions are sown directly into open ground, but in central Russia due to the threat of return frosts this is not possible. That is why in cold regions it is recommended to grow Drummond phlox from seeds and seedlings.
How to collect and prepare seeds
Phlox Drummond seeds ripen in mid-summer. They are large and located in small spherical boxes. After full maturity, these capsules are collected, dried, laid out on a flat surface in a dry and dark place, and then the seeds are removed from them. They remain viable for 3 - 4 years.
Immediately before planting, the seed is sometimes germinated. To do this, the seeds are placed on a damp cotton pad, covered with film, and then put in a warm place. As a rule, if the seeds were of high quality, they should germinate in a couple of days.
Advice! To prevent the seeds from starting to rot, it is recommended to make several holes in the film.
Container selection
You can grow phlox seedlings in various containers:
- It is convenient to do this immediately in small separate pots. Thus, there will be no need to pick the seedlings; during transplantation, they can simply be dumped into the ground. This significantly reduces the risk of damage to the fragile root system.
- Using seedling boxes made of wood or plastic, you can significantly save space. You can even make such a box yourself.
- The most convenient way is to plant in peat pots, which can decompose in the ground over time. The plant is placed in the soil along with the pot, and the roots grow into the ground through its walls. In this case, the risk of injuring them is completely eliminated, and seedling survival rates reach almost 100%.
Soil preparation
For planting Drummond phlox seedlings, a loose soil mixture is ideal, including:
- humus;
- peat;
- sand;
- lime;
- mineral fertilizers.
All components are mixed, placed in selected containers, and then watered with a moderate amount of water and sowing begins.
Drummond phlox planting technology
Despite the fact that the seeds are large and dense, there is no need to deeply bury them. For Drummond phlox seeds, good lighting is important, so they are simply scattered over the surface of the soil, lightly pressing with your hand. After this, the seedlings need to be sprayed with water from a spray bottle, and the container should be covered with film and placed on the windowsill, at a temperature not lower than +23 degrees.
Important! Future seedlings will subsequently need to be ventilated and sprayed daily.
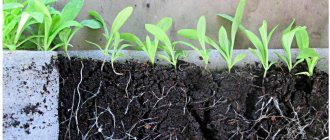
After the sprouts that have hatched from the seeds begin to attach to the ground and take root, the film is removed. If the planting technology is followed, the first shoots should appear in 7 - 10 days.
Further care of the seedlings consists of moderate watering as the top layer of the soil mixture dries. It is recommended to maintain a temperature in the room of about +20 degrees. Picking is done 2 - 3 weeks after the first true leaves have formed; the plant should be planted at a distance of at least 15 cm from each other.
On the eve of planting, the seedlings are hardened, gradually lowering the temperature to +15 degrees. It is advisable to increase the frequency of watering at this time, and combine the watering itself with mineral fertilizing.
Advice! After the first 4-5 leaves appear, the top of the plant can be pinched: this will make the Drummond phlox bushes more lush in the future.
The best conditions for growth
By their nature, phlox is a very picky and grateful plant. But if you want to get strong seedlings and the most lush flowering, then you need to provide optimal conditions for growing this crop.
| Conditions | Care Tips |
| Temperature | The optimal growing temperature at the initial stage from the moment of sowing until the appearance of the first shoots is 23-25 degrees Celsius. But after the first shoots appear, this figure is reduced to 20 degrees. |
| Humidity | In order for the seeds to germinate, they must be placed in a moist environment. To do this, cover the crops with thick plastic film or transparent glass, which will create a stable greenhouse effect. At the same time, rotting is possible, so such a mini-greenhouse must be ventilated daily for at least 15-20 minutes. In addition, after germination, the film is generally removed, since there is no longer any need for it. |
| Watering | At the initial stage, the soil is sprayed daily with a spray bottle. Next, when the sprouts are already well defined, a syringe bulb is used, with the help of which it is possible to qualitatively moisten the soil lump without affecting the seedlings themselves. |
| Lighting | Since the full development of seedlings requires a long daylight hours of 12 to 14 hours, and its cultivation occurs at the end of winter and the first two months of spring, it is necessary to take care of high-quality supplementary lighting. |
In general, phlox seeds, provided that we are talking about high-quality, non-expired material, have good germination, and compliance with all the conditions given in the table allows you to count on an excellent result.
Planting seedlings in the ground
The site where it is planned to grow Drummond phlox should be located in light partial shade. The soil should be moderately acidic, sandy and non-clayey, light, fertile, saturated with vermicompost or compost. Too heavy soils are lightened with peat, sand and organic fertilizers. Good drainage is also extremely important.
The recommended distance between plants is 20 cm. Planting algorithm:
- dig small holes;
- sprinkle them with ash (up to 150 g);
- place seedlings in the holes, straightening the roots to a horizontal position;
- cover with earth.
The soil
Land for planting can be taken from the garden bed, adding a little river sand and peat to it. If the soil is acidic, you will have to add lime or ash. In sandy soil, plant roots can overheat in hot weather.
Moisture can stagnate in clay soil, which will lead to rotting of the roots. For the same reason, an area with high groundwater levels is not suitable for planting phlox.
Fertile and well-drained soil is ideal.
Sowing Drummond phlox with seeds in open ground
When growing annual phlox Drummond from seeds directly in open ground, the first step is to form shallow grooves, after which they are watered and wait until the water is absorbed.
2-3 seeds are placed in one hole; a distance of 15 cm is also maintained between holes. In cases where several seeds sprout in one hole at once, the weakest of them should be pinched off. For about the first 2 weeks, before shoots appear, the plant requires shelter that retains moisture.
Advice! When sprouts appear, the soil needs to be loosened and nitrogen fertilizers applied. After a week, nitrogen fertilizing must be repeated.
Caring for Drummond phlox in open ground
Further care for phloxes in the open ground is pleasant and easy. Even novice gardeners can cope with growing these unusually beautiful flowers.
Watering
In summer, the plant requires regular watering. Prolonged drought contributes to overheating of the root system and a lack of nutrients, as a result of which the plant becomes weak and susceptible to disease, and may even die.
Top dressing
Over the entire season, plants are fertilized 4 times:
- fertilizing with manure - in the last days of May;
- fertilizing with a mixture of liquid manure and superphosphate - in early June;
- application of liquid manure - in early July;
- fertilization with potassium salt and phosphorus - at the end of July.
Advice! To make flowering more abundant, it is allowed to fertilize the plant with ammonium nitrate several times a season.
Weeding and loosening
Periodically, the soil needs to be carefully loosened, trying not to touch the roots of the phlox. Loosening improves soil breathability. During the second half of the growing season, the plants hill up the soil around the bushes. It is also important to promptly remove weeds growing near the planted flowers.
Removing flowers
Phlox Drummond flowers must be removed as they wilt and dry out. Otherwise, flowering will not be as abundant.
Shelter for the winter
Phlox Drummond is an annual plant and does not need shelter for the winter. However, next year it will always be possible to grow new phlox from seeds collected with one’s own hands from last year’s plants.
Choosing a planting site, soil requirements
Phlox blooms most profusely in a sunny or slightly shaded location. For abundant flowering and beautiful flower colors, the plant is grown in full sun. Areas with good sun but partial shade for part of the day may also be suitable, for example planting phlox in the shade of a building or hedge or shrub.
The soil for Drummond phlox should be:
- fertile;
- well drained;
- moderately humid;
- slightly acidic or neutral.
But this species is also suitable for low-quality substrates; the plant tolerates drought well. Manure or compost can be added to the soil in the fall or spring; manure cannot be added before planting phlox; the plant does not like it.
For planting in pots and cache-pots, soil for flowering plants is suitable; it is better if it contains moisture-retaining substances.
On terraces and balconies, you should avoid the hottest places and do not allow the substrate to dry out completely. To find the best solution, you can test several locations, observing the growth and flowering of plants and the rate at which the substrate dries out.
Diseases and pests of Phlox Drummond
Phlox Drummond can be threatened by many pests and diseases, including:
- Jaundice is a rare disease that manifests itself as greening of the inflorescences and is spread by insects. It will not be possible to save diseased phlox; it is better to destroy them immediately so that the infection does not spread to other, healthy plants.
- Variegation is another dangerous, incurable disease in which light stripes appear on flower petals. Infected plants should also be removed.
- Spot is a fungal disease that can be recognized by dark spots on the leaf blades. You can save phlox with the help of fungicides or a drug such as Topaz.
- Powdery mildew is also a fungal disease and can be treated with fungicides and Topaz. Signs of the disease are a decrease in turgor in the leaves and a white coating.
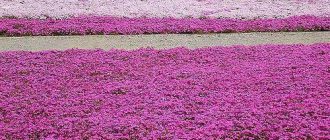
Drummond phloxes in landscape design
Drummond phloxes are famous for their variety of varieties, differing in shape and color of flowers, so they are often used in landscape design. Annual phloxes are used to decorate borders, flower beds and rock gardens. Due to its compact size, the plant can be grown even in a container.
Different varieties can be planted either individually or combined with each other. The bright flowers of Drummond phlox look interesting next to silver and blue coniferous plants.
Origin
According to its origin, the flower comes from America, from the Texas prairies. It was brought by an English botanist named Drummond. Natural growing conditions - open steppe spaces, meadows. It was brought in the eighteenth century. The whole family got its name because of the bright flower that resembles a flame, as the translation from Greek sounds.
Important! If you plant phlox according to variety correctly, you will be able to admire the riot of colors during flowering from the end of May to the end of September.
There is a beautiful legend about Odysseus’s visit with the Argonauts to the kingdom of Hades, where they were forced to move around, lighting the way with torches. When exiting the caves to the surface, the torches were thrown onto the ground, where they took the form of flowers. They remind us of the courage of people who were not afraid of death.