Hello, dear readers! There are several varieties of indoor peperomia. Whichever one makes you happy, you need to know how this flower reproduces. This way we can get new plants - we can share them with others and keep a copy for ourselves; a beautiful plant in the house will not be out of place.
You can propagate peperomia by cuttings, dividing the bush, or even with a single leaf. Only propagation by seeds at home is extremely difficult.
Transfer
The frequency of replanting peperomia also greatly depends on the type of plant.
For example, small-leaved species need to be replanted every year, while large-leaved species need to be replanted every 2 years. The best time for transplantation is spring. This can also be done when an urgent need arises - for example, when roots appear from the drainage hole. Considering that the roots of the plant are small, too spacious pots are not used for replanting.
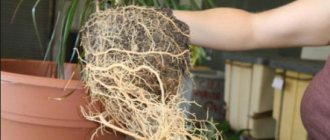
Since the root system of peperomia grows very slowly, the plant needs a small, wide and shallow pot. For replanting, take a container whose diameter exceeds the old one by 2-3 cm. The maximum diameter of a peperomia pot is 9 cm.
It is important to lay a good drainage layer (1/3 of the volume) at the bottom of the container, which can be used as pebbles, expanded clay, broken brick, or pieces of foam plastic. Then a layer of soil 1.5-2 cm thick is poured
The plant is removed from the old pot and transferred to a new pot without damaging the earthen coma. The voids between the walls and the flower are filled with a new substrate, which is slightly compacted.
After transplantation, the peperomia is watered moderately and placed in a warm place, in partial shade. After 2 weeks, the plant can be returned to its permanent place.
Dividing the bush
Dividing a bush is the process of replanting an overgrown plant by dividing the root system. Only very large peperomia bushes are suitable for using this propagation method. You can do this in the following way:
- The plant that needs to be divided must be removed from the pot and its roots cleaned from the ground.
- The root system must be divided into several parts (usually three or four). It is necessary to work with a sharp blade.
- Crushed activated carbon should be sprinkled on the cut areas.
- The separated parts of the plant are planted in prepared pots with soil.
- The soil needs to be moderately moistened.
The plant may not take root if the roots were severely damaged during the transplantation process, so the process of propagating peperomia by dividing the bush must be approached carefully and carefully.
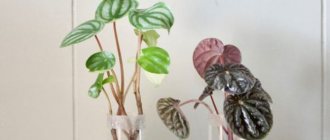
Reproduction of peperomia by leaf - subtleties of rooting
Peperomia takes root equally well both in water and in soil, provided that the latter meets the requirements of the plant. The only thing that can be noted is that only leaves with long petioles can be placed in water, without immersing them completely in the liquid. If there is a short “tail”, it is better to root immediately in the ground.
The rooting process itself is not particularly difficult:
- Take the soil mixture into a small pot or glass and pour it with settled water.
- Stick a leaf into the ground so that the cutting is almost completely immersed in it. If it is short, you can plant the leaf deeper by dusting the bottom of the plate.
- Build a greenhouse by covering the pot with a jar or bag. You can do without it, but then the sprouts will not appear soon.
- Place the flowerpot on a window with diffused lighting.
Sprouts will appear in about 3 to 4 weeks. Then young peperomias need to be planted in separate containers, slightly larger in volume.
Fertilizing with nitrogenous fertilizers.
After cutting the planting material from the main plant, do not forget to feed it with nitrogenous fertilizers, which all evergreen species love so much. Follow the dosage when diluting the fertilizer in water, or simply sprinkle some granules on the top of the soil in the pot and water lightly. The granules will dissolve in water and the soil will absorb the fertilizer, bringing it to the very roots.
Feeding is carried out at any time from the beginning of spring to the end of September. Next, the plant enters a period of rest and does not need unnecessary shocks in the form of fertilizers!
Peperomia: care at home
The plant is easy to propagate. Even beginners can provide proper care at home. Almost all types of peperomia require identical conditions of watering, fertilizing, lighting, and temperature conditions
In order for them to rapidly climb and reproduce, it is important to know the basics of transplantation, as well as what diseases and pests can affect them if done incorrectly
Peperomia flower
Peperomia blooming
The plant blooms in spring and summer. Although, with proper maintenance and abundant watering, it can bloom a second time at the end of autumn.
The flowering is not particularly interesting as it is modest. Small flowers appear without a perianth and are collected in inflorescences like a cob or spikelet. Peduncles need to be trimmed, as they lead to depletion of the plant and are not decorative. Sometimes it is worth pruning them at the embryonic stage so that the peperomia does not drop its leaves after flowering.
How does a plant bloom?
What to do if it doesn’t take root?
If, when peperomia is propagated by cuttings, their rooting does not occur, then, most likely, lateral shoots without nodes—growth points—were taken for this method. For successful rooting, 2–3 pieces are enough, but no more than 5.
In the case of propagation by dividing the bush, damage to the roots may occur as a result of carelessness , so with this method you need to be as careful as possible. You can cut off damaged areas of the root system with a treated sharp blade, sprinkle the sections with charcoal or activated carbon, and then replant them in new soil.
Reproduction of peperomia is not a difficult process that even a beginner in this matter can do. Most gardeners recommend propagating the plant using cuttings, because all that is required is minimal knowledge in the field of floriculture, patience and accuracy.
Description of the plant
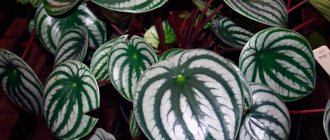
Peperomia leaves are fleshy and come in a rich variety of colors. There are species with green, light green, and emerald colors. Some peperomia are characterized by the presence of variegated leaves with a golden or silver coating.
The shoots are quite flexible, there are hanging varieties. When transplanted or propagated, it quickly adapts, which makes it popular among gardeners. In winter, growth slows down somewhat; with the onset of spring, active vegetation occurs. Not all varieties of peperomia bloom; some are classified as evergreen indoor shrubs.
Peperomia at home grows approximately 13 cm over the course of a year. Adult specimens of ampelous varieties reach 50-60 cm. With regular pruning, the bushes become lush and compact.
For timely flowering, it is necessary to observe the temperature regime. The plant responds well to fertilizing and spraying.
Varieties of peperomia
Let's look at what types of peperomia there are.
The popularity of peperomia for breeding at home is dictated by the wide variety of its varieties; scientists have identified more than 1200. Some varieties and subspecies may differ significantly from others. Among the domestic varieties of peperomia, there are about 50 varieties.
Peperomia Tupolifolia
Peperomia of this variety is a shrub with tall, straight stems, slightly forked towards the top. All shoots have rounded leaves, reaching 12 cm in adult specimens.
The shoots themselves are dark red or brown, and the leaves of peppermonia are green, fleshy with a high content of juice.
The subspecies of Blunt-leafed peppermonia, Variegatna, has special decorative properties. Along the edges of the heart-shaped leaves there is an openwork light green cream edging. Thin veins appear in the center, which gives a unique exotic color.
Peperomia Lilian
It belongs to the subshrubs and has unique decorative characteristics. The leaves are thick, heart-shaped, with swollen veins. They are located very compactly, so the bushes of Peppermonia Lilian seem lush and dense.
At the beginning of June, vertical flower stalks form, they stretch to the top, and at the end they form beige inflorescences with a dark shade, similar to lily buds.
Peperomia Rosso
The plant has tall stems connected in a large bunch, sometimes reaching a height of 25 cm. The flower is in demand among gardeners because of its unique color. The outer side of the leaves is emerald or light green, the inner side has a rich burgundy color.
In nature, the Rosso subspecies blooms in July-August, at home - in early autumn. When constantly grown indoors, flower stalks appear very rarely.
Peperomia Magnolifolia
The flower differs from other varieties in the ampelous branching of its shoots, with a burgundy surface. The leaves are smooth, thick, located almost on the shoots, and can reach 20-25 cm in size. When constantly exposed to the sun, specks of a silver or yellow hue form on them.
Peperomia clusifolia
The voluminous shrub has erect, fleshy stems. They grow large semicircular leaves, up to 20 cm long. They have a rich green color, with burgundy openwork lines along the edges. Various shapes, balls, and squares are well formed from this species.
Peperomia whorled
Peperomia flower of the Whorled variety is a herbaceous perennial. It differs from other varieties in the ampelous arrangement of stems. The shoots are thin, completely covered with semicircular or diamond-shaped leaves of emerald color.
They do not grow from petioles, like all peperomia, but on nodes located immediately on the branches. Abundant flowering occurs in the first half of summer.
Peperomia Pereskifolia
This type of plant is characterized by its large size. In young specimens, shoots begin to grow directly from the root, over time they lengthen and hang down to the bottom. The oval leaves are collected in bunches of up to 5-6 pieces, reaching a size of 3-5 cm. The top is covered with semicircular veins with pink or silver streaks on a green background.
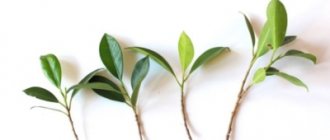
How to prepare planting material
An adult and always healthy leaf is suitable for propagation. It needs to be cut with a sharp knife, trying to keep the cut area even. The leaf must have a petiole, at least a short one.
It is recommended to dry the cut sheet slightly, leaving it overnight on paper, but not on the window. It is advisable to sprinkle the cut area with finely tuned activated carbon. This will prevent rotting.
It is best to start breeding in spring or summer. At this time, peperomia is actively growing its aerial part and sap flow occurs faster. This means that the mother bush will not be damaged, and the new plant will form faster.
Rules for propagation by cuttings
Gardeners use both woody and green cuttings to propagate their favorite varieties
Lignified cuttings
Last year's branches are used for planting material. Cuttings are separated in the second part of September. If you do this later, they will not have time to take root before the onset of frost.
The upper part of the cutting is cut at an angle, and the lower part in a straight line. The length of planting material should be within 20 cm with several full buds.
The cuttings are planted in a moist nutrient substrate at an angle. In this case, no more than two buds should remain above the ground.
When planting, you need to monitor the distance of the branches. The optimal values are 10-12 cm. After the procedure, water the soil generously and mulch.
Propagation using green cuttings
This method is used least often, as it requires some effort. Planting of cuttings is carried out only in a cold greenhouse. The soil should consist of deciduous soil and compost. You can also add a small amount of coarse sand to the composition.
Cuttings are separated only from healthy and large branches. Their length should not exceed 15 cm. The lower leaves must be removed and the upper ones shortened by half.
For quick rooting, it is recommended to make several shallow cuts in the lower part of the planting material and one under the upper leaf plate.
Before planting chokeberry, you need to dip the cuttings in a growth stimulator. Keep them in this state for 8 hours. At the end of this time, landing is carried out. The specimens are placed at an angle, maintaining a distance of 4 cm. Keep the greenhouse at a temperature not lower than 25 C, watering periodically.
Green cuttings can be replanted after 10 days. During the first few months, young chokeberries are often and abundantly irrigated, weeds are removed and the soil is loosened. They are transplanted to a permanent place in the first month of autumn.
Description
Peperomia (from Latin Peperomia) is a perennial herbaceous evergreen plant. It comes from the pepper family. In the wild it grows in the tropical forests of South America and Asia. It can be found on tree trunks, peat bogs, and mountains. Today, some varieties have gained popularity in home floriculture.
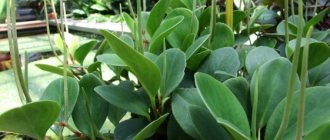
Peperomia has beautiful, lush foliage. Each variety has a different leaf appearance. There are specimens with small and large leaves, thin and thick, as well as shiny, wrinkled, and leathery. Color - dark emerald, light green, golden, brown, even with a silver tint.
The structure of the foliage of blunt-leaved peperomia is fleshy, dense, smooth. Painted dark green. The bush grows up to 20 cm in height. In a young plant, the branches tend upward, but after a while you can notice how they bend and reach towards the ground.
Variegated peperomia is a non-flowering species of this crop, so it should not be confused with dull-leaved peperomia, whose flowering period occurs in spring. The inflorescences that appear look like spikelets with small flowers on the top. Sometimes blunt-leaved peperomia is compared with magnolia-leaved peperomia - both species do not differ in the beauty of their peduncles, which is why it is recommended to remove them so as not to draw excess juices out of the plant.
Nevertheless, a lush green bush can decorate any room, and all the beauty of the foliage lies in proper care.
Peculiarities
One of the characteristic features of the flower is its low growth, rarely when the plant grows more than 20 cm. It belongs to the evergreen herbaceous perennials, although some representatives of the genus are closer to shrubs. In its natural environment, this green beauty is a tropical carpet and thrives in shady areas. Distinctive features:
- thick shoots;
- the foliage is fleshy and can have different shapes;
- the color of the leaves can vary from green to gold and even brownish tones, they can be decorated with patterns and spots, straight lines;
- Peperomia caperata foliage has a corrugated structure;
- the flower is small in the shape of a cylindrical spike;
- flowering turns into berries.
There are a great many types of peperomia. Botanists differ in their opinions, but on average they number 850 representatives. Peperomia caperata is the most famous of this series, it is also called wrinkled or wrinkled. Peperomia in some of its incarnations is considered a spectacular decorative representative; it is planted in greenhouses, botanical gardens, and used as an element of ampelous floral compositions and groups. All types of peperomia live well together, so many gardeners breed various varieties, combining them into fancy compositions.
Description of plants and species for indoor growing
Peperomia is a perennial epiphytic plant representing the Pepper family. The flower can have an ampelous form, a subshrub or a shrub. The tropical regions of America and India are considered the homeland of exotics.
Peperomia does not exceed 50 cm in height. It has fleshy, thick shoots that stand upright, lie down, creep or hang down, depending on the species. The leaves of the plant are dense, often covered with a waxy coating. Their shape and color also depend on the species.
There are lanceolate, round, heart-shaped, oblong leaves, painted in green, silver, golden, brown, olive colors with various stains, spots and stripes. Small cream peperomia flowers are not decorative; they are collected in cylindrical or spike-shaped inflorescences on high pedicels.
About 1000 species of peperomia are known in nature, about 30 of them are grown indoors. The most popular of them:
Peperomia wrinkled is bush-like, low-growing, up to 10 cm high. The leaves are close together, wrinkled, have a dark green or brown-chocolate tint. Brown veins along the leaf blade are concave on the upper side and convex on the lower side
This species is beautifully flowering and attracts attention with its long thin ears. Peperomia obtufolia is an erect species. It has bare shoots and oval or ovoid leaves, leathery, dense and blunt at the ends, 5-10 cm long
The color of the leaves is green, but varieties with milky white and gray-green leaves have been bred. Peperomia clusifolia is an erect species with thick shoots and sessile dense leaves, up to 15 cm long. Their base is wedge-shaped and the apex is obtuse. Color – dark green with a reddish tint. Peperomia creeping is an ampelous species. Has recumbent or hanging shoots. The leaves are wide, heart-shaped, green or variegated.
Photo of peperomia during care at home and in the natural environment.
Caring for syngonium at home
Lighting
The optimal location of plants is windows on the east or west side. They can also grow on the north side. In the south, the plant will be too hot - with too much sunlight, the leaves of the syngonium plant may turn pale, which will lead to a decrease in decorativeness. Avoid direct sunlight on the plant.
Temperature
During the growing season, the temperature must be kept between 18 and 24 °C. In winter, the temperature should be slightly lower - 16-18 °C.
Watering syngonium
Soft water is used for watering the syngonium; before watering, it must be left for 24 hours. From spring to autumn, water immediately after the top layer of soil dries, and in winter - a couple of days after the soil on top dries. Water should not stagnate in the pot.
Spraying syngonium
It is recommended to spray home syngonium twice a day in the hot season - morning and evening. You can also wipe the leaves of the plant with a soft, damp cloth. To increase humidity, a pot with a plant can be placed on a tray with wet peat or expanded clay, but so that the water does not touch the pot. The indoor flower syngonium does not do well near heating radiators.
Feeding syngonium
In winter, the house plant syngonium does not need feeding. The rest of the time, the plant is fed with mineral fertilizers 1-2 times a month.
Syngonium flowering
At home, syngonium usually does not bloom. If this happens, the syngonium flower will be expressed as a small cob, wrapped in a white blanket.
Syngonium pruning
To make the syngonium plant more lush, the apical shoots can be pinched. Usually pinch off after the 6th or 7th leaf.
Syngonium transplantation
Young specimens of indoor syngonium are replanted every year, and older specimens are replanted every two to three years. Drainage is poured onto the bottom of the pot, and a slightly acidic or neutral substrate is poured on top: two parts each of turf, leaf soil and peat, and 1 part sand. Indoor syngonium is excellent for growing hydroponically.
Propagation of syngonium by cuttings
To propagate syngonium, take a shoot with at least one bud. The shoot takes root well in sand, in vermiculite, in water (you need to throw an activated carbon tablet into the water), in sphagnum, as well as in mixtures of sand and peat or sand and sphagnum. The temperature is maintained around 25-27 °C. When the syngonium cuttings take root, the young plants are planted in individual pots. You can plant several seedlings in one pot to make the plant look more luxuriant.
Syngonium toxicity
The juice of the syngonium plant is poisonous, so you should avoid getting the juice on your hands, eyes or mouth. If this happens, wash off the juice with plenty of running clean water.
Diseases and pests
Peperomia leaves are falling off. The most common options: either keeping the plant at a low temperature, or insufficient watering (drying out the earthen coma).
The edges and tips of peperomia leaves turn brown. In peperomia, these are signs of sudden temperature changes (sharp drops). Another reason is that the plant is in a draft; this should not be allowed.
Peperomia leaves and stems rot. The reason for this is excessive soil moisture. Symptoms appear more quickly if waterlogging is accompanied by conditions below 16°C.
Peperomia leaves wither and wrinkle. Peperomia should not be in direct sunlight. Location on southern window sills can also lead to burns on the leaves.
Peperomia pests. If not properly cared for, peperomia is easily attacked by mites, thrips, nematodes, scale insects and mealybugs. Read how to deal with them in the pests section (see the Plants menu item at the top of the site).
- Groups of indoor plants (part 3)
Cuttings
Propagating peperomia from cuttings is as easy as propagating from leaves. It is best to root cuttings in the ground. In this case, the new plant will be strong. You can prepare the soil for this yourself. To do this, mix equal amounts of humus, peat and sand. For cuttings, use the top of a healthy peperomia stem. At the same time, it must have at least two growth points. They look like nodes on the surface of the stem. Cut the cutting with a sharp knife, and treat the cut area with ash or ground charcoal.
Some gardeners keep the cuttings in water for several days before planting them in the ground. Be sure to make drainage at the bottom of the pot.
Cover the planted cuttings with a transparent film, ensuring an influx of fresh air. The best temperature for germination is +25 degrees Celsius. After planting the cutting, place the pot in a shaded place for two weeks. After this period, remove the film and transfer the pot to the windowsill.
How to make ready-made soil?
This plant prefers an exceptionally loose and light substrate, which allows moisture and air to pass unhindered to its roots. You can prepare the soil yourself, and to do this you need to mix the following components in certain proportions:
- Humus - 1 part.
- Peat – 1 part.
- Sand – 1 part.
- Leaf soil - 2 parts.
It is in a substrate of this composition that leaves and cuttings can quickly and correctly take root and grow as independent plants.
From purchased soils, it is recommended to take universal ones, for any type of plants , or those intended for palm trees or ficuses. The former are already quite loose from the start, which guarantees that moisture will not stagnate in the substrate, but at the same time, the universal soil is not so nutritious, so you will have to independently fill it with useful substances through more frequent fertilizers.
And substrates for ficus or palm trees are oversaturated with peat components, i.e. more dense, and to grow new peperomia it is necessary to add special leavening agents (perlite, agroperlite, vermiculite) to them.
How to care?
In order for a home plant to please with a healthy and blooming appearance, it is necessary to competently carry out, although simple, regular care, taking into account the characteristics of this type of plant. At home, these procedures will not cause any particular inconvenience.
Watering
Oddly enough, the tropical beauty is not a fan of strong humidity, so it should be watered in moderate doses. The following frequency of watering is optimal:
- summer – 3 times a month;
- winter – once every 20 days.
Pay attention to the degree of dryness of the soil - it should not become too dry at depth, otherwise this will lead to the loss of the spectacular appearance of the plant. If the soil has dried more than 3 cm down, you can water the flower again
Also make sure that the water is settled, not hard and warm, slightly above room temperature. Since the flower does not need abundant moisture, stagnation of water is unacceptable, this will lead to pathological disorders of the root system, rot and disease. The tropical guest is not afraid of drought, but is very sensitive to high humidity. To prevent this from happening, wait half an hour after moistening the soil and rid the tray of excess water.
Trimming
During normal development, peperomia does not need to be pruned; it is enough to pinch the top of the elongated shoots in the spring for the bush to branch. Pinching is done approximately one-fifth of the length from the top. However, there are times when the flower becomes bald, and then pruning becomes necessary. After this procedure, new shoots and stems are formed. When pruning, do not touch just a few leaves at the bottom of the plant.
Fertilizer
Feeding the plant is carried out twice a month during the most intensive development and growth, that is, from the beginning of spring to the end of summer. You can use any liquid mineral fertilizers aimed at home flora, succulents, and deciduous plants. The main thing is to maintain a small dosage, about half the usual amount. From September until spring, it is enough to fertilize once every month and a half; you can eliminate this stage of care if the plant feels well enough. Take precautions, as overfeeding can have a negative impact on the condition of the flower. Always moisten the soil first, otherwise you can burn the sensitive root system.
How to prepare material for planting
An adult and primarily healthy leaf is suitable for propagation. It must be cut with a sharp knife, trying to ensure that the cut area is even. The leaf must have a petiole, at least a short one.
It is recommended to dry the cut leaf slightly, leaving it overnight on paper, but not on the window. It would be a good idea to sprinkle the cut area with finely tuned activated carbon. This will prevent rotting.
The best time to start breeding is in spring or summer. At this time, peperomia is actively growing its aerial part and sap flow occurs faster. This means that the mother bush will not be able to suffer, and the new plant will form faster.
About caring for peperomia
Temperature: Peperomia is a heat-loving plant. In summer, the optimal temperature for it is 20-22 °C. At the same time, peperomia does not tolerate heat and stuffiness; for it, the permissible temperature limit is 25°C. In winter, the temperature should not fall below 16 °C; on cold windowsills, special warm stands must be placed under the pot.
Peperomia obtusifolia Variegata.
Lighting: The plant needs bright, diffused lighting and does not tolerate direct sunlight. Western and northern windows are perfect for it. The degree of lighting intensity depends on the type of foliage color. Peperomia with variegated leaves need more intense lighting than specimens with solid dark green leaves.
Watering: Peperomia species with fleshy leaves are classified as succulent plants. They are able to accumulate moisture, so they need moderate watering immediately after the earthen clod has completely dried out. In summer, watering is easy to regulate; in winter, watering is done once every 10-20 days. Such peperomia easily tolerate dry soil, but are difficult to waterlogged, which can lead to rotting. Types of peperomia with thin, delicate leaves, on the contrary, need stable, regular watering, without drying out the earthen clod, which can lead to the complete death of the entire bush. Water the peperomia with soft, settled water, always warm.
Peperomia griseoargentea.
Air humidity: Depends on the type of peperomia. Succulent plant species are not demanding on air humidity. Species with delicate leaves are more demanding and require regular spraying, but peperomia with folded and drooping leaves should not be sprayed.
Crown formation: Peperomia needs to be formed; if this is not done, the plant quickly loses its attractiveness, the shoots do not grow evenly - some stretch out, while others, on the contrary, lag behind in growth. In order to get a bush from a peperomia, it is enough to cut off its crown, the plant will begin to actively branch, and young side shoots will appear.
Peperomia clusiifolia Jelly.
Fertilizers: During the period of active growth in spring and summer. Contributed 2 times a month. In winter, peperomia can also be fertilized once a month. For fertilization, special complex fertilizers for decorative deciduous plants are used.
Soil: Very important for this plant. The soil must be loose and breathable. A universal substrate is suitable, to which sand or vermiculite is added for looseness. For nutritional value, you can add a little humus. There should be a thick layer of drainage at the bottom of the pot, which will protect the roots from excessive waterlogging.
Peperomia claviformis.
Transplantation: This bush is replanted only as needed, in the spring, using the transshipment method. The signal for replanting should be the roots peeking out of the drainage holes of the pot. Peperomia has a poorly developed root system, so you need to choose a small, small pot for it. When replanting, try not to bury the base of the plant stem.
Pests: Peperomia bushes are quite resistant to pests, but sometimes with improper care they can be affected by mealybugs and spider mites.
Peperomia ampelous
Peperomia obtufolia - home care
The ampelous variety grows as a herbaceous creeping tree or ground shrub with tightly packed leaves on the stems. Peperomia can grow in areas with thick moss litter.
Certain varieties grow in the natural environment as epiphytes:
- Holovataya. The leaves are green, glossy, on short petioles. The stems are branched and long. This is a valuable ornamental bush with rapid development.
- Round-leaved. Grows as an epiphyte. The leaves are thick, round, juicy. The shoots are brown or burgundy branched. Petioles are short.
- Whorled. It is distinguished by thick, powerful shoots hanging from the pots. When flowering, thin green spikelets and small flowers form at their tops. The leaves are sessile, round, collected in whorls. The plates on the underside are contrasting reddish.
- Angulata is a perennial ampelous shrub similar to Tradescantia. The shoots are thin, juicy light brown. The leaves are dark green, oblong-lanceolate or with arcuate veins. At the tops of the shoots during flowering, peduncles with greenish spikelets are formed.
Ampelous type of peperomia
Microclimate
The peperomia flower is not picky about the microclimate and does not have a special dormant period. Although it prefers to grow in sunny areas, so in winter it is important to provide bright lighting using fluorescent lamps. The main thing is that the rays of direct sun do not fall on the bushes.
Temperature and humidity
The plant is tropical, so it is important to maintain the temperature regime for comfortable growth in the room. The optimum temperature throughout the year is 25°C. The temperature should not be allowed to drop below 16°C to avoid the development of diseases.
Important! Peperomia is afraid of drafts and is practically not adapted to growth and development in the Russian climate in the open air. It should not be taken outside even in summer. Although it is necessary to ventilate the room by temporarily putting the flower away, for example, in a box, covering it with film.
Humidity does not matter for peperomia. It will grow well both in dry, stuffy apartments and in humid tropical forests. There is no need to spray the bushes, because it is unlikely that the water will be absorbed and roll off the glossy leaves. It is enough to wipe them with a damp sponge, removing dust particles.
Illumination
For a plant with leaves of a single color, it is preferable to create a light shadow. Variegated varieties need more light. It is better to grow peperomia on windows facing east and west. But you should not place it on southern windows, otherwise direct sunlight will damage the leaves, including wrinkling and burns.
Watering regime and fertilizer application schedule
In the warm season, the plant needs regular watering, especially during the growing season. You need to water with soft, settled water at room temperature.
In autumn and winter, when the room temperature is 18°C, the frequency of watering should be reduced.
Note! It is unacceptable to water the plant with cold tap water, otherwise it may become infected with fungal diseases. It is better to water moderately as the soil dries. The main thing is not to overdo it, as the root system will begin to rot if it is over-watered. It is better to take soft tap water for irrigation after settling for 2 days.
The houseplant is deciduous, so any complex store-bought preparations are suitable for feeding. You can apply mineral fertilizers, feeding 2 times a month in spring, summer, and autumn. In winter, once every 4 weeks is enough. It is not advisable to feed a plant at rest. It is also recommended to pinch for better branching of flower stems.
Soil for peperomia
The ideal soil is light, airy, loose with impeccable water permeability. The composition for the soil mixture is 2 parts of leaf soil, humus and sand (1 part each). You can also add soaked hydrogel granules.
Optimal soil acidity is 5.5 to 6.5 pH.
Note! The plant does not take root well and takes root in heavy soil. For normal growth, the soil must be loose, collected from humus, peat, sand. It is better to buy special soil for pepper species or begonias. You can also prepare the mixture with your own hands: leaf soil (2 parts), sand, peat, humus (1 part each) or leaf peat soil and sand, taken in equal quantities. The main thing is that oxygen constantly flows to the root system. For this purpose, it is advisable to lay a drainage layer at the bottom of the pots, which protects the roots from excess moisture and the occurrence of fungal diseases.
Methods of propagation of chokeberry.
It is best to propagate this crop in the fall. However, you can do this work in the spring. It should be noted right away that due to the fact that in different regions there are different climatic conditions, the timing of work on propagating shrubs will, of course, be different. That is why, first of all, you should take into account weather conditions and coordinate them with the gardening calendar. If you propagate chokeberry in the fall, it is best to do this in September or October. It is not difficult to care for the plantings in the future, and if you propagate the shrub in the spring, it is better to carry out planting work in March or April. However, take into account the climatic conditions of the region where you live. Therefore, everything needs to be done in a timely manner. Chokeberry is propagated by many methods. Firstly, this is cuttings, secondly, breeding layering, as well as dividing shrubs. Chokeberry can be propagated by seeds, through grafting, and also through the formation of root suckers. It should be said that propagation by seeds and grafting is the least effective compared to the previous proposed methods, therefore, if you are a beginner gardener, then it is best to do, for example, cuttings. But only experienced gardeners can graft a plant or plant seeds. If we talk about cuttings, it can be done both in spring and autumn. In order to cut off the necessary branches, it is best to choose young shoots. Cuttings are cut at the end of May or at the beginning of June. And then they are grown in greenhouses or greenhouses. It should be said that they winter there too. But it will be possible to plant cuttings in a permanent habitat only next season. Very often, gardeners take cuttings in the fall. For this purpose, already lignified annuals are used; it is these shoots that adapt better to new conditions. Moreover, these shoots are immediately planted in a new place. In principle, they take root normally. If we talk about dividing the bush, then it should be noted that it is best to divide old plants. They must have strong shoots and a good root system, it is better to do this in the spring; before this procedure, it is recommended to water the chokeberry intensively; after transplanting, the plants are also watered abundantly, and the soil around them is loosened. Layers are rooted mainly in the spring. For this purpose, both one-year and two-year-olds are used. It is these shoots that best take root in the soil and form roots. In order to propagate chokeberry using the layering method, you will need to dig peculiar grooves, bend the shoots to the ground, cover them with loose soil and wait for the root system to form. But it will be possible to separate the shoots from the mother bush only next season. It should also be said that sometimes new plants do not take root. A lot of shoots usually form around the chokeberry bushes, so the root shoots are often transplanted to new habitats, separating them from the mother bush. And they do this throughout the season. However, it is most effective to carry out these procedures in summer and spring. New plants must be given time to adapt to new conditions. But it takes a very long time to propagate chokeberry with seeds; in addition, such planting material will need to be stratified, but despite this, the germination rate of the seeds is still very low, and the plant takes a very long time to develop. You can more quickly propagate chokeberry by grafting; this must be done in the spring, but in order for the cutting to take root well on the new plant, you will need to provide the shrub with favorable growing conditions and care for it properly. However, even in this case, the vaccine does not take root very well. Well, we have described the main methods of propagation of chokeberry, and now we will proceed to a more specific description of the presented methods of propagation.
What time of year is best to propagate from cuttings?
Peperomia is recommended to be propagated in spring and summer if you use the propagation method by cuttings. In the warm season, cuttings take root faster. If you propagate it by seeds or leaves, then any time of year with high temperatures is suitable.
Peperomia has a dormant period in winter. It is better not to propagate at this time, since the plant needs a lot of light, a sufficient amount of which cannot be provided by artificial lighting.
It is necessary to water peperomia moderately in summer, and rarely in winter, since stagnation of water will negatively affect the condition of the plant.
Origin and appearance of peperomia
Botanists have described about a thousand species of peperomia, and only 17 of them are found in Africa. The main habitat of the plant is the tropical forests of South America. Many peperomias are perennial epiphytes. The plant prefers shady places, lives under and on trees, and loves loose peaty soils. Sometimes peperomia can even be found on rocks. The flower has thick stems and fleshy leaves with grooves of contrasting colors. Most members of the genus have tiny flowers that are “packed” into a characteristic greenish-brown spike (spaix). Some species, for example, Fraser's peperomia (fraseri) from Ecuador, have more attractive and fragrant white flowers.
Peperomia is loved by gardeners for its unpretentiousness.
The genus includes several species with tuberous roots. These are mainly peperomias, native to Mexico. After flowering, the foliage dies back and the tuber can withstand long periods of drought. Other members form a caudex (a trunk bearing characteristics of both stem and root) and may be of interest to collectors of unusually shaped exotic plants.
The size and color of peperomia leaf blades are incredibly varied. The most typical shape is heart-shaped, round or broadly oval. Breeders have developed varieties with miniature and large, smooth and corrugated, glossy and pubescent leaves. The color varies from light to dark green; the leaf blades can be decorated with spots, stripes and streaks of contrasting colors. The leaves are located oppositely and quite densely on a small shoot, forming a compact decorative bush.
The size, color and shape of peperomia leaf blades are incredibly varied.