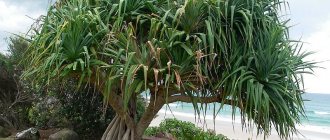
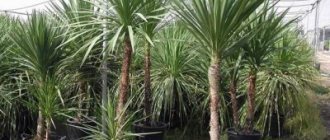
Pandanus flower is one of the most exotic plants. At the same time, its distinctive features are unpretentiousness and absolute non-capriciousness. An undeservedly forgotten culture. Even in the last century, tubs with a beautiful palm-shaped crown stood in the homes of many wealthy people, decorating winter gardens, country residences, and holiday homes.
Now indoor pandanus is a rare guest in modern homes. Gradually, the fashion for such plants, which add a special chic to the interior, is returning again.
Corn plant description
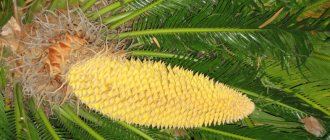
Sweet corn is a tall herbaceous plant, reaching a height of 3 meters or more. Corn has a well-developed fibrous root system, going 1-1.5 m deep. Supporting aerial roots can form at the lower nodes of the stem, preventing the stem from falling and supplying the plant with food and water. The stem of corn is erect, not hollow, up to 7 cm in diameter. Large linear-lanceolate leaves can reach 10 cm in width and 1 m in length. On one plant there can be from 8 to 42. Corn flowers are unisexual: the male ones are collected on the tops of the shoots into panicles, and the female ones into cobs tightly surrounded by leaf-shaped wrappers, hiding in the axils of the leaves and reaching a mass of 30 to 500 g, a length of 4 to 50 cm, and a diameter of 2 to 10 cm. One plant rarely forms more than two ears, at the tops of which a tuft of pistillate columns emerges from the wrappers, looking like a tuft of hair. The wind carries pollen from the male flowers to these columns, and fertilization occurs, resulting in the formation of large grains - the fruits of corn. The grains, located on the cob shaft in vertical rows and closely pressed to each other, have a round or cubic shape. One ear of corn can contain up to a thousand grains; their color can be yellow, reddish, blue, purple and almost black.
Crown formation
As you know, there are plants that require additional attention to branches and foliage. One of them is the indoor flower pachistachis. Caring for the crown of the plant must begin quite early. As soon as the flower grows to 10-15 cm, you need to carry out the first pruning. It is also necessary to pinch out the side shoots. To do this, it is enough to remove the 3rd pair of leaves. Pachistachis should be pinched up to 4 times a year. As a result, by the beginning of winter, a small plant about 8 cm tall with a large number of tops will form. After wintering, the flower needs to be cut again or the shoots pinched. There is no need to be upset that the plant will not bloom in the first year. It is better to devote this time to the formation of the crown, and enjoy the flowering next year. Each branch that fades will independently split into two, which will also bloom. Next spring, you need to pinch the shoots again in order to again enjoy how the pachistachis indoor plant blooms. Caring for the flower crown is necessary. The plant begins to branch only after it has grown to a height of 80 cm to 1.5 m. The result will be a long bare trunk and one flower at the top, which does not look very attractive.
Diseases and pests of pachistachis
Indoor plant stephanotis
There are some specific diseases and pests of pachystachys that create problems when growing it indoors. Most often, whiteflies, mealybugs, aphids, and spider mites settle on flowers. May be affected by powdery mildew. Against pests and diseases, you should use special preparations that you can purchase in stores.
In the summer, the problem with diseases and pests is solved by regularly ventilating the bushes in the open air under the direct, unprotected action of ultraviolet rays.
Very often, gardeners complain that pachystachys leaves curl. This is a consequence of insufficient watering and dry air. Inspect the leaves from the inside; if you do not see any damage or insects there, then simply wet the earthen ball thoroughly and increase watering of the plant. To soak the earthen clod, place the pot with the plant in a bowl of settled water at room temperature for 10 hours.
If pachystachys leaves fall off, this is a consequence of improper care of the plant at home. It is necessary to reconsider your policy of applying mineral fertilizers. Most likely this is a consequence of nitrogen deficiency. Also check the moisture content of the earthen clod and spray the leaves of the plant at least once a day.
We hope that we have provided you with comprehensive information about indoor pachystachis flowers, their propagation and cultivation at home. We wish you good luck in cultivating this exotic guest on our windowsills.
What does pachistachis look like? Photo. Care
Pachistachis is a tropical plant. It is native to southern and central America and eastern India. On average there are 12 plant species. Pachistachis yellow is grown as an indoor flower. It is very rare to see red pachystachys. Home care is not difficult. The main things for him are light, warmth and humidity. And during active growth and flowering, you need to provide the plant with additional feeding.
Pachistachis has elongated dark green leaves. It attracts attention with its yellow inflorescences, reminiscent of golden ears or candles. They are often mistaken for flowers, but they are only pre-flowers. Pachistachys blooms with inconspicuous white flowers that grow perpendicular to the preflowers, and they quickly fall off. But the yellow ears last a very long time and give the plant an elegant, solemn appearance.
Use of Pachistachis flowers in culture
Houseplant aporocactus
Pachistachis yellow flowers are easy to grow indoors. For propagation, the method of cuttings and dividing the bush is used. For cultivation, places with a high level of illumination are selected throughout the daylight hours. Otherwise, the stems may stretch and the leaves may fall off.
In central Russia, pachistachis can be used as a decorative landscape crop. Typically, the seedling growing method is used for this. For future planting, cuttings are carried out in the first half of February. The cuttings are rooted and planted in seedling containers. Additional lighting and regular feeding are provided.
After frosts on the soil have passed, the grown bushes are planted in the ground in their place of permanent growth. During the period of growing seedlings, it is necessary to periodically pinch out the main shoots. This way you can create an excellent appearance and prevent early flowering. When the outside air temperature rises to 15 degrees Celsius, you can begin hardening off the plants. For this purpose, they need to be taken out into fresh air once a day. The procedure begins in 20 minutes and gradually progresses to 3 hours.
Reproduction and transplantation
Pachistachis propagates by cuttings. They appear during flowering. To propagate pachistachis, you need to cut a cutting 10-12 cm long and place it in water for rooting. After 2 or 3 weeks, when the roots appear, the plant can be planted in a small glass. As the pachistachis grows, it is transplanted into a pot 12-13 cm in diameter, and then into a large flower pot. It should be 2.5 liters in volume and low. Flower roots love space. It is also necessary to take care of drainage. This can be a layer of expanded clay or clay shards 1.5 cm high. Frequent replanting causes pachistachis to actively bloom.
You can immediately plant the cuttings in the ground. In this case, the soil is mixed with sand. If you cover the cutting with polyethylene or a glass cover, it will grow faster. With this propagation method, it is necessary to open the soil for 2-3 hours for ventilation 2 times a week.
The air temperature in the room during the rooting period of the flower should be at least 200C and no more than 260C. It is also necessary to constantly maintain high humidity.
Corn varieties
Presentation Geranium - indoor plant
Nowadays, there are quite a large number of productive varieties of corn with different ripening periods. Several of them with the most optimal characteristics for planting in all regions of the country are given below with brief descriptions:
Spirit F1
Refers to hybrid varieties of very early fruiting. The cobs ripen and are at least 20 cm long; the grains have a delicious taste. The height of the stem reaches 1.9 m, the lower ear is laid at a height of half a meter.
Violetta F1
Also a hybrid variety. An interesting feature of this corn is the combination of purple grains and pleasant taste. They say that it is purple sweet corn that has a wider range of substances beneficial to humans, therefore, by planting such corn, you can not only decorate your garden with an unusual plant, but also receive an additional dose of vitamins when consumed.
White Dakota
An early ripening variety of corn with white grains. The cobs are formed about 15 cm long. The stem grows up to 1.8 m in height.
Preparing seeds for planting
First of all, it should be noted that corn is considered a heat-loving and light-loving plant. Its seeds germinate within 15 days only at temperatures above +12C. Naturally, the higher the temperature, the faster the seeds will germinate (the optimal temperature is +20-25C). Frosts are very dangerous for corn during seedling growth and flowering, so it is better not to plant it in northern regions with changeable weather. In addition, the plant is very demanding of moisture during the period of grain formation, but at the same time it tolerates drought well and does not tolerate waterlogging of the soil.
How to grow corn in the country? First of all, you need to decide on the varieties of seeds, among which the following are the highest yielding ones:
- variety “Aurica” (ripens within 80-95 days and has high taste);
- variety “pearl” (ripens within 85-100 days and has two ears on each stem);
- variety “Golden Fleece” (ripens within 72-75 days and is intended for fresh consumption);
- “favorite” variety (ripens within 75-79 days and has an elongated grain).
To plant corn seeds, it is necessary to thoroughly cultivate the soil, so digging the ridge takes place in two stages (autumn and spring) with the addition of fertilizers (manure, superphosphate, nitrogen and potassium additives). Remember that corn likes to grow in places where potatoes, cabbage, beans and squash have previously grown. Sweet corn can be grown in two ways:
- Seed method. This method allows you to grow corn in the middle zone, when you make a hole 10 cm deep in the garden bed and put 3-4 parsed corn seeds in it. The number of holes will vary from the total number of seeds, but the distance between them should not be less than 30 cm in a row.
- Seedling method. Growing corn at the dacha consists of precisely this method, as it allows you to grow corn seedlings in room conditions ahead of time. This is done simply: corn seeds are planted in a tray at a certain distance from each other, and after they sprout, they are transplanted into separate yoghurt or kefir boxes.
After planting, the corn will grow very slowly, but gradually the growth rate will gain strength (up to 10 cm per day), and when the plant blooms, stem growth will stop. Corn is a tall plant, the length of which can range from 110 to 300 cm.
Corn care
The technology for growing corn consists of the following manipulations with the plant throughout the entire period of growth and development:
- Loosening. The soil on which corn grows must be constantly loosened so that a crust does not appear. In addition, when the plant has only 3-4 leaves, thinning should be done in each hole, leaving only 1-2 strong and strong stems.
- Hilling. This procedure is usually carried out after rain in order to simultaneously free the soil from the crust and enhance root nutrition. Hilling promotes the development of strong corn roots, and therefore improves the growth and development of plants.
- Stepsonning. This is necessary in order to allow the plant not to waste its energy, but to direct it to the formation of cobs. As a rule, stepsons 15 cm long are removed immediately, and no more than 3 ears are left on the plant itself.
- Feeding. This is one of the main components of caring for any plant, including sweet corn. Growing it directly involves 2-3 feedings during the entire ripening period. So, at the initial stages, corn can be fed with bird droppings or manure with wood ash, and later superphosphate, potassium chloride and ammonium nitrate will do.
- Pollination. This procedure must be carried out to completely fertilize the ears by shaking the flower panicles. As a rule, after 2-3 such procedures, the corn cob becomes fully grained. It is especially necessary to carry out such manipulation with the plant for those who grow corn for grain.
Corn harvesting takes place when the cobs are in the period of milk maturity (approximately 25-30 days after flowering). Collected cobs are stored for a relatively short time, so they should be immediately placed in the refrigerator or processed.
Now you know how to grow corn correctly. Follow all the instructions, and you will receive a long-awaited, rich harvest.
Care Tips
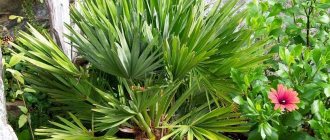
Despite its large size, pandanus does not require painstaking and complex care. In order for the palm tree to please the eye with the rich color of its foliage and grow normally, it is enough to follow the simple recommendations described below. The plant needs proper watering, regular fertilizing and timely replanting.
Watering
Pandanus reacts negatively to soil that is too wet, so it should be watered sparingly. It will take time for the top layer of soil to dry out.
Let's consider the basic rules for watering a flower:
- in summer, water once every 2–3 days;
- in winter, watering is carried out every 3–4 days;
- water only with settled water at a temperature of about +35°C;
- It is better to use the bottom watering method - pour water into a tray on which to place the pandanus pot. The plant absorbs moisture through drainage holes located at the bottom of the container. After 30 minutes, drain excess water from the pan.
Top dressing
Even if grown in nutritious soil, the screw palm needs fertilizer.
The frequency of feeding depends on the time of year:
- in spring and summer, fertilizers are applied every 2 weeks;
- in the cold season, it is enough to feed the plant once a month.
Trimming
The screw palm does not need pruning. Sometimes, if not properly cared for, the tips of the plant's leaves may turn yellow, which spoils the appearance of the pandanus. In this case, you can carefully trim the yellowed edges of the sheet.
When growing indoors, pandanus sometimes forms so-called stilted roots. This often happens when palm trees are grown in a room with high humidity.
These roots spoil the appearance of the flower, but cutting them is strictly prohibited, as they help the plant maintain stability. To prevent the aerial roots of the screw palm from drying out, they are covered with moistened peat or sphagnum.
Important! In order not to cause the leaves to dry out, you cannot cut off their green part.
Transfer
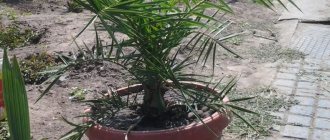
The best time to transplant a flower is the end of March or the beginning of April. The roots of young plants grow quickly, so they need to be replanted every year in the first 2–3 years of life. After this, the procedure can be performed once every 2-3 years.
When the roots of a flower begin to stick out of the ground in a flowerpot, this indicates the need to replant it in a larger container and fresh soil. Perennial pandanuses growing in huge flowerpots are difficult to replant. Therefore, if necessary, add fresh soil to the flowerpot or partially change its top layer.
To replant the plant, you can buy standard soil for palm trees or prepare the soil yourself using the following components, taken in equal proportions:
- leaf soil;
- turf land;
- sand;
- humus.
The new flower pot should be slightly larger than the old flowerpot. You cannot choose a container that is too large - in an excess amount of soil, the pandanus roots quickly begin to rot.
Did you know? Pandanus leaves have a sweet taste and are used to make tea.
The process of transplanting a screw palm:
Tie and secure the palm leaves so that they do not accidentally break during transplantation and the thorns do not scratch the skin. Place coarse sand at the bottom of the flowerpot for drainage, and sprinkle some soil on top. Carefully remove the pandanus from the old pot along with the earthen ball around the roots. Transfer the plant to a new pot and lightly sprinkle the roots with soil. It is not recommended to bury them deeply, so as not to provoke rotting of the root system.
The upper roots should be slightly visible through the soil layer.
If you replant a flower often, it will grow faster. To slow down the growth of pandanus, you need to replant it less often into new soil and pot.
How to collect your seeds
Corn for seeds is initially planted as far as possible from the general plantings to prevent cross-pollination. To obtain high-quality corn seeds, the healthiest and strongest plants are selected, and they have the largest cobs without traces of rot and other diseases. It is better to mark them separately in some way, usually tied with ribbon.
Here they wait for the moment of waxy ripeness, and not milky, as during standard harvesting, so they are left on the plant until the grains acquire a bright yellow color and hardness (cutting such cobs often occurs in mid-September).
After cutting, the corn cobs are sent to ripen for a couple of weeks, after which the seeds are removed and dried. Self-collected corn seeds can be stored for up to 5 years and still have excellent germination.
Caring for corn in summer
Watering is desirable abundant and regular, as for most vegetable crops. Corn is quite drought-resistant, but prolonged drying out of the soil will have a very negative impact on the formation of cobs, and, as a result, the yield. Feeding. The first is carried out 10 days after planting the seedlings in the ground, and the second – two weeks after the first. If the seeds were planted directly into the ground, then the first feeding is carried out in the phase of appearance of 2...3 true leaves, and the subsequent one - when the ears are laid. The fertilizers used are organic (infusion of mullein or chicken manure) or a mixture of minerals (ammophos, superphosphate and potassium-containing). Weeding and loosening. Careful weeding of plantings, especially in the early stages of development, is necessary to prevent weeds from shading young plantings and taking all the beneficial substances from the soil. As the corn grows, it displaces them on its own.
Loosening is also important and is carried out at least three times a season to a depth of 5 cm. This operation allows for air permeability of the soil and prevents the formation of an earthen crust
Therefore, it is better to loosen after watering and heavy rains. Hilling. This operation is necessary because corn tends to form shallow roots to better establish itself in the ground. Therefore, soil is periodically thrown up to the trunks. Hilling helps plants not to lie down under their own weight, the weight of the cobs and in strong winds.
Palm tree at home
Some gardeners are afraid to start pandanus at home. The reason for this is unfounded superstition. They say that with its thorns it attracts negative energy. However, even fans of spiritual practices do not confirm this version.
At home, the plant is used as a fodder crop and also for weaving baskets. By chewing a pandanus leaf, local residents get rid of toothache. The only cause for concern is the sharp thorns, so it is not recommended to place the palm tree in a place accessible to children.
Peach palm description, beneficial properties and contraindications
The peach palm (lat. Bactris gasipaes) is a fruit tree that belongs to the Palm family.
Distribution of the peach palm
The plant is native to the jungles of Brazil, Peru, Colombia and Ecuador. Since ancient times, the palm tree has been cultivated and distributed by Indian tribes throughout the Amazon, gaining its greatest economic importance in Costa Rica. In recent decades, the peach palm has been grown in Central American countries (in Guatemala, Honduras, Nicaragua, Panama, in the very north of South America, as well as in the Antilles. In the Philippines, the first palm plantings appeared in 1924, and in India in the 1970s .
In principle, the peach palm can grow in any country with a humid and hot tropical climate. It is found at altitudes up to 1200 meters above sea level. Very undemanding to soil. It reproduces both vegetatively and by seeds.
Biological description of the peach palm
The peach palm tree is tall and slender, reaching a height of 20-30 meters. Its entire length or only its upper part is surrounded by rings of long (up to 12 centimeters) black needle-shaped spines. By the way, they make it very difficult to harvest from trees.
The leaves of the plant are quite long (from 2.4 to 3.6 meters). They are pinnately complex in structure, have lanceolate, dark green leaves with spiny edges. The petioles are also dotted with spines.
The flowers are yellowish-white, small. Male and female flowers are collected in mixed clusters and are located under the very crown of the palm tree. The length of the inflorescences reaches 30 centimeters.
Description of peach palm fruits
The fruits are yellow, orange or red in color and hang in clusters of up to 100 pieces. They can be of various shapes (oval, cupped or conical), up to 6 centimeters long, and have six faint edges. The harvest begins to produce already 3-4 years after germination from the seed.
The skin of the fruit is thin, underneath it there is a sweet yellow-orange pulp that tastes sweet. There is one large seed inside the fruit.
Beneficial properties of peach palm fruits
The fruits contain a lot of vitamins A and C, starch and vegetable fats.
The fruits are not eaten fresh. True connoisseurs of fresh fruits are various species of parrots, whose numbers are declining as tropical forests in the Amazon basin are cut down. For human consumption, they are boiled in salted water for 2-3 hours, usually with the addition of vegetable or butter. But first the peel of the fruit is cut. Eat boiled fruits while they are still hot. The fruits are usually eaten as a side dish for fatty dishes or separately with some kind of gravy, since even the boiled pulp is a bit dry. Sometimes the pulp of the fruit is added to baked goods, and is also used to prepare a strong alcoholic drink, which is obtained by distilling the mash obtained from fermenting the fruit.
Gourmets also eat the kernels, which taste somewhat like coconut.
Carefully collected fruits (without dents) can be stored at room conditions for a week.
Other uses of peach palm
The soft core from the upper part of the palm tree trunk (palmetto) is also used, which can be eaten raw or used for preservation and preparation of a wide variety of dishes. The taste of the fresh core is somewhat reminiscent of the taste of celery stalks.
Peach palm wood is an excellent building material. The leaves of local tribes are used to make roofs for huts. The leaves can also be used to prepare a decoction that Indians drink for stomach aches and headaches.
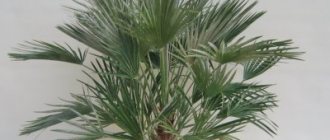
Variety Licuala big Licuala grandis
The large liqual variety is a huge palm tree native to the lowland tropical forests of the Solomon Islands and Vanuatu with leaves up to 2.5 meters, a trunk up to 3 meters. But few people have seen such luxury in person - at home the plant blooms very slowly and rarely reaches its maximum growth. This is a very finicky plant, requiring protection from the sun and any drafts that could damage the appearance of the bright, smooth pleated leaves.
In the photo of the Likuala plant, you can see that despite this they still remain small in size. Over time, the stems they grow on will spread more laterally and appear on tall, smooth stems.
This is the most popular variety of licual palm, as it is constantly used to decorate the landscape or garden of your site, and its small size allows it to be used in any office and home premises. If you follow all growing conditions and choose a wide container with the right soil, you can also grow a palm tree outside.
If the licuala still reaches its usual size, then you will have the chance to see an unusually beautiful sight - bright red fruits against a background of equally bright greenery.
The palm tree grows well under minimal survival conditions. It grows best in shade from sunlight, although it can tolerate direct sun in humid tropical conditions, or similar conditions created artificially at home. But there is a danger of getting sunburn.
They have a moderate need for water, but not in hot and dry times. In soil, it is better to give preference to organically enriched soil with good drainage. If there is a good drain, then, in principle, any other soil will work well, but only if it is well fertilized once a month.
Over time, remove yellowed and scorched leaves, as well as flowering thorns (to prevent pests).
In Asian countries, the stem of the palm tree is used as a base for reeds for walking sticks, nicknamed Penang Lawyer. There are two versions of the origin of this name:
The first is from the Malaysian phrase “Pinang liya” (name of wild palm tree);
The second is the use of this cane as a deadly weapon to kill one’s worst enemies.
But the main area of use is decorating gardens and open landscapes in Europe and America. Recently, decorating the interior of homes and offices has also become common.
Where to place it?
The flower requires good lighting and warmth. The ideal location would be windows facing west or east. Pachistachis requires bright, but at the same time diffused lighting. You can place the flower on a south window, but then in the summer the plant needs to be shaded.
The most comfortable temperature in spring and summer is 200C for the pachystachis flower. Care at home at temperatures above 240C requires increasing the humidity. In summer, pachistachis can be taken out to the balcony and placed in the shade. In autumn and winter, you need to maintain the room temperature within 16-190C. Pachistachis is sensitive to drafts. It is also not advisable to place the flower near the battery.
Pachistachis requires maintaining sufficiently high humidity. For spraying, it is better to use soft water, filtered or settled. In winter, the flower needs to be sprayed every day. During flowering, you must be careful when spraying and not get it on the inflorescences.
Corn harvesting and storage
Harvesting of sweet corn begins selectively when the cobs reach milk maturity. How do you know when it’s time to remove the cob? Look out for the following signs:
- the outer layer of the wrapper has shrunk and its color has turned light green;
- the threads hanging from the cob have turned brown and dried out;
- when pressed, white juice is released from the grains;
- The grains on the cob are smooth, yellow, closed in dense rows, without wrinkles or dents.
If you are late in harvesting corn, it will become overripe and lose its taste and nutritional qualities; the grains will wrinkle and become poorly cooked.
Preparing corn for long-term storage includes the initial cleaning of the cobs, then drying and cleaning from grain and weeds. Undamaged cobs are sent for drying. They are freed from the leaves, but the wrapper is not cut off, the corn silks (thin threads enveloping the cob) are removed, the cobs are braided with leaves and hung from the ceiling until completely dry in a well-ventilated dry room. Drying of corn is considered complete if the kernels fall out of the cob with gentle shaking.
If you are going to store corn for a long time, the grains need to be husked and poured into plastic or glass jars, cardboard boxes or fabric bags. Corn for popcorn is stored in plastic bags in the freezer, and if necessary, placed directly frozen in a frying pan.
Dairy corn intended for cooking should be kept in the refrigerator at 0 ºC for no more than three weeks. When stored at higher temperatures, corn loses one and a half or more percent of sugar per day - the higher the temperature, the greater the loss. It is best to keep milk corn frozen or canned because this way the nutritional value of the product is preserved. Moreover, if the freezer allows, you need to put corn in it right on the cob. To prepare corn for storing, prepare two large containers - one with boiling water, and the other with cold water and pieces of ice. First, the cob, cleared of the wrapper and stigmas, is dipped in boiling water for a couple of minutes, and then in cold water for the same time, after which the corn is dried on a cloth, each cob is wrapped in cling film and placed in the freezer, where it is stored for up to 1.5 years without loss of quality.
Corn care
How to Grow Corn
Beginning gardeners consider corn to be an unpretentious crop and limit themselves to weeding and infrequent watering, however, insufficient care can lead to a poor harvest and depletion of the soil on the site. Growing corn requires regular care of the seedlings while they are not yet strong - they are watered, weeded and necessarily hilled so that the plants can acquire strong adventitious roots in the lower part of the stem, which will give them stability and help them grow and develop properly. In addition, it is necessary to loosen the soil between the plants several times, apply fertilizing and protect the corn from pests and diseases, of which it has many.
Watering corn
Corn is moisture-loving: it can absorb 2-4 liters of water per day, but waterlogging is difficult for it - in water-logged soil, due to lack of air, its roots die, it stops growing, the leaves become purple, and the corn harvest is in jeopardy. Therefore, the soil moisture in the area is maintained at 70-80%, that is, 1-2 liters of water are spent on each plant. If there are no conditions for regular watering, you will have to frequently loosen the soil around the plants in order to retain moisture in it for as long as possible - it’s not for nothing that loosening is called dry watering.
After planting the seedlings, watering should be moderate, but from the moment 7 leaves appear on the plants, water consumption and frequency of watering are gradually increased until the stage of mass appearance of panicles. When the threads on the cobs begin to darken, watering is gradually reduced to moderate.
The best way to maintain soil moisture in a corn plot is to use a drip irrigation system because the water and dissolved nutrients go directly to the plant roots, saving both water and fertilizer.
Corn feeding
A good owner must amend the soil with organic and mineral fertilizers before planting corn. However, this does not mean that there is no need to fertilize the soil during the growing season. The fact is that, unlike other crops, corn grows green mass throughout the growing season, so it will need fertilizing from spring to autumn. In addition, at each period of development, plants require certain nutrients, and if you fill the soil with the entire amount of fertilizer needed for the season before planting, then too high a concentration may turn out to be a greater problem than a lack of fertilizer.
Nitrogen must be added to the soil before the seeds ripen. But the plant must receive the main amount of the element in the period before the formation of inflorescences. The most intensive absorption of potassium fertilizers occurs in the first half of the season; in the second half, the element flows back from the plant into the soil. Corn needs phosphorus in much smaller quantities, but throughout the season. Phosphate fertilizing begins when preparing the site, and stops applying phosphorus after the grains ripen.
In addition to the three main elements, corn requires microelements - primarily manganese and zinc, and to a lesser extent boron and copper. Keep in mind that alkaline soils lack manganese and boron, while acidic soils tend to lack calcium. The lack of microelements is compensated for by foliar treatments of corn.
The first fertilizing is usually applied during the period when the third and fourth leaves appear, and it consists of slurry or a solution of bird droppings. The second feeding should consist of ammonium nitrate (15-20 g per m²), potassium salt (15-20 g per m²) and superphosphate (30-50 g per m²). If a deficiency of specific elements is detected, treat the corn with their solutions on the leaves. For example, if white stripes appear on the leaves, you need to spray the corn with a zinc solution, and if fertilization is delayed, a boron solution will be needed to treat the plants.