Author of the article
Daria Vorontsova
Reading time: 19 minutes
AA
I am sure that it is not enough to buy seeds and plant them in the soil. Growing seeds at home is a whole science. It is important to grow them correctly, because if the seeds do not sprout or grow weak, you will not see good and strong seedlings, and therefore a good harvest.
A lot depends on the gardener’s literacy, including the growth of seeds. Growing seeds is not as easy a procedure as it might seem at first glance. It includes many rules and principles. It is the correct choice of seeds, preliminary preparation of the material and optimal care that is the key to the future harvest.
I will tell you about all the nuances in this article.
Hybrid or natural variety?
The main determining factor for a good harvest is the variety. There are natural varieties, and there are hybrid ones, which are superior in performance to their natural counterparts. The two main advantages that distinguish a hybrid from a natural variety are high yield and strong immunity.
Hybrid varieties are practically not affected by diseases (since they are already pre-treated with stimulants and fungicides), and harmful insects bypass them. But there is one drawback: seeds from hybrid varieties are not suitable for collection the next year, and, moreover, they are much more expensive than natural ones.
When should you not grow plants from seeds?
There are several aspects in which you should abandon the idea of growing plants from seeds. Among them:
- Inability to provide the sprouts with the necessary climatic conditions.
- Seeds of hybrid varieties are not suitable for germination, because there is a high probability that the result will not resemble the original at all.
- Uncertainty about the quality of the maternal fetus.
In all other cases, if you have the desire and sufficient patience, you can grow any plant.
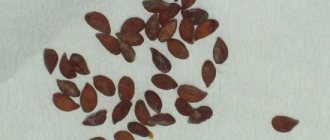
How to properly collect seeds from a fruit?
In fact, a lot depends on the culture itself. For example, onion and carrot seeds are dried until completely dry in umbrellas, then peeled. Melon seeds are removed from the fruit, freed from pulp and thoroughly dried. An example seed collection process looks like this:
- The fruit must be fully ripe and large, since there are many more seeds. If the weather no longer allows the fruit to ripen in the garden, carefully pick it and ripen it indoors.
- Cut the fruit lengthwise or crosswise (depending on the type of crop) and remove the seeds along with the pulp. Place in a glass jar for pre-fermentation.
- After the juice brightens and the pulp rises to the surface, it is much easier to select the seeds. They are freed from pulp, washed in running water and dried for about a week.
What fruits can you take a seed from to grow at home?
A kernel is a woody shell containing a kernel. These also include seeds covered with a hard shell. Under natural conditions, such a structure protects the seed from untimely germination and various damages.
To successfully grow a plant, it is important to choose the right fruit. It is better to purchase 2-3 options in different places, then choose the most delicious one. The requirements for the condition of the fetus are approximately the same:
- moderate ripeness (not overripe);
- no dents or signs of rotting.
Although in some cases there are exceptions in the form of extracting seeds from green fruits (dogwood) or dried fruits (dates).
The timing of sowing seeds: what does it depend on?
There are not so many nuances: firstly, the period depends on the region of residence and the type of seed.
In the southern regions, seeds are sown in late spring, in May. The weather in the south already in spring pleases with warm weather.
Mid-ripening and late-ripening varieties are planted around the end of February - beginning of March, that is, about a month and a half before the intended planting in the ground.
Early ripening varieties are sown a couple of weeks later.
Basic information is always indicated on the seed packaging.
Which container to choose
Traditionally, seedlings were given boxes and individual pots. But now it has become popular to use other, both forgotten ancient and modern growing technologies. Let's take a look at each method.
Boxes
Pros: the boxes are easily and compactly placed on a window or table, it is very convenient to water and feed plants.
Disadvantage: the roots of the plants are intertwined, which makes replanting difficult.
Cassette
Pros: saving space, land, ease of use (especially in versions with a removable top or with a tray), roots do not get closer together.
Disadvantage: there is not always enough space for plants.
Peat pots
Pros: no replanting is required, the sprout is additionally provided with nutrients, the walls allow water and air to pass through.
Cons: if you water too much, the walls will become covered with mold, and due to lack of moisture, the soil will dry out and move away from the walls.
Polyethylene (“diapers”)
Pros: space saving, ability to immediately discard weak plants, convenient to replant.
Disadvantage: slow growth compared to the potting method.
Snail method
A snail is a spiral-twisted strip of polyethylene, inside which toilet paper, soil and seeds are placed.
After sowing, the snail is tied with an elastic band and placed in a tray, where water is poured for irrigation throughout its growth.
Pros: weak seedlings are immediately visible, it is possible to cull them, saving space and soil.
Minus: the roots of the plants are close to each other, which means they can intertwine.
Peat tablets
Plus: peat supplies the sprouts with nutrients.
Disadvantage: slow growth compared to the potting method.
Eggshell
Mainly used for growing cucumbers. It is not necessary to wash the shells before use, but it is definitely worth drying.
Pros: when planting in the ground, the roots are not injured, an additional source of calcium.
Disadvantage: you need to carefully monitor the soil moisture.
Pre-sowing preparation
Gardeners who do not have sufficient experience sow seed directly into the ground or boxes, without taking proper care of the preliminary preparation. But a lot depends on it: the percentage of germination, the possibility of infection with various diseases. Untreated seeds germinate less well and are more often affected by pathogens. Pre-seeding includes several procedures:
- Soaking in saline solution.
- Disinfection in a solution of potassium permanganate.
- Treatment with growth stimulants.
- Hardening of seeds.
- Germination.
Saline solution: getting rid of “pacifiers”
And now the solemn moment has come: the seeds have been purchased and sown. But then a day or two passes, a week, two - and the shoots do not appear. And if they do appear, then it’s only a couple of pieces. The owner is disappointed: how can this be? So the variety turned out to be defective? This is not entirely true. In any, even the highest-yielding variety, there are “dummy” seeds: seeds that do not contain any nutrients and elements necessary for growth and development. And so that the summer resident does not boil with righteous anger, it is important for him to cull the seeds, that is, get rid of the “dummies.”
For this:
- Take a glass of warm water and dissolve a teaspoon of salt (or baking soda) in it.
- Pour the seeds in there.
- Leave for half an hour.
Seeds that have floated to the surface can be thrown away without regret; these are the same “dummies”. Those seeds that rest at the bottom are suitable for sowing. They are carefully caught with a strainer, washed in running water and dried.
Disinfection: prevention is better than cure
To prevent future plants from contracting blackleg, rot and other diseases, they need to be disinfected. To do this, take a 1% pink solution of potassium permanganate and soak the seeds in it for 20-25 minutes. After this, the seed material is also washed and dried.
We accelerate the growth process: we use stimulants
To make the seeds germinate faster, you can use special growth stimulants (Epin, Fitosporin, Zircon, and others). They quickly destroy the seed coat, activating the production of enzymes necessary for further germination. But this process has its own nuances:
- Hybrid seeds are already pre-treated with stimulants and do not require additional processing. If you prepared the seed yourself, stimulants can be safely used.
- Before processing the seeds, they need to be soaked for a couple of hours in water at room temperature so that they swell a little. This way the stimulator will quickly reach the inner shell.
- The drug must be diluted strictly according to the instructions.
Cold resistance: the key to strong seedlings is seed hardening
Despite the beautiful, promising description of the variety that it “perfectly tolerates frosts and temperature changes,” summer residents do not rely on chance, and prefer to “train” the seeds by hardening.
Hardening obeys several rules:
- Before the procedure, the seeds are placed in fabric bags and soaked for 12 hours in warm water.
- After this, the seeds are kept at a temperature of 15-20 degrees for the same time.
- As soon as 12 hours have passed, the seeds are placed in the refrigerator for 12 hours, at a temperature of three degrees.
Growing Herbs Indoors: Think About a Plan
The first thing to think about when planning to grow indoors is the type and quantity of herbs you plan to grow. Will it be potted rosemary, sage or other perennials? Would you like to germinate and grow successive crops of coriander and parsley? What will you need to create the ideal conditions for your plants? Most culinary herbs grow well if indoor conditions resemble a Mediterranean climate, with bright, powerful light and drier, cooler air. Some herbs, such as mint and chives, are less demanding on humidity and light brightness. Planning for a variety of herbs will influence the type of lighting and substrate you will need to purchase.
How much of your favorite herbs you plan to use in your cooking (or want to give to friends or sell) should also factor into your planning. If you're only going to use a pinch of fresh oregano for homemade pizza every now and then, or a little marjoram for sautéed mushrooms, then a few pots on the kitchen shelf under a properly placed fluorescent light should be more than enough. If you, like me, need enough basil to make pesto every week (or for Christmas gifts), or enough rosemary to roast a chicken on Sunday, then more global methods will be required.
Where to grow is another matter. Basements, with their small temperature differences, make it easy to control conditions for plants regardless of the time of year. Attics are usually too hot. Any space in the house itself will do, but many of us don't have the extra space for even a small growing space, let alone converting an entire pantry or closet (which would be ideal). Some grow setups may not fit into your home decor. Others, subject to thoughtful design, can become its central element.
Hydroponic herbs as a central element of the interior
Those who want maximum yields in a minimum space should consider placing their plants in a reflective grow tent or closet. Growing in such small spaces allows you to easily control the conditions: light, temperature, humidity, air circulation, which will allow your plants to thrive. Pots with plants can also be placed on shelves, racks, or hung near a south window or spotlight, but one must understand that such less effective lighting will lead to a lack of growth and little fruiting.
Herbs growing in a grow tent
Using reflective materials to reflect and retain useful light not only increases illumination, but also helps control temperature. You can find a variety of grow tents in various sizes in stores, or you can try constructing one yourself by stretching reflective sheeting or a survival blanket over a simple frame or closet walls. You can also turn an unnecessary closet or nightstand into a grow space (growing space). You can even create a grow space from plastic containers with fluorescent lamps. Creative gardeners are limited only by their imagination and the size of their available space.
It is important to maintain easy access to your plants. Make sure you leave enough space to water and care for your plants. Rearranging potted plants involves some heavy lifting - you need to be sure you can reach and move the pot when needed. There should also be outlets and a water source nearby, and it would also help to have a place to drain the water, but this is not necessary.
Germination
This method has been known since time immemorial. Summer residents still use it. The seeds are laid out on a damp cloth soaked in warm water and covered with the remaining piece of cloth. After which they are removed to a warm place. The fabric must be periodically moistened to prevent it from drying out. What are the consequences of forgetting to moisten the fabric? The seeds will suffocate without access to fresh air and die.
After a couple of days, the first shoots usually appear and can be planted. Nowadays, seeds are germinated on a moistened cotton pad, but the essence does not change. The main thing is not to overdo it with water, otherwise the water will displace the oxygen the seeds need and they will die.
Where to begin
What's great about growing flowers? This useful hobby helps you decorate your interior and bring some life into your life. In addition, flowers purify the air in the house and lift your spirits.
Answer simple questions
Indoor plants do not require the same attention and constant care as, for example, a cat or dog. But all the same, in order not to regret the ruined plant and not waste money, it is worth preparing,
- If someone in your home is allergic to certain types of plants, then you should look for hypoallergenic varieties. For example, orchids, phelenopsis, guzmania, cambria or begonia.
- If you often leave home for more than a couple of days, then you will have to ask one of your friends or neighbors. If this is not possible, choose plants that can be watered once every two weeks or less.
- If you have children and pets in the house, then species with thorns or poisonous sap are most likely not suitable for you.
Determine a place for flowers
The first step is to find a suitable place for green pets. How much space are you willing to allocate for a potty? Is it a well-lit room or is it in the shade most of the day? What is the average temperature at your home in winter and summer?
The east or west side is most suitable. In this case, the sun will illuminate them only part of the day, which suits most flower crops.
Not all flowers like direct sunlight, so the south side is not very suitable for organizing a green corner. Plants that prefer diffused light will grow well in the northern part of the house, in hanging flower pots, or on shelves nailed to the walls.
Your next step: selecting flower pots, preparing soil and drainage.
Soil selection
If you are a meticulous and conscientious owner, you will not buy soil. And cook it yourself. Making seeding soil is not difficult; just mix garden soil, peat and river sand in equal parts. Although in any agricultural store you can purchase soil from domestic producers. It already contains everything you need, in equal proportions. The most popular brands of soil:
- Bogatyr.
- Terra Vita.
- Flora's Gold and others.
Nutrient deficiency
Well-balanced soil provides plants with nutrients.
This cannot be achieved by applying fertilizers alone; drastic measures are needed to improve the soil. Nutrient deficiency manifests itself in a variety of ways: impaired or stunted plant growth, yellowing or spotting of leaves, curled edges of leaf blades, premature ripening of fruits, and dying or weak root growth.
Some types of nutrient deficiencies are common in certain groups of plants. For example, fruit trees that develop yellow leaves with green veins are helped by chelated iron, and if gardenia's old leaves begin to turn yellow or brown at the edges, an old remedy is used - a combination of magnesium and Epsom salts (magnesium sulfate) dissolved in water.
Other symptoms require closer examination. Show the diseased plant to the nursery staff, contact a gardening club, read gardening books, or search for information on the Internet.
Treatment of soil and planting container
It’s not enough to buy soil or make it yourself. The main danger lies in the soil of your own preparation: pathogens, in particular late blight, gray or blossom-end rot, lie dormant in it. Also, do not forget about sleeping insect larvae. Therefore, any soil (your own or purchased) must be disinfected.
There are two methods of disinfection:
- Calcination. This method is more suitable for home-made soil. To do this, place the soil in a preheated oven for an hour. Temperature - maximum (200 degrees).
- Steaming. This method is suitable for purchased soil. To do this, the soil, without removing it from the packaging, is placed in a bucket of boiling water for an hour. Then let it cool.
Planting containers (wooden or plastic containers) also need pre-treatment to eliminate the possibility of infection by pathogens. Do you know how glass jars are steamed before preservation? Here the procedure is very similar: the container is treated with hot boiling water or a strong, hot solution of potassium permanganate.
Method No. 2. Sprouting in a jar or container
- Good for:
- turnips
- salad mustard
- radishes
- watercress
Place pieces of foam rubber or cotton wool in a layer of 1-1.5 cm in glass jars or small plastic containers, moisten and sprinkle turnip, mustard, and radish seeds thickly there. Place it on the windowsill, and if the temperature there is 18-20 degrees, the seeds will germinate quickly. They are easier to care for than those sprouted on a plate: you need to moisten them less often, and it is not at all necessary to turn the jar or container.
Eat long white or greenish sprouts in the cotyledon leaf phase. Turnips, salad mustard and watercress have a piquant, slightly spicy taste. These sprouts have a beneficial effect on the nervous system, maintain body tone, and have an antimicrobial effect.
Soybean sprouts are unique in that they are high in vitamin C, protein, eliminate excess cholesterol and normalize liver function. Usually have a matte color. They cannot be stored as they quickly become moldy. Mustard sprouts are very tender and have a pleasant nutty taste. They increase hemoglobin, reduce capillary permeability and fragility.
Sunflower sprouts improve skin condition, vision, and strengthen the nervous system.
Seed sowing procedure
Many who are confident in the result scatter the seeds directly on the surface. But this does not guarantee success. Even the highest percentage of germination will not guarantee that your seeds will sprout. First of all, they need to gain a foothold in the ground. And for this you need at least a little depth. The stages of sowing seed material look like this:
- A drainage layer is poured into the pre-treated planting container so that excess moisture drains away and does not linger in the ground.
- Not reaching the edges by about 2-3 cm, disinfected soil is poured into the container, which is moistened from a spray bottle with warm water at room temperature.
- Planting grooves are made on the ground, 1.5-2 cm deep, into which germinated or treated seeds are poured. The distance between seeds is at least 2 cm. The distance between rows is 2-2.5 cm.
- After sowing, the seeds need to be compacted a little and sprinkled with a layer of soil on top. The thickness of the layer should not exceed 1 cm.
Effective lighting for growing plants is the key to success
Light is the most important component of your entire growing system. If you want harvests to be frequent and abundant, the light source must be powerful and bright. The type of lamp you use will determine not only whether the herbs survive or not, but also how quickly and confidently they grow.
Office-style commercial fluorescent lights have long been used by home gardeners. They will keep your plants alive and even produce some growth, but the use of modern fluorescent lamps designed specifically for plants will give a noticeable increase in growth. Fluorescent bulbs are affordable, use less electricity than other types of bulbs, and don't produce much heat. They require little maintenance and, when used correctly, it is possible to grow enough herbs for serious culinary enthusiasts. A 150-watt lamp is enough to illuminate up to 1 square meter of area.
Modernization of the spectra and light intensity of modern fluorescent lamps, designed specifically for indoor growing, has led to the emergence of high-power T5 lamps, which are a good choice for the home gardener. A system with T5 fluorescent lamps produces approximately twice as much light as a standard T12 lamp. Again, placing the lamp close to the plants and using reflective materials to focus the light into the grow space will greatly improve your results. Since these lamps produce very little heat, they are suitable for hot areas such as attics, especially if you place the lamps very close to the plants.
Basil under T5 lamps
Those gardeners who strive to get quick and serious harvests should pay attention to gas discharge lamps. They usually range from 250 to 1000 watts. It is very important to choose a lamp of the required power that suits your area. A lamp that is too weak will produce uneven results, no matter how much reflective material you use. A lamp that is too powerful will overheat your grow space and your electricity bills and lamp components will be huge. A rough recommendation for lamp power is 400 watts per 2 square meters of area.
There are two types of discharge lamps: metal halide and high pressure sodium. Both types of lamps require additional ballast - electrical equipment that allows you to create the voltage and current required by the lamp. Metal halide lamps, due to their blue spectrum, are recommended for growing green herbs, as it specifically promotes the growth of green leaves. High-pressure sodium lamps (usually the HPS type) with their white-red spectrum are best suited for the growth of flowering plants (use of HPS lamps can cause unwanted flowering of herbs such as basil, followed by the formation of seeds). Sodium lamps are best suited for flowering herbs that are valued specifically for their flowers: chamomile, calendula, borage and others. The correct placement of the lamp and reflector is very important. You should be able to lower the lamp as low as necessary and then raise the lamp higher as the grass grows. To do this, you need to hang the lamp using ropes or chains, securing them to strong frames so that you can move them up and down with ease.
A grow tent with a HPS lamp can produce huge yields
LED lamps are also slowly gaining popularity. Advances in LED technology have made them suitable for growing herbs on a small scale, but the cost is still too high for the average gardening enthusiast. They have a number of advantages: they use less electricity, produce less heat, and last five or six times longer than HID lamps. They also do not require additional ballast. How much all this justifies their high price is still an open question. However, there are examples of successful use of LED lamps, in addition, LED lamps are available in different spectra: lamps with more blue light are better for growing herbs than others.
Connecting electricity to lamps and ventilation requires special attention. You'll need to design your grow space so that all electrical equipment - lights, sockets, plugs, wires, ballasts - are elevated above the surface and away from wet areas and water. Water and electricity in the same place always pose a potential danger. Although most home gardeners do not need this, larger and more complex systems that use large amounts of electricity should be connected through their residual current system. If you are not well versed in connecting electrical appliances, then it is better to ask a qualified specialist for help. As always when it comes to electricity, safety is key.
The light source should be as close to the plants as possible without burning them. You can check the proximity of the lamp by placing the back of your hand over the tops of the plants. If your hand is too hot, then the lamp should be raised higher.
Multi-level cultivation under fluorescent lamps
Discharge (metal halide and HPS) lamps must be connected to ballasts that match them in type and wattage (some ballasts can be connected to both types of lamps if the wattage is the same). We advise you to check this information with the lamp seller.
Creating a greenhouse effect
Not everyone does this procedure, but it is extremely important for seed germination. After sowing, it is not recommended to water the seeds so that they do not suffocate from excess moisture. But moisture is still necessary, so planting containers with sown seeds are covered with a special transparent coating. It could be:
- Polyethylene film.
- Glass.
How it works: cover the containers and put them in a warm and dark place. In such conditions, swollen seeds will germinate faster. To prevent your seeds from suffocating from lack of air, you need to slightly open the film or glass for an hour a couple of times a day. This way you give the seeds the opportunity to get the missing oxygen. The first shoots will appear in about a week.
What crops are grown through seedlings?
The method of growing a crop: from seeds or through seedlings is determined by its growing season (i.e., the period from sowing to fruiting), heat requirements and climatic characteristics of the region.
In the conditions of the middle zone, seedlings are grown:
- most crops with a long ripening period (tomatoes, peppers, eggplants, cucumbers, watermelons, melons, pumpkins);
- strawberries from seeds, if the variety does not produce whiskers;
- early cabbage;
- some biennial crops to produce a harvest or flowers in the same year (violets, some varieties of onions);
- some herbs;
- flowers with small seeds (violets, petunias, snapdragons, purslane).
Proper seed care
So, the sprouts have sprouted. Now the most important work begins, so as not to ruin them, but, on the contrary, to support and grow them. To do this, young shoots need the optimal amount of light, heat and humidity.
Light. The duration of daylight for active growth of seedlings is approximately 12-14 hours. If the weather is cloudy outside, the lack of light is compensated with special lamps. Why is this so important? If the young growth does not receive enough light, the seedlings will reach towards the sun and become tall, thin and fragile. Such seedlings will develop more slowly in a permanent place or will not develop at all.
Humidity. You should not water the plants at the roots; this will damage their root system, which has just begun to develop. The roots may suffocate or rot. Make sure that the soil is not too dry, and periodically moisten it with a spray bottle. Water should only be warm, room temperature. Do not use cold water under any circumstances, as this will cause stress to the plants. The roots will begin to rot and the shoots will die.
Warm. The optimal temperature when the container is still covered with film is from 22-28 degrees Celsius. After the film is removed, the container with the seedlings is removed to a well-lit place. Most often this is a window sill. From this moment on, the sprouts need more light and a little less heat for the normal process of photosynthesis. The optimal temperature is up to 23 degrees Celsius.
Feeding. At an early stage, you should not feed the plant: for now, the supply of nutrients from the soil and its own shell is sufficient. Moreover, young shoots simply will not be able to absorb minerals from fertilizers, due to the weakness of the root system. The first feeding is carried out during picking.
Lighting
Growing seedlings occurs during short daylight hours, when there is still not enough sunlight outside. Therefore, the plants have to be illuminated. If the seedlings develop normally, additional illumination of the seedlings is not required. If the plants are pale, stunted, thin, and stretch upward, you cannot do without additional light sources.
It is ideal to use phytolamps - they have the spectrum that plants need. In second place in terms of usefulness are fluorescent lamps. Regular incandescent light bulbs will not work because they get very hot. The lamps should be turned on in the morning and evening for one to two hours, placing them above the plants at a height of at least 12-25 cm.
Picking seedlings
When a pair of true leaves appear on the plants, they need to be released “to swim on their own.” Seedlings must develop on their own, otherwise they simply will not have enough space in the box.
Picking is transplanting plants into separate containers.
What does the procedure include:
- Pre-treatment of the container with boiling water or potassium permanganate. Sometimes the container is a cardboard juice box. Then there is no need to process it, otherwise it will spread. You can also use peat tablets or pots. They contain many nutrients.
- The plant is pulled out of the box along with a small lump of earth, trying not to damage the roots.
- Transplant into a separate container.
- Moisten with a spray bottle.
At this stage, you can feed the plant a little. But even using fertilizer, it is necessary to reduce the recommended dose by half, otherwise you may cause burns to the roots. The most optimal and suitable fertilizer is considered to be complex, containing equal parts of nitrogen, potassium and phosphorus.
Tall seedlings with a wide crown and a small lump of earth
After planting, such plants can be knocked down by wind or snow. Even if the weather is good today, it is easier and more reliable to secure them immediately. is NOT needed here . It should keep the plant in its new location for the first year. The ideal option is a piece of picket fence driven into the soil at an angle, wrapped at the point of contact with the trunk with a piece of fabric. You need to tie the trunk (also at the point of contact) with the same fabric. After this, the trunk must be STRONGLY tied to the support with twine, electrical tape or a strip of fabric. The barrel should NOT rub against the support - it should be tied!
This whole simple design meets two important requirements: 1 – constrictions do not form on the trunk (in a year the fabric, twine or electrical tape will age in the sun) 2 – the design is NOT aesthetically pleasing. You will delete it after a year. If the trunk of the seedling is evenly covered with branches, and it is inconvenient to lean the support, you can do otherwise. You need to drive three pegs around the perimeter of the crown and secure the trunk with guy ropes made of strong twine.
Hardening of seedlings
The final stage in growing seeds at home is the hardening procedure. A couple of weeks before planting in a permanent place, the young animals begin to be hardened by taking the containers out into the fresh air.
If seedlings are grown in an apartment, then they are taken out to the balcony. There should be fresh air, wind, but not through. If you live in a private house, take the seedlings outside. The initial time spent in the fresh air is 20-25 minutes. Every day the interval time should increase. By the end of the second week, the time period should be at least two hours.
Why is the hardening procedure necessary? In order for the seedlings to quickly adapt to external weather conditions and possible temperature changes. Without the hardening procedure, young seedlings will develop much more slowly in their permanent location.
Temperature
When growing seedlings, it is extremely important to maintain an optimal temperature. There are general rules to follow:
- Keep the sown seeds at a temperature of 20-25 °C.
- After germination, create coolness - this will stimulate root growth.
- After 3-4 days, raise the temperature to optimal values for the culture, and at night reduce it by several degrees.
With this regime, the seedlings will not stretch. It will be strong, stocky and will take root easily after transplantation.