What is a fern
Ferns or mosses are among the most ancient representatives of the plant world of planet Earth. They once grew as tall trees, but today they grow as low shrubs, about 1 meter high. Reproduction of ferns, such as ostrich, horsetail, and bracken, occurs with the help of spores that form on the back of the leaf blades.
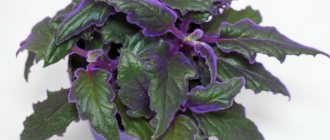
Indoor fern - decorative foliage plant
How do ferns reproduce in nature?
The development and reproduction of ferns in the wild takes a little longer than at home. The plant reproduces by spores or brood buds. Each season, plants of the Fern class form spores and go through sporophyte and gametophyte cycles.
Scheme and description of fern propagation naturally independently in nature:
- the formation of sporangia on fern leaves, within which spores form;
- after their complete formation, they are separated from the plates and spread in the water or around the area with the help of the wind;
- under good climatic conditions, a shoot grows from them, which, with the help of its rhizoid, is fixed in the ground;
- on the underside of this growth female and male reproductive cells appear, within which fertilization occurs;
- soon a zygote is born, which forms its root system and grows into the soil.
Note! Spores form only on spore leaves, and ferns also have sterile or asexual plates.
Kinds
Thousands of species of this perennial grow in nature. But only a few of them are used for home breeding:
- Nephrolepis (the so-called genus of fern) sublime is the most common species with vertically located roots and a large rosette of single-pinnate leaves. This plant significantly affects the level of humidity in the room.
- Nephrolepis boston. One of the varieties of sublime fern. It has long, concave, wavy leaves at the edges.
- Nephrolepis cordifolia. The leaves of this plant are light and directed upward. The rosette is dense, the feathers are superimposed on each other. Heart-leaved fern tolerates low air humidity well.
- Nephrolepis Green Lady. A beautifully growing plant that looks like a fountain of greenery. The leaves are openwork and slightly wavy along the edges.
- Davallia. Another name is hare's foot. A shrub with characteristic shaggy red roots.
- Platycerium. A plant with flat leaves that grow in different directions - like deer antlers.
- Kostenets is a plant with undivided leaves with wavy edges. Doesn't like to be touched.
- Blekhnum - fern looks like a palm tree, with a crown up to one meter in diameter.
- Polypodium. Another name is centipede. The plant has deeply dissected leaves, thin stems and aerial roots.
Basic ways to get a new plant at home
At home, ferns can be propagated in the garden in many ways. As a rule, they belong to the vegetative and spore method. Mosses propagate vegetatively by rooting lateral aerial shoots, planting brood buds and dividing the mother bush into several parts. The spore method involves collecting formed spores and sowing them in the ground.
Which method is the most effective
All methods are widely used by fern owners, so it is difficult to say exactly which one is more effective. If you choose a method with a higher survival rate, then it is spore sowing. However, it takes a long time.
The effectiveness of the method is determined by the type of fern, since each variety differs in its morphological structure.
Separation of the root system of an adult bush
How and when to divide a bush
One of the most effective and shortest vegetative methods of propagation of club mosses is the division of an adult bush. Before carrying out this procedure, it is necessary to water the bush generously with water at room temperature in order to easily pull it out of the ground without damaging the root system.
How to propagate indoor fern by dividing the bush:
- Dig holes 40-60 centimeters deep in advance. Their bottom is covered with drainage material, and the top is sprinkled with soil mixture.
- Pull the plant out of the old soil and divide it into several equal parts.
- Each of them is planted in a separate hole or pot.
Thorough root watering is carried out once a week and watered from above twice using a watering can.
Important! You cannot divide a young bush with one root rosette.
Spores on the underside of leaves
Watering
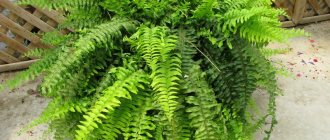
The curly fern (in the photo you can see how good this beauty is) needs to be watered in excess, avoiding dry periods. It should not be brought to such a state that the soil around the rhizome turns into a lump - it should always remain loose and moist.
During the period when the plant reduces activity, the amount of water must be reduced, but watering cannot be stopped completely.
You need to take soft water - melted or filtered, without lime and other impurities.
Overmoistening, in turn, can lead to damage to the roots, so the water from the pan must be drained.
How ferns reproduce by spores
This method is most effective in the spring after the soil has warmed up. Sowing in a pot is done in autumn or early spring.
How fern reproduces using spores at home:
- Moisten the soil with a spray bottle.
- Sprinkle spores on top.
- Sprinkle a 3-centimeter layer of soil on top.
- Cover the top with glass or plastic containers, since it is necessary to create a greenhouse effect.
- When sprouts appear, you will need to remove the cover every day for 2 hours.
How to root side shoots
Arrows in the form of tendrils appear on the leaf blades of garden ferns, which can be rooted in the ground. Next to the plant in which this green arrow has formed, you need to place a separate container with a nutrient substrate. It is important that this container is either the same height or slightly lower than the pot with the mother plant.
Two containers are placed side by side and a side shoot with a healthy and stable tendril is bent towards the ground. Lightly dig it in with soil. If necessary, secure with a pin or wire. After this, it is thoroughly moistened and both containers are left in a well-lit place.
Diseases and pests, combating them
Ferns are susceptible to diseases, like any other indoor flower. In order to prevent the occurrence of pathogenic bacteria and the invasion of parasites, it is worth following the care conditions and constantly monitoring the condition of the plant.
The following diseases are identified that most often affect ferns:
- Rotting of the root system - initially the problem is reflected in the foliage, it begins to turn yellow, then turns brown. To prevent the formation of a fungal disease, it is necessary to correctly add the amount of nutrient moisture and avoid overmoistening.
- Gray rot - on any section of the bush, as well as on the soil substrate, there is a pile of gray plaque. To save the bush, you need to put it in quarantine, away from other plants from the collection. Remove all damaged parts. If possible, disinfect the soil and spray the branches with anti-mold chemicals.
- Anthracnose - Brown streaks form at the ends of the leaf blades. All diseased leaves should be removed from the plant, and healthy ones should be treated with a fungicide. In this situation, it is recommended to reduce the application of nutrient moisture somewhat, and also remove spraying for a while.
- Spotting on leaf blades - brown spots of a weeping nature form on the foliage. To save your pet, you should completely remove all affected areas, also reduce watering to a minimum and spray with chemicals.
In addition to diseases, the plant is affected by pests. Such parasitic insects include whiteflies, scale insects, spider mites, nematodes, thrips, and aphids.
If the infestation of parasites is detected at the initial stages, then it is recommended to remove the pests by hand. If the pest population exceeds acceptable standards, then chemicals must be used.
Most often, all problems arise due to improper care and lack of control over the plant. Therefore, it is recommended to monitor not only the volume of watering, but also the dryness in the house, as well as the introduction of nutrients.
How to propagate fern using brood buds
Another vegetative way by which a fern can reproduce at home is by planting formed buds on the leaves in the ground. Fern-like plants have the ability to grow lateral shoots on the petioles of their leaf blades. You cannot plant an unformed bud; it must produce small roots.
Carefully separate one shoot at a time and place them in a box with substrate. Moisten the soil and place it in a warm and bright place. It is necessary to create a humid microclimate for the growth of buds, so at first they can be covered with film.
As soon as the seedlings have 2-3 leaves, you can remove the film and plant them in separate containers.
Important! You should not immediately transplant the seedlings into a huge pot. During the first years of growth, the fern will still have to be moved to larger containers each spring.
Air humidity
House curly fern loves high humidity. In optimal temperature conditions, the plant will grow well even with reduced air humidity in the room, which is typical for residential premises during the heating season. If temperatures are higher than normal or approaching a dangerous limit, your green pet needs to be sprayed more often - ideally every day. To do this, use soft melted or filtered water.
When it gets too hot and the room temperature goes through the roof, the fern needs to find a new place, where it will be covered in deep shade.
To maintain optimal humidity, the pot is often placed in a wide tray, which is covered along the edges with drainage (expanded clay) or rolled with moss. This filler, sprinkled with water, takes a long time to evaporate the moisture the plant needs.
Cool temperatures and high humidity can cause the fern to become susceptible to fungus, so this is a bad combination of factors to avoid.
Features of caring for sprouted ferns
Subsequent care of the fern after reproduction consists of the following activities:
- Air humidity. Small seedlings after transplantation are especially sensitive to humidity. It is necessary to try to maintain it at high levels, especially in winter with additional heating of the room. Every day you need to spray the bushes with a spray bottle, and if the air is particularly dry, the procedure can be repeated several times a day.
- Regular watering on schedule. You cannot violate the regime and ignore this procedure, but there is no need to overwater the plants. Young seedlings are especially susceptible to root rot due to stagnation of water in the soil. When planting, it is recommended to first cover the drainage at the bottom of the pot and only then fill in the substrate. Also, do not forget to drain excess liquid from the pan.
- Feeding. It is better to apply fertilizers in liquid form, dissolving the preparations in plain water and in low concentration. The procedure is carried out once every two weeks. It is necessary to use complex mineral preparations for fern-like shrubs. During this period, all minerals are necessary for the normal development of the plant, especially nitrogen, which helps to build up green mass.
- Lighting should be long, but slightly diffused, so as not to burn the delicate leaves. You need to place the box with seedlings on the south window in winter and move it to the east or west side with the arrival of warm, clear days.
- Temperature conditions. The most optimal indicators during this period are considered to be 22-25 ℃.
House ferns easily take root after propagation at home
Indoor ferns are decorative deciduous evergreen shrubs that have a pleasant appearance and can refresh any dull interior. It is placed in offices and other rooms to add coziness. Propagating ferns is an easy and effective process that can be done in many ways. The main thing is then to provide the seedlings with attentive and proper care so as not to completely lose all the planting material planted.
Source
Temperature
In order for the plant to remain healthy, grow well and have an attractive appearance, you need to know how to care for a curly fern. This is a tropical plant, but it also does well in moderate temperatures. The optimal mode is 20 ⁰C all year round. The maximum permissible values are 28 ⁰С. Minimum – not lower than 14 ⁰С. Exceeding this temperature range can lead to complications. If the air in the room is hotter than necessary, the fern needs to be sprayed more often. The plant does not tolerate being near heat sources - central heating radiators and stoves.
What is a fern
Along with the usual rhizome organ for plants, ferns (Polypophyta), instead of stems, leaves, peduncles with seed pods, have developed a leaf-like shoot, scientifically called frond. Spores are formed on the fronds, with the help of which one of the methods of reproduction and development of ferns occurs.
Fern imprint on stone
Currently, about 10 thousand species of perennial ferns have been identified on Earth. In the temperate climate of Russia, they grow in moist, shady forests and are grown as a garden crop. The most common European species of Polypodiophyta include ostrich, bracken, and shieldweed. Bracken fern is harvested in early spring, soaked, dried and used as a food product.
How do ferns reproduce in nature?
The propagation of ferns has become the subject of study not only by botanists and plant growers; spore, vegetative, and asexual methods of propagation of ferns with diagrams and descriptions are taught to students in grades 5-6 in high school.
Spore reproduction of Polypodióphyta is divided into two cycles. They involve two genetically identical species of the same plant. At the first stage, fronds grow from the rhizomes, sporangia are formed on the lower surface of the shoots, and spores are formed in them. Clumps of sporangia with spores are collected in sacs (soruses). They are clearly visible on the lower sides of the fronds. Spores from them spill out onto the ground after ripening.
Sori with mature sporangia on the reverse side of an ostrich frond
At the second stage, a small, thin plant plate - a prothallus - is formed from spores on the surface of the earth. It contains sperm and eggs separated from each other by plant fibers. They can unite into a single cell only under the external influence of water.
During the rains, mature male cells swim to the eggs and form zygotes. The strongest of them forms an embryo. The embryo draws strength from the growth, which gradually dies. The embryo forms the root system and gives life to a new plant.
Note! The rhizome of Polypodiophyta is the underground part of the stem in which plants accumulate nutrients.
In some species of ferns, spores are not formed on all fronds. In the Ostrich feather fern, spores are formed in sporangia located on special fronds collected in the center of the plant. They differ in size, fabric thickness, and are collected in a bundle. Some people mistake these branches for flower stalks.
Ostrich with central fronds
How fern propagates at home
Indoor propagation and cultivation of Polypodióphyta is possible in several ways - by spores, planting shoots and vegetative methods:
- division of rhizomes;
- rooting of shoots;
- separation and rooting of brood buds.
The most common methods of propagation are spores and the separation of rhizomes and root shoots. In open ground conditions, for the propagation of fern-like crops, they mainly use the division of bushes during transplantation to a new growing location.
The structure of the root system and surface shoots of Polypodiophyta
How to propagate a fern by dividing a bush
The division of root shoots and rhizomes of plants in the garden is carried out in spring or early autumn. Indoor overgrown ferns can be propagated throughout the warm period by combining replanting with dividing the bush.
In the garden, the area for new cuttings is pre-prepared. For ferns, the best place to grow is in an area of the garden where the plants can be in partial shade.
Important! Bright sun and dense shade are not suitable for fern crops.
The soil for plants should be loose, fertile, and well-permeable to moisture. A special soil mixture can be purchased at a garden store or made independently from leaf soil, sand and peat (ratio 2:1:1). For indoor Polypodióphyta, a drainage layer is poured onto the bottom of the pots. The soil is moistened before transplanting plants.
The soil in the pot with the plant that is going to be planted is moistened 2 days before replanting. The procedure begins by turning the container with the fern on its side and starting to roll it on a flat surface, thus separating the earthen lump from the walls of the pot.
Holding the plant with one hand, turn the pot upside down, using rotational movements to pull out the bush along with the lump of earth. Inspect the condition of the roots and rosettes. The bush is divided in such a way that each division contains 2-3 rosettes with well-developed roots and growth buds.
Illumination
Caring for a curly fern involves choosing the right place for it. If you look at how the plant grows in its natural habitat, you can see that it avoids direct rays of the sun and loves soft, diffused light, shaded by tree crowns. For him, partial shade and even deep shade are much better than direct light.
When choosing a location, you need to take this factor into account. The fern will feel good on the north side of the house or in the back of the room, away from the windows.
If the fern suffers from excess light, it will begin to grow more slowly, its leaves will turn pale, become drier and more curled.
How to propagate indoor fern by spores
Many gardeners treat Polypodióphyta spores as the seeds of ordinary indoor and garden flowers. Spores in different types of ferns mature at different times. A sign that the spores can be used as planting material is a change in the color of the sporangia to brown or brown.
The sporangia along with the spores are cut from the fronds and placed in a paper bag. You can start sowing after the spores have completely dried.
Attention! They will begin to fall out to the bottom of the bag as a brown powder, so the bag must be handled carefully to avoid spilling the seed material.
For planting, prepare shallow planting boxes and pots with drainage holes or a layer of expanded clay and small pieces of polystyrene foam. A soil mixture with the addition of coarse river sand, leaf soil, and peat is placed in the boxes. The spores can also germinate well in violet soil.
The soil is well moistened several days before planting. Before planting, the soil is compacted, the spores are placed on the surface of the soil, and they are not sprinkled with anything. Transparent caps made of plastic bags are put on the planting containers or covered with pieces of glass, that is, mini-greenhouse conditions are created. Periodically, the soil must be moistened and the boxes ventilated.
Important! The soil in the container with the sown spores must be constantly moistened, otherwise the process of fertilization of the eggs will not occur.
The process of spore germination is very long. The first stage of spore development is the appearance of moss-like growths. The root system will begin to form in a few weeks from the formed embryo, and until then the shoots receive moisture and nutrition through rhizoids - hairs formed on them after spore germination.
Rhizoids in the lower part of the shoots
Soil selection
For normal growth, indoor curly fern needs a light soil mixture rich in nutrients. To do this, you need to mix three components in equal parts - peat, greenhouse soil (or coniferous soil), and sand.
You can purchase a ready-made substrate for ferns. It is used both in its original form and enriched with peat and sand. Drainage must be placed at the bottom of the container - expanded clay or small pieces of coniferous tree bark (mainly pine).
The rapid propagation process of ferns
Ferns can be quickly propagated by separating brood buds and side shoots.
Side shoots are thin tendrils that the fern forms along with the fronds. Their purpose is to provide the main plant with nutrients. The plant is capable of reproducing with its mustache on its own. When they come into contact with moist soil, the shoots grow into it and take root. The shoots take root within a month. They are separated from the mother bush and planted in specially prepared pots.
Brood buds are formed in some species of Polypodiophyta in the axils of leaf petioles. Under natural conditions, they fall off and take root in moist soil. At home, fronds with brood buds are bent to the ground, pinned with a V-shaped fastener, and sprinkled with moist soil. The buds send out shoots. When 3 young leaves are formed on the shoots, they are planted in individual containers.
Brood buds in the axils of the petioles