There are several ways to propagate plants - using seeds or vegetatively. Seed propagation has a number of advantages. But in order to preserve all the characteristics of the original plant, vegetative propagation is mainly used. Methods of vegetative propagation include leaf and stem cuttings, grafting, layering, propagation methods using cell culture, etc. Some plants at home are difficult to take cuttings or there is no way to get cuttings, others cannot be propagated at all by vegetative methods, then you have to resort to seed propagation. But the most common way to propagate plants at home is cuttings.
Rooting cuttings
There is a small group of plants that can produce a new plant from part of a leaf, such as Sansevieria. Others require at least part of the petiole in addition to leaf plastic to recreate a new plant. These are begonia rex, zamioculcas, uzambar violet, aloe, kalanchoe, crassula, etc.
Other plants are able to recreate themselves only from a part of the stem that bears one or more buds. In this way, you can propagate ficus, hibiscus, abutilons, citrus fruits, myrtles, and many other plants. For many years I have been successfully making cuttings of various trees, shrubs and vines, which I grow as indoor plants. I want to share my practical experience.
Cutting time, cutting selection
The best time for cuttings for the vast majority of plants is spring-autumn, the period of active growing season. However, cuttings are also possible at other times - plants, although with great difficulty, take cuttings. When, with the onset of autumn cold weather, you have to bring plants from the balcony into the room, there is absolutely not enough space on the window sills, and you have to heavily trim the plants that have grown over the summer. It’s a pity to throw away cut branches, so you have to put them for rooting.
The cutting must be taken from a healthy, stable plant. You cannot take cuttings from a plant that has suffered stress. Cuttings taken from recently purchased imported plants root poorly. The fact is that these plants, in order to quickly achieve a spectacular presentation, are stimulated with special substances to flower, fruit and grow, which inhibits their root formation process. From experience, only after a year does the plant begin to take cuttings with normal yield.
Cuttings should be semi-lignified, when the bark at the apical part of the cutting is still green, and at the cutting level has recently become lignified. It is better to take them from this year's fresh growth. Cuttings from plants that are overfed, especially with nitrogen, take root poorly—they often simply rot.
Most plants have waves of growth: first, young shoots grow actively, then they seem to freeze, then they begin to grow again. It is at the fading stage that it is advisable to take cuttings. For citrus fruits, it is recommended to take shoots for rooting that have already acquired a rounded shape from the ribbed ones. In many flowering plants, the shoot reaches the required stage for cuttings immediately after flowering (bougainvillea, plumbago, clerodendrum).
Usually the cutting contains 3-5 buds for large-leaved plants such as hibiscus, abutilon, ficus. For small-leaved plants, such as myrtle, the number of buds is greater, the cutting length is approximately 6-10 cm. The cuttings can be either apical, i.e. cut from the top of the shoot, and intermediate ones. So, a branch of bougainvillea or passionflower can be cut into pieces of 3-4 buds and get 5-10 cuttings at a time.
Care after propagation of indoor plants (with photo)
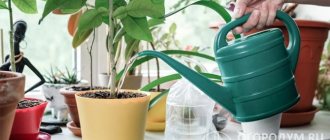
If you listen to the following tips for caring for indoor plants after propagation, the seedlings will thank you with good flowering.
- Place seedlings and cuttings in the brightest and warmest places, but under no circumstances in the sun.
- By removing the tips of the shoots, ensure their branching. This is important for plants such as Acalipha, Catharanthus roseus, crossandra, ixora, jasmine and pentas.
- Do not apply fertilizers for the first few weeks; the nutrients present in the substrate are sufficient. Only annual fast-growing plants, such as cineraria (Senecio cruentus) and exacum (Exacum affine), can be fed for the first time after 4 weeks.
How to care for indoor plants after propagation is shown in these photos:
The time when a homemade plant first blooms depends on the species, variety and existing conditions. In general, the shorter a plant's lifespan, the faster it matures to flower.
Plants propagated by seed typically flower 8-12 weeks after sowing if they are annuals. In perennial species, weeks and even months pass before the emergence of shoots, as in Ardisia (Ardisia crenata) , Stephanotis (Stephanotis flonbunda) , and sometimes years until the plant grows and is able to bloom.
Divided plants most often bloom at the next flowering period of their species. If the plants begin to bloom poorly, then division can serve as a strong impetus for flowering. . Plants propagated from cuttings often bloom the following year if they are large enough and well cared for. Plants made from leaf parts behave in the same way.
Cacti propagated by seeds sometimes bloom after 2-3 years. Bulb crops must first form large enough bulbs before they bloom. Hippeastrum , for example, blooms in 1-3 years.
Bromeliads require different amounts of time before their first flowering, depending on the species and variety. The offspring must first grow to adult size. This can last from 1 to 3 years. It's the same with orchids.
Soil and container for cuttings
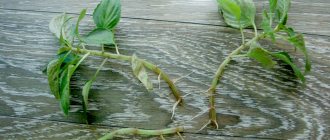
Many plants grow roots well in water; you just need to put an activated carbon tablet in the water so that the water does not spoil. It is advisable that the container with water is not transparent (dark glass, opaque plastic). It is necessary to monitor the purity of the water and change it if necessary. This is how you can achieve root growth in monstera, syngonium, scindapsus, and epipremnum.
Other plants (ficus, myrtle, hibiscus) can also take root in water, but when cuttings are planted in the ground, the roots are replaced with new ones and the plants take a long time to get used to the new conditions. In addition, the rooting process in the ground is faster and less painless. Therefore, I prefer to root cuttings in an earthen substrate. Successfully, with almost 90% yield, not only ficus, hibiscus, but also myrtles, eugenias, metrosideros, callistemons, olives, plumbago, pomegranates and many others take root in it.
The soil must be taken depleted in organic matter - it is of no use, excess organic matter will only cause decay. My substrate consists of 50% peat and 50% sand with the addition of crushed sphagnum. Sphagnum is added to lighten the soil, to increase moisture capacity and bind the substrate, so that when transplanting a rooted cutting to a permanent place, the lump of earth does not collapse. It is important that the substrate is sterilized. At home, you can steam the mixture in the microwave. I steam it in a large saucepan, put sifted and washed sand on the bottom in a layer of several centimeters, put peat on it, and, if necessary, other substrate ingredients on top, steam a 10-liter saucepan on the stove for 40 minutes. Sterilization kills all pathogenic micro- and macroorganisms and kills weeds.
However, it is possible to disinfect the sustratum without steaming, using microbiological agents Siyanie or Vostok-EM1, using the technology for preparing the substrate for growing seedlings, described in the instructions for the preparations. This requires a time reserve of more than 2 weeks, during which microorganisms multiply and suppress the pathogenic microflora present in the soil.
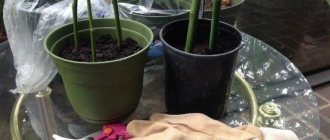
After this, I mix sand, peat, add sphagnum, put it in transparent disposable cups, and first cut off part of the bottom and walls with scissors to obtain drainage holes. Transparent dishes allow you to monitor the process of root formation - the roots are clearly visible, there is no need to disturb the plant. I take 200 ml cups for large-leaved cuttings and 100 ml for small-leaved ones. After the finished substrate is laid out in cups, I lightly soak it. Do not allow the substrate to become too wet.
Begonia
Begonia will decorate any windowsill with lush bushes with bright buds. Suitable soil for it is leaf soil, high turf, peat and sand with a pH of 5.5 to 6.5. Watering is carried out when the soil dries to a depth of 1.5 cm.
The flower is fed with complex additives after budding.
Begonia can be propagated by cuttings and leaves. In the first case, the upper part of the stem is cut off and kept in water until roots appear. In the second situation, the leaf is placed in moist soil. After 8 weeks, young shoots appear and are planted.
Preparation of cuttings
For a cut branch, you must immediately make an oblique cut under the lower bud and remove the leaf. If there is milky juice (from ficuses), be sure to hold it under running water until the juice is released. Dip the lower part of the cutting into Kornevin and immerse vertically in a glass with substrate up to the next leaf so that the second bud from the bottom is at the level of the substrate. We must try to ensure that the stalk sits tightly in the soil and does not dangle; to do this, I do not cut off the second leaf from the bottom, but slightly deepen its petiole into the substrate. The cutting must have at least one or two more buds, from which the future plant will develop. Rubber-bearing ficus, for example, can be propagated by a piece of stem with only one bud, but such a cutting will have less chance of producing a new plant than a longer one. In small-leaved cuttings, the number of buds inside the substrate and on top will be greater. Sometimes it is recommended to wound the stem of the cutting (in citrus fruits, hibiscus). This is done with a clean needle - the bark of that part of the cutting that will go underground is slightly scratched.
Usambara violet
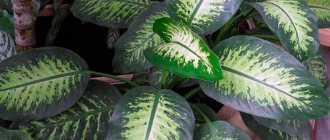
Saintpaulias (Usambara violets) are one of the most common indoor plants, loved by gardeners for their fast growth, unpretentiousness and incredible abundance of varieties, differing colors and the shape of pubescent leaves collected in a dense rosette, as well as the size, shape and color of the flowers.
Usambara violets are easy to propagate by leaf cuttings, part of a leaf and daughter rosettes. Moreover, you can do this in your apartment all year round.
The most common way is to propagate violets using leaf cuttings. Using a disinfected tool, cut off a well-formed leaf with a petiole of at least 2-3 cm from an adult healthy plant and place it in an opaque container with water so that the edge of the leaf blade is not flooded. You can add any root formation stimulator to the water.
Keep the container until roots form in a bright place, but protected from direct sunlight, and after new roots grow (usually this takes 2-3 weeks), plant the seedling in loose, moist soil and cover it for the first time with a plastic bag, which acts as a greenhouse.
- The two easiest ways to propagate violets from leaf cuttings
Of all the indoor plants, the violet is perhaps the easiest to propagate. Our master class will help a beginning Saintpaulist understand the nuances of this process.
Greenhouses and lighting
After planting, you need to spray the cuttings with water and Zircon and put them in a greenhouse. The greenhouse is a container covered with plastic film, into which cuttings are included with a margin of height. The greenhouse can be made from an old glass aquarium, maybe not completely airtight, a deep plastic basin or container. A mini-greenhouse can be built from a 5-liter or 1.5-liter water bottle, cutting it crosswise.
Rooting cuttings
The cuttings must be kept in conditions of high humidity until they form their own roots, which will take over the process of supplying the plant with water. But in addition to 100% humidity, cuttings need light to root. It is not recommended to place cuttings in the sun, since overheating inside the greenhouse is possible, so additional lighting is provided. Special phytolamps, especially LED ones, are best suited for illumination, but it is quite sufficient to use cheaper, albeit less economical, fluorescent lamps. By the way, among them there are energy-saving phytolamps, which, however, produce pink light that is not very pleasant to the eyes.
Rooting cuttings
Daylight hours should optimally last 12 hours. Observance of day and night is mandatory. The optimal temperature for rooting is +25 degrees; at lower temperatures, root formation is reluctant. For many plants (for example, bougainvillea), bottom heating is desirable when the substrate temperature is higher than the air temperature. On my shelving, this is achieved by heating from a fluorescent lamp, which illuminates the shelf below.
I expect the first results of rooting in 2 weeks for myrtle, melaleuca, callistemon, rosemary, abutilon, fig, ficus. After a month - for hibiscus, bougainvillea, metrosideros, eugenias, psidiums, citrus fruits, olives. I carefully take out the cups - the formed roots are clearly visible through the transparent walls of the cups.
Epipremnum aureus
A climbing plant will decorate a window opening or the top shelves of open cabinets. The dark green leaves are strewn with yellow-white spots, which gives the plant an original appearance. Epipremnum should be placed at a distance of 1.5-2 m from the window, since heat and abundance of light can negatively affect the shoots.
Watering once every 5 days will ensure the active development of greenery.
In winter, the soil is not moistened as often. Once every 3 weeks from April to October, it is recommended to apply fertilizers - complex liquid components for indoor flowers. The crop is propagated in spring or summer using apical cuttings with 2-3 leaves.
How to adapt rooted cuttings to indoor conditions
Cuttings take root in a greenhouse at a humidity close to 100%. When they are abruptly transferred indoors after the formation of roots, partial wilting of the leaves is observed. To avoid this and give the cuttings the opportunity to acclimatize to environmental conditions, it is enough to spray some plants several times a day, others have to be placed in loosely closed greenhouses for several days, ventilated frequently, gradually accustoming them to dry air.
2 weeks after transplanting into pots, rooted cuttings can begin to be fed to support the active growth of young plants.
Photo by the author
ROOT FORMATION STIMULANTS
Some gardeners, before planting cuttings, soak them in a solution of heteroauxin or other root formation stimulant. Such substances promote plant regeneration, stimulate root formation in cuttings, accelerate root formation in seedlings and adult plants, and enhance the growth of adventitious roots. There are different medications. The cuttings are either soaked in a solution, or sprinkled with powder, or watered under the root strictly according to the instructions.
These root formation stimulators make it possible to obtain new specimens from cuttings of even the most difficult plants to propagate.
WHAT SHOULD BE DONE
Before you begin harvesting cuttings and rooting them, it is important to decide on the following issues:
- Find out what kind of plant it is, whether it can be propagated by cuttings and read tips on how to do this specifically for this species.
- Select and cut the cuttings correctly.
- Prepare dishes for rooting and soil suitable for this plant.
- Treat with a root growth stimulator, if necessary.
- Plant the cuttings and care for them properly.
Some indoor plants take root easily and quickly. There are no problems with rooting balsam, zonal pelargonium, tradescantia, coleus . Large-flowered pelargoniums are more capricious. Ficuses and begonias are almost always successfully propagated by cuttings . Azaleas and gardenias are difficult to root. If you don’t have any experience, then it’s better to practice on the most unpretentious and easily rooted house flowers.
Aloe
Aloe vera (real aloe) is the most popular indoor plant among our grandmothers, known not only for its decorative qualities, but also for its healing properties.
Propagating this succulent yourself is easy. During the process of growth, an adult aloe bush necessarily produces children - root shoots, which look like miniature bushes at the base of the mother plant. The babies need to be carefully separated from the “mother” and planted in a separate pot.
Moreover, you can simply use a sharp knife to separate the fleshy leaf at the base of the mother aloe plant, dry it thoroughly in a dark, cool place and, sprinkle the cut with crushed coal, plant it directly in a moist substrate. The main thing is not to forget to water such a leaf abundantly for its speedy rooting. The same can be done with the cut off tops of aloe - but before planting, they must first be placed in water with a root stimulator until roots form.