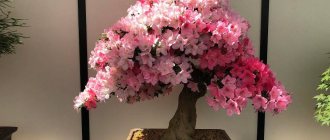
China and Japan, as carriers of culture, are increasingly spreading their influence on the everyday life of the common man. And today, one of their traditional elements is the ancient art of bonsai. It has spread throughout the world due to its ability to unobtrusively and elegantly decorate every home.
Today, bonsai can be found by looking into a tea shop or in an apartment furnished with taste. Despite the popularity of the trend, the rules for caring for a miniature garden play a key role here, on which the well-being of the plant and its appearance depend. Therefore, many people wonder how to grow bonsai and care for it correctly.
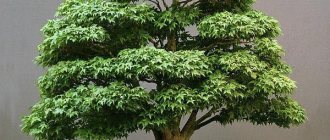
What is bonsai
Pun sai or bonsai is a tree with a thickened trunk, a properly formed crown, and a height of 20 cm to 2 m. Growth is hampered by a lack of minerals, regular pruning of branches, young shoots, and roots.
Bonsai sizes may vary:
- large – 60-120 cm;
- average – 30-60 cm;
- small – 15-30 cm;
- miniature, “nail size” or “baby” – 5-15 cm.
Indoor bonsai
Home care
Zanthoxylum is a heat-loving flower, but does not tolerate direct sunlight. The most comfortable place will be a southwestern or eastern window - in the morning and evening the sun does not have such scorching power.
In summer, with good ventilation and airing, zanthoxylum grows well on balconies and loggias in the presence of shading from the midday sun. Direct sunlight can leave burns on the leaves and bark of the tree. Temperature range in summer is from +20 to +28 °C.
In winter, the plant will appreciate the sunny side of the room. At this time, growth slows down slightly, the temperature optimum decreases to +16-+18 °C.
The tropical plant is moisture-loving, but you need to pay attention to the importance of the soil. With excessive watering, the roots rot and are easily attacked by pests.
The crown also needs periodic warm showers.
Pruning is carried out regularly to correct and rejuvenate the plant. The optimal period is the end of winter before the start of active growth.
After purchasing an adult zanthoxylum (or even better, before it when choosing a specimen), carefully inspect the crown for the presence of dry or diseased branches and leaves. In the first days after purchase, yellowwood is watered moderately and placed on shaded window sills or cabinets. On average, adaptation to new conditions takes place within a week or two.
Bonsai styles
Before you start creating, study the common types of bonsai:
- Tekkan or Chokkan is a symmetrical tree with a straight, powerful trunk. The center is decorated with three main branches, there are none below, large roots peek out from the ground. The style is applicable to any trees.
- Syakan, Mayogi - a slightly tilted tree.
- Kengai, Fukinagashi - a tree strongly inclined to the side. It grows in a deeper pot, the branches are located in one part of the trunk, directed in one direction.
- Khan-kengai - at first the trunk grows straight, then it bends to the side, the branches can bend over the edge of the pot.
- Ishizuki - translated as growing on a rock. The pot is filled with large stones, which subsequently entwine the roots.
- Kabudati is a forked trunk. The two main branches differ in thickness.
- Yose-ue, Hokidachi - several plants can be used, many trunks, the shape resembles a fan.
- Sokan - two identical trunks grow from one root.
- Sankan - three trunks from one root.
- Yose-Yu is a mini-forest. Several different trees are used.
- Ikadabuki – translated as “raft” or “multiple-trunked tree”. The trunk can be knocked down to the ground, the branches pointing upward.
- Sharimiki - there is dead bark. When growing on the trunk, certain areas are cut off and bleached.
- Bankan is a twisted trunk.
- Neagari - roots protrude from the ground. The best products come from tropical plants with aerial roots.
Bonsai in a pot
Remember that the selection of container depends on the style of bonsai. Cascading and sloping trees require heavy, stable pots to support the weight of the sloping crown. If you are just starting to practice the art, choose the Tekkan or Chokkan style.
Selecting a light source
A constant source of light, even artificial, is suitable for the normal development of the plant and will serve as an alternative substitute for those who, for one reason or another, do not have the opportunity to organize full-fledged conditions close to natural.
It does not matter what kind of lighting - the main thing is that it is present
Anyone who doesn’t know what bonsai is has probably heard that this plant feels best on a west window on the right side or an east window on the left. This way the tree will set a course for more intensive growth and gain strength.
To ensure optimal access to natural light, it is necessary to monitor the window, regulating the entry of rays using curtains, moving them aside or lowering them in time.
Important! Due to differences in the length of daylight hours in its homeland (subtropical and tropical zones), the plant may experience a deficiency in lighting. This may affect the condition of the tree
What plants are suitable for growing bonsai?
Choose trees and shrubs that eventually develop a lignified trunk and powerful branches. Give preference to crops that suit your climatic conditions. Avoid choosing plants with large flowers, large fruits and leaves. Suitable options for indoor bonsai:
- dwarf bamboo – originally from China, heat-loving;
- cypress - a subtropical species, it is possible to grow bonsai on a balcony or terrace;
- rosemary - unpretentious;
- olive – can bear fruit;
- Buckthorn is a poisonous berry, so it is not advisable to plant it if you have pets or small children;
- boxwood - unpretentious;
- Chinese elm is resilient and does not require complex care;
- common ficus – ideal for home and office, unpretentious;
- myrtle is evergreen, has a pleasant smell, blooms, and releases bactericidal essential oils.
Olive bonsai
At home, grow non-deciduous crops that can grow year-round. It is better for beginners to practice on ficus benjamina, portulacaria africanica. More options for creating compositions:
| Conifers | Deciduous | Blooming |
|
|
|
Reproduction methods
Many gardeners try to propagate yucca in order to get as many copies of the plant as possible. After all, it not only decorates the house, but is also suitable as an original gift. The tree is propagated using different methods: cuttings, seeds, suckers, and topping. It is worth considering some methods step by step.
With the help of offspring
Almost throughout the summer, you can see that the yucca is covered with a large number of roots, which many novice gardeners try to get rid of. However, you should not be too hasty in removing them; with the help of such offspring you can propagate the plant. To do this you need to do the following:
- cut off the largest shoots with a sharp knife;
- place them in slightly moistened sand;
- Cover the top with a glass container;
- After about two months, sprouts should appear and can be transplanted into prepared pots.
It is best to carry out this procedure in the fall.
Cuttings
This is one of the simplest and most practical ways to propagate yucca. If the false palm tree has stretched out a little, then it must be very carefully cut to the desired height. After that, follow the simple recommendations.
- The stem must be divided into several parts at once. The upper part of the cut should be lubricated with garden varnish, and the lower part should be dried for several hours.
- Then the cuttings must be immersed in soil prepared in advance, which should include the following components: sand, earth and expanded clay. The substrate must be slightly moistened and covered with glass or thick film, after which the container must be placed in a warmer place.
- Don't forget to ventilate the greenhouse. This must be done every day.
- If necessary, you can water with clean water at room temperature.
- When the first leaves appear, the glass is removed. Afterwards, future plants are transplanted to a permanent place.
Seeds
Yucca practically does not bloom at home, so the seeds will be very difficult to get. But if you still manage to do this, then you can try to grow a new tree this way. Of course, this process is quite long and labor-intensive.
- Before planting, the seeds must be soaked in warm water for 24 hours.
- After this, they must be laid out on the surface of the moistened soil, without immersing them too deeply. By the way, it must also be chosen correctly. The optimal substrate is a mixture of wood soil and sand.
- In order for sprouts to appear as quickly as possible, it is necessary to create a greenhouse effect. To do this, cover the container with glass and then place it in a fairly warm place.
- After a certain period of time, when the first shoots hatch, small yuccas are planted in separate pots.
Top
If the plant stretches upward and no lateral shoots appear, it is worth cutting off the top. As a result of this, you can get another yucca and the long-awaited shoots from the main trunk may finally appear.
In the first case, when young roots appear, the plant will immediately need to be transplanted into a separate container. If the leaves begin to rot, the damaged areas must be removed.
Trunk sections
Yucca is characterized by having many “dormant” buds. They are evenly distributed throughout the entire trunk of the plant. A single bud can sprout stems if certain conditions are created for this. Usually, yucca spends all its nutrients on creating leaves. Therefore, the buds will begin to develop more actively if you cut off the top
After this, you need to separate several sections of the trunk, the length of which should be up to 18 centimeters. They should be planted in previously prepared soil, then covered with glass or film, creating a “greenhouse”, and wait for the sprouts to appear. This should be done in the spring. After the first leaves appear, the segments can be planted in small containers.
How to grow bonsai yourself
Decide in advance on the method of growing indoor bonsai - from seeds or cuttings. Seeds can be purchased or taken after they are fully ripe from a suitable plant in a park, forest or garden. Planting takes place from spring to early autumn:
- In the fall, sow hard-shelled seeds in a flat container with damp sand and place the container outside throughout the winter. The top layer of seeds will crack due to frost, and shoots will appear in the spring. When sprouts appear, water them. Sow soft-shelled seeds in a box and keep them at a temperature of about 0 degrees.
- In June, cut branches 5-7 cm long, place them in a substrate, water them, cover the pot with a glass jar or film, and place them in a warm place with diffused light. When young shoots appear, remove the jar or film. Please note that coniferous cuttings develop roots within a few months or a year.
Bonsai care
Create an indoor bonsai using:
- concave cutters - for cutting wire, branches for the trunk;
- convex pliers - they safely cut convex elements on the trunk, branches, roots;
- special nippers or scissors for removing roots - they have a curved head;
- tweezers with a curved tip - for removing buds, foliage, pine needles.
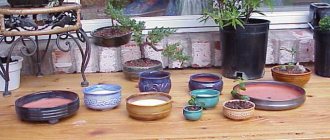
Choosing a pot
Root the plant in a large, deep pot. This way the trunk will actively develop. Form the bonsai tree for about 2 years, then move it to a permanent container. The container should be of a simple, laconic shape, harmoniously combined with the composition. Buy a container for the seedling based on the chosen style of your indoor bonsai:
- inclined trees - heavy, stable pots made of clay, ceramics;
- dense, branched crown, several trunks - wide, shallow containers;
- open horses - tall, narrow containers;
- cascade style - narrow shallow pots.
How to choose a bonsai pot size
Basic rules for choosing a pot:
- The height of the walls should not be less than the diameter of the trunk.
- The width is equal to 2/3 of the length of the indoor plant.
- There must be drainage holes.
Soil preparation
Choose ready-made mixtures very carefully. Do not buy peat compounds with garden fertilizers. It is better to purchase a minimally nutritious, permeable substrate processed by California worms. Use scanty soil that prevents the active growth of indoor bonsai:
- For coniferous trees, take 6 parts clay and 4 parts sand.
- For deciduous soil, a mixture of 7 parts clay soil and 3 parts sand soil is suitable.
- For flowering plants - 6 parts clay soil, 1 part leaf humus.
Preparing the soil for growing bonsai
Prepare the soil in April, after the ground has thawed. Universal mixture: 1/3 part clay, ½ part peat or rotted leaves, ¼ part sand and vermiculite, small stones. Before use, rinse the sand thoroughly, calcine the soil for about an hour in the oven at a temperature of 100-120 degrees or boil for half an hour in a sieve and water.
First transplant
Rooting is carried out in a shaded place:
- Trim vertically growing roots. With this formation, the growth of the tree slows down.
- Plant the bonsai in the substrate, compact it, water it.
- Arrange a quarantine for the plant: choose a slightly shaded place for the pot, isolated from other plants.
Bonsai transplant
How to choose soil and pot for a bonsai tree
It is advisable to plant home bonsai in a shallow and small container so that it does not grow to enormous sizes. At the same time, it is necessary to form and trim some of the roots.
The bonsai pot is chosen very carefully. It is taken into account that from year to year the plant will become heavier and may become unstable, especially if it has a cascading, inclined or irregular shape. Consequently, for the “green friend”, which ranges in size from a few centimeters to a meter, ceramic bowls, containers or pots are made, usually massive, of different shapes and styles. Their bottom should have several drainage holes used to release excess moisture and to secure the future tree.
Scalding with boiling water or a hot solution of potassium permanganate is very suitable for treating the pot. This will protect your Japanese bonsai from root fungus.
The soil helps the tree retain moisture and provides nutrition, and also thanks to the soil, the roots of the plant are anchored in a small pot. Therefore, in order to grow miniature copies of maples, oaks, lemons, lindens, etc., they resort to using a special substrate. This mixture, which is based on certain types of clay, is called akadama in Japan.
The granular substance is “flavored” with sand and fertile soil for good looseness and nutritional value:
- To grow flowering crops, take three parts of sand, seven parts of soil with turf and part of highly nutritious humus, which are mixed together;
- Deciduous bonsai trees grow well thanks to a substrate with three parts of washed coarse sand and seven parts of turf soil;
- Conifers love loose soil, consisting of two parts washed sand and three parts turf soil.
Before planting a bonsai, the soil must be sorted out and all excess that can damage the root system must be removed. The substrate is also sterilized and sifted, and drainage is made at the bottom of the container.
How to care for an adult plant
Each plant variety has individual preferences for climate, lighting, temperature, air humidity, and watering. Before you acquire a particular crop, read the recommendations for keeping it at home.
Climatic conditions
Basic rules for growing indoor bonsai:
- Lighting. There should be no direct sunlight. It is desirable that the light be diffused in summer and bright in winter. During the day, from 11:00 to 16:00, periodically turn the plant with different sides to the sun. This will help form a beautiful crown.
- Ventilation. Accustom your bonsai to the open air gradually. Every day in the summer, take him outside for 5-10 minutes, subsequently increasing the “walk” time.
- Temperature conditions. Indoor bonsai develop well at temperatures of +10-25 degrees. The minimum indicators for coniferous species are 10 degrees, for deciduous, flowering species - 12-14 degrees.
Watering and air humidity
Watering bonsai
To water indoor bonsai, warm, soft, filtered, rain or melt water is used. The procedure is carried out early in the morning or in the evening. If the sun is shining brightly, the liquid should not get on the foliage. Basic rules for watering indoor bonsai:
- To moisten a clod of earth in a small container, use the water immersion method. To do this, dip the bonsai pot in a bowl of liquid for several hours. Water from above until water flows out of the drainage holes. Half an hour after watering, drain the excess liquid.
- Moisten the soil, taking into account the individual characteristics of the plant. Some tolerate drought well, others suffer and immediately drop leaves, flowers, and fruits.
- In summer, watering should be frequent, sometimes daily, in winter – sparing, about once a week.
- The top layer of soil should dry out between waterings.
- In summer, spray tropical plants daily early in the morning. Use a humidifier. In addition, a water bath is useful: expanded clay, sand, moss, stones (elements that absorb and release moisture) are placed in a deep bowl, everything is filled with water, and a bonsai pot is placed on top. This procedure can be combined with spraying.
Bonsai watering mode
Fertilizer application
Use special fertilizers for bonsai or indoor plants:
- To stop growth, reduce the dosage indicated on the label by 2-3 times.
- Do not feed a diseased, recently pruned or transplanted plant.
- Apply compounds after watering.
- The feeding regime depends on the type of crop. A common scheme is once every 1-2 weeks. Take breaks in the summer to stop shoot growth and improve lignification. Feed evergreen indoor bonsai every 3-6 weeks during the winter.
- Feed coniferous trees 2 times less than other species.
Plant pruning
Use pre-disinfected scissors. Pruning of slow-growing indoor bonsai is carried out annually, in the spring, after the first buds appear. Branches that thicken the crown too much are removed. Young shoots leave 1-2 pairs of leaves.
Bonsai pruning
Fast-growing trees require regular pruning throughout the year. The more often the procedure is performed, the smaller and denser the crown will be. Trim off unnecessary and overly long branches. Treat the cut areas with crushed coal.
Procedure for pruning indoor bonsai:
- Find and shorten the apical, strongest shoot. There should be 3-5 leaves or buds left.
- Shape the crown so that it resembles an irregular truncated cone. Trim the side branches to the desired length. The first leaves on the shoots should point down. This way the branches will grow horizontally.
- Cut vertically growing side shoots to 1-3 leaves. These branches will properly thicken the crown.
- If 2 strong branches interfere with each other's growth, remove one of them so that it does not harm the overall silhouette of the indoor bonsai.
Creating a wireframe
Wire frame
Create a style immediately after planting your indoor bonsai in the first pot:
- Use aluminum or copper wire, the thickness of which corresponds to the branches, the length is 1.5 times the area to be wrapped.
- Bury one end of the wire and secure it in the ground, then wrap the trunk and branches, giving them the desired direction.
- Press the wire firmly against the trunk without damaging the bark.
- Remove the frame from the branches after 6-8 months, from the trunk - after 1.5-2 years.
- Repot your indoor bonsai into a permanent pot.
Transfer
Indoor bonsai does not require frequent replanting. The procedure is carried out every 3-5 years, in early spring. Transplantation is necessary for two-year-old indoor plants when the first buds appear. It is better not to touch flowering crops and postpone the procedure until autumn.
Step by step replanting bonsai
To stop the upward development of bonsai, trim the vertical roots. The taproot and thick roots are removed if the lateral roots are well developed. If all the roots are weak, leave them and change the direction with a wire. Leave thicker, stronger roots above the ground. Cover the top of the soil with moss.
Transfer
How to care for bonsai without replanting? Alas, sooner or later you will still be faced with the need to replant the tree. The best time to move a tree to another “home” is spring. During the cold period (dormant time for bonsai), the plant strengthens its roots and is psychologically ready for replanting.
In general, the plant should be replanted annually or only once every 5 years. By the way, young trees will more often require moving, and older bonsai can easily remain in the same pot for up to 5 years. If the leaves of the tree turn light yellow, young ones appear, and buds form on the stem, it’s time to replant.
Diseases and pests of tea sageretia
Sageretia often suffer from red mites and spider mites, especially in very dry air and warm wintering. Both whiteflies and aphids are found on this bonsai species. It is advisable to inspect plants regularly to detect infestation at the earliest stages. To combat ticks and other pests, insecticides are used, supplementing spraying with washing the crown and increasing air humidity.
If watered incorrectly or if heavy soil with too much clay is used, sageretia may suffer from the spread of rot or powdery mildew. Diseases should be combated by correcting care, replanting and treating with fungicides.
Common growing problems:
- wilting of the plant, blanching of the leaves due to excessive watering;
- yellowing and dropping of leaves when the soil dries out, lack of fertilizing or using hard water for irrigation;
- drying of leaf tips, stunting of growth, exposure of shoots in dry air and hot temperatures.
Types of callistemon with photos and descriptions
Quite a few species are grown at home, distinguished by their unpretentiousness and long-lasting flowering. Among them are the following.
Callistemon lemon Callistemon citrinus
Lemon callistemon Callistemon citrinus photo
It is a dense bush or small tree up to two meters with bright red inflorescences. Smells like lemon. This is not only one of the most common types. This exotic beauty has many varieties. Most of them appeared by chance:
- Lilac Mist - beautiful, purple flowers;
- Burgundy - purple-red flowers;
- Rowena's estate is about one and a half meters high and wide. Flowers are red at the time of flowering and pale pink before wilting;
- White Anzac - short one and a half meters long, white inflorescences;
- Endeavor has a rounded crown of about two meters and red flowers;
- Little John is a dwarf variety, not exceeding a meter in height. Has red filaments;
- Reeves Pink - pink flowers.
Callistemon rod-shaped Callistemon viminalis
Callistemon rod-shaped Callistemon viminalis photo
It differs from lemon in the bent shape of the stems. One of the most famous varieties is Captain Cook. It stretches up to one and a half meters high, although in nature it reaches seven meters.
Callistemon rigidus Callistemon rigidus
Callistemon rigidus Callistemon rigidus photo
This shrub is up to three meters high and is distinguished by erect shoots stretching upward. The home flower is a small upright tree with gorgeous crimson inflorescences. He loves fancy curly haircuts.
Callistemon salignus
Callistemon salignus photo
The largest representative of the genus, individual plants reach ten meters in height, and the average height is 5 - 7 meters. It stands out not only for its impressive size, but also for its whitish paper-like bark. The inflorescences are pale yellow or white with bright yellow stamens.
Callistemon Formosus Callistemon formosus
Callistemon Formosa Callistemon formosus Perth Pink photo
Shrub with “weeping” shoots up to five meters. Stamen filaments are light yellow. Collectors have developed varieties of this bush with red, white, purple and pink inflorescences.
Callistemon beautiful Callistemon speciosus
Beautiful Callistemon Callistemon speciosus photo
Bushes in nature grow up to four meters, the stamen filaments are red-crimson. Particularly decorative, popular in indoor floriculture.
Callistemon bright red Callistemon coccineus
Callistemon bright red Callistemon coccineus photo
These are trees or shrubs up to four meters high. Red-pink stamen filaments and colorful yellow anthers give the inflorescences a golden-variegated color.
Pine Callistemon Callistemon pityoides
Pine Callistemon Callistemon pityoides photo
A shrub up to three meters high, the leaves are very similar in appearance to pine needles. Young shoots have a silver-gray color, old shoots become dark green. Pleases with yellow-green flowers.
Key points in care
Caring for podocarpus at home is not particularly difficult.
It is only important to observe 3 main points: choose the right soil composition, maintain light and humidity conditions
Soil composition
When growing Podocarpus bonsai at home, use well-drained soil. To do this, when compiling the soil composition, the following proportion is maintained:
- clay-turf soil - 2 parts;
- leaf soil - 1 part;
- sand - 1 part.
The reaction of the finished substrate should be close to neutral. Conifers are planted in ceramic containers of medium depth. The shape of the container is selected based on the style of the tree. For bonsai, as a rule, rectangular ones are used.
Young conifers are replanted once a year, and adult plants are replanted once every 2-3 years. When replanting an adult plant, the size of the new flowerpot is determined at the rate of +1 cm relative to the diameter of the previous one.
In order to minimize damage to the root system, replanting is performed using the transshipment method. You can also update the earthen ball by replacing the top layer of soil. The optimal period for the procedure is the beginning of spring.
Feed the conifers once every 1-1.5 months, using complex fertilizers for conifers.
Light mode
Podocarpus is a light-loving crop. It needs bright and continuous light, but without direct sunlight. Hot summer sun can cause leaf scorch. In the house, it is better to place the tree near windows facing south and east. If there is insufficient light, the leaves on the lower branches may turn yellow.
Although the “Buddhist pine” is by nature a heat-loving crop, it can easily tolerate low temperatures when grown at home. Optimal temperature indicators for the plant:
- in winter – from +6 to +12°С;
- in the summer months – from +18 to +22°С.
If an ephedra has spent the entire summer outdoors, it can tolerate a short-term drop in temperature in the fall ranging from +6°C to +8°C. The absence of drafts is another key condition when growing exotics. Regular “air circulation” can cause partial leaf fall.
Watering frequency
Nogocarp is not picky about humidity conditions. It easily tolerates dry indoor air. But as the ambient temperature rises in the summer months, it requires periodic spraying. A good effect is obtained by placing the podocarpus on a tray with stones, the bottom of which is filled with water. Evaporating water provides additional hydration.
The frequency of watering depends on the temperature. In the summer months, you need to water once every 2-3 days, preventing the earthen clod from drying out. This is especially true if the plant is planted in a wide and low pot. In winter, the frequency of watering can be reduced to once a week. Regular overwatering can cause rotting of the exotic root system.
Pests, such as scale insects or spider mites, like to make their home under the bark of the trunk in the area of peeling areas. To protect the plant from these pests, experienced gardeners recommend using Nero or Karbafos.
The earthen ball of a bonsai tree is traditionally covered with a layer of moss. In addition to its decorative function, moss performs two important tasks: it acts as an indicator of soil moisture and protects the soil from rapid evaporation of moisture during hot periods.
Crown formation
- The footcarp grows new shoots once a year. To form a dense, steep crown, in early spring or late autumn, the top and side branches of the plant, which clearly protrude beyond the contours of the established shape, are trimmed. This stimulates a redistribution of growth in the inner and lower parts of the crown.
- It is recommended to remove the tops by plucking with your fingers. To do this, the top of the shoots is clamped with the pads of two fingers and gently bent, breaking off the shoot at the weakest point.
- The cut sites are treated with healing paste-like compositions, which are sold in flower shops. Garden pitch is not suitable for these purposes, since it eats deep into the bark, leaving bare spots on the trunk.
- Young shoots of podocarpus are very flexible. To give them the required shape, it is convenient to use metal wire clamps. It is better not to touch woody branches, as they are very fragile.
Comfortable conditions and the need for fresh air
We can only speak conditionally about certain conditions that are comfortable for all bonsai. After all, each type of tree and shrub used to create bonsai partially retains its individual preferences. The most comfortable temperature for these living works of art is considered to be an average, restrained temperature of 18 to 25 degrees Celsius during the active growth phase. Almost all bonsai require cooler conditions in winter. If you maintain the usual room temperatures and do not lower their value by at least 2-3 degrees, reducing light will lead to problems with their health. The minimum temperature is limited to 10 degrees for conifers and 12-14 degrees for other types of bonsai.
Lighting for these plants is selected purely individually. Most bonsai thrive in indirect, bright light, but the ability to grow in full sun or partial shade is worth checking for each plant individually. In winter, bonsai of any kind will not refuse bright lighting, and if you compensate for seasonal conditions, you can achieve amazing results.
Among bonsai there are many varieties that are sold mainly as purely indoor plants. But still, most of these living pieces of art prefer fresh air and are much less comfortable indoors. In the warm season, noble and expensive plants will only respond with gratitude to being placed on a balcony, terrace or in a recreation area - where they can “breathe” to their heart’s content. When buying a bonsai, be sure to check whether the plant is accustomed to such a summer regime and how it relates to ventilation and drafts. But for most bonsai, you still need to select protected places and more stable conditions.