Daylilies have another name of Greek origin - Hemerocallis, in Russian it sounds like krasodnev. In most types of daylily, each (and very beautiful) flower on the arrow of the plant blooms (shows off) for one day.
There is a belief about the magical power of daylily. You need to get up at dawn and touch the flower, then all bitterness will be forgotten, and sorrows will go away.
Up to 3 flowers bloom at the same time. The total flowering time of the bush is up to 30 days. After this you can replant the bushes.
How to choose the right place to transplant daylilies
In order for daylilies to take root in a new place, choose it correctly:
- The plant loves the sun. Find an area away from large canopy trees or lush bushes. It shouldn't be in a low place. But for daylilies with dark buds - purple, violet, burgundy - slightly darkened areas are also suitable;
- The plant does not like places with high groundwater levels. Therefore, a drainage layer is needed at the planting site to avoid stagnation of water;
- Perform a soil analysis correctly (see the paragraph on the soil requirements of daylilies).
Selecting a location
When choosing a site for planting, you should take into account that the plant will grow well in soil with high fertility. If the crop is fully provided with moisture, then in such soil it will develop faster. The illumination of the area also matters. The more sun the plant receives, the larger the flowers the gardener will be able to observe in the flowerbed. If you plant a daylily in a somewhat shaded area, then, on the contrary, it will delight you with abundant lush foliage.
It is believed that partial shade is also suitable for natural varieties, and hybrids should be provided with high-quality lighting. If these are dark-colored species, then partial shading during the day is recommended so that the petals do not fade.
The plant does not need strong shade, as it stops blooming in such conditions. Wetlands are also not suitable for planting. It is better to avoid planting in low-lying areas. To ensure that the soil is full of minerals for the full development of the crop, it is recommended to first add humus or compost to its composition.
The depth of the fertile layer should be up to 50 cm, and the pH should be from 6 to 6.7, acceptable from 5 to 7. If it is sandy soil, then clay and rotted organic matter should be added, you can also add 10 kg of chernozem per 1 sq. m. m. If the soil is clayey, then coarse sand, peat, compost and drainage will allow you to dilute the composition.
It is important to first rid the garden flower bed of weeds. If planting is organized on virgin soil, then the roots of weeds must be removed in the fall, and planting in this case should be carried out next spring
In the fall, when the acidity level is too high, lime is added to the soil.
What you need to know when growing daylilies in one place for a long time
- If you decide to grow daylilies in one place for a long time, then you need to prepare the place according to the 40*40cm or 60*60cm scheme;
- Dig a hole twice the size of the root ball and add loose soil to the center. Spread the roots and place them in loose soil. If the roots are too long, you can trim them to 15 centimeters. Sprinkle with soil and compact lightly. The root collar of the plant should rise a couple of centimeters above the ground;
- After planting the bush, you need to water the ground underneath it generously; the plant should be watered daily for 14 days, then as the soil dries out. And after a month, add mineral fertilizers.
The plant loves the sun
Why replant?
Daylily is a perennial plant with cord-like fleshy roots that are capable of forming stolons. The plant is flexible and blooms even in the shade. But only in a sunny place its beauty is fully revealed.
Daylilies bloom in the garden for about a month
For your information! New hybrid varieties have been developed in which the flower blooms only in strong sunlight.
The bush can bloom in one place for about 15 years, increasing in size, but with age the abundance and size of its flowers decrease. The roots, growing, intertwine with each other, and the plant begins to feel a lack of nutrition.
Experts recommend replanting bushes after 5-7 years to prevent degradation of the bush. A reminder will be the appearance of flowering shoots near the mother bush.
If you neglect this operation, even support with fertilizers will not help; the beauty of the bush begins to fade. And then the gardener will be faced with the question: when to replant daylilies?
Note! The growing season of daylilies in spring begins immediately after the night temperature reaches positive temperatures.
Transplanting daylilies is possible at any period of its growing season: from early spring to late autumn. The survival rate of the plant depends on the conditions of its care and the growing climate. Preference is given to spring transplantation, in which the divisions easily take root and bloom in the same year.
When is the best time to transplant and propagate daylilies?
The most suitable time for transplanting and dividing daylilies is spring, the period of leaf growth, and autumn (in this case, you should not delay replanting, since the plants need time to take root).
If necessary, replanting is permissible at any time during the growing season, with the exception of very hot weather.
Bushes with large roots, transplanted in the spring, will bloom this season. If the root system is weak, then flowering can only be expected next summer.
Even flowering bushes can find a new home. If you want to move daylilies in the summer, during flowering, do not cut off the rhizomes or divide the bushes. This traumatizes them. Carefully remove only the rotten roots and treat the cuts with ash.
The autumn deadlines depend on the variety and climate zone, the range is from mid-October to mid-November.
It is better to do spring and summer transplants in the evening, and autumn ones - during the day, as the air becomes cooler.
Features of seasonal transplantation
There are several options for dividing and planting daylilies.
Transplantation in autumn
When to replant tulips
When choosing an autumn transplant, you need to take into account all the nuances. You should not focus on the second half of autumn; plants may not take root before the onset of frost. Then in winter the flowers may die. September and early October are the most favorable times. If you still cannot invest on time, you can plant frost-resistant varieties. If you follow all the recommendations, the transplantation of daylilies will go well, the plant will take root remarkably well in the spring and will begin to grow actively.
Note! Daylilies need at least one and a half months to take root. Don't delay the transfer.
Transplant in summer
Sometimes daylilies are replanted in the summer, but this is rather an exception to the rule, since they bloom all summer. The procedure severely injures the roots and makes the plant weak. Then how to replant daylilies in the summer?
It will not be possible to propagate the bush during the daytime, because... it cannot be divided. Work can only be done when there is no sun. It is necessary to preserve the earthen lump, otherwise the plant will not take root.
Bloom
Spring transplantation of bushes
Dividing the bushes in the spring gives them the opportunity to bloom this year. This applies to strong plants with powerful roots. When transplanting weak bushes, you should not expect rapid flowering. Working in spring has a huge advantage, because the flower has a lot of time ahead to take root. There will be lush blooms in summer.
Important! In spring and summer, it is not recommended to plant daylilies during the day.
If it is difficult to decide which season to choose for transplanting daylilies, when it is better in spring or autumn, then it is better to choose spring. This is an excellent time for minimal intervention in the life of the flower.
Methods for propagating daylilies
Dividing the bush
1 Scheme for dividing a daylily bush; 2 Scheme of planting a division.
Option 1
Dividing the bush is the easiest way to propagate daylilies. It is used for daylilies 5-7 years old.
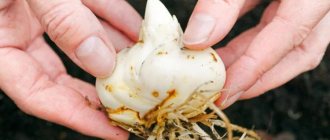
To do this, dig up the daylily, carefully shake off or wash off the soil.
Very old specimens are dried in the shade for 24 hours and then cleared of soil. The roots are carefully separated by hand so that each division has a part of the root collar with buds.
Very long roots are shortened by 1/3.
From a 5-year-old bush you can get up to 20 divisions, which bloom in 2 years. (see diagram 1)
The divisions are planted at the same depth as adult plants and watered. (see diagram 2)
Option 2
Scheme 3. Method of vegetative propagation of daylily by obtaining new shoots from the mother plant
This method of division is used in early spring, when the shoots do not exceed 5 - 10 cm.
Soil is raked from the roots of the transplanted specimen.
Using a sharp knife, cut the stem just above the root collar (you cannot leave a tall stump, as the buds will begin to grow too late).
After 3-4 weeks you can get up to 6 new shoots. After 1-2 years the bush is divided. (see diagram 3)
Option 3
Varieties of daylilies with a loose bush can be divided into 2-4 parts with a shovel (the decorative appearance of the bush is preserved and the division blooms in the year of planting).
Option 4
As an option, you can cut off part of the daylily from a large mother specimen with a shovel. As a rule, cuttings take root well, and the queen cell does not need to be dug up.
How to plant a flower correctly
Before you start planting a daylily, it must be immersed for some time in water with diluted growth stimulants. Such drugs as “Zircon”, “Epin”, “Gumate”, etc. are suitable as such stimulants.
Since daylily is a perennial crop, the place for its planting should be selected and prepared with special care. This plant requires a fairly large amount of space in the flowerbed. So, the hole for planting daylilies should be at least 30 cm deep. Also, it is necessary to first pour the peat humus mixture into this hole, and then add a small amount of potassium-phosphorus fertilizer. After this, the daylily is carefully immersed in the hole. The plant should be planted to the level of its root collar. The entire remaining space of the hole should be sprinkled with garden soil, and then it should be compacted and watered thoroughly.
Important! If moisture is quickly absorbed, this indicates that the soil has not been compacted enough. In this case, simply add dry soil and compact the soil well.
Methods of propagation of especially rare varieties of daylilies
Cuttings
At the end of flowering, from 1 to 5 shortened shoots (rosettes) appear on the peduncle from dormant buds. They are suitable for cuttings when 4-6 pairs of leaves have formed on the rosette and callus has appeared (these are cells that can give rise to a whole plant). (see diagram 4)
4 Diagram of the formation of a rosette with callus on a daylily peduncle
Such a shoot is cut off with part of the peduncle and the leaves are shortened by 1/3 and planted in the ground. With this method, up to 90% -100% of cuttings take root.
Air layering
This type of vegetative propagation is used in daylilies if a rosette has formed, but flowering is not completed, and the seeds have not ripened.
In this case, a linen bag (cover) with a mixture of peat, sand and garden soil in a ratio of 2:1:1 is placed on the peduncle at the base of the rosette. It is watered and sprayed daily. During dry periods - 2 times a day. When roots form, the rosette is separated from the mother plant and planted in the ground.
Seedlings obtained from cuttings and air layering bloom in the second year.
Daylilies delight us with their luxurious flowers
Easy care, trouble-free rooting and luxurious appearance make daylilies the favorite flowers of novice gardeners. After all, daylily is a flower of joy and good mood!
Daylily flower - description
Daylilies are herbaceous perennial rhizomatous plants. The adventitious roots of daylily rhizomes are usually fleshy and cord-like, which allows the plants to survive drought. Sometimes the root system forms stolons. The basal leaves of daylily are broad-linear, entire, double-rowed, arcuate or straight. On leafy peduncles up to 1 m high, of which there may be several, there are large six-part funnel-shaped flowers of orange, yellow, pink or red-brown collected in spreading inflorescences of 2-10 pieces. No more than 3 flowers open simultaneously on one inflorescence; the total flowering time of the bush is 3-3.5 weeks.
And the culture is grown both natural species of daylily, and numerous forms and varieties, which are united under the name hybrid daylily.
Which daylilies overwinter best?
These perennials thrive in temperate climates, but are still sensitive to frost and severe temperature changes. This is why many daylilies need shelter for the winter.
Source: Depositphotos
Daylilies of American and Australian selection especially need careful preparation for winter.
According to susceptibility to low temperatures there are:
- Low-winter-hardy evergreen daylilies. They grow well in the southern regions. In areas with cold winters, they require careful shelter or storage in the basement.
- Winter-hardy deciduous daylilies. Such flowers winter well unprotected. This category includes traditional, as well as many species varieties.
- Medium-winter-hardy semi-evergreen daylilies are the result of crossing the previous two species. In warm winters the foliage of these plants remains green, but in severe cold they die.
For evergreen daylilies, the danger is not so much the frost itself as the lack of snow cover and spring temperature changes. When a thaw occurs, they, retaining up to 5 cm of green mass, easily begin to grow. Frosts that follow, as a rule, lead to the death of the emerging buds. The situation is different with semi-evergreen daylilies, but it is advisable to protect them from frost.
Care after transplant
Proper care of the perennial will ensure its ability to bloom long and luxuriantly.
Watering
When is it better to replant phloxes to another place?
Immediately after transplanting, the soil under the bush is watered generously and mulched to retain moisture. Rotted pine needles or crushed bark are used for mulch. Covered soil does not overheat in hot weather and is easy to maintain in a loose state.
The powerful root system of the perennial allows it to survive the absence of watering for a long time, but the number of buds and the size of the flowers will decrease. With a lack of moisture, even the foliage turns pale.
Water infrequently, but abundantly. In hot weather, it is better to water (sprinkle) through a fine sieve of a watering can.
Top dressing
During transplantation, fertilizers are added to the hole, so in the first year the daylily does not need feeding. They begin to carry it out from the second year and apply it in dry or liquid form three times per season:
- in early spring - complex mineral fertilizer;
- when buds appear - with complex fertilizer;
- after mass flowering - phosphorus-potassium fertilizer.
The culture loves liquid organic fertilizers in light concentrations. They are held from June to August.
Note! It is important to regulate the amount of nitrogen in fertilizers. An excess causes the growth of green mass with minimal flowering. Varieties with purple inflorescences may change color.
Trimming
In the spring, for rejuvenation, old leaves along the edge of the bush and dried stems are cut off.
After flowering, the flower stalks should be cut out.
In late autumn, old leaves are cut off, leaving only young, recently grown ones. Pruning may not be necessary. Dried leaves will additionally protect the perennial from winter cold.
Preparing for winter
The roots of many daylily varieties tolerate frosts down to −25 °C. The upper part of the plant freezes after the first frost.
The bush is ready for winter
Mulching with dry peat or sawdust will help the bushes survive the winter safely. This should be done after cold weather sets in.
Important! Early covering may cause the plant to dampen off.
Heat-loving varieties require additional cover with spruce branches.
In landscape design, daylilies are used in single or group compositions. Their fate depends on proper planting and care: whether they will become a decoration of the garden or whether they will vegetate. And not the least role in this is played by transplantation, which must be carried out according to the rules described above.
Planting daylilies in autumn
The first step in planting daylilies on your site is to determine a suitable location for the flower. Daylilies should be planted in open, sunny areas. Wild unpretentious varieties can tolerate partial shade, but modern hybrids are more capricious and require illumination for at least 6-8 hours a day.
On a note. Daylily with flowers painted in burgundy, cherry and other dark shades can fade in bright sun. Such plants can be placed in the lacy shade of trees or artificially shaded from the sun.
The soil type for daylilies is neutral or slightly acidic, with a pH level of 5 to 7 units.
- Loam or sandy loam enriched with humus is an excellent soil for perennials.
- Heavy soils are corrected by adding sand and peat in the amount of 10 kg and 2-3 kg per 1 sq. m. meter of area, respectively.
- Sandy soils are fertilized with well-rotted manure or compost up to 8 kg per square.
Important! Do not apply fresh manure under the daylily! Excess nitrogen leads to an outbreak of fungal diseases.
The site is prepared several days before planting: it is dug up and fertilizers are applied. If the site is located in such a way that in the spring there is a threat of stagnation of melt water, drainage grooves are dug around the flower bed, and the flower bed itself is raised above the soil level by 18-25 cm. When planting, crushed stone or expanded clay is poured into the bottom of the holes in a layer of up to 4 cm as drainage.
Preparing daylilies for planting
If the perennial bush was purchased with a closed root system, it is removed from the pot and immersed in water for several hours (4-5). You can add any growth stimulant to the liquid: Epin, Zircon, Heteroauxin. The roots of the flower are saturated with moisture, and it is visually easier to determine which roots are dead. They are cut off. The tips of healthy fleshy and light roots are cut off.
If traces of rot are found on the roots of the daylily, the affected parts are cleaned back to healthy tissue. The plant is soaked in a rich pink solution of potassium permanganate or in Fitosporin for about half an hour.
The long leaves of the plant are cut at a height of 25 cm so that they do not interfere with planting and do not evaporate moisture, weakening the daylily.
Operating procedure
Planting daylilies in the fall should be done in the following sequence:
- A hole for the perennial is dug, about 30 cm deep, and drainage made of crushed stone or expanded clay is poured onto the bottom.
- Add 80 g of superphosphate and a glass of wood ash to the soil removed from the pit and mix thoroughly.
- At the bottom of the hole, pour a small mound of soil with fertilizer. A flower is placed on this mound, spreading the roots along the slopes of the earthen hill. The hole is filled with soil, pressing it tightly against the roots.
Important! The root collar of the daylily is covered with 1.5-2 cm of soil, no more! - The planted perennial is watered abundantly, spending at least 10-15 liters of water per bush.
- After watering, the surface of the earth is mulched with peat, straw or wood shavings. Mulch will not only protect the soil from drying out and make it possible to reduce watering, but will also protect the roots of the flower from early frosts. The mulch layer should be 5-8 cm.
Daylily bushes are placed at a distance from each other, at least a meter. The gardener needs to remember how widely the daylily grows.
Video about planting daylilies from nursery experts
Types and varieties of flowers
The first hybrid variety of daylily was bred in 1893 by biologist J. Eld. In 1975, the flower catalog already included more than 15,000 hybrid plant varieties. Ten years later, their number almost tripled - about 40,000. It is not known exactly how many varieties of daylily exist at the moment.
It is impossible to talk about all the varieties of these inimitable flowers. We invite you to appreciate the beauty and uniqueness of some varieties in the photo below.
- Ay On America
- Après Mois
- Best-seller
- Blizzard Bay
- Burgundy Love
- Wild Horses
- Pone of Profession
- Lacy Doyley
- Knight Ambers
- Ash Flame
- Siloam Baby Talk
- Siloam Double Classic
- Frans Hals
In addition to the variety of colors, modern daylily varieties have so-called ruffles or denticles along the edge of the petals; some specimens are distinguished by a peculiar pattern on the petals. There are even terry varieties of plants.