It is difficult to find an amateur gardener who is indifferent to orchids. This is a masterpiece created by nature itself. They are deservedly called “aristocrats of the plant world.” Flowers simply fascinate with their tenderness and elegance, as well as their variety of shapes, colors and aromas. They can resemble tropical butterflies, birds, ballerinas, even slippers and lizards. Despite the fact that orchids are demanding to care for and are rather reluctant to propagate at home, very few gardeners are willing to give up their pets. Until recently, it was believed that it was impossible in principle to grow them from seeds, but now there are chances, although the technology is complex and the procedure requires strict adherence to it. But even in this case, success is not guaranteed.
Where are they located and what do they look like?
This plant is very common and has more than 30,000 varieties.
Orchid seeds ripen in seed pods that appear on the orchid after the flower is pollinated.
They can only be examined under a microscope, they are so small that they can be mistaken for dust. If you compare an orchid seed with a grain of wheat, to which they are very similar in appearance, then the grain is 15,000 times larger.
Orchid seeds meet the following parameters:
- Small, like dust. One seed measures 0.35-3 mm in length and 0.08 to 0.3 mm in width.
- Color – cream, beige, light brown.
- Narrow, elongated shape.
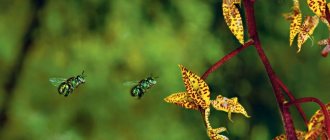
Many will wonder how plants reproduce in nature with such small and demanding seeds? It's all about the number of seeds - there are more than 5 million of them in one box. The wind carries the seeds, they cling to the bark of trees, but only a few germinate .
We offer a video to see what an orchid box with seeds looks like:
Distinctive features of real ones from fake ones
This is quite simple - the bag should contain creamy “dust”. Some flower lovers order seeds from the Internet to be delivered to their home, and having received seeds of a different type, they vainly hope to grow an exotic beauty from them, but this, unfortunately, is impossible.
Some people, when buying orchid seeds in a store, feel the large seeds and think that they are capsules - this is also not true. It is worth knowing that as soon as the seeds ripen, the capsule cracks and they fall out , so it is impossible to keep it intact.
Secrets of artificial pollination: expert advice
To increase the chances of pollination and get good seeds, you should take into account several important nuances:
“If the air humidity in the apartment is insufficient, it is better to take young flowers for pollination. In older ones, the top of the column dries out, and the fertility of the organ decreases. In general, orchids that are used for seed propagation must be kept in an ideal microclimate. Everything can play a role here - humidity, air temperature, and light intensity. If it is not possible to create the necessary conditions in winter, it is better to postpone pollination until spring or summer.”
E. Ladychuk, orchid collector, biologist
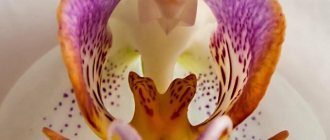
Photo
Look at the photo to see what orchid seeds look like.
The phalaenopsis orchid has bloomed: what to do with it next?
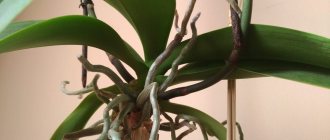
The end of the orchid flowering period is a sad period for any gardener. But let's figure out what happens next. Many plant lovers simply cut off the peduncle, but do not rush to do this.
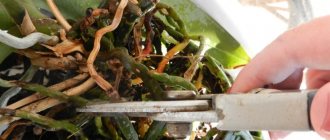
- If the tip of the peduncle turns yellow, brown, or withers, the orchid has faded. Your task is to inspect the stem. Even if it begins to dry out, do not cut it, because it delivers the nutrients needed for the development of the entire orchid throughout the plant. You can remove the peduncle when it has turned completely yellow, but you need to leave a 2-centimeter stump.
- Check the stem tip and side branches - you may find a new green tip, and if it is not damaged, it will likely continue to flower and produce additional buds. This can happen both during the main flowering and a couple of months after it.
- If the orchid has faded and the stem has dried out, trim it, but if there is a living “sleeping” bud on the stem, cut the peduncle higher than it. This bud can give birth to a new peduncle.
- The formation of phalaenopsis babies is difficult to predict. Some species can produce 2-3 offspring on one peduncle, while others, on the contrary, “sting up” on children even with regular feeding and careful care.
Is it available for sale and how much does it cost?
You can find orchid seeds in seed stores, and ordering them online is not difficult.
The cost of planting material depends on several factors:
- varieties;
- manufacturer;
- quality;
- packaging material.
But the average cost of 20 seeds ranges from 180 to 250 rubles.
It is worth mentioning separately about the seeds that can be purchased on Chinese websites; they cost around 50 rubles for 100 pieces. But despite the cheapness, it is worth understanding the risks, since it is almost impossible to obtain high-quality material. But nevertheless, there are sites that sell good planting material from which it is possible to grow magnificent flowers. Read more about how to grow a beautiful flower from seeds from China at home in this material.
Collecting seeds
One of the most important points determining the success of the operation is the ripening time of the seed capsule. So, for example, Ludisia Precious ripens within 1 month, Cambria takes about 4-5 months, Phalaenopsis grows a box for almost 7 months.
There are two sowing options: before the boll opens and after. While the seeds are inside, they are sterile and do not require additional disinfection. After opening the boxes, they should be disinfected in a solution of potassium permanganate before sowing. However, in fairness, it should be noted that there are also disadvantages of sowing from an unopened box: it is quite difficult to accurately calculate the time of seed ripening.
The main sign that the box is ripe is a color change from green to brown. If the grower decides not to wait for opening, then you can sow immediately after the color changes. If you decide to act for sure, it is better to tie a napkin to the seed pod so that if it is opened, the seeds will not fly away.
After opening the box, the seeds should be divided into 2-3 parts and try to sow one part first and, if the seeds sprout, then all the rest.
Read on to learn how to plant orchid seeds.
How to get it at home?
Orchid seeds can be obtained at home , for this you need to cross-pollinate during flowering.
Take a soft brush and transfer pollen from one inflorescence to another.- As soon as the plant fades, boxes will appear in which the seeds will ripen.
- After three months, the box is wrapped in a paper napkin in order not to lose the seed material when the testis cracks.
- The capsule will definitely crack as soon as the seeds ripen.
- After this, the testis is cut off and the seeds are poured from a napkin onto a clean sheet of paper.
- Divide the seed material into parts.
- Wrap each part in a separate white piece of paper, place it in a plastic container and put it in the refrigerator until you plant it.
We invite you to watch a visual video of orchid pollination at home:
Sowing
After completing the sterilization process, seed material is introduced into the mixture using a syringe or pipette. The process is carried out over steam to prevent bacteria from entering the crop.
To achieve uniform sowing, shake the mixture and then cover with a tight lid. The sowing process is carried out as quickly as possible so as not to contaminate the seeds with bacteria.
Advantages and disadvantages
There are aspects that can be attributed to the disadvantages of growing orchids from seeds:
- labor intensity and complexity of the process;
- requirements of planting material for sterility and nutrient mixture;
- duration;
- the risk of purchasing low-quality planting material.
But, despite this, you can also find certain advantages in this process - this is the pleasure that can be obtained from observing the process of seed germination. And when these small seeds grow into beautiful, flowering plants, all the disadvantages will turn into advantages. But it is worth remembering that you will get a flowering plant only after 5 years .
Preparatory process
A notable feature of orchid seeds is their small size. They can only be viewed under a microscope or a powerful magnifying glass.
Before planting, it is necessary to disinfect the planting material using an aqueous solution of bleach. Take 15 grams of lime per 100 grams of water, filter, then add seeds and shake the mixture periodically for 15 minutes.
Cultivation instructions
As mentioned above, before sowing the seeds, you need to prepare everything you need.
Equipment and its sterilization
In the store you should buy:
glassware - these can be test tubes, glass flasks or 100 gram jars with lids that will be hermetically sealed;- cotton wool and a sterile bandage or gauze; stoppers for test tubes will need to be made from this material;
- a rack for test tubes, if germination will be carried out in them;
- litmus paper to determine the acidity of the nutrient mixture;
- hydrogen peroxide 2%;
- a special pipette or sterile syringe.
If you choose ordinary glass jars for germination, then you need to make holes in the lids for glass tubes, since the seeds need air. As soon as the seeds are placed in the mixture, the tubes will need to be closed with stoppers made of gauze and cotton wool.
Sterilization:
- The dishes are sterilized together with the prepared composition - this can be done in a double boiler, oven or in an electric oven by placing the dishes in a water bath.
- You need to sterilize in an upright position, with the lids tightly closed.
- If we talk about time, then together with heating the oven or steamer, this process will take about an hour.
- Sterilization temperature 120 degrees.
- After sterilization, cool the composition to room temperature.
Preparation of seed material
As already written above, the seed pods are wrapped in a napkin, and as soon as the testis bursts, the seeds are ready for sowing . In our case, they are already in the refrigerator; they can simply be taken out of the container.
Nutrient medium for planting
It’s worth warning right away that the process is labor-intensive and requires care and attention. You can, of course, buy a ready-made mixture in the store, but if you want to go the whole way of growing an orchid from seeds yourself, then prepare a nutritious mixture at home.
Will need:
1 liter of distilled water;- agar-agar – 8 g;
- glucose – 10 g;
- complex phosphorus-nitrogen-potassium fertilizer – 1.5 g;
- fructose – 10 g;
- stimulator forming the root system – 5 drops;
- activated carbon – 1 g.
Procedure:
- Pour 0.5 liters of water into a container, put on fire, and boil. While boiling, add agar-agar, glucose and fructose. Reduce the heat and cook the mixture until the agar-agar is completely dissolved.
- Heat the second part of the water, add fertilizer, coal, phytostimulant to it and mix well.
- Combine both compositions and check the acidity.
- The acidity of the nutrient mixture should be from 4.8 to 5.2 pH - this is the most favorable environment for the germination of orchid seeds. It can be increased with orthophosphoric acid, and decreased with potash solution.
The nutritional composition should not be too thin or thick; ideally, the germination mixture is a jelly .
Pour 30 mg of the mixture into each 100 g jar, seal tightly and sterilize. Now it’s worth checking the composition for sterility - to do this, leave the jars at room temperature. If during this time a pathological environment has not developed in the composition, then it can be used; if mold has appeared, then we throw everything away and start all over again.
Below is a visual video on how to prepare a growing medium for planting orchid seeds:
Preparatory stage
Before putting the jars with the solution for sterilization, you need to wrap the lids with foil , since the lids can be torn off during the heating process.
How to plant and germinate correctly?
Before planting a flower at home, its seeds and nutritional composition must be thoroughly sterilized. To do this, you need to prepare a 10% chlorine salt solution.
- Pour 10 g of chlorine into a liter of water and stir until completely dissolved.
- Filter the mixture through several layers of cheesecloth and place the seeds in it for 10 minutes.
- The seeds are pulled out with a sterile syringe and placed into the nutrient mixture through tubes, which are immediately closed with a cotton plug. You can place flasks for seed germination, the air temperature should be 18-23 degrees, and the daylight hours should be 14 hours.
Below is a visual video of planting orchid seeds:
Read more about how to plant an orchid here.
Phalaenopsis orchid: proper watering
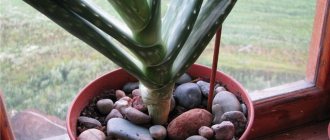
There is one important rule when watering orchids: it is better not to top up than to overfill. Phalaenopsis should be watered only after the soil has completely dried after the previous watering.
Signs that it is time to water the plant are:
- complete drying of the substrate and plant roots;
- completely dry walls of the pot;
- significant lightening of the roots in color.
There is no specific frequency of watering phalaenopsis - it fluctuates depending on the temperature and moisture in the house, the weather outside the window, and the substrate. But the approximate interval for watering is 2 weeks .
- You cannot water the orchid over the leaves; it is better to place the pot in a pan of water, and the substrate will be saturated through the drainage holes.
- Phalaenopsis should be watered with clean, filtered, or even better, boiled water.
- Once a month, give the phalaenopsis a shower or wash its leaves carefully under the tap, and then wipe it dry to avoid rotting.
Seedling care
After about a month, pseudobulbs will begin to appear. In six months, the flasks will contain green seedlings with roots, but the seedlings can only be replanted after a year.
Read more about growing orchids in a flask in this material.
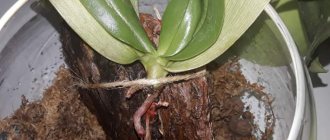
The orchid is transplanted into a substrate that consists of sphagnum moss, fern roots and pine bark.
The transplant is carried out in the following way:
- the substrate is placed in boiling water for 30 minutes;
- open the jars, pour a little boiled water into them;
- then pour the seedlings into a container with a foundation solution;
- take tweezers with rubber tips and transfer the seedlings to the substrate, do not deepen them;
- provide greenhouse conditions;
- It is worth spraying seedlings every day from a distance of 20 cm.
We invite you to watch a visual video about caring for orchid seedlings and replanting them:
We invite you to familiarize yourself with information about soil and pots for orchids, about choosing a Thai orchid and about growing a flower from Vietnam, also about how to grow using hydroponics or in a closed system, and about planting with children.
Is it possible to grow a flower from them?
The main difficulty in growing an orchid from scratch lies in the physiological characteristics of the seed. The seed does not have endosperm - a protective shell that should nourish the embryo. In nature, an orchid seed receives nutrients through symbiosis with fungi, since it adheres to the mycelium and develops simultaneously with the mycelium.
The absence of a protective shell affects the immunity of the seed. Orchid seed material is susceptible to rotting, parasites and is not capable of rapid adaptation to external influences. For successful germination, seeds need to create sterile conditions.
Problems and difficulties
There can be many difficulties when germinating seeds yourself:
- It is almost impossible to obtain seeds from an orchid at home.
- It is not always possible to buy high-quality planting material.
- At any stage, death of seeds or seedlings may occur, since sterility for cultivation must be absolute.
At home, unfortunately, it is difficult to properly grow orchids using seeds, so think before you decide on this not very simple process. There are more affordable ways to propagate this exotic plant. But if you do everything according to the rules and be patient, a positive result will not be long in coming.
Peculiarities
When ordering seeds from China, you can often encounter unscrupulous sellers who pass off seeds of other plants and even lawn grass or weed seeds as orchid seeds.
In this case, many people feel sorry for the time and labor spent on trying to grow, and they become disillusioned with this idea. But, fortunately, they are inexpensive and if you have a strong desire to try growing them, you can order them again. After all, if you manage to grow a flower yourself, you will receive incomparable pleasure watching its growth, and then a beautiful adult blooming orchid.
Phalaenopsis orchid pests
The vital activity of parasites has a detrimental effect on the plant. Even more than other indoor flowers, phalaenopsis are susceptible to damage by various insect pests:
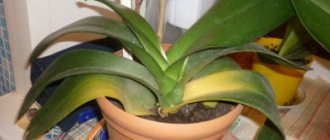
What to do if the phalaenopsis orchid withers?
If the phalaenopsis withers, its leaves have lost turgor, become wrinkled and inelastic, and the luxurious flowers have shrunk, which means:
- you make some mistake when caring for a flower: perhaps the air in the room is too dry, watering is rare, or you have not fertilized the plant for a long time;
- the plant does not have enough sunlight;
- on the contrary, the plant constantly overheats;
- there may have been damage or rotting of the roots;
- the flower is in a draft or the air in the room is quite cool;
- natural aging of flowers occurs as the flowering period ends;
- Perhaps your plant has been affected by some disease or pest; see below how to deal with them.