With the onset of warm weather, the streets of cities and small towns, garden plots and balconies are transformed thanks to the lush flowering of a wide variety of ornamental crops.
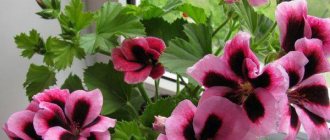
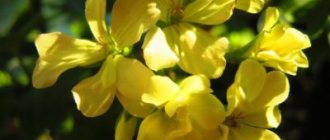
Ampelous pelargonium, as in the photo, with spectacular flowing shoots and inflorescences consisting of one and a half dozen flowers, occupies one of the first places among plants used for landscaping. Like other types of pelargonium, the ampelous or ivy-leaved variety was first discovered in southern Africa, but the unpretentious and responsive plant quickly gained the love of gardeners in all corners of the world.
Today, many spectacular varieties have been developed with different shapes and colors of flowers, green and variegated leaves. They all have common features:
- graceful, freely flowing stems reaching 90 cm in length;
- smooth five-lobed leaves of a characteristic shape, which gave the plant one of its names;
- simple or double flowers located on elongated peduncles and collected in umbrella inflorescences.
At the same time, caring for ampelous pelargonium and propagating plants you like will not be difficult even for a gardener who is just beginning to be interested in this species.
Reproduction: ampelous geranium, or pelargonium
In order for the window sill to bloom for three seasons, you need to carefully care for the plant and propagate it correctly. If you want to propagate geraniums of various types (pelargonium, as it is also called), you need to know a few simple rules:
- You can grow a seedling using seeds or cuttings. Ivy-leaved geranium prefers propagation by cuttings according to the same principle as ampelous geranium;
- the plant loves saturated soil, slightly clayey, consisting of several components;
- You can plant the sprouts in the garden. But it is worth planting cuttings in the ground, taking into account certain care conditions.
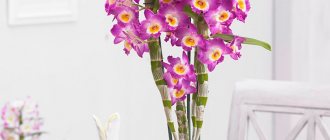
Unique flower with bright buds
In order for sprouts to take root, it is advisable to have a certain amount of knowledge and be able to work with the soil. It is necessary to think through every step of action. Any gardener can choose his own method regarding how to propagate pelargonium.
Methods for propagating geraniums
Caring for young plants
Young geraniums are cared for in the same way as adult plants.
Pots with bushes are placed on southern windowsills with good lighting or light partial shade. During particularly hot times of the day, geraniums are shaded so that the sun's rays do not burn the leaves. In the hot season, geraniums are often irrigated. The amount of winter watering is reduced to 1-2 times a week. It depends on the type and condition of the air in the room. Additional moisture in the form of spraying or sprinkling pelargonium is not necessary. Regularly loosen the soil in the container and remove wilted leaves and faded buds.
To activate growth and provoke geranium to bloom, feed it with mineral complexes with a small amount of nitrogen twice a month in spring and summer. To make the bush more lush, pinch the top of the geranium and several side shoots.
Ivy geranium: care and propagation
In order for a plant to grow and develop normally, you need to know certain rules. Ivy geranium is almost always accepted. There are several secrets that will help keep geraniums from drying out and falling leaves, so that the indoor plant blooms and grows in size. Caring for this type of plant is completely identical to that present in garden crops.
Ivy-leaved ampelous geranium care and propagation requires the following:
- In order for ivy-leaved pelargonium to feel good, you need to prepare a special soil. The following components should be present in equal proportions: peat, sand, turf and leaf soil;
- in summer you need to water geraniums 2 times a day. You need to use water at room temperature. The soil should be treated with a spray bottle;
- Periodically you need to trim the flower bushes, removing the lower branches. The result should be a mini-tree with a profusely flowering crown;
- Before winter, it is necessary to trim all shoots except the central one, which has no more than 6 leaves.
Caring for geranium seedlings
For your information! The main condition is frequency of actions. Don’t forget about watering, trimming branches, and sometimes fertilizing the soil. Caring for ivy-leaved pelargonium is not difficult if you follow these rules.
Growing from seeds
Geranium can be propagated from seeds. Germination of planting material occurs within 1-2 weeks under normal conditions. In order for the seedlings to germinate accurately and be strong, you need to take into account several nuances:
- choose quality planting material. Each seed should be brown. Each specimen should be firm and slightly oblong;
- seed preparation. If the material is purchased, then there will be no problems with this, since the seeds have already been processed. Homemade specimens need to be sanded with sandpaper, treated with special products and soaked in water;
- prepare loose soil, which should have the appropriate composition. It is better to buy ready-made in an agricultural store;
- select containers for sowing. You need to choose flowerpots that are not too tall. This will make it easier to root the plant;
- how to sow: lay out drainage at the bottom, fill in the soil, and then the seeds at a distance of 5 cm from each other, sprinkle them with 2 cm of soil and spray with a spray bottle. After this, place the flowerpot on the windowsill and cover with glass.
Growing geraniums from seeds
Note! It is better to purchase planting material from a specialized store. The purchase will cost more, but the quality will be 100%.
The growing process itself is simple: moisten the soil according to need, open the glass for a few minutes a day. After the first shoots appear, standard care is carried out as for ordinary seedlings.
Propagation of ampelous geranium by cuttings at home
Geranium can also reproduce by planting cuttings. This option is relevant for beginning gardeners. It is better to take cuttings in the spring. At this moment, not only the shoots are split off, but also the plant is cultivated. If there is no need to trim excess branches, then you can pinch off the cuttings in autumn or winter.
First you need to correctly cut the branch, which will later become a shoot. Cuttings of ampelous pelargonium are carried out in accordance with the following algorithm:
- Select a branch. The length of the shoot should be 10-12 cm and have at least 5 leaves.
- The cuttings are being prepared. After splitting, treat the cut with a special agent. Place on paper to let the twig dry. 6 hours is enough.
- Prepare the soil by pouring it into a container. Drainage should already be formed at the bottom of the container before this.
- Bury each branch by 1-1.5 cm. Compact the soil around the trunk well.
- Moisten the soil with a spray bottle.
Note! The cuttings should not be placed in water. The twig will not sprout roots, but will simply rot.
The seedling will take root in 2-3 weeks. During this time, 1-2 leaves may turn yellow and fall off. If the trunk begins to dry out, the plant is receiving too much moisture.
Basic care
In conditions of limited soil volume, care plays an important role for good growth and development of pelargonium .
Svetlana Lisova / Personal archive
Watering
You should pay the most attention to watering . Both overwatering and lack of moisture in the soil can be destructive.
- In the first case, with constant overwatering , rotting of the roots is ensured, during which you can say goodbye to the plant, often it can no longer be saved . You can, of course, try to revive it : dig it up, remove the damaged areas and plant again. Miracles sometimes happen.
What definitely wouldn’t hurt to do is to find suitable (healthy) shoots and cut cuttings from them for further rooting.
- In the second case, if you come to the rescue in time and resume watering , you can even avoid yellowing and falling leaves. In general, ampelous pelargonium tolerates drying out of the soil than waterlogging.
Kars Alfrink / Flickr.com
Feeding
- The intensively growing and abundantly flowering ampelous pelargonium will have to be fed quite often - once every 7-10 days.
- A complete complex mineral fertilizer for flowering plants is suitable. Use according to instructions.
- Or, by halving the recommended concentration, you can feed the plant every watering .
pxhere.com 1144345 / Personal archive
Autumn pruning
- With the onset of damp autumn weather, ampelous pelargonium is brought indoors and prepared for the upcoming winter.
- All hanging lashes are cut off , but not at the root, but only to the first growth point (node) on each shoot.
- Experienced gardeners recommend not watering the plants two days before and immediately after pruning.
- The material remaining after shortening the shoots can be used for propagation (even if autumn cuttings do not always take root readily).
Rest period
- After autumn pruning, you get a compact bush that will feel comfortable in winter at a temperature of about +10 °C.
- Watering at this time should be reduced to a minimum. Quite a lot of green mass has been cut off, and the plant no longer needs the same amount of moisture.
How to root ivy-leaved pelargonium
Many gardeners have a lot of questions about how to root ivy-leaved geranium without losing sprouts. There are several recommendations that will save the plant from death:
- In order for the sprout to take root faster, you need to select soil with a high peat content. Sometimes peat tablets are additionally used;
- There is no need to moisten the soil too much. Just spraying the soil and the above-ground part of the flower is enough. But this must be done depending on the drying of the top layer of the earth;
- Direct sunlight helps the flower to take root well. The construction of greenhouses and greenhouses is not required. Geranium does not really like the creation of artificial heat.
When can you cut geraniums?
You can cut cuttings from a pelargonium bush and root them in spring, summer, autumn and even winter. However, the best time for rooting is considered to be March, April, August and September. It is during these months that cuttings cut from geraniums quickly take root and grow well.
If the procedure for cutting pelargonium is carried out in the spring, by autumn you can get a small but full-fledged bush, which may even bloom. When rooted in August and September, geranium will bloom next year in the spring.
How to pinch ampelous geraniums
If you had to take cuttings from a bush of a certain variety of geranium, then you don’t have to throw away the branches, but graft them onto another bush. The result is a plant that, at the time of flowering, will produce buds of different colors and shapes. The question arises: is it necessary to pinch ivy-leaved pelargonium?
You can, and in some cases even need to pinch, the plant. If the bush is powerful and large, but quickly loses leaves and for some reason does not bloom, then the procedure can save the situation. It is worth choosing autumn or winter for this purpose, so that the flower does not lose a lot of juice at the time of cutting.
Rules for pinching geraniums
You need to cut the branch and dry it slightly, treat it with a special product. Next, you should make a small notch into which a twig cut at an acute angle is inserted. Cover the area with a cloth adhesive tape. You will get homemade versions of the plant with original flowering.
Formation of plants
From February to March, flower growers pinch pelargonium shoots. This procedure is designed to:
- form the crown of the plant;
- stimulate the growth of new shoots;
- rejuvenate the bush;
- lay the foundations for the next flowering.
It is at the end of winter, when daylight arrives, that the formation of crowns gives the best results and is most painless. When carrying out shaping, it is necessary to take into account that the spectacular form of ampelous pelargonium is provided by the long shoots of the lower tier.
During pinching:
- remove old shoots, leaving two or three lower buds;
- pinch the young upper stems;
- remove all shoots growing from the upper axils of existing stems.
If regular pruning is carried out in early spring, then you need to constantly cut out weak shoots, yellowed pelargonium leaves and wilted flower stalks. This will allow the plant not to weaken and maintain its strength for growth and flowering.
How to plant ampelous geraniums in flower pots
A very popular option for garden containers for planting plants is a flowerpot. Geraniums can also be planted in this type of device. The flower pots are made from a special cement mortar using a special technology.
Important! Constantly growing a flower in such a container is undesirable. You can plant the plant in a pot for a while, but no longer.
Step-by-step algorithm for planting geraniums in pots:
- The bottom must have holes for drainage. The plant does not like moisture very much, so when watering, the remaining water must self-destruct, otherwise the root will rot and the plant will die.
- A drainage layer of small pebbles is laid out at the bottom of the pot.
- Pour soil into the container, which is heavily enriched with peat and treated with parasite and insect repellents.
- You can plant a cutting or a fully formed bush.
- During the rooting period and the rest of the time, you only need to spray the soil. Watering is not necessary.
Note! To prevent the plant from disappearing, it is advisable to place the pot in the sun. The cement base of an unusual flowerpot can remain damp for a long time, so the sun should warm the ground well and evaporate excess moisture.
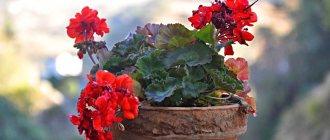
To make your windowsill blooming and “alive,” you should choose geranium as a houseplant. This will be a good option if you want constant flowering, but don’t have time to care for the flowerpots. Geranium is easy to grow and takes root well under the right conditions.
Hello my dear readers! Whatever you say, blooming flowers cause admiration for any person. And in this article I want to talk about such a flower as ivy-leaved geranium and its cultivation from seeds. If you don’t have this plant yet, be sure to get one. Firstly, it has an attractive appearance, and secondly, the flowering period is quite long. Agree, not many flowers can delight us with their bloom from May until the very frost.
Geranium ivy can be grown in an apartment, on the street, or on a balcony; it will look great anywhere. Well, if you don’t know where you can buy it, then try growing it from seeds first. There is nothing complicated, and in the end you can get several plants for a ridiculous amount. But a cutting may cost you a little more.
How to propagate a plant at home?
The most acceptable way to propagate ampelous geraniums at home is the vegetative method, namely with the help of cuttings: this method is simple (even beginners in floriculture can do it), fast (the first flowers will bloom soon), and when cuttings, all the characteristics of the mother plant are preserved ( color, leaf color, flower shape and size, etc.).
Propagation of ampelous geraniums by cuttings is best done in spring and summer during seasonal pruning.
Autumn and winter shoots will produce weak and disease-prone plants.
Spring and summer are a period of active plant growth: it is during these seasons that all metabolic processes occurring in the plant, including the processes of building new cells, accelerate. In addition, it is in spring and summer that it is easy to create all the conditions that contribute to the painless rooting of petioles: a lot of sunlight, an optimal temperature level.
From the video you will learn how to root cuttings of ivy-leaved pelargonium:
Preparation of planting material
- A healthy, strong, non-flowering shoot without visible damage is selected.
- The apical part of the shoot, at least 10 cm long, is cut from the ampelous geranium bush below the node with sharp scissors or a knife.
- Treat the cut with crushed activated carbon, which will help avoid putrefactive processes; you can also treat it with the drug “Kornevin”.
- Remove all lower leaves from the shoot. There should be at least 2-3 buds left on it.
- It is recommended to dry the petiole for 24 hours.
Rooting
Rooting is the process of the appearance of the root system of a shoot cut from the mother plant. Ampelous geraniums should be rooted in the ground. It should be loose, airy, air- and water-permeable. An integral element of the substrate should be sand. One option: mix turf soil, sand, and peat in equal proportions. It is recommended to first disinfect it with fungicides or thermally.
The cut and dried petiole is dipped with the tip into a root formation stimulator, for example, “Kornevin”. Next, the shoot is buried 3–4 cm into the moist soil; the ground around it should be well compacted for better fixation of the seedling. Several cuttings should be rooted into pots at a distance of 2–3 cm from each other so that young plants do not intertwine their roots with each other. After 2 - 3 weeks, the shoots will produce roots, then they can be planted in individual pots.
The optimal conditions for the development of shoots are considered to be a temperature of +20C – +25C , moderate watering (as the top layer of soil dries out), and diffused sunlight.
Planting in the soil
After the cuttings have formed a root system, they need to be transplanted into individual pots. To do this, you need to prepare a container in advance, fill its lower layer with expanded clay or brick chips, and then with a substrate from the store or a mixture of peat and sand. Having made a depression in the soil with your hand, place the seedling in the pot.
The best planting method for young seedlings rooting in the ground is the transfer method: the plant is taken out of the container and, without shaking off the earthen lump, is placed in a new pot. The top layer of soil near the stem is pressed down with your hands, the plant is watered and put in its place. It is recommended to plant 5–6 petioles on a pot with a diameter of 12 cm so that the ampelous geranium bush is lush and beautiful.
The method of propagating ampelous geraniums by seeds is not as popular as cuttings. But it is necessary when it comes to obtaining new plant varieties, although it requires a lot of labor and time.
In this way, geranium can be propagated from December until the end of April:
- First, the container must be filled with soil (1 part garden soil: 1 part sand: 1 part peat, a little sphagnum moss).
- Seeds pre-soaked for a day in water are sown on its moistened surface and sprinkled with soil to a depth of 3–5 mm. The soil should not be compacted for better seed germination.
- Next, the box is covered with glass or plastic film, not forgetting about daily ventilation of the crops.
- After the seedlings appear and become stronger (after 7–15 days), the coating can be removed. The optimal temperature for growing seedlings is +22C – +24C.
- It is also important to ensure systematic but moderate watering of the seedlings (avoid accumulation of moisture and do not allow the top layer of soil to dry out). To avoid soil erosion, you can irrigate the substrate with a spray bottle.
- After 3 weeks, it is necessary to pick, seating them 2 - 3 cm from each other.
- After diving, in order to stimulate the growth of seedlings, you can begin to feed them with complex fertilizers for ornamental crops.
- And after several true leaves appear, young seedlings should be planted in individual pots.
Growing ivy-leaved geranium from seeds
The time for planting geranium seeds can be done at any time, it all depends on the purpose for which you want to grow this flower. If you plan to grow at home, then planting seeds can be done at any time, be it winter or summer. But if you want to see your site in flowers in spring, summer and autumn, then the favorable time for this is the end of winter (late February - early March).
Before planting, geranium seeds must first be prepared. Firstly, the seeds have a rather thick skin, which can become an obstacle for the sprout to emerge into the light of day. Therefore, the surface needs to be damaged a little. This method is called scarification. Scratch the surface lightly with a knife, or rub it with an emery stone.
At the next stage, the seeds need to be soaked in water for a day. Ideally, it is better to use melted water, but if not, then you can use boiled water, cooled to room temperature.
By the way,
To
prevent various diseases, you can first keep the seeds in a solution of potassium permanganate for 20 minutes, and then rinse and soak in plain water.
After the preparatory stage, you can begin to grow seeds in the ground. It is better to use soft, light soil that allows moisture and air to pass through. I usually buy soil at the store that is designed for geraniums. I haven’t yet learned how to prepare soil myself, so I trust store-bought ones. Although, I heard that you may come across unscrupulous manufacturers who make low-quality goods.
Possible problems
The appearance of signs of infectious diseases
To prevent this phenomenon, it is recommended to disinfect the soil and pot in which cuttings will be planted or seeds will be sown (fungicide treatment, heat treatment). You can also disinfect seeds by placing them in a weak solution of potassium permanganate for a while.
Rotting of cuttings
This phenomenon is possible with excessive watering and irrigation.
Seeds don't sprout
This is possible if the seed was of poor quality or had been lying around for a long time. It is important to check the expiration date of seeds purchased in the store.
The plant does not bloom
After rooting the cuttings, geraniums should throw out the first flowers in the first summer.
The plant will bloom in full force after wintering. If the flowers were never released, then most likely the problem, oddly enough, is in the pot. An excessively large pot will encourage the geranium to actively develop its root system and grow foliage rather than buds. Therefore, it is necessary to transplant the flower into a smaller pot. And this fact must be taken into account when choosing a pot for planting a young plant.
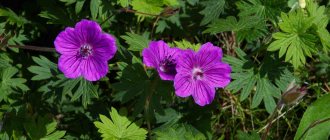
Planting seeds is the best way to propagate pelargonium
Pelargonium is a perennial plant. The versatility of the flower is that, in addition to growing in protected soil conditions, it can become a wonderful decoration for a garden plot. The leaves of the plant are used in the production of essential oils and as a medicine in folk medicine.
Pelargonium seeds are elongated, large, brown in color
Planting pelargonium seeds is considered one of the best methods, because such seedlings are unpretentious, resistant to diseases and are always characterized by abundant flowering. In addition, the seeds germinate quickly even with a lack of sun. When cuttings, problems arise due to improper watering and unsuitable soil.
Rooting
After the cuttings have been successfully cut, and in order to propagate them further, you need to pick off all the flower arrows and buds. We also remove leaves from the cuttings, except for two - one on top and the other on the side. This must be done so that the cuttings form and develop a root system, and the forces of the sprout are not wasted on flowering.
When the sprouts take root, they must be transplanted into a pre-prepared permanent container. Like any other plant, geranium has its own varieties. The sprout of each variety needs its own time to take root. There are 4 main varieties of geranium:
- fragrant pelargonium – rooting period up to 6 weeks;
- royal geranium – up to 4 weeks;
- ivy geranium – 2 weeks;
- zonal pelargonium - rooting period is also 2 weeks.
Optimal timing is better than planting
Pelargonium begins to bloom 3–4 months after planting the seeds. Experts recommend taking these terms into account to obtain flowering in a given period.
For those who want to please themselves with hanging varieties for the design of a summer terrace, it is better to have the seedlings ready in April. This means that pelargonium seeds should be planted in February - March.
The Early Generalist variety, sown in early March, will delight you with bright and abundant flowering in early May. Pelargonium Black Velvet should be planted 2-3 weeks earlier for these purposes.
When growing indoors, you can plant seeds all year round.
In different regions
- In the conditions of the northern region, where there is little sun and light, it is better to sow seeds at the end of April - May.
- In mid-latitudes, the optimal time for obtaining mature seedlings for planting in open ground is February - March.
- In the south, plants are brought to the terraces at the end of March, so the seeds need to be sown in December. By the beginning of spring, they will already be actively blooming and delighting with their beauty.
Best sowing dates according to the lunar calendar 2022
Pelargonium cannot be planted on the full and waning moon. The seedlings will be uneven, and the plants themselves will be weak, with a poorly developing root system. When picking seedlings or transplanting them into the ground, low survival rate is noted.
The most favorable dates in March are: 10, 11, 12, 15, 16, 23, 24, 28, 29. And it is better to dive seedlings on the 1st, 2nd, 15th, 16th, 19th, 20th, 22nd, 28th, 29th.
In April, it is recommended to sow pelargonium seeds: 7, 8, 11, 12, 18, 20, 21, 29, 30. You need to seat: 2, 3, 7, 8, 11, 12, 16,17.
Preparing planting material for rooting
Typically, pelargonium cuttings take root well without any preparation, but to increase the chances of favorable reproduction, several measures are carried out:
- After cutting, the cuttings are laid out on a flat surface in a darkened room for 2-3 hours to dry.
- Dried sections are treated with crushed activated carbon, wood ash or the drug “Kornevin”. The same applies to cuttings from the mother bush.
- Before planting, the cuttings are additionally treated with a root formation stimulator.
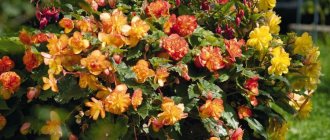
The most popular varieties with photos
The most popular types of pelargonium are zonal, ivy-leaved and fragrant. The plants are not particularly demanding on the composition of the soil, grow quickly, are unpretentious in fertilizing and are characterized by a long flowering period. Each species has the most popular varieties, which are presented in the photo below.
The Early Universal variety is the most common among amateur flower growers. The period from planting seeds to flowering is more than 2 months
Zonal species of pelargonium propagate well both by seeds and cuttings. They can be grown in containers, flower pots, and flowerpots. They are recommended for open and closed ground. The colors of the buds are rich and varied.
Tips and tricks
To make cuttings successful, flower growers with extensive experience advise:
- a few days before cutting the cuttings, stop watering the mother bush;
- to protect against fungus, cover the planted cuttings with plastic bags or glass jars for 2 days;
- for planting cuttings, use small pots or place several in flowerpots;
- do not use clay pots with a porous structure for growing geraniums, as they provoke moisture evaporation;
- In summer, transplant geraniums into a flowerbed in the garden or simply take the pots out into the open air.
Landing instructions
The ideal soil for planting pelargonium is a soil that contains 2 parts each of river sand and peat and two parts turf soil. You can purchase ready-made soil specifically for pelargonium. It is not recommended to add fertilizer - the flower does not like it. The most suitable containers are peat or plastic cups.
- The cups are filled with earth.
- Then it is watered with warm water.
- Seeds are placed in 2–3 pieces. into each container.
- They can be sprinkled with 1 cm of soil or lightly pressed into the soil.
- Cover with cling film, not forgetting the holes.
Seeds begin to germinate at a temperature of 20–22°C after 2–3 weeks. In rare cases, a month passes before the first shoots appear.
Reproduction in a greenhouse
Flower growers engaged in mass breeding of geraniums often use mini-greenhouses to root cuttings.
Such a device is a wide container with soil, covered with glass or film. The greenhouse speeds up the rooting process and allows you to work with several cuttings simultaneously and save space on the windowsill. You can build such a greenhouse yourself from scrap items or purchase a ready-made one. The greenhouse tray is filled with nutritious soil, several cuttings are planted in it and covered with a lid. The soil in the greenhouse is regularly irrigated so that it does not dry out. You cannot fill the soil, otherwise the cuttings will rot. 2 weeks after rooting begins, the lid is removed.
The period of root formation for all pelargoniums is different. So, royal geranium takes root in a month, but ivy geranium takes only 2 weeks. Successful rooting is indicated by young leaves growing on the cuttings. After their appearance, the seedling is moved to a permanent container. This is done by transferring the plant along with a clod of earth.
How to care for seedlings
When two or three leaves appear on the seedlings, the film cover is removed and the seedlings are transferred to lighted windowsills. It is necessary to regularly loosen the soil and water, avoiding moisture getting on the leaves. Seedlings are picked when 4–5 branches form on the main stem.
After the plants have taken root and the 6th–7th leaf appears, it needs to be pinched. This way a branched, lush bush will grow and it will bloom profusely.
If germination is poor, the plant can be fed with a special liquid fertilizer for flower seedlings or a growth stimulator. The containers can be placed under the phytolamp. It is important to avoid direct sunlight on the plants - this will help prevent burns on already grown seedlings.
Harvesting cuttings
For better survival, mother bushes are selected and cuttings are cut, guided by the following rules:
- Healthy and strong pelargoniums are suitable for reproduction;
- cuttings are cut from the top of the bush;
- for work, use a sharply sharpened knife with a disinfected blade;
- cut cuttings 8 cm long with 2-3 internodes with an oblique cut;
- if the stem is long, cut 2 cuttings from it, making the upper cut directly above the bud;
- the stump above the bud is kept minimal so as not to provoke rotting;
- The leaves are torn off from below, leaving 3 to 5 leaves on the stem;
- all flower stalks with buds are plucked to improve survival.