Pelargonium from seeds at home grows quite quickly. The plant can be planted in open ground or left in the apartment. Its specific aroma helps reduce nervous tension, helps get rid of insomnia and eliminate headaches. Bright and juicy shades of buds always lift your spirits and fill you with vigor.
- 2 Optimal timing is better than planting
2.1 In different regions - 2.2 Best sowing dates according to the lunar calendar 2022
- 3.1 Is it worth planting pelargonium seeds by ordering them from Aliexpress?
What is pelargonium
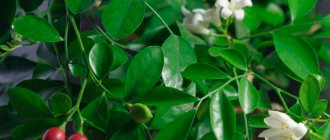
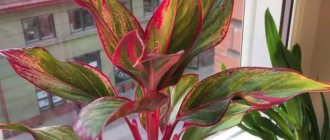
Pelargonium is native to African savannas. The heat-loving crop easily tolerates dry air. Plants of this genus have straight and creeping branched stems. They have slightly pubescent leaves, round in shape, palmate or palmately dissected. The color of the foliage of different species varies from light green to emerald. Some representatives of the genus have light leaf blades with dark patterns.
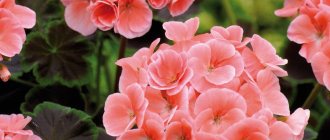
The umbrella-shaped inflorescences of the culture consist of 20 five-petaled flowers. Their petals are painted in white, yellow and red in all shades. Varieties with double flowers have been bred. The fruit is a capsule with retained sepals.
Description of geranium
Pelargonium is a source of valuable geranium oil. The flower secretes phytoncides that kill microbes. In cosmetology, indoor geranium extract is used as a component of masks for the face and hair. In folk medicine, geranium oil is used against inflammation, stress, and to improve blood circulation.
Pelargonium species
“Granny's little balls” is what the common people called the most common (zonal) types of pelargonium. Today there are about 75 thousand varieties and hybrids of the crop. The species diversity is impressive in the shape of the flowers and the brightness of the inflorescences:
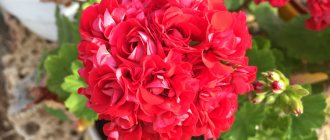
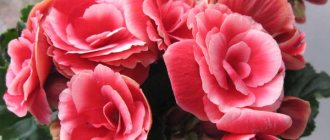
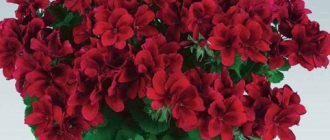
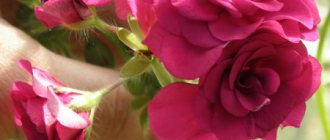
- Rose-bud Zonal. Double showy flowers look like roses. In inflorescence they look like a miniature bouquet. A rare species found in the collections of experienced flower growers.
- Tulipe-bud. The tulip-shaped variety was obtained through a spontaneous mutation of the plant. The inflorescences look like a bouquet of unopened tulips.
- Stellar Zonal. Due to the pointed shape of the petals, pelargonium is called “star-shaped”. Varieties with double flowers of various colors have been bred.
- Cactus. The flowers of cactus-shaped pelargonium are large, with pointed, needle-shaped petals. The inflorescence has a perky “disheveled” appearance.
- Carnation. The inflorescences look like a miniature bouquet of carnations. The edges of the petals are serrated.
- Ivy-leaved. The ampelous leaves are similar to the leaf blades of ivy. Creeping stems can reach about 1 m in length. The flowers are often double. The variegated species is distinguished by dark leaves with a light web-like pattern and an inflorescence of simple 5-leaf flowers.
- Regal Pelargonium. Each flower is up to 7 cm in diameter. Its contrasting shades, veins highlighted in a different color, variegated spots, specks are a distinctive feature of the species. Flowers can have single or double petals.
- Angel. An ampelous appearance with a lush green mass and small flowers of delicate color. The middle or edging of light petals is often burgundy (red).
- Unique. The “Unicum” species combines several varieties with small petals of a multi-color palette. The leaves are intricately dissected. There are varieties with corrugated foliage, which emits an unusual smell. For example, the leaves of the Paton's Unique species smell fruity.
Pelargonium varieties
FEEDING
The flower cannot be fed with organic fertilizers. It is better to choose fertilizers rich in nitrogen, potassium and phosphorus. With proper feeding, pelargonium will definitely delight you with its long flowering.
Listen to our advice and you will easily grow pelargonium. In our online store you will find high-quality vegetable and flower seeds - classic and rare varieties.
Inna Orlova
How to care for pelargonium at home
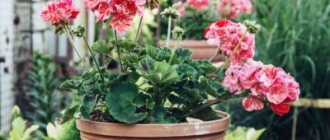
Growing pelargonium at home means regular watering, lighting, proper feeding and crown formation. If you follow the basic rules of care, the plant will never get sick and will grow lush and bloom profusely.
Lighting and temperature conditions
Indoor geranium needs 12 hours of daylight. The more intense the lighting, the more saturated the color of its foliage and inflorescences becomes. The culture does not tolerate strong shading. With a lack of lighting, the shoots become elongated and bare, the leaves become smaller, and the intensity of flowering is greatly reduced. During short daylight hours, flowers need additional illumination with phytolamps. Pelargonium is a heat-loving crop. does not tolerate cold well. In summer, the optimal temperature for the flower is 24-28°C. Pelargonium in the apartment is at a dormant stage in winter, so that in summer it blooms profusely again. From November, the crop needs to be provided with a lower temperature (12-16°C), constantly ventilating the room, but avoiding drafts.
Pelargonium growing conditions
Watering and moistening
Caring for pelargonium at home involves watering 2-3 times a week. The crop needs to be watered when the top lump of earth has dried 2 cm. Excess liquid causes the formation of rot on the roots. In winter, the humidification regime is reduced to 1 time every 7-10 days. If the flower pot is located near a central heating radiator, you will need to water the plant more often.
Hydrating geraniums
Indoor geranium can do without spraying, but it takes this procedure well. You can irrigate the flower only with warm, settled, rain or melt water. Calcium and iron contained in tap water leave unsightly stains on the leaves. Harmful substances clog the stomata of the leaf blade, making the crop's breathing difficult.
To improve the quality of tap water, pour 2 handfuls of peat into a bucket of liquid and leave to settle for 2 days. Harmful impurities will settle to the bottom, and the chlorine will evaporate. Before spraying or watering, carefully drain the water into another container. When draining, 1/5 of the volume of liquid is left in the bucket, which is not suitable for watering and spraying.
Loosening and fertilizing the soil
Caring for pelargonium
Pelargonium grows well in slightly acidic and neutral soil pH 5.4-7.3. You need to periodically check the indicator using a litmus indicator (you can buy a kit). Indoor geranium breathes through its roots, so the soil needs to be enriched with oxygen. To do this, after watering, carefully so as not to damage the root system, loosen the soil with a spatula or fork to a depth of 2-3 cm.
During the process of growing new shoots and forming inflorescences (from March to August), the plant requires a lot of nutrients. In order for the bush to be lush, it is necessary to add complex fertilizer for flowering plants to the soil every 2 weeks.
The main element of crop nutrition should be potassium. Nitrogen stimulates the growth of green mass of the bush and inhibits flowering, so the complex fertilizer should contain a minimum amount of it. An excess of nutrients in the soil is as detrimental to a plant as a deficiency. The fertilizer must be prepared according to the instructions for use. The best purchased fertilizers for pelargonium are:
- "Zircon";
- “Clean slate” for pelargoniums;
- “Royal Mix”;
- "Garden Club"
Pruning and shaping the bush
Proper care of pelargonium includes annual pruning of the bush. The crown is formed in the fall, after the crop blooms, or in early spring before active growth. If this is not done, the shoots will become very stretched and exposed at the bottom. The more you prune the bush, the thicker the crown will be.
Pruning promotes the formation of side shoots and the growth of greenery. Properly pruned crops bloom longer. Elite royal varieties of pelargonium are pruned only in the fall, starting from the second year of the growing season. Spring pruning deprives them of flowering.
How to prune pelargonium
Pinching the tops of shoots is a technique that gardeners use during the active growth phase. It allows you to maintain the splendor and beauty of the crown. When the top of a shoot with a pair of young leaves is pinched off, further growth of the shoot stops.
During the spring-summer growing season, branches of the bush that extend beyond the formed crown are periodically pinched. Faded flower stalks should be cut off immediately so that they do not draw back food.
Procedure for pruning pelargonium:
- Use sharp scissors disinfected with alcohol to remove dried, wilted leaves.
- Trim bare and long stems at the bottom node.
- Cut off the main branches by a third.
Transfer
Indoor geranium cannot be replanted often because the plant is under severe stress. You need to start replanting if the roots do not fit in the old pot and go into the drainage holes. The second sign that it is time to replant the bush is that the plant withers soon after watering.
Transplantation is carried out no more than once every 2 years. Caring for pelargonium requires annual replacement of the top layer of soil in the pot with a new substrate. A flower older than 4 years is replanted once every 3-4 years, because plant development slows down with age.
The process of transplanting pelargonium
The culture does not need a large pot. In it, indoor geranium grows fat and blooms poorly. Indoor geranium is not demanding on the composition of the soil. At home, you can prepare a soil mixture from turf soil, peat, humus and sand (2:1:1:1). To destroy pathogenic microbes, the soil is calcined in the oven for 10-15 minutes and allowed to cool.
A flower transplant is carried out as follows:
- Water the flower generously half an hour before transplanting.
- Scald a new pot with boiling water.
- Fill 1/3 of the container volume with drainage (small stones, vermiculite or expanded clay)
- Fill with soil, covering the drainage material by 3-4 cm.
- Carefully remove the bush from the old pot.
- Shake off the soil. If the roots are tightly woven into a ball of earth, there is no need to separate them.
- Inspect the root system. Trim dry, damaged, rotten, or too long roots.
- Sprinkle the cut areas with crushed activated carbon tablets for disinfection.
- Place the bush in the center of the pot and pour soil to the edge of the container.
- Gently press down the soil around the stem.
- Water and spray the flower generously.
PREPARATORY STEPS
First you should start preparing the seeds, which can be divided into several steps:
- Selection of seed material. Try to select high-quality seeds with an elongated shape. They should be brown without any damage.
- The next step is scarification, which will speed up the germination process. To remove the top layer you need to use any sharp object. This must be done carefully, taking care not to harm the seeds.
- Soil preparation. You can buy it at the store or make it yourself. Take 2 parts of turf soil and one part each of peat and sand. Stir the resulting mixture and place in the oven.
- Disinfection. It is carried out using a weak solution of potassium permanganate or peroxide.
- Soaking seeds. After all the preparatory work has been carried out, the seeds are soaked in water so that they swell.
Disease and pest control
Improper care can lead to indoor geranium disease or pest damage. It is recommended to carefully inspect the plant once a week. Knowing what dangers await pelargonium, you can detect the problem by external signs and eliminate it:
| Name of disease or pest | How it manifests itself | Methods of healing |
| Edema (swelling from excess moisture) | Small yellow spots on leaves. |
|
| Gray rot |
|
|
| Late blight |
|
|
| Powdery mildew |
|
|
| Rust |
|
|
| Caterpillars | The leaves are eaten away and black excrement is visible on them. |
|
| Ticks |
|
|
| Thrips |
|
|
| Aphid |
|
|
| Whitefly |
|
|
Methods of propagation of pelargonium
At home, pelargonium is propagated by seeds, cuttings and dividing the bush. The first method does not guarantee the preservation of varietal characteristics of the crop. It is believed that a plant grown from seeds blooms more profusely - it forms up to 30 inflorescences per season. When annual pruning of a bush is carried out, the cut shoots are not thrown away, but cuttings are used to propagate the crop. An adult plant is propagated by dividing the bush.
Seeds
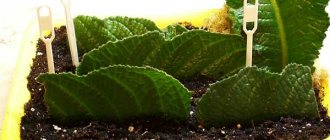
Growing pelargonium from seeds
Growing pelargonium at home from seeds is a troublesome task. First you need to buy or collect seed yourself. The seeds are in fruit boxes. The dried inflorescence is carefully trimmed and the fruits are removed. After this, they need to be kept in the fresh air (balcony, loggia) until the seed pods are completely dry.
Further actions:
- Soak the seed in a growth stimulator such as Kornevin for 2 hours.
- Fill a flat planting container with universal soil mixture.
- Plant the seeds in moistened soil to a depth of 1 cm at a distance of 2 cm from each other.
- Cover the container with plastic film to create a special microclimate for the seedlings.
- Place the container in a well-lit place. Seed germination temperature is 24-27°C.
- Caring for seedlings consists of systematic watering. It is better to water the soil with a watering can with a fine sieve to prevent erosion of the soil. The water should be warm, settled and soft.
- When the first 2 leaves appear, the seedlings are picked and transplanted at a distance of 5-7 cm from each other.
- When the sprouts reach a height of 10-15 cm, they are placed in permanent pots by transferring them.
By cuttings
It is better to harvest flower cuttings in March. Cut them with sharp, disinfected scissors or pruners. The cuttings should have 2-3 internodes 5-10 cm long. The cut is sprinkled with a crushed tablet of activated carbon. This will prevent the shoot from rotting.
Pelargonium cuttings
To form roots in cuttings, place the shoots in water or immediately place them in moist soil. The second option requires more careful care - constant moistening of the soil as the top 1 cm layer dries. When planted in the ground, the sprout takes root without stress, and the delicate roots are not damaged during planting.
To make the formation of roots in water faster, you need to add a growth stimulator like Kornevin to the liquid. Pelargonium seedlings do not need large pots, i.e. The root system of the flower is fibrous and is located close to the soil surface.
The optimal diameter of the pot for cuttings is 9 cm. Pots can be plastic or ceramic. The first ones retain moisture longer; if there is an excess of water, the roots in them can rot. Fired clay pots allow air to pass through. The root system in them is less likely to rot.
To plant cuttings, use the same soil as when transplanting pelargonium. When planting, the cutting should be deepened into the ground so that the lower node is in the ground. Root formation will begin from the place where the leaf used to be.
The seedling should be covered with a cut plastic bottle, placed on a well-lit windowsill, systematically watered and ventilated. No dew should accumulate on the inner surface of the bottle. Rooting will occur in 1.5-3 weeks.
Dividing the bush
The result of propagating pelargonium by dividing the bush.
The easiest way to propagate pelargonium at home is by dividing the rhizome. It is better to carry out the procedure during the next transplant. A plant propagated by dividing the rhizome will bloom next summer. Step-by-step instructions for the procedure:
- Water the plant generously 2 hours before propagation.
- Remove the flower from the pot by gently pulling the stems.
- Shake off the root system from the soil.
- Place the bush in a basin of warm water so that the soil leaves the roots.
- Rinse the root system under warm running water.
- Remove rotten, dry and damaged roots.
- Divide the rhizome into several parts with a knife. Each division should have several strong shoots with a growth bud at the base.
- Treat the sections with Kornevin powder.
- Shorten the shoots to 10 cm so that the plant does not waste extra energy feeding long stems and branches.
- Plant the cuttings into prepared pots. Their root collar should be lightly sprinkled with soil.
- Water the soil well with settled water.
- After 10 days, feed the plant with nitrogen-containing fertilizer to activate the process of growing green mass.
Optimal timing is better than planting
Pelargonium begins to bloom 3–4 months after planting the seeds. Experts recommend taking these terms into account to obtain flowering in a given period.
For those who want to please themselves with hanging varieties for the design of a summer terrace, it is better to have the seedlings ready in April. This means that pelargonium seeds should be planted in February - March.
The Early Generalist variety, sown in early March, will delight you with bright and abundant flowering in early May. Pelargonium Black Velvet should be planted 2-3 weeks earlier for these purposes.
When growing indoors, you can plant seeds all year round.
In different regions
- In the conditions of the northern region, where there is little sun and light, it is better to sow seeds at the end of April - May.
- In mid-latitudes, the optimal time for obtaining mature seedlings for planting in open ground is February - March.
- In the south, plants are brought to the terraces at the end of March, so the seeds need to be sown in December. By the beginning of spring, they will already be actively blooming and delighting with their beauty.
Best sowing dates according to the lunar calendar 2022
Pelargonium cannot be planted on the full and waning moon. The seedlings will be uneven, and the plants themselves will be weak, with a poorly developing root system. When picking seedlings or transplanting them into the ground, low survival rate is noted.
The most favorable dates in March are: 10, 11, 12, 15, 16, 23, 24, 28, 29. And it is better to dive seedlings on the 1st, 2nd, 15th, 16th, 19th, 20th, 22nd, 28th, 29th.
In April, it is recommended to sow pelargonium seeds: 7, 8, 11, 12, 18, 20, 21, 29, 30. You need to seat: 2, 3, 7, 8, 11, 12, 16,17.
Problems when growing pelargonium at home
The cause of indoor geranium disease is always the same - improper care. Knowing what caused the painful state of the crop, the owner of the plant can easily correct the situation:
- The leaves are turning yellow. The cause of the problem is a lack of moisture in the bush or rotting of the roots. Replanting the plant and increasing the time between watering are ways to solve the problem.
- Yellowing of the edge of the leaf blade. The reasons are lack of moisture, the plant is cramped in the pot. Transplanting into an empty container with new soil will improve the condition of the crop.
- The plant does not bloom. The reason is non-compliance with the conditions of detention. It is necessary to move the crop to a well-lit place, adjust the watering regime, and feed the flower.
- It doesn't grow well. It is necessary to check the acidity of the soil. If the soil has become acidic, replant the pelargonium. Feeding the flower with nitrogen-containing fertilizer will improve its condition.
LIGHTING
Good lighting is important for pelargonium. Therefore, care should be taken about lighting, especially in winter. In this case, phytolamps will come in handy. In the warm season, do not keep pelargonium under the scorching rays of the sun. At lunchtime, it is better to take the flower from the windowsill and place it in a place that will not receive direct sunlight. Pelargonium also does not like drafts.